Monday, January 31, 2011

Sistine Chapel Sugar Cookies

When I was a little girl, my mother would take me across town, every couple of months, to what was unarguably the BEST bakery in town, Lake Forest Pastry Shop.  It was always jammed, and my small self often got lost in the crowd of shirt-waist dresses and leather handbags, some of them bopping me in the face!  I can still remember the black-and-white tiled floor, the icing-scented, hair-netted ladies behind the counter, and the heady aroma of freshly baked pastry when I walked in the door.  As a child of eight, my line of sight was in perfect alignment with the pastries in the glass cases.  I'd put my hands on the glass (I'll bet the shopkeepers just LOVED that!) and peer inside just longing for one of their very big, very delicious sugar cookies.  My mother generally bought coffee cakes and stollens (Stollen?!  I never did quite get that name as a child, I still don't.), but what I wanted most were the cookies.  I wasn't deprived, she did get one for me on occasion, but generally my hands needed to be free for carrying one of the many white boxes tied with twine out to the car for the long drive home.

Ever since then I've been tampering with sugar cookie recipes in an attempt to recreate what I considered to be the Sistine Chapel of sugar cookies.  Okay, as a kid, I did not know what the Sistine Chapel was, but you get the idea: the sugar cookie to end all sugar cookies.  The cookie that took me back to that little bakeshop frequented in my youth.

A couple of years ago I did it, and I'm sharing this recipe with you.  Crispy on the outside, puffed and tender on the inside, with a complex yet comforting light citrus and vanilla flavor, this is my "go to" cookie when I'm nostalgic for that sweet taste of my youth.
Sistine Chapel Sugar Cookies

1½ c. granulated sugar
½ c. butter, room temperature
½ c. Crisco
3 eggs
1 t. vanilla
2½ c. all-purpose flour
1 t. baking soda
1 t. cream of tartar
Sugar for coating

Preheat oven to 350ºF.  In a mixer fitted with paddle attachment, cream together sugar, butter, and Crisco until light and fluffy, about two minutes.  Beat in eggs, one at a time, add vanilla, lemon, and orange extracts.  In a separate bowl, stir together flour, baking soda, and cream of tartar.  With mixer set to low, gradually add dry mixture to wet ingredients.  
For each cookie drop two tablespoons of dough (I use a cookie scoop for this) into a bowl of sugar; roll to coat.  Place cookies on a greased cookie sheet.  
Before baking sprinkle about a teaspoon of additional sugar on the top of each dough ball, this will cause the crackled top.  Bake for 14-17 minutes or until the edges are light brown.  Remove from  cookie sheet to cool on wire racks.  Makes approximately 30 4" cookies.

The additional sugar on top is what gives them their crackled appearance.
As an Amazon Associate I earn from qualifying purchases.

Sunday, January 30, 2011

Tate's Bakeshop Squash Rolls

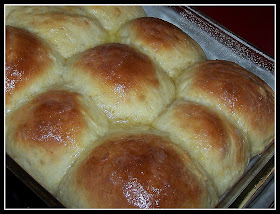
Brush tops with melted butter as soon as you pull them out of the oven.
With dire weather predicted Monday through Wednesday of this week, it is time to hunker down with homemade bread, steaming pots of soups and stews, and a stack of good books.  In preparedness I made a batch of Squash Rolls.  Hot from the oven these are so light and delicious that one calls for another.  If the thought of making bread has you shaking in your snow boots, don't despair, I made these in the bread machine!  Both the traditional directions and ABM directions are below, so you can decide for yourself how to proceed.
Shaped and ready for the oven.  When shaping them into rounds, pinch the dough together and place the rolls, pinched-side down into the pan.

You can see the little flecks of butternut squash throughout this delicious roll.

Tate's Bakeshop Squash Rolls

1-1/4 oz. package active dry yeast
1/4 cup warm water
1/2 cup milk
1/2 cup squash*
1/3 cup sugar
1 teaspoon salt
4 Tablespoon butter 
2-1/2 to 2-3/4 cups all-purpose flour

Traditional directions:

Dissolve yeast in warm water, with a temperature between 105-110 degrees F; set aside. Scald milk in a heavy medium saucepan.  Remove from heat and add squash, sugar, salt, and butter.  Stir until butter is melted and fully incorporated into the mixture.  Add yeast and water to the squash mixture. Place 2-1/2 cups flour in a large bowl.  Add the squash mixture to the flour and mix together well.  Turn dough onto a floured board and knead it until it is smooth and elastic, adding more flour as needed.  Oil a medium-sized bowl.  Turn dough into bowl, cover and place it in a warm spot to allow it to rise.  Once it's doubled in size (about 1 to 1-1/2 hours depending upon the temperature of your house), punch it down and move it to a floured board.  Divide the dough into twelve equal portions and shape into rolls.  Place the rolls in a greased 9" x 13" pan. Preheat oven to 350 degrees F.  Bake the rolls for 20-25 minutes until golden.

ABM directions:

This is not a bread machine recipe, per se, but I have found that a lot of non-ABM recipes work just fine in the bread machine, these rolls included.  I simply put all of the ingredients into the bread machine according to the manufacturer's instructions and set the machine to the "dough" setting.  After the 90-minute cycle was complete. I dumped the dough onto a floured board (the dough is a bit sticky, but don't be alarmed, the rolls will come out fine), punched it down and continued as directed above, by shaping them and putting them into a greased pan and baking.  The rolls pictured here are the result of having been made in the bread machine.

*I emailed Kathleen King, owner of Tate's and editor of the cookbook, and asked her which is better, to roast a fresh butternut squash or use frozen.  She told me that frozen squash may be used equally well in this recipe and saves a lot of time and trouble.  Simply thaw out the package of squash, measure out the 1/2 cup and then cook and enjoy the rest.

For more delicious recipes from Tate's, I strongly recommend this book.

Tate's Bake Shop Cookbook: The Best Recipes from Southampton's Favorite Bakery for Homestyle Cookies, Cakes, Pies, Muffins, and Breads
This is linked to:


Saturday, January 29, 2011

A Romantic Postmark for a Romantic Day

A stack of Valentines in decorated envelopes ready to be packaged and sent off to a city offering a special cancellation in honor of the day.
Which one will I choose?

I know you're probably telling yourself that it's still January, and way too early to start thinking about St. Valentine's Day, but you're wrong.  Now is the PERFECT time to think about it because, if you plan ahead, you can delight the recipients of your Valentine's Day cards with a romantic postmark to match the day. Did you know that over 30 cities across the nation offer special cancellations for St. Valentine's Day?  If you've never participated in getting a special cancellation, then you are in for a treat.  Here are some examples:


Here is what you do:
To get a special Valentine-related cancellation, Valentines must be signed, sealed, addressed, and with stamps affixed.  Place them into an outer envelope addressed to: 

Postmaster 
Valentine Cancellations
Participating city and state 

Be sure to address one of the cards to yourself so you can get the special cancellation back.

Here’s the entire list:

                          Bliss, NY 14024-9998
                      Darling, MS 38623-9998
                      Deary, ID 83823-9998
                      Fidelity, IL 62030-9998
                      Hart, TX 79043-9998
                      Hart, MI 49420-9998
                      Harts, WV 25524-9998
                      Honeyville, UT 84314-9998
                      Juliette, GA 31046-9998
                      Kissimmee, FL 34741-9998
                      Lovejoy, GA 30250-9998
                      Lovejoy, IL 62059-9998
                      Loveland, CO 80537-9998
                      Loveland, OH 45140-9998
                      Loveland, OK 73553-9998
                      Lovely, KY 41231-9998
                      Loves Park, IL 61111-9998
                      Loveville, MD 20656-9998
                      Loving, NM 88256-9998
                      Loving, TX 76460-9998
                      Lovington, IL 61937-9998
                      Romance, AR 72136-9998
                      Romeo, CO 81148-9998
                      Romeo, MI 48065-9998
                      Sugar City, ID 83448-9998
                      Sweet, ID 83670-9998
            Valentine, AZ 86437
                      Valentine, NE 69201-9998
                      Valentine, TX 79854-9998
                      Valentines, VA 23887-9998
                      Venus, PA 16364-9998


You have plenty of time to hand select special Valentines and dress up your envelope as I did here.  A couple of additions of clip art and a recipe for Café Au Lait for Lovers, and you have a card and envelope that people will treasure for years to come.  As a veteran rubber stamper and envelope artist, I've been sending out decorated envelopes for nearly 10 years.  Some people have developed quite a collection of them, and this pleases me to no end.  Why not start your own similar tradition?  If you have children, get them involved as well; the post office will thank you, and the kids will learn that not all mail is electronic.


Café Au Lait for Lovers 
Serves 2
¾ cup whole milk 
1/3 cup plus 1 teaspoon sugar 
¼ cup unsweetened Dutch-process cocoa powder 
One 2-inch cinnamon sticks 
1 strip orange peel, about 1/2" by 3"
5 whole cloves 
1 to 1 ½ cups hot brewed strong coffee 
¼ cup cold heavy cream
Ground cinnamon, for garnish
Cocoa powder, for garnish


In a medium saucepan, whisk together the milk, the 1/3 cup of sugar, and cocoa powder until smooth. Add the cinnamon stick, orange peel, and cloves and bring to a simmer, stirring to dissolve the sugar and prevent the cocoa from sticking to the bottom of the pot. Simmer for 2 minutes, then remove from the heat, cover, and let steep for 10 minutes.

In a medium bowl, whip the heavy cream with the remaining teaspoon of sugar until thick, frothy, and soft peaks form. Set aside.

Strain the milk mixture into a coffee pot or carafe and add 2 cups of the hot coffee (or up to 1/2 cup more, to taste.) Pour into cups or mugs and top each with a dollop of the lightly sweetened whipped cream. Serve immediately.

(The recipe is by Emeril.)

This post is linked to:


Beach Cottage Good Life Wednesdays


Thursday, January 27, 2011

Pattie's Desperation Trifle


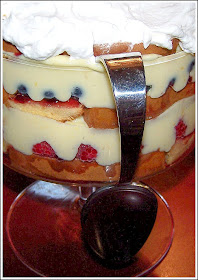
When Jim mentioned, rather forlornly this morning, as he was walking out the door that he didn't get his usual trifle for his birthday this year (and I knew that due to unforeseen circumstances he didn't get one last year), I kicked into high gear and put this together while he was gone. I had to remove shelves in order to get it into the fridge!

Trifle is his favorite dessert, bar none, and he has a number of recipes for them, but I had no time to dig for recipes, just gathered things up like a squirrel preparing for winter and started assembling.  The bowl isn't even a trifle bowl.  It's a lidded glass candy dish that I bought in December at Crate & Barrel to use as part of the centerpiece on my Boxing Day table.  It worked out just perfectly! (Which pretty much goes to show you can make a trifle in any size.)

The process is shown below, the result was delicious!  Instead of vanilla pudding I made an orange custard that was just heaven (recipe below).  I'm going to keep it in mind for the summer as it would go extremely well on strawberry shortcake, or simply to top a bowl of fresh berries of any kind.  I can hardly wait until spring!
Slice Sara Lee pound cake into 3/4" slices.
Spread each slice with a thick coating of raspberry jam.
Fit pieces into the bottom of trifle dish as though you're putting a puzzle together, and drizzle generously, and I'm talking GENEROUSLY with cream sherry.  (You might just give it a taste, you know, to make sure it's still good.)
Top cake layer with fresh raspberries that have been thoroughly rinsed and inverted on paper towels to completely dry.
Pour a third of the custard over raspberries and spread to cover.
Repeat with another layer of cake, this time coating it with blueberry jam.  Again GENEROUSLY drizzle with sherry, and top with fresh blueberries and strawberries.  Is this a work of art, or what?  I seriously hated to cover it up with another layer of custard cream and cake, but I did.  The final layer of cake I coated with raspberry jam, once again, and placed it jam-side down on top of the berries -- more sherry --and then topped it all with whipped cream and strawberry garnish.
Look at those luscious layers.
I love this spoon that hangs from the side of the bowl (another Crate & Barrel purchase).
Beautiful!
Needless to say, he was surprised, and very pleased.  Here's the recipe for the custard that I used, but Instant French Vanilla pudding would work just fine.

Orange Custard Cream
1 1/2 cups milk
1 tablespoon grated orange zest 
5 extra-large egg yolks
1/2 cup sugar
2 tablespoons cornstarch
1/2 teaspoon pure vanilla extract
1 teaspoon Triple Sec
1 tablespoon butter
1 tablespoon heavy cream

Combine the milk and orange zest in a medium stainless steel saucepan over medium heat and bring to a low simmer. Remove from the heat.

Beat the yolks and sugar on medium-high speed in the bowl of an electric mixer fitted with the paddle attachment for 5 minutes. Turn the mixer to low and slowly add cornstarch. Beat on medium-low speed until combined, scraping down the bowl with a rubber spatula. Turn the mixer to low and pour the hot milk mixture into the egg mixture. Pour the mixture back into the pan. Cook over low heat, stirring constantly, until the mixture thickens, about 5 to 7 minutes. Watch very carefully as it tends to thicken very fast.  Once thickened, remove from heat and add the vanilla, Triple Sec, butter and cream.  Cover with plastic wrap and refrigerate until cold.

This is linked to
Miz Helen’s Country Cottage

Wednesday, January 26, 2011

Cheesy Bacon Pecan Spirals


Some time ago a friend gave me this recipe and I only just got a chance to try it when we were snowed in over the weekend.  Am I glad I did!  These are terrifically tasty little tidbits that work on so many levels.  They are great as a side dish for a brunch, as an appetizer for a dinner, or the perfect accompaniment to a bowl of soup or a nice salad for lunch.  Have you ever known a food to be so versatile as to work at every meal (other than the chocolate chip cookie, of course!)?

Cheesy Bacon Pecan Spirals

2 cups shredded sharp cheddar cheese
1 cup grated Parmesan cheese
1 3-oz. package Philadelphia cream cheese, room temperature
1 16-oz. package Hickory Smoked Bacon, cooked, drained and crumbled
1 cup toasted, chopped pecans
1/2 teaspoon cayenne pepper, or to taste
1 17.3 oz.pkg. frozen puff pastry, thawed
1 large egg
1 tablespoon water

In a medium bowl, mix grated cheeses and cream cheese; beat at medium speed with mixer until smooth.  Add bacon, pecans, and cayenne paper.  Beat at medium speed until thoroughly mixed.  On lightly floured surface, roll one puff pastry sheet into a 13" x 11" rectangle.  In a small bowl, combine egg and water, whisking to mix.  Brush egg mixture on puff pastry sheet.  Spread half of cheese mixture over pastry, leaving a 1/2" border.  Beginning with short side, roll up jelly-roll style.  Repeat procedure with remaining puff pastry sheet and cheese mixture.  Wrap tightly in plastic wrap and chill for 2 hours or up to 2 days, if desired.

To serve, preheat oven to 350 degrees F.  Line baking sheets with parchment paper.  Cut rolls into 1/2" thick slices, place on prepared baking sheets.  Bake for 20 to 25 minutes or until golden brown.

Makes approximately 2 dozen spirals.
Spreading the cheese mixture over the puff pastry is NOT an easy task.  I dipped my fingers into the egg wash mixture in order to accomplish this and even then I had a gap or two that didn't really make a difference in the end.
I did not have difficulty with this, but I think the next time I'll roll the puff pastry out onto a big piece of waxed paper to keep it from sticking to the board.
While the recipe does not state this, I cut off the doughy ends that didn't contain much of the mixture.
Use a sharp nice to slice and they come out beautifully!
I cut the recipe in half with great success, and baked up only six -- three each -- to be consumed with our salad for lunch. We both loved these.  I froze the rest and will let you know if that worked successfully.
Hot from the oven!
If you're planning a Super Bowl party, these would be a great snack.  They are equally good hot from the oven as they are at room temperature...if they last that long!


This is linked to


Tuesday, January 25, 2011

FRUIT PIZZA


As promised, here is the dessert to yesterday's pizza luncheon in the form of fruit pizza.  I generally think of this as a summer dessert, but with nearly all summer fruits being available during the winter months there's no reason not to make it. Plus, it really does make you feel as if summer is on the way.  So a slice of this and that extra minute of light at the end of the day will have you searching for your beach hat and flip flops!

FRUIT PIZZA
1 (18-oz.) package refrigerated sugar cookie dough, cut into 1/8" slices
1 (8-oz.) package cream cheese, room temperature
1/3 cup sugar
1/2 teaspoon almond extract
Fresh blueberries, strawberries, raspberries, mandarin oranges, kiwi, or anything else that's in season (or in your fridge)
1/2 cup apricot preserves
1 tablespoon water

Preheat oven to 375 degrees F.  Line an ungreased 14" pizza pan with cookie dough, overlapping slices slightly, and pressing together to form a nice bottom crust.  Bake 12 minutes or until light brown; remove from oven and cool on a wire rack.

In a medium bowl, combine cream cheese, sugar, and almond extract; using an offset spatula, spread cream cheese mixture over the cookie crust.  Arrange fruit over the cheese layer in any pleasing design.

In a small saucepan over very low heat, make a glaze by heating preserves and water.  Brush glaze over fruit using a silicone pastry brush, making sure to cover the fruit completely so none of it turns dark.  Refrigerate until ready to serve.

This does not keep well, so plan on using it up as quickly as possible.  I've kept it for a total of 3 days which is just about as long as it will last, and by the third day the crust is pretty gummy.  You can replace the refrigerated cookie dough with one of your own making, but why bother?  It's great this way and much faster and easier.

Serves 8-10 delighted diners
As you can see from this photo, I baked mine in a fluted-edge tart pan.  It was pretty, but a real booger to remove from the pan.  So stick with a pizza pan if you can find yours.  I couldn't find mine, hence the poor tart pan choice.


This is linked to: