Wednesday, June 29, 2011

A Coastal Dinner

My Lobster Linens, Now What? post brought a lot of comments from amazingly creative people both on Blogger and Flickr, for which I thank you all very much!  I couldn't have done it without all of your wonderful suggestions.  Now, bearing in mind that I live in the Mississippi Valley, not near an ocean, and, as such, nautical items are few and far between, I don't think I did such a bad job.  Here is the result of  couple of weeks of brainstorming, your suggestions, and using what I had.  I think this tablescape drew more comments from diners than any other I've ever done.  My son, who is probably my number one fan, told his grandmother, that I can open up a closet and pull out anything and make a centerpiece out of it.  Funny, but probably true.  It happened in this case when I pulled out the small black roasting pan and started from there.  Let me know what you think,  I loved creating this one.
Here is the roasting pan in question.  While I don't have a lobster pot, per se, this got the job done.  I filled it with new potatoes and corn, giving an indication of what was to come, and topped it with a plastic lobster that I bought from Amazon (of all places).

I absolutely adore these napkin rings and this wonderful fabric.  I had not planned on making such a big display of the napkins.  I simply accordion folded them and slid each into a napkin ring.  In doing so it splayed out more than I liked, so I figured, heck, why not just take it around the entire white plate.  People loved this!

I found the lobster salt and pepper shakers at Pine Hill online.  I think they are my new favorite pair and I'll be putting them to a lot of use this season.  The pails I had around the house: the large one once was home to an amaryllis plant, the smaller one contained the burned down remains of a citronella candle.  I cleaned both up and think they worked out beautifully.

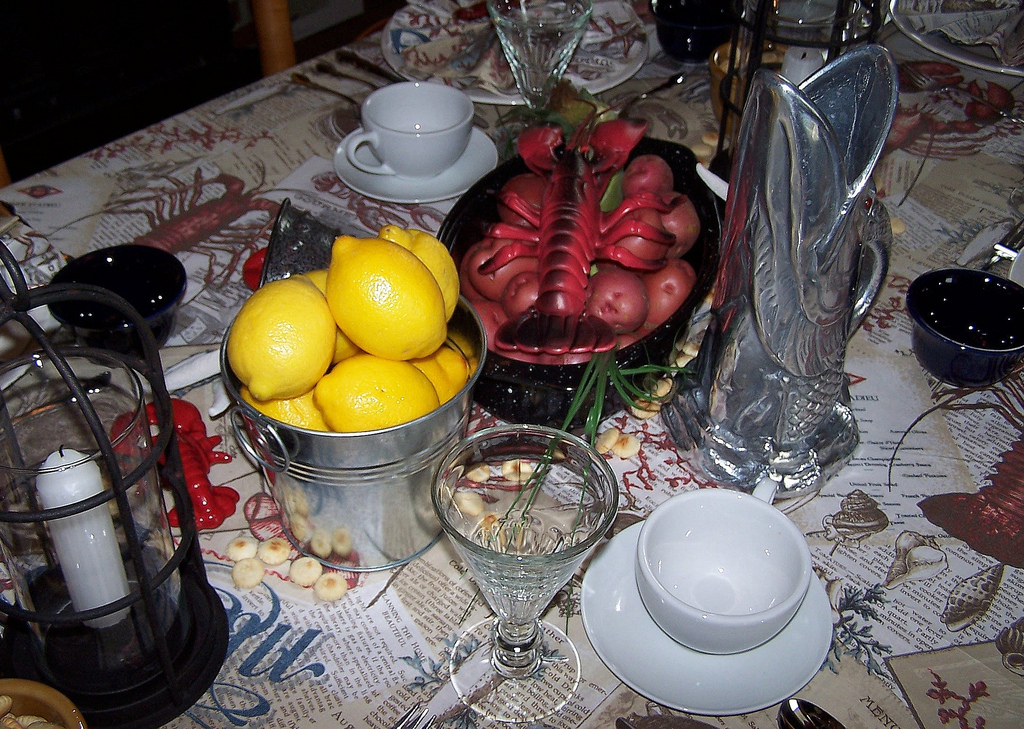
Here's an overview.  Someone had suggested I use lanterns.  While these candleholders aren't lanterns exactly, they gave the look of them and worked well.  The fish pitcher, well, it's been with me since the seventies and is one of the first pieces of tableware I think I ever purchased.  I love it and it never fails to draw comments.


Tablecoth and napkins - Pottery Barn
Plates and roasting pan - Old Time Pottery
Cups and Saucers - Amazon
Napkin Rings - Pine Hill
Lobster Salt & Pepper Shakers - Stonewall Kitchens
Glassware - La Rochere


This is linked to

Sunday, June 26, 2011

Chilled Cucumber Dill Soup


For the first time in my decades of gardening experience,  I'm growing cucumbers in containers, and boy, are they thriving!  Of course it could be the tropical conditions we've been having lately, rain daily followed by 95-degree heat with an equal amount of humidity.  I have three Bush Slicer plants in this 18" container and have spotted, thus far, 22 cucumbers and equally as many flowers. I think this should be the year I learn to make pickles.


To avoid getting dry and tough cucumbers, these must be harvested when they reach 6 to 8 inches in length. This one is just short of seven, so is ready for harvest.  While pickles are definitely in my future, I'm excited at the prospect of being able to make chilled cucumber soup with my own home grown vegetables and herbs.


So refreshing on a hot day, this easy-to-make recipe from La Bonne Bouchee Restaurant is featured in one of my favorite cookbooks, Special Requests, a publication of the St. Louis Post-Dispatch.


A wonderful summer cooler, it pairs well with both salads and sandwiches.  It's also perfect for picnics as it can be taken chilled in a cooler, and then poured into chilled cups for a cooling, healthy and delicious treat on a hot day.

If you have an interest in container gardening, I cannot recommend enough the following books.
Crops in PotsMcGee & Stuckey's Bountiful Container: Create Container Gardens of Vegetables, Herbs, Fruits, and Edible Flowers


Friday, June 24, 2011

Shatteringly Good Mini Mustard Batons


It's been one of those days.  The air conditioner that conked out last week during 95-degree weather has now been fixed, hooray for that.  And though we still have a lot ahead of us, things have started to calm down into a manageable disarray.  The day is beautiful, a seasonable 82, with (also seasonable) high humidity, but a light breeze makes being outside very pleasant.  My son is working on rebuilding the brick patio now that the uprooted tree has been pulled up and carted off, and I was happily working away in the kitchen making chicken pot pies and chocolate cake for our dinner (and to send home with my son).  Then I heard a strange noise, and I knew that just couldn't be good.  The grass cutters were here, cutting the front lawn.  One of them hit a rock, and sent it flying into our front storm door, shattering it into a million pieces that rained down on the potted plants, porch swing, and brick surface of the front porch.  Ugh.


I poured myself a glass of iced tea, eyeing the bourbon warily, then decided a squeeze of lemon would do instead, enjoying it while paging through Dorie Greenspan's recent tome, Around My French Table.  A recipe on page 25 for Mustard Batons caught my eye.  Hers called for full sheets of rolled out puff pastry and a 1/2 cup of Dijon mustard.  I sized up the trimmed remains of the puff pastry I'd used to top the pot pies and decided to make my own mini version of her Batons.  As she writes in her book, they are terrific!  They also illustrate how it doesn't take a lot of ingredients to make something easy and delicious.  Just ask my husband and son.  I made four of these and by the time I got my camera, only two of them were left!

Dorie's recipe is below, but all I did was slather stone ground mustard onto a long strip of puff pastry, fold it in half, and made four equal, vertical slices.  I transferred them to a piece of foil while preheating my toaster oven, brushed them with an egg wash (1 lightly beaten egg to which 1 tablespoon of cool water has been added), and sprinkled poppy seeds on top.  Since mine were smaller, I baked them a minute or two less than she suggested, removing them when they'd turned golden brown.
I will definitely be making these again!  I love that they can be made ahead of time, and frozen until ready to bake.  I also think a sweet version would make great breakfast pastries sprinkled with a cinnamon and sugar mixture, or cinnamon, sugar, cocoa and chopped nuts, or even raspberry jam.  Imagine the possibilities!  Try these, you'll love 'em.  And while you're at it, treat yourself to Dorie's book.

Around My French Table: More Than 300 Recipes from My Home to Yours

This post is linked to:

Wednesday, June 22, 2011

Blackberry-Cinnamon Cobbler

The only berries I grow are blueberries, so all other berries I buy from the local farmers market, or in the winter, Sam's (what can I say?).  This week I was craving blackberries, so stocked up with a number of quarts.  I like eating them fresh from the package, seeds and all, but this dessert is a fine use of them as well.

Blackberry-Cinnamon Cobbler a la Mode
From Bon Appetit, July 2007


6 cups fresh blackberries
1/3 cup plus 2 tablespoons sugar
2 tablespoons cornstarch
1 tablespoon fresh lemon juice
3/4 teaspoon ground cinnamon, divided
1 1/4 cups buttermilk baking mix (such as Bisquick)
1 1/2 teaspoons finely grated lemon peel
1/2 cup chilled whipping cream
Vanilla ice cream

Preheat oven to 375 degrees F. Toss berries, 1/3 cup sugar, cornstarch, lemon juice, and 1/2 teaspoon cinnamon in large bowl. Let stand 10 minutes, tossing occasionally. Transfer to 9-inch deep-dish glass pie plate. Bake until berries soften, about 15 minutes.

Meanwhile, combine baking mix and lemon peel in medium bowl. Add cream, tossing until soft dough forms.

Drop dough by heaping tablespoonfuls over filling. Mix 2 tablespoons sugar and 1/4 teaspoon cinnamon in cup; sprinkle cinnamon-sugar over top. Bake until filling bubbles thickly and tester inserted into biscuits comes out clean, about 25 minutes. Spoon cobbler into bowls. Top with ice cream.


This post is linked to:
and
Cast Party Wednesday


Tuesday, June 21, 2011

Pain & Suffering Chocolate Cream Pie

Those of you who read my blog with any regularity know that we had a little setback in the form of a tornado plowing its way through our back yard on the evening of Good Friday.  While we suffered "massive damage" according to the insurance company, many people were far worse off than we, some having to leave their homes as the damage rendered them structurally unsound.  A couple of people, however, sustained little or no damage, one of whom has taken it upon himself to file public complaints with the City over the "mess" in the backyards of people whose houses he can see from his pristine-condition back porch.  

Imagine the horror of being him!  Having to look, day after day, at the pain and suffering of others as they toll, physically exhausted and emotionally drained, trying to recover their belongings, arrange for tree removal, carpentry work, demolition and removal of damaged property, and home and roof repair.  How awful to have to witness this day in and day out, interrupting your cocktail hour as you dangle your toes in your pool.  

For this poor soul, who shall remain nameless (though everyone in the neighborhood knows who he is), I created a special pie full of comfort and calories and chocolaty goodness in the hopes that his pain soon subsides and his meaningless suffering comes to an end.
Pain & Suffering Chocolate Cream Pie
 1 cup plus 2 tablespoons sugar
3/4 cup heavy cream, plus 2 cups
3/4 cup sour milk*
3 1/2 tablespoons cornstarch
Pinch salt
4 egg yolks
3/4 c. Ghirardelli 60% Cacao Bittersweet Chocolate Chips, roughly chopped to facilitate melting
1 tablespoon butter
3/4 teaspoon vanilla extract
3 tablespoons confectioners' sugar

Crust:
25 Oreo cookies (with filling, this adds "tooth")
6 T. melted butter

Put oven rack in middle position and preheat oven to 350 degrees F.  Put Oreos into the work bowl of a food processor and process until fine.  Slowly pour melted butter into the feed tube with the processor running and process 30-45 seconds until well combined.  Press into a 9-inch deep dish pie pan.  Bake for 10 minutes.  Remove from oven and allow to cool.

In a medium saucepan combine sugar, 3/4 cup heavy cream, sour milk, cornstarch and pinch of salt, and whisk until smooth. Place over medium-high heat, and bring to a boil, whisking occasionally until the mixture begins to thicken, 3-5 minutes. Continue cooking at a low boil for an additional 5 minutes, whisking constantly.

In a mixing bowl, beat the egg yolks lightly. Pour 1/2 cup of the hot mixture into the egg yolks and whisk thoroughly. Pour the egg yolk mixture into the saucepan and whisk over the heat until thoroughly combined and very thick, 2 to 3 minutes. Remove from heat and whisk in the chocolate, butter and vanilla. Continue whisking until thoroughly combined and mixture becomes very thick. Cover the mixture with plastic wrap placed directly on the surface and refrigerate 30 minutes.

Place 2 cups heavy cream in a chilled mixing bowl and whip until soft peaks form.  Add the confectioners' sugar; beat until stiff peaks form. Gently fold about 1/2 cup of the whipped cream into the cooled chocolate mixture.  When thoroughly combined, spoon into chocolate crust.  Refrigerate until firm and cool, at least 4 hours (if you're in a rush, place in freezer for an hour). Refrigerate the remaining whipped cream until you are ready to serve the pie.

When ready to serve, top with whipped cream and serve immediately.

*To sour milk, add 1 T. white vinegar to a cup of milk.  Allow to set on the counter at room temperature for 10 minutes before using.


Sunday, June 19, 2011

Malted Waffles

Father's Day calls for a special breakfast, so today I turned to one of my favorite new cookbooks, Baked Explorations, for ideas.  The Malted Waffles nearly leapt off the page.  It was exactly what I was looking for: tasty, but manly, and unique among the glut of waffle recipes or, heaven forbid, frozen waffles (egad!).  I knew this recipe would never fail me as this book is a wonder from beginning to end.  I try to hold back when it comes to buying cookbooks, since I'm overwhelmed already, but when I find one that has me wanting to try every recipe, well, how can I resist?  I'll share this one recipe with you, and then you'll just have to buy your own!
I cut this recipe in half with great success.  Even so, I had some waffles left over, but in the past I've frozen leftovers (well, the Eggo people do it!), and then reheated them in the toaster oven and find them nearly as fresh tasting as the day they were made.  The malt powder in these makes all the difference, so don't even think about making them without it.  We tried these both ways suggested, i.e. with powdered sugar and a dollop of whipped cream, and with syrup and chocolate chips.  The syrup version won hands down.  Delish!

Baked Explorations: Classic American Desserts Reinvented

The winner of the biscuit cutter giveaway is...
CONGRATULATIONS!

This post is linked to:

Saturday, June 18, 2011

Dan Field's Pickled Green Cherry Tomatoes

Easy to make, here is a photo tutorial, the recipe is below.
This is a recipe that I stumbled upon years ago and for which I've been grateful ever since.  It suits me quite well in the spring, when the bounty of Sweet 100 cherry tomatoes begin to overwhelm and I over anxiously pick them before they turn, and again in the fall when I'm desperate to collect every last tomato from the vine before the frost.  I like having them in both seasons.  They are always welcome on picnic relish trays during the heat of summer, and such a wonderful taste of spring in a cocktail or salads during the fall and winter.
Nothing is quite so thrilling to a devoted gardener as that first tomato of the summer.
If you've never tried your hand at canning, preserving, or pickling, this is a great way to get your feet wet because truly, nothing is easier.
There is always something about pickling and canning that soothes my soul.  I love nothing more than pantry shelves full of  pickled and preserved items I've grown and harvested from my own garden.

Dan Field's Pickled Green Cherry Tomatoes
(adapted from Rick Field of Ricks Picks)
Eat these cherry tomato pickles as soon as they are ready -- 2 weeks. Ours were slightly sweet, gently sour, very crunchy and tasted of fresh tomato. They are delicious in a martini - the alcohol brings out the salty side of the pickle - but they are also very good with grilled pork tenderloin. Makes 6 pints.


For each pint jar:
2 cups (approximately) hard green cherry tomatoes, washed
2 bay leaves
1 teaspoon pickling spice (see note)
2 cloves garlic
1 dill head (or 3 sprigs fresh dill and 1 teaspoon dill seed)
1 slice onion
1/8 teaspoon celery seed

For the brine:
4 cups water
2 cups cider vinegar
1/2 cup Kosher salt

Method:
1. Sterilize jars and lids in a large pot of boiling water to cover for10 minutes. Using tongs, lift the jars and lids out of the hot water and place them on clean dishtowels on the kitchen counter.
2. Into each jar, as indicated above, place bay leaves, pickling spice, garlic, dill, onion and celery seed. Firmly pack tomatoes in each jar, to just below the fill line (the extruded line on the jar approximately 1/4-inch below the top of the glass). This can be tricky since the cherry tomatoes are so small. Don't skimp on the tomatoes and try to wedge them tightly in the jar to prevent shifting.
3. Bring the water, vinegar and salt to a boil. Pour the brine, still boiling, into the jars. The liquid should cover the solids--but only just cover them.
4. Wait 1-2 minutes to allow the brine to settle. If necessary, add a little more liquid to cover the tomatoes. Put on the tops and store for two weeks in the refrigerator or a cool, dark cupboard.

Note: The pickling spice I used came from Whole Foods and included mustard seed, cinnamon chips, allspice, dill seed, celery seed, bay leaf, mild chiles, cloves, caraway seed and ginger.
Peeking through the fence at the first bounty of the summer.
Books I recommend:
(Click on the book cover for more information)
The Joy of Pickling: 250 Flavor-Packed Recipes for Vegetables and More from Garden or Market (Revised Edition)The Complete Book of Pickling: 250 Recipes from Pickles and Relishes to Chutneys and SalsasThe Joy of Pickling: 200 Flavor-Packed Recipes for All Kinds of Produce from Garden or Market

Wednesday, June 15, 2011

Passionate Egg Salad

Did I get your attention with that title? I thought I might. Actually the name of the recipe is not Passionate Egg Salad, but "Paul Shipley's Egg Salad," and it appears in the wonderful Consuming Passions, A Food-Obsessed Life, a book about which I'm passionate, so I figured it all worked out, title-wise.  

The author is none other than Michael Lee West of the Designs by Gollum blog, not to mention seven other books, and a couple of character-related blogs.  This woman is prolific.  Not only is she prolific, she's good!  I adored this book of comfort, recipes, and living life in a close-knit family of Southern crazies. Warm, witty, sweet, and at times laugh-out-loud funny, this is one of those books impossible to put down, but when forced to, as you've reached the end, feel sad that there's nothing more.  This is one book I'll be reading again, and once you read it, you will too.  Be sure to shelve it with your cookbooks, there are some great sounding recipes in here along with valuable cooking and home-keeping information such as (something I'm still afraid to do) seasoning cast iron.

Now go make yourself an egg salad sandwich, put your feet up, and order this book.  You're in for a great time!

Consuming Passions : A Food-Obsessed Life
This post is linked to:
Foodie Friday


Don't forget to enter my 200th post GIVEAWAY here.