Wednesday, January 31, 2018

Game Day Popcorn Salad


The last of my popcorn-based treats is this unique crowd pleaser, Popcorn Salad. I guarantee, your guests haven't experienced anything quite like this. It is largely make ahead as all components, except popcorn, can be mixed together and stored in the fridge, until you are ready to add the popcorn when it's time to set up your Halftime Buffet. Because of the nature of the salad, it doesn't keep well, and cannot be carried over to the next day. But, doubtless that won't be a problem, because once your guests taste this, they will be back for more. One thing that I cannot stress enough is to be certain to remove any unpopped kernels from the popcorn before tossing it into the salad. The last thing you are going to want to do is to cause someone dental pain!
Game Day Popcorn Salad

1/2 cup mayonnaise
1 tablespoon cider vinegar
1/2 teaspoon Frank's hot sauce
1 cup diced celery
1/4 cup diced carrots
1/4 cup chopped scallions, both white and green parts
1 8-ounce can sliced water chestnuts, drained
6 slices bacon, cooked and crumbled
1-1/2 cups shredded cheddar cheese
Few gratings freshly ground black pepper
6 cups G. H. Cretor's Buffalo & Ranch Popcorn

In a large bowl combine mayonnaise, vinegar, hot sauce, celery, carrots, scallions, water chestnuts, half of the bacon, and one cup of the cheese. Mix well. Add popcorn, and stir to combine. Top with remaining cheese and bacon, and serve within 15 minutes of assembly.

Disclaimer: This post has been sponsored by G.H. Cretor's from whom I received compensation.

This post is linked to:

This post contains affiliate links.


Tuesday, January 30, 2018

Smoky Popcorn Chowder


Game Day eats need to be plentiful and varied. They need to appeal to a wide variety of individuals, both young and old, and appetites from the picky to the hearty. This Smoky Popcorn Chowder, topped with G.H. Cretor’s new Cheese Lover’s Mix Popcorn will appeal to everyone. Even the little ones in your crowd will not be able to resist the crunchy popcorn topping, and delicious smoky taste of the chowder.

Served in bowls as a main course, or in shooter glasses to make them portable, this will warm your crowd from the inside out, please their palates, and send them back for more. Keep bowls of Cretor’s Cheese Lover’s Mix and Buffalo and Ranch Mix Popcorn on the side, so as not to run out. A hungry crowd can become a surly crowd! You can make the chowder 1 to 2 days ahead of time; being held a couple of days in the fridge is only going to enhance its flavors.
Smoky Popcorn Chowder

3 tablespoons butter
3 tablespoons all-purpose flour
4 slices bacon, diced
1 cup frozen corn
1 medium onion, diced
1 medium carrot, minced
1 Melissa's jalapeño pepper, seeded and diced
1/2 teaspoon minced garlic
1-1/2 teaspoons ground cumin
1/2 teaspoon chili powder
3 cups chicken stock
1 cup cream
1 cup diced Yukon Gold potatoes
1/4 teaspoon freshly ground black pepper
1/4 teaspoon kosher salt
1-2 cups G.H. Cretor's Cheese Lover's Mix Popcorn

Melt butter over medium heat.  Whisk flour into melted better and cook, stirring frequently, until lightly browned, 3 to 5 minutes.  Set roux aside.

Cook bacon over medium heat until crisp.  Add corn, onion, carrot and jalapeño, and sauté until vegetables begin to soften. Stir in garlic, cumin, and chili powder and cook 2 minutes.  Add stock and bring to a boil, then reduce heat and simmer 10 minutes.

Add cream and potatoes, and simmer until potatoes are tender, 12-15 minutes depending upon the size of your dice. As they cook, use a small potato masher to break them up. (I love this one.) Gradually whisk in roux, a little bit at a time, cooking the soup for a few minutes after each addition, until the soup reaches the desired consistency.  Add salt and pepper, to taste. Serve topped with popcorn.

Be sure to stop by Eat Your Books to get see how Cretor’s popcorn is used with Jimmy V's Chill-e, the Chili Hater’s Chili.

Disclaimer: This post has been sponsored by G.H. Cretor's from whom I received compensation.
This post is linked to:

This post contains affiliate links.


Monday, January 29, 2018

Crispy Popcorn Cookies


If you think popcorn is addicting, wait until you try these cookies! It is Game Day Snack Week here on the Olla-Podrida blog. Whether you're a devoted fan of football, or, like me, baseball is your game, I'm sure that you can get totally on board when a party is involved with lots of delicious food. This week, I'm partnering with the good people at G.H. Cretor's Popcorn, and will be providing you with some popcorn-based snack ideas as well as a football themed buffet on which to serve them.
First up are these delicious Crispy Popcorn Cookies. Yes, you read that right, popcorn! I am a big fan of cookies, and I'm also a fan of salty snacks, popcorn being one of my favorites. So, I figured why not combine two of my faves? The result was a delicious cookie with a buttery popcorn taste, and pleasing crunch.
This cookie is going to quickly become a favorite among your family and friends.  It's a breeze to put together, make ahead, slice-and-bake easy, and will disappear right before your eyes.

Crispy Popcorn Cookies

1/2 cup butter, softened
1 cup granulated sugar
1 large egg
1 teaspoon vanilla extract
1/2 teaspoon butter flavoring
1-1/2 cups all purpose flour
1/2 teaspoon baking soda
Pinch of kosher salt
2 cups crushed G.H. Cretor's Simply Salted Organic Popped Corn*
1/2 cup chopped pecans, toasted

In the work bowl of your stand mixer, cream the butter and sugar until light and fluffy. Beat in egg and flavorings. In a separate bowl combine flour, baking soda, and salt. Add dry mixture to the creamed mixture, beating to combine. Stir in the popcorn and pecans. Using hands, form mixture into a 2" x 12" log. 
Wrap in plastic wrap, and place in the refrigerator to chill for 30 minutes. (At this point the dough can be refrigerated overnight and sliced and baked the following day so that your house smells wonderful when your guests arrive.) Slice into generous 1/4" slices (see photo). 

Place cookies on an ungreased baking sheet and bake at 350° for 18-20 minutes, turning the cookie sheet halfway, or until golden brown. Cool on cookie sheet for five minutes before removing to racks to cool completely.

*I used plain popcorn for this recipe, but there's no reason that you can't use caramel corn, or a combination of plain and caramel. To make a toffee popcorn version, use 1 cup plain popcorn, 1 cup caramel popcorn, and 1/2 cup toffee bits.
 

Disclaimer: This post has been sponsored by G.H. Cretor's from whom I received compensation.
This post is linked to:


This post contains affiliate links.


Sunday, January 28, 2018

Slow Cooker Chicken & Wild Mushroom Pot Pie


There is nothing more comforting than homemade chicken pot pie, and I love it, but I don't like to make it. Frankly, it's a bit of a pain. But when I have a hankering for chicken pot pie, unless I want to bake a frozen one (and in the interest of full disclosure, I have been known to do this), I far prefer homemade.

Recently I found a recipe for chicken pot pie made in a slow cooker (Read: the filling is made in the Slow Cooker). It was a recipe of  P. Allen Smith's, and I gave it a try, adapting it as I went along. It's only slightly easier than the more labor intensive version, but I liked the fact that I could put it all together early in the day when I have the most energy, and let it simmer on its own, to be ready when I was exhausted and wanting to sit down to a good meal. He had a homemade crust on top of his, I didn't want to bother with that, so I used a biscuit topping to top mine, and I loved it!

Here is my adaptation of P. Allen's recipe:
 
Slow Cooker Chicken & Wild Mushroom Pot Pie


Sauce Ingredients
2 tablespoons unsalted butter
3 tablespoons flour
2/3 cup whole milk
cup chicken broth
1/4 teaspoon salt
1/4 teaspoon black pepper

Filling Ingredients

2 boneless, skinless chicken breasts, cut into bite sized pieces
1 cup peeled and cubed Yukon Gold potatoes
1/2 cup frozen peas
1/2 cup frozen corn kernels
1/4 cup diced carrots
1/2 cup diced celery
1/4 cup diced yellow onion
1/4 teaspoon dried thyme
1/2 teaspoon fresh rosemary
1/4 teaspoon paprika
1/4 teaspoon ground pepper
1/2 teaspoon salt
2 tablespoons milk

Hydrate mushrooms according to package directions while you are preparing the rest of the ingredients; rough chop.

To make the sauce, melt butter in a 9"-10"skillet. Add flour and brown, whisking occasionally. Add milk, chicken broth, salt, and black pepper. Whisk to incorporate and pour into crock pot. Add chicken, potatoes, onion, carrots, mushrooms, spices, and milk. Stir; cover and cook on low for 4 to 6 hours.
 Add the corn and peas to the chicken filling and transfer from the crock pot into an 8-inch round baking dish (I used four individual serving dishes). Top with the homemade biscuit of your choice, any piecrust you have on hand, or a square of puff pastry. Bake in a preheated 400° F oven for 15 to 20 minutes or until the filling bubbles and the crust is golden.
 This post is linked to:

This post contains affiliate links.


Wednesday, January 24, 2018

Chocolate Snack Cake with Mocha Kahlúa Buttercream Frosting


No sooner than I announced I was not going to bake any longer, I baked something. What can I tell you? It was a moment of weakness. In my defense, it was my number two son's birthday, and I have always felt that a birthday deserves a cake. My "go to" cake is my Chocolate Stout Cake, but not having any Guinness on hand, I hunted around for a new recipe and came up with this one. Because I was transporting this cake to my dad's, and don't have a suitable cake carrier (I can't imagine why not), I decided to make a snack cake in an 8" x 8" pan.

I had no idea what I was doing with the frosting, but lately I've been enjoying Kahlúa (probably too much), so decided to make a Mocha Kahlúa Buttercream Frosting. Both turned out to be phenomenal, so I had to share it with you. I gave most of it away, otherwise I would have been sitting down at the breakfast table with the pan in front of me, fork in hand, wolfing it down. Whether you are apt to make a cake from scratch, or not, making this one would be well worth your while.
Chocolate Snack Cake with
Mocha Kahlúa Buttercream Frosting

2 cups all-purpose flour
2 cups granulated sugar
¾ cup Hershey’s Special Dark Cocoa Powder
2 teaspoons baking soda
1 teaspoon baking powder
Pinch of salt
1 cup whole milk
½ cup vegetable oil
1 cup hot strong brewed coffee
2 large eggs

​Preheat oven to 325°F. Grease and flour an 8” x 8” baking pan.

In a large bowl, sift together flour, sugar, cocoa, baking powder, soda, and salt.

Add oil, milk, coffee, and eggs; beat well. Batter will be thin. Pour into prepared pan.
Bake for 45-50 minutes, or until top springs back when lightly touched. Cool in pan before turning out onto a wire rack to cool completely.

Mocha Kahlúa Buttercream Frosting

1/2 cup butter, softened
4 ounces cream cheese, softened
5 tablespoons (1/4 c. + 1 tablespoon) unsweetened cocoa powder
1 tablespoon Kahlúa
1/4 cup strong coffee
4-5 cups confectioners' sugar

Beat butter and cream cheese together until creamy. Add cocoa powder, Kahlúa, and coffee, and beat to combine. Beat in sugar, 1 cup at a time, until smooth and spreadable.


This post is linked to:

This post contains affiliate links.


Tuesday, January 23, 2018

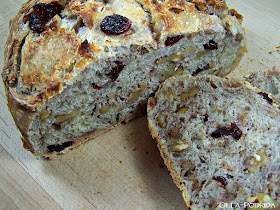
Crusty No-Knead Cranberry Walnut Bread

I think about my late husband every day, but never so much as in January, which would have been his birthday month, and today his birthday. He loved a good loaf of bread, and not a week would go by where I wouldn't find him buying a loaf or two from one of the local bakeries. He liked it with a crispy exterior and a dense and chewy interior. I don't know if it was because I was thinking about him that caused me to make this bread, or because I was just in the mood for dense and chewy home-baked goodness. Either way, when I spotted this recipe I knew I had to give it a try.
The recipe may seem long, but it is very simple to put together. It also yields spectacular results! Honestly, I could not believe it. I had a slice this morning, spread with softened cream cheese, and it was as good, if not better, than any bread I've had from one of the top local bakeries. The fact that I made it at home astounds me. I can tell you that this is going to be the starting point for other fruit/nut/seed varieties that I plan to make. If the thought of making bread seems daunting to you, you need to try this one. The fact that it requires no kneading and precious little work will have you making it again and again.

Happy Birthday, Jim! I miss you, sweetie.
 Crusty No Knead Cranberry Walnut Bread
Adapted from Sally's Baking Addiction

3 cups + 2 Tablespoons all-purpose flour, plus more for hands
2 teaspoons kosher salt
1/2 teaspoon granulated yeast
3/4 cup chopped walnuts
1 Tablespoon honey
1 ½ cups warm water (about 95°F)

Stir the first 6 ingredients together in a large bowl. Stir in the warm water. The dough will be pretty sticky. Don't be tempted to add more flour, sticky is what you're going for. Gently shape into a ball as well as you can. Cover tightly with plastic wrap. Set on the counter at room temperature and allow to rise for 12-18 hours. I tend to keep my house on the cool side (62° during the day and 55° at night) so mine took the entire 18 hours. You'll know the dough is ready when it doubles in size and sticks to the side of the bowl. The top should be covered with air bubbles.

Turn the dough out onto a lightly floured work surface and, using lightly floured hands, shape into a ball. Transfer dough to a large piece of parchment paper.

Using a very sharp knife, gently score an “X” into the top. Cover dough lightly with plastic wrap and set aside while you preheat your oven.

Place your covered Dutch oven into your oven and preheat it to 475° F. When your oven comes up to temperature, set a timer for 30 minutes. After 30 minutes, remove the Dutch oven from the oven, remove the plastic from the top of your bread dough, and carefully place the dough inside by lifting it up with the parchment paper and sticking it all-- the parchment paper included-- inside the pot. Cover with the lid.

Bake for 25 minutes with the lid on. Carefully remove the lid and continue baking for 8-10 more minutes until the bread is golden brown. Remove pot from the oven, carefully remove the bread from the pot, and allow to cool on the counter for 30 minutes before serving.

Cover and store leftover bread at room temperature for 1 week.


This post is linked to:

This post contains affiliate links.