Tuesday, April 29, 2025

Dirty Bloody Mary

 
There’s something undeniably satisfying about a well-crafted Bloody Mary. It’s the quintessential brunch cocktail—savory, spicy, and just a little bit indulgent. But what happens when you take inspiration from another classic, the dirty martini, and infuse its briny, complex charm into this beloved drink? You get the Dirty Bloody Mary—a cocktail that’s bold, nuanced, and guaranteed to leave your guests intrigued. The secret lies in the olive juice, a touch of horseradish, and (if you’re feeling adventurous) a splash of bacon vodka. This isn’t just a drink; it’s a conversation starter.

I stumbled upon this idea one lazy Sunday morning, craving something familiar yet new. A dirty martini’s salty, savory depth had always been a favorite, so I wondered: why not marry that “dirtiness” with the robust tomato backbone of a Bloody Mary? The result was a revelation—a drink that’s not overtly briny but carries a subtle, sophisticated edge. It’s the kind of complexity that makes people pause mid-sip, wondering why your Bloody Mary tastes so much better than the standard version. The fact that I served it in vintage barware that I inherited from my dad made it even better.

Here’s how to make it, with a recipe that serves a crowd (because trust me, they’ll want seconds).
Dirty Bloody Mary

 Juice of 1lime
½ c. freshly squeezed lemon juice (about 2–3 lemons)
1 46-oz. bottle
V8 Vegetable Juice, divided
½ c. Worcestershire sauce
¼ c. olive juice
½ c. prepared horseradish
2 t. Crystal hot sauce
1 t. celery seeds
¼ t. kosher salt, plus more to taste
2 c. vodka*
Ice, for serving
Garnishes (get creative: celery stalks, pickled green beans, olives, bacon strips, or even shrimp)


Squeeze the juice of one lime into a 1/2-cup measuring cup. Then, juice your lemons, ensuring you have enough to fill the measuring cup to the brim (about 1/2 cup total). Fresh citrus is non-negotiable here—it cuts through the richness and balances the drink.

Pour the lime-lemon juice into a blender. Add half the V8 bottle (about 23 ounces), Worcestershire sauce, olive juice, horseradish, hot sauce, celery seeds, and kosher salt. Blend on high for about 1 minute until the mixture is smooth and well-combined. The horseradish and celery seeds will meld beautifully.

Pour the blended mixture into a large pitcher. Stir in the remaining V8 juice to lighten the texture slightly. Cover the pitcher tightly and refrigerate overnight. This step is crucial—it allows the flavors to marry and deepen, transforming a good drink into a great one. Meanwhile, store your vodka in a separate container in the fridge to keep it chilled.

The next day, give the mixture a taste. Adjust with more salt, hot sauce, or even a splash of olive juice if you want extra “dirtiness.” When you’re happy with the balance, stir in the chilled vodka. (If you’re using bacon vodka, it adds a smoky, meaty layer that’s divine.)


Fill tall glasses with ice and pour the Dirty Bloody Mary over top. Garnish to your heart’s content—classic celery stalks and olives are a must, but don’t shy away from pickled veggies, crispy bacon, or even a skewer of grilled shrimp for a coastal twist.
 
*plain is great, but bacon vodka takes it to another level

 Serves: 8–10 As an Amazon Associate I earn from qualifying purchases.

Monday, April 28, 2025

Poached Salmon Piccata

 
There’s something undeniably elegant about a dish that marries simplicity with sophistication. I created this Poached Salmon Piccata to celebrate the art of poaching—a gentle technique that keeps the fish succulent and lets the sauce take center stage. The dry white wine and Dijon mustard weave a subtle complexity, while the scallions add a fresh, vibrant finish.

What makes this dish a keeper is its versatility. Serve it with a simple green salad and crusty bread for a quick weeknight treat, or pair it with roasted veggies and herbed couscous for an impromptu dinner party. As a Type-A creative always on the move, I adore that it’s ready in under 30 minutes—proof that fast can still be fabulous.

Poached Salmon Piccata

½ T. butter

1 clove garlic, minced

½ c. water

2 T. lemon juice

⅛ t. chicken bouillon granules

2 (4-oz.) salmon fillets

¼ c. dry white wine

1 T. butter

½ t. Dijon mustard

2 scallions, chopped

Freshly ground black pepper, to taste

 In a 9-inch sauté pan, melt ½ tablespoon of butter over medium heat. Add the minced garlic and cook, stirring, for about 1 minute until fragrant.

Pour in ½ cup water and 2 tablespoons lemon juice, then bring the mixture to a gentle boil. Stir in ⅛ teaspoon chicken bouillon granules until dissolved.

Lower the heat to a simmer and gently place the salmon fillets in the pan. Cover and cook over low heat for 10 minutes per inch of thickness (measure at the thickest part), or until the salmon flakes easily with a fork. Carefully transfer the fillets to a warm plate and tent with foil to keep warm.

 Pour ¼ cup dry white wine into the remaining liquid in the pan. Increase the heat and boil until the mixture reduces to about ¼ cup, concentrating those lovely flavors. Whisk in 1 tablespoon butter and ½ teaspoon Dijon mustard until the sauce is smooth and velvety.

 Spoon the sauce generously over the salmon fillets. Season with freshly ground black pepper to taste, then sprinkle with chopped scallions for a burst of flavor and color. Serve immediately and enjoy!

As an Amazon Associate I earn from qualifying purchases.

Sunday, April 27, 2025

A Quick Favor to Banish Blog Ads (and Score a New Vacuum!)

You may have noticed some ads popping up on my blog lately, and I owe you an apology for the clutter. I promise there’s a story behind it—and a plan to make them disappear for good!

 A while back, I experimented with running ads to earn a little extra income. Honestly? I wasn’t a fan of how they made the blog look. It felt less like my cozy corner of the Internet. So, I turned them off and forgot all about it—until I checked my ad account recently and saw that I’ve got $33 sitting there. The catch? They won’t pay out until I hit $100.

This is Stanley helping me clean.

Now, that $100 would be a game-changer. You see, I’m in desperate need of a new vacuum cleaner. This past weekend, I was getting the lower level ready for a visit from my son and grandkids (they were sweet enough to help me tidy up down there). I hauled out my two downstairs vacuums, but they were not up to the task. I vacuumed and vacuumed, yet the carpet looked worse afterward. Yes, I take good care of my vacuums. Yes, I regularly change and clean the filter. Yes, I disassemble them and make sure they’re clean as a whistle. No, that hasn’t helped one bit. I ended up on my hands and knees, picking up bits of debris by hand. Talk about humbling.

So, here’s where you come in. Those ads you see? If you give them a quick click, it helps nudge my account closer to that $100 payout. The sooner I hit that goal, the sooner I can ditch the ads for good and treat myself to a vacuum that actually works. It’s a win-win! I’m so grateful for your support—it means the world to me and keeps this blog feeling like home.


Friday, April 25, 2025

Braised Lotus Root

If you’re craving something fresh and exotic, lotus root might be your next culinary adventure. This versatile ingredient can be enjoyed in many ways—whether as a standalone snack or a delightful side dish. I recently paired it with homemade banh mi sandwiches, complete with kimchi cucumbers and pickled daikon (everything but the bread was handmade), and it was a fantastic combination.

I tried a sweet and savory lotus root dish that had a pleasant bite and a chewy, toothsome texture. The flavors were a mix of sweet and salty, though I think slicing the lotus root a bit thicker would have made it even better. Still, it was a delicious addition to my meal. If you’re looking for a new ingredient to spice up your cooking, give lotus root a try with this simple recipe below! You might also consider making lotus chips as a healthy snack. A recipe for these follows.

 Braised Lotus Root

 1 lb. Melissa’s lotus root, peeled and trimmed

1 t. apple cider vinegar

1 T. avocado oil

¼ c. soy sauce

2 garlic cloves, minced

½ c. sugar

1 t. sesame oil

1 t. sesame seeds (for garnish)

 Slice the lotus root into ¼-inch thick rounds. Soak them in cold water for 30 minutes to remove excess starch.

Boil water in a pot, add the vinegar, and blanch the lotus root slices for 5 minutes. Drain and rinse with cold water.

 Heat the vegetable oil in a large non-stick pan over medium heat. Add the lotus root slices and stir-fry for 3-4 minutes until they soften slightly and turn translucent.

 Pour in 2 cups of water, soy sauce, and garlic. Stir, cover, and simmer on low heat for 40 minutes, flipping the slices halfway through. Add a splash of water if it gets too dry.

 Stir in the sugar, cover again, and cook for another 20 minutes on low heat.

 Uncover, turn the heat to medium-high, and cook for 10 more minutes, stirring occasionally, until the liquid thickens into a shiny glaze.

 Remove from heat, drizzle with sesame oil, and sprinkle with sesame seeds.

 Serve as a side dish with rice or alongside banh mi sandwiches. Store leftovers in an airtight container in the fridge for up to 2 weeks.

 Here’s a simple, tasty recipe for lotus root chips that you can make at home. They’re crispy, lightly seasoned, and showcase that gorgeous natural pattern. This version is baked for a healthier twist, but I’ll note a frying option too.

 
Baked Lotus Root Chips

 1 large Melissa’s lotus root (about 8-10 inches long, fresh is best)

2 T.  olive oil

1 t. sea salt, more or less to taste

Freshly ground, black pepper

 Optional seasonings: paprika, garlic powder, or chili powder (1/2 teaspoon each for a kick)

 Peel the lotus root with a vegetable peeler to remove the brown skin.

 Slice it thinly—aim for 1/8 inch thick. A mandoline works great for consistency; if using a knife, keep slices uniform so they cook evenly.

 Rinse the slices in cold water, then soak them in a bowl of water with 1 teaspoon of vinegar or lemon juice for 10-15 minutes. This prevents browning and removes excess starch.

 Drain the slices and pat them dry thoroughly with a clean kitchen towel or paper towels. Wet slices won’t crisp up.

 In a large bowl, toss the slices with olive oil, salt, pepper, and any optional seasonings. Make sure they’re evenly coated but not drenched—too much oil makes them soggy.

 Preheat your oven to 375°F.

Line a baking sheet with parchment paper, and lay the slices in a single layer. Do not overlap. 

Bake for 20-25 minutes, flipping the slices halfway through (around 10-12 minutes in). They’re done when golden brown and crisp at the edges. Watch closely near the end—thinner slices can burn fast.

Let them cool on the baking sheet for 5 minutes; they’ll crisp up more as they sit. Serve as a snack or side. Beef don’t keep, so eat and enjoy.

 As an Amazon Associate I earn from qualifying purchases.


Thursday, April 24, 2025

Dilly Deviled Egg Potato Salad in Mini Peppers

 
Have I just revolutionized potato salad by serving it as a finger food? I might just be the first to stuff creamy, dreamy potato salad into vibrant mini sweet peppers, and let me tell you, it’s a game-changer. There’s something so comforting about potato salad—picnics, barbecues, family gatherings—but when you pack my Dilly Deviled Egg Potato Salad into those crisp, colorful peppers, it becomes an irresistible handheld delight. The sweet crunch of the peppers perfectly complements the tangy, herb-packed creaminess of the salad, blending the best of deviled eggs and classic potato salad into one crowd-pleasing bite. Serve these at your next backyard cookout, and trust me, you’ll never want to eat potato salad any other way.Dilly Deviled Egg Potato Salad

 1 1.5-lbs. Melissa’s Peewee Dutch Yellow Potatoes
1/3 c. sour cream
1/3 c.
Duke’s mayonnaise
½ c. finely chopped scallions (about 4)
1-2 celery stalks, finely chopped
1 T.
apple cider vinegar, more or less, to taste
2 T.
Dijon mustard, more or less, to taste
1 T.
sweet pickle relish
1-2 t. kosher salt
1 t.
celery seed
Freshly ground black pepper, to taste
3 hard-boiled eggs, roughly chopped
¼ c. chopped
Melissa’s fresh dill
1 1-lb. bag Melissa’s mini sweet peppers, for serving


Place the potatoes in a large pot and cover with water. Bring to a boil over high heat, then reduce to medium-low. Simmer for about 20 minutes, or until the potatoes are tender but still firm when pierced with a fork. Drain, let cool slightly, and cut into bite-sized chunks. Set aside. (Don’t overcook the potatoes—they should hold their shape. Test with a fork after 15 minutes to avoid mushiness.)

In a medium bowl, combine sour cream, mayonnaise, scallions, celery, apple cider vinegar, Dijon mustard, sweet pickle relish, kosher salt, celery seed, and black pepper. Stir
until smooth. Taste and adjust vinegar, mustard, or pepper as needed.

In a large bowl, combine the potato chunks, chopped hard-boiled eggs, and fresh dill. Pour the dressing over the top and gently toss to coat evenly, being careful not to mash the potatoes or eggs.

Cover the salad and refrigerate for at least 30 minutes to let the flavors meld. This also makes it easier to serve cold. This salad tastes even better the next day, so feel free to prep it a day in advance. Just give it a gentle stir before serving.

Serve as is in a bowl or get creative by stuffing the salad into mini sweet peppers for a colorful, bite-sized appetizer. To prepare the peppers, slice off the tops, remove the seeds, and spoon the potato salad inside. (If using mini sweet peppers, choose a mix of red, yellow, and orange for a vibrant presentation. They’re sturdy enough to hold the salad without wilting.)

Got leftovers? They’ll keep in the fridge for up to 3 days in an airtight container. Just note that the mini peppers are best stuffed fresh to maintain their crunch.

Serves 6-8

As an Amazon Associate I earn from qualifying purchases.

Wednesday, April 23, 2025

My Experience with the Luxurious Crown Melon from Japan

I recently had the privilege of receiving a Crown Melon from Melissa’s Produce, and let me tell you, this $156 bad boy, referred to as the “Japanese King of Fruits” lives up to its reputation! Grown in Hamamatsu, Japan, where the region boasts the longest sunshine hours and a warm climate, Crown Melons are the epitome of elegance. Known for their delicate sweetness and unmatched juicy texture, this muskmelon is unlike any I’ve ever tasted—I don’t think I’ve ever experienced a melon this juicy.

What sets Crown Melons apart is their unique cultivation: the “one tree, one fruit” method, a 100-year-old tradition. By allowing only one fruit per sapling, all the plant’s nutrients and flavor concentrate into a single, perfect melon. Each melon undergoes rigorous inspection and sugar content analysis, ensuring only the best make it to market. You’ll know it’s authentic by the signature “T” shaped stem, and it arrives in a beautiful gift box, making it a ceremonial treat.

To check for ripeness, gently press the bottom—if it feels slightly soft, it’s ready. To prepare, cut off the bitter stem, wash your knife, then slice the melon vertically. Scoop out the seeds (I saved mine to plant in spring!), and cut into smaller sections. For the best experience, chill it in the fridge for 2–3 hours before serving.
 

As a hybrid, the seeds I harvested might not yield a melon as sweet as this one, but I’m excited to try growing them in my Zone 6B garden next spring. It’ll be a fun experiment, even if the results don’t match the original’s perfection. If you ever get the chance to try a Crown Melon, don’t miss out—it’s a taste sensation worth every penny!


Tuesday, April 22, 2025

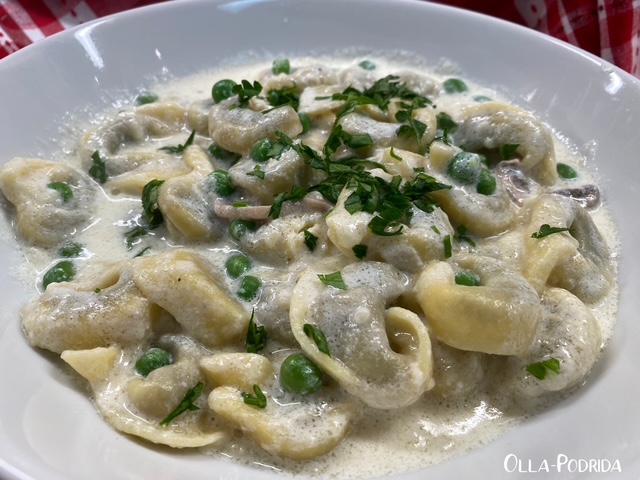
Recreating Cicero’s Legendary Creamy Tortellini at Home


 If you ever dined at Cicero’s in the Delmar Loop section of St. Louis, you know it was more than just a restaurant—it was a legend. Famous for its salads, pizzas, pastas, sandwiches, and burgers, Cicero’s left an indelible mark on the local food scene before closing its doors. For me, Cicero’s holds a special place in my heart, partly because they once served me imitation crab in my linguine tutto mare (there was much discussion), but mostly for their creamy tortellini—a dish so iconic it was one of the most ordered items on their menu. Even years after Cicero’s closed, I can still taste that rich, velvety tortellini, brimming with artichokes, mushrooms, and peas. The other day, feeling nostalgic, I decided to recreate this beloved dish at home. Here’s my version of Cicero’s Tortellini with Artichokes, Mushrooms, and Peas. Is it restaurant quality? I’ll let you be the judge.

Tortellini with Artichokes, Mushrooms & Peas
Inspired by Cicero’s Restaurant

1 lb. frozen meat tortellini
¼ c. (½ stick) butter
2 cloves garlic, minced
½ c. chopped artichoke hearts
½ c. sliced mushrooms
¼ c. frozen green peas
1 c. whole milk
1 c. heavy cream
1 c. grated Parmesan cheese
Freshly ground black pepper
Parsley (for garnish)

Cook tortellini according to package instructions. Drain and set aside. 
Melt butter in a large skillet over medium-high heat. Add garlic and sauté for about 1 minute until fragrant. Stir in artichoke hearts, mushrooms, peas, whole milk, and heavy cream. Stir to combine and bring the mixture to a boil. 

Add Parmesan cheese and mix well until the sauce is smooth. Stir in the cooked tortellini, ensuring it’s well coated with the creamy sauce. Season to taste with salt (if needed) and a few grinds of freshly ground black pepper.
Pour the tortellini onto serving plates, garnish with parsley, and serve immediately.

Serves: 2 amply, or 3 less generously.

This dish pairs beautifully with a crisp Chardonnay, just like they recommended at Cicero’s. The wine’s buttery notes complement the creamy sauce perfectly.


Monday, April 21, 2025

Crispy Potato Bites

 
It’s been decades since “Seinfeld” wrapped up its iconic run, yet certain scenes still linger in my mind like old friends. One that stands out involves Elaine and her on-again, off-again boyfriend, David Puddy. In this particular gem, Puddy’s shoveling dip like it’s his last meal, pausing only to ponder aloud, “Why don’t people have dip for dinner?” Elaine stares at him like he’s lost it, but honestly? Puddy’s onto something. I’m Team Puddy all the way—I’ve absolutely had dip for dinner, and I’m not ashamed to admit it.
 
 Appetizers are my love language. I’ve even swapped a proper meal for a spread of snacks more times than I can count. But here’s the catch: appetizers can be a ton of work. After hosting a cocktail party with all the nibbles, I often think I should’ve just cooked a roast and called it a day. That’s why this recipe—a simple, delicious twist on classic restaurant potato skins—is a game-changer. It’s low-effort, high-reward, and trust me, it beats anything you’d order out.

Crispy Potato Bites

 3 Melissa’s organic russet potatoes, scrubbed
2 T. olive oil
1 t. garlic salt
Freshly ground black pepper, to taste.
Pinch Slap Ya Mama seasoning, to taste
1 ½ c. shredded cheddar cheese.
Six slices, bacon, cooked and crumbled
3 scallions, thinly sliced
Sour cream, for serving
Freshly chopped chives, for garnish

 Preheat oven to 400°F. Slice potatoes into ½” rounds.

In a large bowl, toss the potato rounds with olive oil, garlic salt, black pepper, and Slap Ya Mama, tossing until evenly coated.

Arrange the rounds in a single layer on a foil-lined baking sheet. Bake for 15 minutes, then check with a fork for tenderness. If they’re not quite there, bake longer in 5-minute increments until fork-tender. The foil ensures both sides crisp up—no flipping required. You’re aiming for a golden, crispy outside and a soft, fluffy inside.

Remove from the oven and top each round with shredded cheddar, crumbled bacon, and green onions. Pop them back in the oven for 2-3 minutes, just until the cheese melts into gooey perfection.

Finish with a dollop of sour cream and a sprinkle of fresh chives. Serve warm and enjoy!

 As an Amazon Associate I earn from qualifying purchases.

Sunday, April 20, 2025

Easy Everyday by Jessica Merchant, Reviewed

Jessica Merchant’s new cookbook, Easy Everyday, is like a breath of fresh air for anyone who loves good food but doesn’t want to spend forever in the kitchen. If you’re familiar with her “How Sweet Eats” blog, you already know Jessica’s vibe: quick, tasty meals that feel special without the fuss. This book, which dropped last week, is packed with 100 recipes that totally deliver on that promise, and I’m kind of obsessed.
 
Jessica gets it—dinners shouldn’t take longer than 30 to 45 minutes, and breakfast or lunch? Basically instant, unless it’s a lazy weekend brunch. Her secret sauce is meal prep, but not the boring kind where you’re eating the same thing all week. Nope, she’s all about variety and flexibility, so there’s something for everyone, no matter what you’re into or what your diet looks like.
What I love most is how she keeps prep time to around 10 minutes for so many of these dishes. Ten minutes! And yet, the results are straight-up amazing. Take her Weeknight Baked Penne with Spinach—it’s so cozy and flavorful, and using jarred marinara makes it come together crazy fast. Then there’s the Crab Salad Rolls, which are legit fancy enough for a dinner party but taste like something you’d get at a cute East Coast seafood spot. The fresh herbs? Game-changer. 
Oh, and don’t get me started on the Iced Blueberry Lattes. I’m a blueberry-and-coffee fanatic, and these blew my mind—such a fun, refreshing combo. Her Green Goddess Ranch dressing is another winner; it’s so herby and fresh, I want to put it on everything. For dessert, I tried the Chewy Caramel Pretzel Cookies, and let’s just say they didn’t last long. I’m already eyeing her Sour Cream Peach Cobbler for when peaches hit their peak this summer.

The book’s also got all these smart tips for meal planning, like Jessica’s 10-minute prep strategy that makes throwing together stuff like Crispy Baked Breakfast Quesadillas or Cilantro Lime Sheet Pan Fajitas a total breeze. Plus, the photos are gorgeous, and it just feels like Jessica’s chatting with you, cheering you on to make something yummy and get back to hanging with your people. I want to cook every single thing in here. Easy Everyday is one of those rare cookbooks that feels like it was written for real life, and I’m betting you’ll love it as much as I do. Grab a copy here, and get ready to make your weeknights way tastier. As an Amazon Associate I earn from qualifying purchases.

Friday, April 18, 2025

Simple Salmon Rockefeller


Fennel bulb is one of those ingredients I don’t reach for nearly enough, and every time I do, I’m reminded of just how much I adore its subtle, anise-like flavor and crisp texture. It’s a vegetable that somehow feels both underrated and luxurious, capable of elevating a dish with minimal effort. After letting it languish in my kitchen for too long, I recently rediscovered its magic in this simple yet stunning salmon recipe. Using both the bulb and the feathery fronds, this dish transforms everyday salmon into something truly special—bursting with fresh, herbaceous notes and a creamy, rich topping that’s downright irresistible. What I love most is how uncomplicated it is to prepare, despite tasting like it belongs on a fancy restaurant menu. Whether you’re cooking for yourself on a weeknight or hosting friends for dinner, this salmon with creamy fennel topping delivers big flavor without the fuss. Trust me, once you try it, you’ll wonder why fennel hasn’t been a regular in your rotation all along!Simple Salmon Rockefeller

Adapted from thekitchn.com

2 6-oz. salmon fillets

2 T. olive oil
½ t. kosher salt
¼ t. freshly ground black pepper
2 oz. cream cheese, softened

½ small Melissa’s fennel bulb, diced (about ½ c.)
2 scallions, sliced (white and green parts separated)
1 T. chopped fennel fronds
1 T. water
1 T. white wine
Lemon wedges for serving

Preheat oven to 400°F. Line a baking sheet with foil.
 

Pat salmon dry, place on the sheet, and brush with 1 tablespoon olive oil. Season with salt and pepper. Roast skin-side down* for 12-15 minutes, until it flakes easily. 

Meanwhile, heat 1 tablespoon olive oil in a skillet over medium heat. Add diced fennel and white scallion parts; cook until soft, about 4 minutes. 

Off heat, stir in cream cheese, water and wine until smooth. Add green scallion parts and fennel fronds. Adjust seasoning if needed. 

Spread the mixture over the roasted salmon (about 2 tablespoons per fillet). Broil for 2-3 minutes until lightly browned. Serve with lemon wedges. 

* I removed the skin. It’s easy if you use the hot water method.

Enjoy this effortless, tasty dish that’s sure to impress!

As an Amazon Associate I earn from qualifying purchases.


Thursday, April 17, 2025

Colors of Spring Tablescape

 
I have a difficult time resisting linens, so when I spotted this Mystic Lotus Tablecloth, I couldn’t resist its bold colors and captivating pattern. The fabric is very chameleon-like in that it pairs beautifully with a wide variety of hues.

 
I wanted the tablecloth to shine, so I skipped placemats and reached for my trusty Bordallo Pinheiro geranium leaf chargers. These have been with me for ages and always bring that earthy, natural vibe I love. On top of them, I layered deep purple dinner plates from the Table Tops Unlimited “Primary Colors” line—vibrant and fun.
 
Then came the second layer: a set of plates I picked up years ago from World Market. They’re marked only “Made exclusively for World Market,” but they’re such hidden gems. The sea-life and text motif and purple-blue tones echo the tablecloth beautifully. These never fail to draw comment.
  
At the center of the table is one of my favorite pieces—a tulipierre. I usually fill it with spring tulips (true to its name), but I use it all year long, moving it from room to room depending on my mood. It’s elegant without trying too hard. 
Glassware is where I had a little fun. The blue-stemmed Fitz & Floyd wine glasses in their “Jardin” pattern provide a nice backdrop for the bold Moroccan tea glasses—with their deep blue color and gold detailing—as well as with Everest Global’s striking purple goblets for a touch of sophistication. Between the colors and textures, it all just clicks.For napkins, I pulled out some teal ones I’ve had from World Market. They tied everything together nicely without stealing the spotlight. My Mikasa “Opulent” hammered flatware made another appearance—it’s classic, weighty, and always feels special. 
On either side of each setting are vintage pressed glass crescent salad dishes. I’ve had them forever, and I love how unique and practical they are. They fit just right and add a subtle vintage touch. 
And finally—candlelight. Always. The set of green candleholders are a new find this year, and I couldn’t be happier with them. They bring a soft, warm glow that finishes the whole look. For me, candles are what make a table feel truly inviting.

As an Amazon Associate I earn from qualifying purchases.

This post is linked to: Tablescape Thursday