Wednesday, August 31, 2011

Lemon Cream Cheese Pound Cake

It was 102 degrees here today, so not the best day for cranking up the oven, but I've been in such a mood for something lemony all summer long. Having recently returned from a lengthy baking hiatus, it was good to get back into the kitchen and bake. This Lemon Cream Cheese Pound Cake from Sticky Gooey Creamy Chewy food blog is one of the best pound cakes I've ever eaten.

The glaze was not part of the recipe. I just stirred lemon juice into powdered sugar and drizzled it over the top.

It was well worth the hot kitchen.

This post is linked to:


Tuesday, August 30, 2011

Millie's Meatballs


I have no idea who Millie is, so don't ask me. It could have been the Millie who cut my hair when I was a little girl. It could have been the Millie who taught Sunday School at my church. I also had a great aunt Mildred, so it could have been her, but I don't honestly know. I'm not sure my mother knows, it's been that long ago. 

What I do remember is seeing and smelling delicious meatballs in Mother's most ornate chafing dish, with blue flames curling underneath. They were only made for special occasions and I was only allowed two before the guests arrived. 

When I began cooking on my own, this was the first recipe I requested. Instead of making the tiny 3/4 inch appetizer-size meatballs of my Mother's cocktail parties, I made them about twice that size and served them over extra wide eggs noodles for dinner. Now I can have them any time I want. And I do!

There are so many good things about this recipe. They are easy,  they can be made ahead, they freeze beautifully, they serve the dual purpose of being both appetizer and dinner, and further, made a bit larger are wonderfully tasty mini burgers when sandwiched between two halves of a little bun. Oh, did I mention that kids love them? That they are equally appropriate at cocktail parties as they are at a tailgate party? The perfect food. Thank you, Millie, whoever you are!

Over the course of years I've made some adjustments on this recipe.  You'll find them in parentheses as I wanted to leave the original recipe in tact.

Millie's Meatballs

1 pound ground beef (I use chuck)
1/2 cup crumbs (I use seasoned Italian bread crumbs)
1 egg
2/3 cup milk 
2 T. grated onion (I used dried minced onion)
1 teaspoon salt (I use Kosher)
1/8 teaspoon pepper (I use freshly ground black pepper)
1/8 teaspoon nutmeg (I use freshly grated nutmeg)

Mix together, form into small balls.  Bake at 350 degrees F for 45 minutes.  Pour a can of gravy* over the top and bake an additional 40 minutes.

*I use Jameson Beef Stock and make the gravy as directed by the instructions on the side of the jar

This post is linked to:


Monday, August 29, 2011

Lettuce Rejoice!

Week One: I planted the Salad Garden kit (Mesclun Spring Mix).  The seeds sprouted in two days.  Look at them grow!
I am so excited!  And if you like growing things as much as I do, then this little gadget is something that you must have.  I was lucky enough to get my AeroGarden as a gift from my son about four years ago and it has been producing ever since.  The price has dropped significantly since I first got mine, and there are a wider variety of sizes, shapes, colors, and seed kits from which to choose.  I always used to find myself a bit bereft when the cool fall weather would roll in, knowing that the growing season had pretty much come to an end.  Not anymore!  Now I grow a variety of lettuces, herbs, seasonings, and flowers indoors, all year round.  I don't represent the company in any way, I'm just an avid gardener who loves fresh herbs and lettuces, and thrills at seeing the first shoot come up from out of its little seed pod.
Week Two: This picture was taken last week. I have since harvested lettuces daily and still can't keep up with the amount we're getting. Alas, I don' t have enough room in my kitchen for this, so it's in the guest room.


 Week Three: I had to move the Aerogarden from the guest room into my studio in order to be able to raise the light two notches to accommodate the lettuce's rapid growth this past week.  Isn't it gorgeous?

With the holiday season coming up, you just might mention this to Santa.  It really is a lot of fun and, I'd think kids would find it particularly interesting just watching how food grows and harvesting it themselves, rain, or snow, or shine!

AeroGarden 900340-1200 6 Elite with Gourmet Herb Seed Kit, Black with Stainless Accents

Click on any of these seed kits for more information, and get growing!

AeroGarden 800502-0208 Universal Seed Kit, Salad GreensAeroGarden 800507-0208 Universal Seed Kit, Italian HerbAeroGarden 0002-00Z Cherry Tomato Seed KitAeroGarden 800542-0208 Universal Seed Kit, Sweet Bell PeppersAeroGarden 800580-0208 Universal Seed Kit, Fresh TeaAeroGarden International Basil Seed Kit


This post is linked to:

Sunday, August 28, 2011

Road Food

As you all know, I love cooking magazines.  Here is a recent pile that I have been going through and, yes, sharing with my mom, daughter-in-law, and various friends.  The one in the middle is a recent acquisition and about which I am very excited.  Both travelogue and cooking magazine, this publication by Road Food devotees, Jane and Michael Stern, takes you on a trip from one side of the country to the other via Route 66, stopping at various quirky dining spots along the way.  It's fun to read, and there are some scrumptious looking recipes in the back.  I can't wait to try some of them and, trust me when I tell you, you'll be the first to know.

I found this at Sam's Wholesale Club - a great place to buy magazines, by the way, as they discount them 30%.  I got this issue marked $8.99 for only $5.99.  Stay tuned!  Road Food ahead!

For more books by the Sterns, take a look at these:
Roadfood: The Coast-to-Coast Guide to 800 of the Best Barbecue Joints, Lobster Shacks, Ice Cream Parlors, Highway Diners, and Much, Much More500 Things to Eat Before It's Too Late: and the Very Best Places to Eat ThemThe Lexicon of Real American FoodRoadfood: The Coast-to-Coast Guide to 700 of the Best Barbecue Joints, Lobster Shacks, Ice Cream Parlors, Highway Diners, and Much, Much More (Roadfood: The Coast-To-Coast Guide to the Best Barbecue)


Thursday, August 25, 2011

Happy Birthday, Mom!


This post is less about a tablescape than it is about an item that I had on the table that turned out to be a big hit at my Mother's 80th birthday luncheon.  It's easy to make and, I suspect, fun for all ages. At least a table full of 80-year-old ladies really enjoyed them!

Find a favorite picture of the celebrant, scan it in, and  print it out, actual size, on heavy duty white cardstock.  Cut around the face, including cutting holes for the eyes.  Go to your local paint store and ask for as many paint stirrers as you need (they give these away).  Attach the stirrers to the back of the cut out face with heavy duty glue.  Allow to dry overnight and then place at each setting when preparing for the party. Have them put on their "party face" and take a picture.

Tomorrow I am very pleased and fortunate to be hosting another luncheon for my mother, this time in honor of her 85th birthday. While, unfortunately, the crowd will be a little smaller this year, the table will be lovely and the food delish. I'll be making use of this table setting, and my menu will consist of Mini Crab Cakes on a bed of mixed greens that have been tossed in a light vinaigrette with a remoulade dipping sauce on the side, a crusty roll, and a cup of New England Clam Chowder.  For dessert, since my mother's favorite dessert is pie, I'll be serving Praline Custard Pie.  I wish you could join us.


This post is linked to Tablescape Thursday at 

Tuesday, August 23, 2011

Growing Garlic


In the past I've written about the benefit of growing herbs, the experience of growing horseradish, and the thrill of growing vegetables and savoring that first, amazingly fresh bite, not to mention the various uses such as turning cucumbers into pickles and chilled soups.  Now I want to talk to you about garlic.  My guess is this is something you've never considered.  I hadn't thought about it much in the past either, until one day one of the garlic pods in the kitchen basket sprouted -- a very healthy sprout -- and I just couldn't bear to cut it up or throw it away.  So I marched it outside that fall afternoon and shoved it into the ground.  After that initial shoving, that is seriously all of the time I spent on it, and the last time I thought about it until shoots started coming up in the spring.  The heat killed them off and I thought that was that, until they returned with a vengeance.  Okay, I'll water them, I said to myself, and I did.  The other day the tops died back, so I thought I'd dig them up and see what was underneath. These are pretty small, but the aroma is just intoxicating. Not only that, but when I cut them, juices ran.  Juices! That's when I realized just how desiccated the pods I've been buying in the store really are. I left some pods in the ground for next year when they should gain a bit of size, and the next pod to sprout in the kitchen basket will join them. This was so easy that I just cannot  encourage you enough to give it a try.  A bit of empty space or an empty plant pot is all you need.  You have nothing to lose, and every aromatic thing to gain.

Now to find just the right recipe to do these cloves justice.

An excellent book on growing vegetables in containers (for those of you who don't have a lot of space) is this one:
McGee & Stuckey's Bountiful Container: Create Container Gardens of Vegetables, Herbs, Fruits, and Edible Flowers
This post is linked to:

Monday, August 22, 2011

Lobster Omelet


I am having a great time with these plates.

Before I say another word, let me tell you that I do not eat like this all of the time.  In fact, the only other time I had a lobster omelet was six years ago at Arno's Restaurant on Main Street in Nantucket.  We were spending an autumn week with friends on Cape Cod and decided to enjoy a couple of days in Nantucket.  If you've not been there, let me tell you it is a wonderful place.  From the time my feet hit terra firma I felt as if I'd somehow wandered into a Charles Wysocki painting.  I can't think of any place else that is quite like it, and I could return again and again.  As I mentioned we were with friends who happened to be seasoned veterans of roaming Nantucket.  As soon as we exited the ferry at around 9:00 in the morning they led the way to Arno's.  Having gotten up in the pre-dawn hours to catch the early ferry we were all starving, so ordered coffee and opened the menus.  My eyes fell upon the words "Lobster Omelet" and  I needed to look no further, I'd decided.  I can still remember the wonderful taste of that omelet, unique to anything else I'd ever had.  Last week while digitizing pictures, I stumbled across the set I'd taken during this trip and I immediately thought of Arno's and that omelet.  I went online to see if I could find a recipe (no), so perused the menu at Arno's website.  It is described as sauteed lobster and Boursin cheese.  (Hence my interest in making  my own homemade Boursin.)  I mentioned this to my husband who bought me a baby lobster (all of five inches long) and I ended up creating a delicious omelet that easily rivaled Arno's, if not surpassed it.

For those of you willing to try it, here are step-by-step directions.
Remove the baby lobster from the shell by loosening the meat from the top and then slowly pulling it from the shell.  It should extract in one piece, as shown.
Cut the lobster meat into bite-sized pieces while you melt about a teaspoon of butter in a 7" saute pan.
Saute the lobster pieces until done.  You can actually smell when it's done as it releases a wonderful fragrance, but if you're unsure, saute until it is opaque.  Remove from pan and set aside.  Melt a tablespoon of butter in the microwave in a small glass dish.  It will separate leaving the milk solids on the bottom and the "clarified" butter on the top.  Pour this clarified liquid into the saute pan and heat until bubbles subside.
Pour 2 eggs, scrambled, into the pan and swirl to cook quickly.  Dot the top with as much Boursin cheese as you like.  I found four dots to be just perfect.
Put the cooked lobster meat into the omelet and continue to swirl until cooked through. (I was actually able to flip this one, can you say "proud?")  Turn it out onto a plate.  Top with fresh chopped chives and a very light sprinkling of Old Bay seasoning.  As an experiment I only put Old Bay on one side.  It was the better tasting, so I would definitely use it again.  Yum!

Friday, August 19, 2011

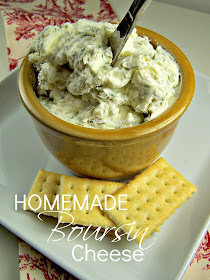
Homemade Boursin Cheese

I've often wondered, maybe you have too, as to why Boursin cheese is so expensive.  Why?  It's cheese, it's herbs, what's so expensive about that?  I suspect the French name ups the price a buck or two and perhaps the quality of the cheese, but when you get down to it, it's really pretty basic.  If you like Boursin the way I do, and enjoy using it in recipes in addition to enjoying it with crackers or crudites, then you will love this clone of the pricey version.  It is easy to put together and I think you'll be amazed at just how close it comes to the taste of the original.  The advantage in making your own, of course, is that you can alter the herbs any way you see fit, to reflect your personal tastes -- can't do that with the purchased version!  Give it a try, and let me know what you think.  Oh, and be sure to look in tomorrow and I'll show you what I did with the cheese.  Yum!

HOMEMADE BOURSIN CHEESE

2 medium garlic gloves, run through a garlic press
1 stick butter, room temperature
2-8 oz. packages Philadelphia Cream Cheese (no substitutions!), room temperature
4 tablespoons freshly grated Parmesan cheese
1 teaspoon dried dill weed
1/2 teaspoon dried marjoram
1/2 teaspoon dried basil
1/2 teaspoon dried chives
1/2 teaspoon freshly ground black pepper (I used Tellicherry)
1/4 teaspoon dried thyme
1 tablespoons dried parsley
 Pinch of salt (about 1/8 teaspoon)

Directions: 

In a medium mixing bowl, beat together the butter and cheese.  If it is truly at room temperature, it will blend together quickly and be very creamy.  Add garlic puree; blend.  Add all remaining ingredients and mix well.  Turn out into a lidded container large enough to hold the cheese and store it in the refrigerator.  Using dried herbs, the cheese will keep for two weeks.

Bring to room temperature. Serve with crudites or crackers...OR check my blog tomorrow for something delicious for breakfast or brunch using this cheese as an ingredient.

NOTE:  Make sure that all of your dried herbs are fresh.  If you can't smell and identify them when you open the jar, throw them away.  If you prefer, you may substitute fresh herbs for some of the dry (tripling the amount of fresh) but due to the moisture content in the fresh herbs, your cheese will not last as long.  I used all dried herbs and the end result was delicious.

This post is linked to:
Fresh Food Friday @ La Bella Vita
Flaunt It Friday @ Chic on a Shoestring Decorating
Friday Link Party @ Creation Corner
Feature Yourself Friday @ Fingerprints on the Fridge

Thursday, August 18, 2011

Filet Zanti

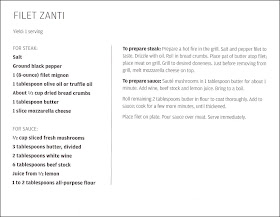
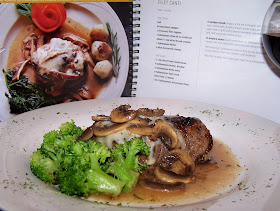
Do you remember those commercials from the Beef Council proclaiming "Beef. It's what's for dinner"? Those words have been going through my head all week.  So when it came time for dinner this evening, beef is exactly what I wanted!  Now, I don't know about you, but when I think beef, I think a thick, juicy steak, filet if possible.  So I pulled out one of my Special Requests cookbooks of recipes from area restaurants and decided on Filet Zanti from Zanti's Ristoranti.  Doesn't this look beautiful?  It was!  And do you know what else?  Making a meal this delicious is also easy.  Not only that, but this recipe serves one. So if you find yourself alone some evening, you can make this wonderful meal just for yourself.  It can easily be doubled, tripled, or even quadrupled.  Here's another tip, no need to fire up the grill, particularly if you're making just one.  I cooked mine in a pan on top of the stove and it turned out beautifully.  Here is the recipe straight from the book; my dinner plate is pictured below.  
Doesn't mine look as pretty as the picture?  What are you waiting for?  Dig in!
Happy Friday!


Wednesday, August 17, 2011

Banana Crunch Muffins


It's been so noisy here all week with the roofers awakening us in the predawn hours that we've just been stumbling around the house muttering, "Coffee! Coffee!" able to do little else.  But this morning, having awakened to bird song, I figured it was time to get caught up with the weekend paper and have a nice hot muffin for breakfast.  This recipe is from Ina [Garten, the Barefoot Contessa] and is delicious!  Do NOT forgo the banana chips on top, they are wonderful.

BANANA CRUNCH MUFFINS

3 cups all-purpose flour
2 cups sugar
2 teaspoons baking powder
1 teaspoon baking soda
1/2 teaspoon salt
1/2 pound unsalted butter, melted and cooled
2 extra-large eggs
3/4 cup whole milk
2 teaspoons pure vanilla extract
1 cup mashed ripe bananas (2 bananas)
1 cup medium-diced ripe bananas (1 banana)
1 cup small-diced walnuts
1 cup granola
1 cup sweetened shredded coconut
Dried banana chips, granola, or shredded coconut, optional

Preheat the oven to 350 degrees F.
Line 18 large muffin cups with paper liners. Sift the flour, sugar, baking powder, baking soda, and salt into the bowl of an electric mixer fitted with a paddle attachment. Add the melted butter and blend. Combine the eggs, milk, vanilla, and mashed bananas, and add them to the flour-and-butter mixture. Scrape the bowl and blend well. Don't overmix.

Fold the diced bananas, walnuts, granola, and coconut into the batter. Spoon the batter into the paper liners, filling each 1 to the top. Top each muffin with dried banana chips, granola, or coconut, if desired. Bake for 25 to 30 minutes, or until the tops are brown and a toothpick comes out clean. Cool slightly, remove from the pan, and serve.

This post is linked to:
Real Food Wednesday
Cast Party Wednesdays
Wow Us Wednesday
Weekday Potluck
For more wonderful recipes from Ina, I highly recommend these books:
Barefoot Contessa How Easy Is That?: Fabulous Recipes & Easy Tips (Fabulous Recipes and Easy Tips)Barefoot Contessa Back to Basics: Fabulous Flavor from Simple IngredientsThe Barefoot Contessa Cookbook