Thursday, August 31, 2017

Slow Cooker Turkey Breast


A couple of days ago Williams-Sonoma had a 40% off pastry sale. As a cardholder, not only did I get the 40% off, but I got free shipping as well. The thought of having a freshly baked cinnamon roll scenting the house in the morning along with my brewing coffee was too tempting to resist, so I bought a box. You're probably wondering what that has to do with turkey, so I'll tell you. My freezer is positively jammed full with other sale items from Williams-Sonoma, not to mention specials from Omaha Steaks. I'm not complaining, mind you, I'm going to have some mighty good eating this winter, but my freezer space was at an absolute minimum. This includes not only the upright freezer, but also the freezer compartments of the both refrigerators. Obviously something had to go. While rummaging through everything I spotted a turkey breast that I had bought last season and figured it was high time that I make it.

I had never made a turkey breast before so I went online to look for a recipe. When I spotted one that was made in the crockpot, with the only ingredient being a packet of dry onion soup mix, I knew I had to try it. I didn't follow the recipe exactly, as you knew I wouldn't, but nonetheless it was very easy to put together, the house smelled like Thanksgiving, and the turkey was succulent.
Here's what I did:

Slow Cooker Turkey Breast

1 turkey breast (mine was 5.3 pounds)
1 package Lipton dry onion soup mix
Handful of baby carrots
3 ribs celery, broken into thirds


Aromatics:
½  lemon
½  medium onion
Leafy tops of celery
Sprig of rosemary

Poultry seasoning
Freshly ground black pepper

1 tablespoon butter, cut into pieces

Place baby carrots and celery in the bottom of a 6-quart slow cooker.

Remove turkey from packaging, rinse and pat dry. Rub turkey with onion soup mix both inside and out. Add aromatics to the cavity of the turkey, and sprinkle with pepper and poultry seasoning. Place (and I have to laugh at this because I didn't place my turkey I jammed it in) turkey breast into the slow cooker and dot with butter. Put a lid on the slow cooker (placing a heavy book on top, if need be, to hold the lid in place -- yep, did that, too), and turn to High. Allow to cook one hour on the High setting, and then reduce temperature to Low and cook seven additional hours. When turkey is finished remove to a plate and tent with foil if you plan to make gravy out of the drippings, or place on a cutting board, slice and serve.


This post is linked to:

This post contains affiliate links.

Monday, August 28, 2017

Loving the (Chef Mepoco) Cuteness!


Last week you all gave me so many wonderful ideas as to what to do with my demitasse cups that I have decided to feature another item  to see what you can come up with this week.
This was another item that I stumbled upon on eBay. I really should delete the eBay app from my iPad, because it beckons me constantly. I was looking for a set of cups and saucers, and ran across a set featuring this cute little chef. Obviously, because it was an auction and not a "buy it now" purchase, I missed out. But I did find this cute little creamer, and managed to get it for a very reasonable price. Isn’t he a darling?
You first saw him in my post about Devonshire Cream. Now I'm challenging you, once again, to give me ideas on what other ways to use this adorable creamer.
This guy is called Chef Mepoco, and he's made in Japan. Personally, I find him absolutely irresistible. So, this week for my "loving the cuteness" post, I introduce you to Chef Mepoco. Tell me what you think.

This post is linked to:


Sunday, August 27, 2017

Bacon Pickle Fries


Football season is coming up and that means snacks, snacks, and more snacks. If you're looking for something that is super easy, and employs items that you already have on hand, then you may be interested in this super simple, super crowd pleasing recipe for bacon pickle fries.

There's really not much to it, so it's hardly worth writing the recipe down. Essentially you wrap one piece of low-sodium (this is very important!) bacon around a drained and patted dry pickle spear. You bake it in a preheated oven at 425° for 17 to 22 minutes, depending upon the heat of your oven, and how crispy you like your bacon. I baked mine for 22 minutes, but then I like my bacon crispy.

Use tongs to remove the bacon-wrapped pickles from the oven, because they are going to be very hot, and arrange them nicely on a plate, alongside a cup of ranch dressing, and a cup of spicy remoulade. These will disappear in a hurry; they are so good.

Bacon Pickle Fries

Dill pickle spears, drained and patted dry
Thin-sliced, low-sodium bacon, one strip for each pickle
Parmesan cheese, optional

Preheat oven to 425°F. Line a cookie sheet with foil, and place wrapped pickle spears on the foil. Sprinkle with Parmesan cheese, if desired. Slide cookie sheet into the oven, and bake for 17 to 22 minutes, until bacon is desired crispness. Remove from oven, and place immediately onto a paper towel-lined plate, to allow excess grease to drain.

Arrange on a serving plate, and serve with ranch dressing, and a spicy remoulade.


This post is linked to:

This post contains affiliate links.

Saturday, August 26, 2017

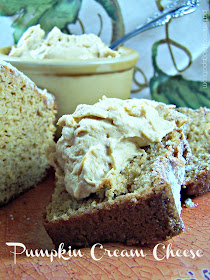
Pumpkin Cream Cheese


As I mentioned yesterday in my blog post on the pumpkin loaf, I hadn't intended to do a pumpkin post quite this early. But, as the pumpkin loaf is greatly enhanced by a healthy dollop of Pumpkin Cream Cheese, I figured why not go all in and do another. You really do need to have make this recipe, so consider this "pushing the season" posting as a bit of a public service.
You are going to love this! You are going to love it so much that you're going to be spreading it on anything you can get your hands on. You might even think that it's dessert. You may, for example, want to spoon it into a parfait glass, dividing layers with mounds of whipped cream, and consume it all at once. I can't say that I blame you. It's that good.

Easy to put together, tasty any time of the year, and it keeps for a week in the fridge…but I doubt it'll last that long.

 Pumpkin Cream Cheese

1 8-ounce package cream cheese, softened
1/2 cup canned solid pack pumpkin
1/4 cup dark brown sugar, packed
3/4 teaspoon pumpkin pie spice
1/2 teaspoon vanilla

Place all ingredients into a medium mixing bowl, and beat until smooth, creamy, and deliciously spreadable, about 2-3 minutes. Store in the fridge.


You’re going to want to spread your cream cheese with these:


 This post is linked to:


This post contains affiliate links.

Friday, August 25, 2017

I Can’t Wait for Autumn Pumpkin Loaf


The other day I was in the mood for goulash. Don't ask me why, I'm not sure that anyone ever gets in the mood for goulash, but I did. Thinking that I had all of the ingredients (and ultimately I was right), I found myself rummaging through the pantry in search of cans of diced tomatoes and tomato sauce. In the doing, I found, way in the back, a can of solid pack pumpkin. Well, you know what had to happen, I had to make a pumpkin loaf.

I have no complaints about this summer, yes we had an excruciatingly hot week in July, but August has been absolutely delightful. Two weeks of the month, so far, have been in the upper 70s or low 80s. Who could ask for more? But, there is something about the shortening days that has me thinking of things like goulash and pumpkin. Combining a number of recipes that I have for both pumpkin bread and pumpkin pound cake, I came up with this, and it is delicious. It gets better with age, so make it a day ahead of when you plan to serve it. I honestly hadn't intended upon doing a pumpkin post in August, but having posted a picture of this loaf on Facebook, I got numerous requests, so here it is.
I Can’t Wait for Autumn Pumpkin Loaf

1½ cups flour
1/2 teaspoon ground cinnamon
1/2 teaspoon salt
1/2 teaspoon baking soda
1/2 teaspoon baking powder
1/4 teaspoon ground cloves
1/4 teaspoon freshly ground nutmeg
1½ cups granulated sugar
1/2 cup sour cream
1/2 teaspoon vanilla extract
3 large egg whites
1 cup canned pumpkin

Preheat oven to 350°. Grease and flour a loaf pan; set aside.

Sift together flour, cinnamon, salt, baking soda, baking powder, cloves, and nutmeg; set aside.

In a large mixing bowl, whisk together sugar, sour cream, and egg whites until thoroughly blended. Stir in pumpkin. Fold in dry ingredients until completely incorporated. Pour into prepared pan and bake for 60 minutes, or until toothpick inserted comes out clean.

Allow to cool on a wire rack for 10 minutes, and then remove from pan to cool completely.

Dust with powdered sugar or drizzle with a powdered sugar glaze.


This post is linked to:

Thursday, August 24, 2017

Corn and Hatch Chile Relish


With hatch chiles in season, and fresh corn still in abundance, there is no better time to make corn relish than now. If you've never made corn relish before, or have no idea what you do with it, let me educate you. Corn relish is a delicious, fresh, crisp, succulent condiment that can be used on sandwiches, stirred into potato salad, chicken salad, tuna salad, or as a delicious topping on a grilled hotdog. It gives a whole new meaning to the word “corndog.” It's easy to stir together, and just needs a number of hours in the fridge for the flavors to meld. I like it so much, that I could eat it as a side dish, and often do. Last night I tossed a scoopful into a chopped salad, it was wonderful! If you're looking for a way to give every day dishes some extra zing, adding corn relish will do the trick!
 Corn and Hatch Chile Relish

1/2 cup Melissa’s Fire Roasted Sweet Red Bell Peppers, diced
1/4 cup roasted
Melissa’s hatch chiles, diced
3 large ears fresh corn, husked and stripped
2 tablespoons chopped scallions
2 tablespoons cider vinegar
1 tablespoon real maple syrup (Grade A)
1 teaspoon Crystal
hot pepper sauce
1/8 teaspoon red pepper flakes
3/4 teaspoon ground turmeric
1/2 teaspoon salt
1 teaspoon Dijon mustard
3 tablespoons olive oil

 In a large bowl toss together red peppers, hatch chiles, fresh corn niblets, and chopped scallions; set aside.

Mix remaining ingredients together in a medium bowl, and whisk until well combined. Pour dressing over vegetables,
stirring to coat. Refrigerate for at least one hour (longer is better), and serve as you see fit.

 This post is linked to:


Tuesday, August 22, 2017

Guinness-Milk Chocolate Ice Cream


You know how you occasionally, after a particularly difficult day, like to treat yourself to your favorite gourmet ice cream? You know the kind I'm talking about, that pricey stuff in those small containers. That stuff is good, but face it, a couple of healthy spoonfuls, and it and your eight dollars are gone. I have another idea. Make your own! The recipe that I'm about to share with you kicks your favorite brand of gourmet ice cream to the curb. No more will you have to go out in search of creamy, decadent, high-end deliciousness, you can make it at home.

I stumbled upon this recipe after making my
Chocolate Stout Cake. I had about a cup of Guinness left and no idea what to do with it. Sure, if I liked beer (or ale, or Porter, or stout, or IPA, or anything else that smacks of yeast or hops) I could have drunk it. But seeing as I don't like Guinness or any of that other stuff, I needed to cook with it. It was way too much to make Guinness ale mustard, and I was looking for something chocolaty. As luck would have it, I found this in David Lebovitz's AMAZING ice cream book, The Perfect Scoop. I had picked up this book at the library some time ago, and just happened to see this while flipping through. I took the book back to the library, drove immediately to the local bookstore, and bought a copy of my own. It's a rare day that I actually buy a cookbook because I get so many of them from publishers for review, but this was one I knew that I had to have as a permanent addition to my cookbook collection . If the rest of the ice cream in this book is half as good as this one, I am going to be one happy girl.

A word of warning, this ice cream is not for the kids because the Guinness does not get cooked out, simply stirred into the custard after it is cooked . So you might want to keep that in mind. But you and your other adult friends are going to want to savor and enjoy every creamy spoonful. Or, you may just want to hoard it all for yourself.
 

Guinness-Milk Chocolate Ice Cream

Makes about one quart

7 ounces milk chocolate, finely chopped
1 cup whole milk
1/2 cup sugar
pinch of salt
4 large egg yolks
1 cup heavy cream
3/4 cup Guinness Stout
1 teaspoon vanilla extract
Put the chocolate pieces in a large bowl and set a mesh strainer over the top.
Warm the milk, sugar, and salt in a medium saucepan. In a separate medium bowl, whisk together the egg yolks. Slowly pour the warm mixture into the egg yolks, whisking constantly, then scrape the warmed egg yolks back into the saucepan.
Stir the mixture constantly over medium heat with a heatproof spatula, scraping the bottom as you stir, until the mixture thickens and coats the spatula. Pour the custard through the strainer over the milk chocolate, then stir until the chocolate is melted. Once the mixture is smooth, whisk in the cream, then the Guinness and vanilla. Stir until cool over an ice bath.
Chill the mixture thoroughly in the refrigerator, then freeze it in your ice cream maker according to the manufacturer's instructions.

This post is linked to:

Monday, August 21, 2017

Hatch Chile Black Bean Hummus

Unless you have been living under a rock, or glued to eclipse websites (which I've recently come to realize is pretty much the same thing), then you may not know that it's hatch chile season. ​


Hatch Chiles are named after the growing region from which they originate, Hatch, New Mexico. The intense sunlight and cool nights that this valley provide result in a uniquely flavored chile that's unrivaled by any other. Meaty, and with mild to medium heat, they are ideal for standards such as Chile Con Queso and Chile Rellenos, but if you allow your imagination to take hold, you will find that they are an excellent addition to almost anything from your morning eggs to your evening soup, snack, or salad.
 This is my third recipe using hatch chiles, and I am struggling to decide which one I like the best. I should probably let you decide, so here is my first concoction pairing the chiles with black beans for a unique and delicious hummus. 
Hatch Chile Black Bean Hummus

1 15-ounce can black beans, rinsed and drained
1 small
Melissa’s Hatch Chile, roasted and seeded
1/4 cup chopped cilantro
1 tablespoon sherry vinegar
1 tablespoon tahini
1 tablespoon olive oil
1/4 - 1/2 teaspoon cumin
Pinch salt

Blend in a bullet blender, food processor, or regular blender until smooth and creamy. Serve with crackers or crudités.


This post is linked to:

Friday, August 18, 2017

Alycia's Peach Daiquiri


Today's recipe is another one from Alycia of Inspirational Sloppy Joe fame. I was going to hold off on this one, not wanting to put two of them from Alycia so close together lest she think I'm stalking her, but peach season is coming to an end, and you need to try this before it's over. It's been a long time since I've made myself a cocktail, but yesterday I decided it was high time. I don't treat myself as often as I should, and, in fact, I have pretty much been eating out of the freezer the past couple of weeks, so felt I deserved a little treat.

This is easy to put together, and I counted it as a serving of fruit on the daily nutrition pyramid, because it calls for an entire peach. Can you imagine another cocktail that's as good for you as this one? Not only is it good for you, but it is also absolutely delicious. The recipe, without alteration it fabulous, but, in the name of full disclosure, I changed it up a tiny bit using a handful of ice cubes made from pineapple juice. I imagine this would be delicious with any type of fruit juice-based ice cube, but do know that it is fine on its own.  I just happen to have an obsession with making ice cubes out of pretty much anything in liquid form.

Okay, run out and get yourself some fresh peaches and prepare to be treated to a luscious cocktail.
Alycia's Peach Daiquiri
Makes one ample portion…unless you're a lush

2 ounces Malibu rum
3 ounces sweet and sour mix
1 whole peach, pitted
Splash Grenadine
Ice (see above regarding my choice here)

Toss all into a blender, or bullet blender, and blend until the ice is crushed and incorporated; serve immediately. Double, triple, quadruple, go crazy. You're going to love this one.

This post is linked to: