Friday, April 30, 2021

Kentucky Derby Bars

This post contains affiliate links.


Had I not been invited to a Kentucky Derby Party, I would have had no idea that the Kentucky Derby was this weekend. It’s not something that I follow. One year I did get involved, and it seemed like much ado about nothing. I mean it’s not as though the horses run laps, it’s just a short distance and everything is over.

One thing that is going to last are these delicious Kentucky Derby Bars. Rich, chocolaty, nutty, and delicious, this is one dessert that can go the distance.


Kentucky Derby Bars

Crust
3 c. graham cracker crumbs*
½ c. unsalted butter, melted
¼ c. sugar
1 large egg white, lightly beaten

Filling
1 c. firmly packed dark brown sugar
½ c. light corn syrup
½ c. dark corn syrup
¼ c. unsalted butter, melted
3 large eggs
1 t. vanilla extract
 

1 t. bourbon flavoring

¼ t. salt
2 c. pecan halves
2 c. semi sweet chocolate chips


Preheat oven to 350° F. Spray a 9” x 13” baking pan with PAM. Line with aluminum foil allowing 2 inches to hang over either end for easy removal of cookie slab.

CRUST: In the work bowl of a food processor combine crumbs, butter, sugar, and egg white, pulsing until combined. Press into the bottom of the prepared pan. Bake for 12 minutes; cool completely.

FILLING: In a large mixing bowl, whisk together sugar, corn syrups, butter, eggs, vanilla, bourbon flavoring, and salt. Fold in pecans and chocolate chips. Pour mixture over prepared crust.

Bake until center is set, 30 to 40 minutes. Allow to cool 15 minutes before removing from the pan. Cut into squares. Makes 24.

*7 whole crackers equal one cup of crumbs.


Thursday, April 29, 2021

Kiwano Salsa Verde

This post contains affiliate links. 

This salsa verde is different from any that you have tasted before. It’s comprised of a variety of roasted vegetables, and one surprise ingredient: the Kiwano horned melon. If you’re unfamiliar with this fruit, you’re not alone. Once it was only grown in New Zealand, but now it is also grown in California, and made available by Melissa’s Produce.

They are seedy and mild in flavor with a taste of cucumber, melon, and lime. It will add a brightness to your salsa verde that will have your guests wondering why yours tastes so much better than theirs. You can introduce them to this colorful and spiky melon by using the scooped out halves as serving dishes. Turn something ordinary into extraordinary.

Kiwano Salsa Verde

2 lbs. Melissa’s tomatillos, husked
2 Melissa’s shallots, peeled
1 large Melissa’s jalapeño
3 cloves garlic
1 small bunch cilantro
Pulp from 1 Melissa’s Kiwano Melon
½ - 1 t. cumin
Salt and pepper to taste

Turn the broiler on in your oven and move the rack as high as it will go while you prepare your ingredients. Line a jelly roll pan with aluminum foil. Place husked tomatillos, shallots, jalapeño, and garlic onto the pan, and roast until charred, turning vegetables to be sure they are charred evenly.

Place roasted vegetables, all remaining ingredients, and pan juices into the work bowl of a food processor, and pulse until saucy. Taste for seasoning adding more salt, pepper, and cumin, if desired.


Wednesday, April 28, 2021

Sausage and Pepper Pasta

This post contains affiliate links.

The late Mr. O-P was an excellent cook. I really miss the days when someone made a nice meal for me. Jim’s specialty was salmon as well as all types of Italian food. He made a mean sausage and pepper sandwich that I can still taste to this day. I had a hankering for them the other day, but not having bread on hand decided to try something different. Instead of the bread, I decided to toss it with cooked pasta. I think he would have approved.

Sausage and Pepper Pasta

3 links Italian sausage, sliced into ½” diagonals
1 T. olive oil
1 red pepper (or orange or yellow or a combination of all three), thinly sliced
1 3-oz. pkg. Melissa’s shallots, sliced
Pinch red pepper flakes
6 oz. cavatappi pasta
1 32-oz. jar of pasta sauce
1/8 t. dried basil
1/8 t. dried oregano
Salt and pepper to taste
Few gratings of Parmesan cheese

Put a large pot of water on to boil for the pasta.

Heat olive oil in a 12-inch skillet over medium high heat. Add sausage to the hot skillet and cook, stirring until it begins to brown. Add bell pepper and shallots, reduce heat slightly, and cook, stirring, until the peppers are tender, 15 to 20 minutes. Stir in hot pepper flakes, pasta sauce, basil, oregano, and salt and pepper to taste.

Cover and reduce heat to low. Allow sauce to simmer until the pasta has finished cooking.

When the water has come to a boil, add pasta and cook according to package directions. Drain pasta reserving ½ cup pasta water. Stir pasta and pasta water into pasta sauce. Cook until heated through. Serve topped with a few gratings of Parmesan cheese.

Amply serves four.


Monday, April 26, 2021

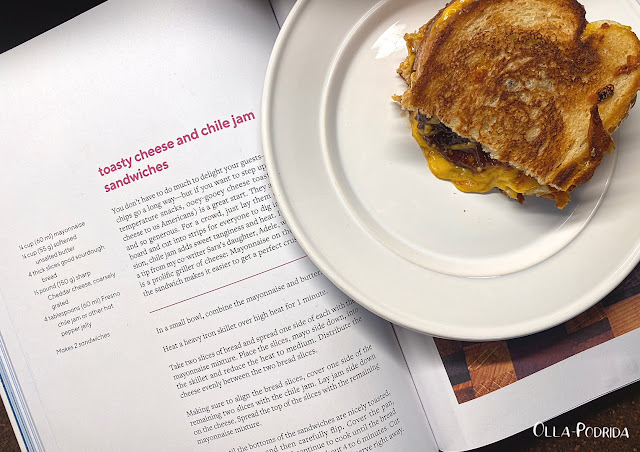
Toasty Cheese and Chile Jam Sandwiches

This post contains affiliate links.

Acclaimed chef, restaurateur, and artist Renee Erickson and I have a good bit in common in that we share favorite places in the world – Rome, Paris, Normandy, and London, to name a few. Her new book, Getaway: Food and Drink to Transport You, available on April 27 from Abrams Books, is a travelogue, guidebook, and cookbook, so you can revisit your favorite destinations, and the food that you consumed there.

I tend to be fairly easy to please. Having spent, all told, nearly a year in England, I found that I really missed the cheese and pickle sandwiches. Erickson’s version is grilled and very delicious. Toasty Cheese and Chile Jam Sandwiches are easy to put together, and sure to be loved by all you plan to serve; this is a taste of England in your own kitchen. 

Toasty Cheese and Chile Jam Sandwiches

1/4 c. mayonnaise
1/4 c. softened unsalted butter
4 thick slices good sourdough bread
1/3 lb. sharp cheddar cheese, coarsely grated
4 T. Fresno chile jam or other hot pepper jelly*

In a small bowl, combine the mayonnaise and butter.

Heat a heavy iron skillet over high heat for one minute.

Take two slices of bread and spread one side of each with the mayonnaise mixture. Place the slices, mayo side down, into the skillet and reduce the heat to medium. Distribute the cheese evenly between the two bread slices.

Making sure to align the bread slices, cover one side of the remaining two slices with the chile jam. Lay jam side down on the cheese. Spread the top of the slices with the remaining mayonnaise mixture.

Cook until the bottoms of the sandwiches are nicely toasted, about four minutes, and then carefully flip. Cover the pan, reduce the heat to low, and continue to cook until the bread is toasted and the cheese is melted, about 4-6 minutes. Cut into halves or slender pieces for sharing and serve right away.

*I made this twice, once with Branston pickle and another time with my mother’s homemade chili sauce. Both were equally good.


 I received a complimentary copy of this book from Abrams Books as a member of their Abrams Dinner Party program.

Friday, April 23, 2021

Pistachio Pesto

This post contains affiliate links.

 I had some pistachios left over from the Pistachio Dream Pie and wanted to put them to particularly good use because those things don’t come cheap. I was in the mood for pesto so figured, why not use them instead of my usual walnuts or pine nuts? I was also low on fresh basil, so made up for it with baby spinach. This is a winner! I saved some of the crushed pistachios to sprinkle on top, gave it a bit of a squirt of fresh lemon juice, and it was some of the best pesto that I have ever eaten.

 Pistachio Pesto

 1/3 c . shelled pistachios
2 cloves of garlic
½ c. grated Parmesan
1 c. packed fresh basil
1 c. packed fresh baby spinach
¾ c.
olive oil

 Place all ingredients into the work bowl of a food processor and pulse until a paste forms. If the pesto looks a bit dry just add some more oil. Keeps in the fridge for 2 weeks. Freezes beautifully.


Thursday, April 22, 2021

Pistachio Dream Pie

This post contains affiliate links.

When I first set up housekeeping, straight out of college, I got my first job as a lowly file clerk. The department was made up primarily of women, all of them older than my parents. An only child, raised around adults, I tended to gravitate toward older people, and really enjoyed talking to these women from whom I learned a great deal. They had a vast amount of experience in cooking and baking, and would often share simple recipes with me. One woman in particular, Genevieve Dienstbach (now long gone), gave me this easy, but crowd pleasing dessert. I made it a lot in the 70s and 80s, and then forgot about it until I was rummaging around in my old recipe box, and found it at the bottom in a crumpled wad. I smoothed it out as well as I could and made it. It’s not fancy, but it is good, simple, comforting, and brought back a lot of memories.

Pistachio Dream Pie

Crust
½ c. (1 stick) unsalted butter, softened
1 c. flour
½ c. chopped pecans

Bottom layer
1 8-oz. pkg. cream cheese, room temperature
1 c. sugar
1 8-oz. container Cool Whip, thawed

Middle Layer
2 3.4-oz. pkgs. instant pistachio pudding
2 ½ c. milk

Top Layer
1 8-oz. container Cool Whip, thawed
1/3 c. chopped pistachios

Preheat oven to 350° F.

In a medium-size bowl, beat together all of the crust ingredients until a smooth dough forms. Spread into the bottom of a 9” x 9” glass baking dish. Bake for 22-25 minutes, until lightly browned. Cool completely.

Beat the cream cheese and sugar together until smooth and creamy, about 2 minutes. Fold the Cool Whip into the cream cheese mixture until combined; spread over cooled crust.

In another bowl, beat the milk and pudding on low speed for 30 seconds, and then increase the speed to medium-high and continue beating for 2 additional minutes. Spread the pudding mixture over the cream cheese layer.

Spread the Cool Whip over the pudding layer and sprinkle with chopped pistachios.

Cover loosely with plastic wrap and refrigerate for at least four hours, preferably overnight.


Friday, April 16, 2021

Pimiento Cheese & Ham Casserole

This post contains affiliate links.

I probably should have designated this week “Ham Week” because I seem to have spent it focusing on using up that half ham that I got for Easter. It wasn’t a big ham, but when you’re serving so few people, it does tend to go a long way. This recipe is pure comfort food. It’s based upon a recipe that my mother used to make when I was a kid, and I always loved it. Who doesn’t love ham, potatoes, and cheese? I felt the original version was a little bland, so I kicked it up with some spice, roasted red peppers, and pickled jalapeños. My pimiento cheese version is a weekday winner.


Pimiento Cheese & Ham Casserole

2 T. butter
½ c. chopped scallions
1 clove garlic, minced
½ c. chopped
Melissa’s Roasted Red Peppers
1 Melissa’s Pickled Jalapeño, seeded and chopped
1 T. flour
½ t.
dry mustard
¼ t. seasoned salt
1½ c. whole milk
2 c. grated sharp cheddar cheese, divided
2 T. mayonnaise
3 c. cubed russet potatoes, cooked
2 c. cubed cooked ham
1 T. melted butter
½ c.
Panko breadcrumbs
Pinch of smoked paprika

Preheat oven to 350° F. Spray a
1½-quart casserole dish with PAM; set aside.

In a
12-inch skillet over medium high heat, melt butter. Sauté scallions in the butter until soft, 2 to 3 minutes. Stir in garlic and cook for 30 seconds. Stir in roasted red peppers and jalapeño, and cook 1 to 2 minutes until the jalapeño has softened. Sprinkle flour over vegetables and stir in; add dry mustard and seasoned salt and cook an additional 2 minutes. Gradually add milk, stirring to blend. Reduce heat to medium low and simmer to thicken slightly. Add 1½ cup of the cheese and mayo and stir until cheese is melted. Add remaining ingredients, stirring to coat. Turn into prepared casserole dish. In a small bowl toss the melted butter with the Panko crumbs and remaining ½ cup cheese, and sprinkle evenly over the top of the casserole. Sprinkle paprika overall. Bake for 30-35 minutes until hot and bubbly. If the crumbs haven’t toasted, run under the broiler for a few minutes until they do.


Wednesday, April 14, 2021

Deviled Ham Cheese Ball

This post contains affiliate links.


Remember that deviled ham that I made earlier in the week? It was delicious, but it was a lot. After I enjoyed it on crackers, bagels, and a sandwich, I’d pretty much had enough. Then, I stumbled upon an ancient recipe cut from a newspaper from days gone by. It was so yellowed and crackly that I was lucky to be able to read it. It was for a Deviled Ham Cheese Ball. Think about that for a minute. The zippy tastiness of deviled ham and the creamy deliciousness of a cheese ball, all in one. I had to try it, and am I ever glad that I did. This is the best, most flavorful cheese ball I have ever eaten. Coating it with Melissa’s Green Hatch Pepper Pecans instead of plain ones (that you are welcome to use if spicy bothers you) took this over the top! Give it a try; you know you want some.
 

Deviled Ham Cheese Ball

1 c. deviled ham salad
1 8-oz. pkg. cream cheese, room temperature
1 8-oz. pkg. shredded cheddar cheese
1 sm. Melissa’s shallot, finely minced
1 T. dried parsley flakes
1 T. fresh lemon juice
1 t. Liquid Smoke
1/2 t. celery salt
1/2 t. garlic powder
1/2 c. ground Melissa’s Green Hatch Pepper Pecans

In a medium mixing bowl combine all ingredients EXCEPT nuts. Chill until slightly firm. Form into a ball, roll in nuts, and wrap in plastic wrap to store in the refrigerator several hours or overnight. Serve with crackers.


Tuesday, April 13, 2021

The Unofficial Aldi Cookbook, Reviewed

This post contains affiliate links.

 I don’t think I ever appreciated Aldi as much as I did during the pandemic, when I found myself, for the first time ever, grocery shopping online. I was amazed at all of the items this rather small, unassuming store carried that I had never noticed in the past. If you’ve not been to Aldi, you need to give it a look, and make that look a careful one because you will be astounded by all that you see. Once you become a diehard Aldi shopper, as I have, then you need to investigate this delightful cookbook, that contains easy-to-prepare recipes to put all of your wonderful Aldi items to good use.

 The Unofficial Aldi Cookbook, Delicious Recipes Made with Fan Favorites from the Award-Winning Grocery Store by “certified Aldi nerd” Jeanette Hurt, is an absolute delight, and must have for Aldi aficionados. It is loaded with mouthwatering photos and easy to prepare recipes to suit every taste. Each recipe features at least one (generally more) Aldi product, and is written in clear and concise fashion. Seasoned cooks and novices alike will find this book of value.

While it lacks an index, it makes up for it with a comprehensive table of contents featuring the location of every recipe, and divided into five different categories: Beverages; Sides, Appetizers, and Soups; Breakfast; Entrées; and Desserts.

Recipes include dishes for every day fare — Swiss Steak and Tamale Pie — as well as those you can serve to company — Baked Salmon with Dijon Parmesan Sauce. There is even a section instructing in charcuterie, with a guide on how to create the basic cheese plate, or a stepped up version.

Desserts are certainly not lacking. Offerings range from an easy and delicious Cannoli Dip, to the more complex Chocolate Peanut Butter Ice Cream Pie, to the whimsical Poop Emoji Cupcakes with Milk Chocolate Frosting that younger members of the family will no doubt adore (and they look darned tasty, too!). Not only does this book need to be amongst the other books in your kitchen library (mine is in my “cult collection“), but imagine what a delightful gift it would make when placed in a basket full of Aldi products. I can envision this for Mother’s Day, as a housewarming gift, to welcome a new neighbor, or a new married couple.

Recommended. You can buy your copy here.


Disclaimer: I received a complimentary copy of this book from the publisher in exchange for an honest review.


Monday, April 12, 2021

Deviled Ham Salad

This post contains affiliate links. 

I discovered Lisa Fain via her Homesick Texan blog, and was immediately sucked in. Thereafter, she further delighted me with the publication of three books: Queso!, The Homesick Texan Cookbook, and The Homesick Texan’s Family Table, all of which I recommend. We seem to have similar ideas about food — we like it hearty, tasty, and with a bit of a kick. This recipe for deviled ham spread is based upon hers. The difference between her recipe and mine is that I prefer shallots to onions, like my red peppers roasted, and my jalapeños pickled, hence the difference in flavor here. I have been eating deviled ham since I was a child, so I consider myself a bit of an expert. I think this is the best recipe you’ll find. If, like me, you have some Easter, this is a way to put it to excellent use.

Deviled Ham Salad
Adapted from Lisa Fain

2 c. chopped ham
¼ c. diced Melissa’s Fire Roasted Red Peppers
¼ c. diced Melissa’s shallots
1 large dill pickle, diced
1 Melissa’s pickled jalapeño, seeded, stemmed, and diced
3 T. Duke’s mayonnaise
3 T. yellow mustard
1 t. pickle juice
Kosher salt
Freshly ground black pepper

Place all ingredients into the work bowl of your food processor, and process until blended, but not smooth (you’re going to want a bit of texture). Taste and adjust any seasoning, or add more mayonnaise and mustard if you’d like. Keeps in the refrigerator for a few days.


Friday, April 9, 2021

Honey Cornbread

This post contains affiliate links.

I found a recipe in my mother’s recipe box for Honey Cornbread. It was her “go to“ recipe for cornbread, and my dad's favorite. The problem was, at least for those of us who love to slather on copious amounts of butter and marmalade, is that it always tended to be a bit too crumbly. So I went to work on this. I reduced the amount of cornmeal (the reason for crumbly cornbread), and increased the amount of flour. Perfect!

 This cornbread is a wonderful accompaniment to a bowl of Slow Cooked Pinto Beans, Red Beans and Rice, or, Overnight Slow Cooked Pinto Beans and Rice. It is easy to put together, has a touch of sweetness (I know that cornbread purists cringe at that, but I like it), and is improved with a schmear of butter while warm from the oven.

Honey Cornbread

 1¼ c. flour

¾ c. yellow cornmeal

¼ c. sugar

1 T. baking powder

½ t. salt

2 extra large eggs, room temperature

1 c. heavy whipping cream

¼ c. vegetable oil

¼ c. honey

 Preheat oven to 400°F. Spray a 9" x 9" baking pan with Baker’s Joy; set aside.

 In a small mixing bowl combine flour, cornmeal, sugar, baking powder, and salt. In a small bowl, beat the eggs. Add cream, oil, and honey; beat well. Stir into the dry ingredients just until moistened. Pour into prepared pan.

 Bake for 20-25 minutes or until a toothpick inserted in the center comes out clean. Serve warm.


Thursday, April 8, 2021

Overnight Slow Cooked Pinto Beans and Rice

This post contains affiliate links.

 My pantry is a disaster; it’s really starting to irritate me. The other day I thought I’d split my lip when a big Tupperware container fell down from the top shelf and hit me in the face. I figured it was time to get serious about organization, so I started pulling things out to take stock of what I had. For whatever reason, I uncovered an embarrassingly large supply of dried pinto beans. Time to put them to use, I told myself.


  This recipe is a combination of the slow cooked pinto beans I made last year as well as red beans and rice that I made earlier this year (sans meat). It’s easy to put together and cooks while you sleep, so upon arising, it’s ready for whatever meal you plan to use it. 


  Replace the chicken stock with vegetable stock or water, and you have a vegetarian meal. It’s a great dish to eat on its own, as a side dish, or when use as an ingredients in burritos. It is versatile, nutritious, and freezes beautifully.


 Overnight Slow Cooked Pinto Beans and Rice

1 1-lb. bag dried pinto beans*
1 green pepper, diced
1 3-oz. pkg.
Melissa’s shallots, sliced
3 medium cloves garlic, minced
2 ½ t. Kosher salt
½ t. pepper
1 t.
garlic powder

1 T. chili powder
½ t. cumin
½ t. oregano

7-8 c. chicken stock**

½ c. uncooked basmati rice


Rinse and drain the beans, discard any dirt clumps or rocks. Place into a 5-quart slow cooker. Add the green pepper, shallots, garlic, salt, pepper, garlic powder, chili powder, cumin, and oregano. Cover beans with chicken stock to 2 inches above them. Cover and cook on low overnight (10-12 hours). Do not open the lid while they cook or they will not get tender.

When you get up in the morning, add the rice and cook for another hour.

Serve topped with garnishes of your choice such as sour cream, chopped jalapeños, chopped scallions, chopped tomatoes, or grated cheese.

Serve with
Honey Cornbread.

* There is no need to soak these, but I soaked mine.

 ** To make vegetarian replace chicken stock with vegetable stock or just use water.


Friday, April 2, 2021

Easter Brunch Tablescape

This post contains affiliate links. 

Am I having company for Easter? No. In fact, I’m still trying to decide what kind of dinner I’m going to have. Part of me feels as though I should be traditional and order a small ham and make an effort. Another part of me really wants some of that delicious fried chicken from the deli. Yet another part of me thinks that, because I’ll probably be watching baseball, why not just have hotdogs? I’m still deciding, and I am easily swayed, so feel free to weigh in with your suggestions.


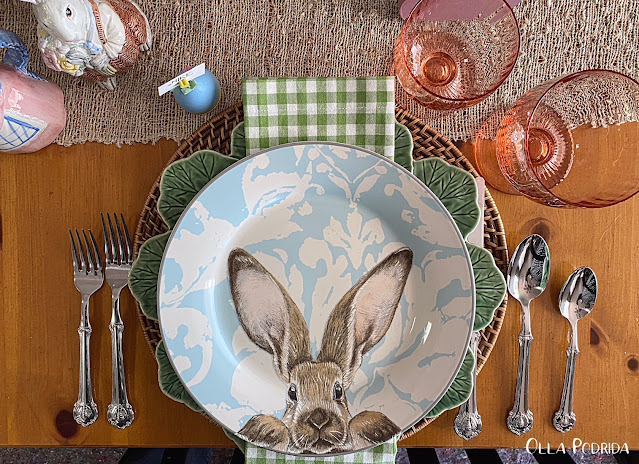
Despite the fact that I’m not having company, I could hardly fail to set an Easter table when I have such adorable Easter dishes. The reality of my situation is that I currently have my trusty remodeler, Joe, here converting my lanai into a conservatory. So this is what the place really looks like. But if we can suspend reality for a moment, this is the table I would have were a serving brunch, and not in the process of remodeling.

The chargers, Bordallo Pinheiro geranium plates, were a gift from a blogger friend. I use these more often than I ever imagined that I would.


The bunny plates I purchased a number of years ago from Williams-Sonoma. That is a purchase I will never regret, I absolutely love them.

The glassware were among my first purchases when I got out of college decades ago (I will not tell you exactly how many decades.) I spotted these at a gift shop at Lake of the Ozarks, and knew that they would pair perfectly with my set of Fitz & Floyd “Coquille” pattern dishes. I was 21 at the time, and already enamored with tableware. Trust me, it’s a sickness!

The little egg place card holders belonged to my mother. Every year she would host a Palm Sunday brunch and press these in the service. I had to use them.

I don’t care how old you get, there is still something magical about an Easter basket, so I had to include this little wooden one. I’ve had it for so long that I honestly can’t remember where I got it.

 The Easter bunny sugar and creamer, also from Fitz & Floyd, are a part of a tea set from my mother. Aren’t they charming? 

The flatware is Napoleon Bee from Wallace, and one of my favorites; the napkins a purchase Pier One, back when they had their brick and mortar stores, and boy, do I miss those stores.

Whatever you plan to do for Easter, make it happy, make it fun, and make an effort.


This post is linked to:

Tablescape Thursday