Friday, May 31, 2024

Coconut Tres Lèche with a Kick

 
I had never heard of a Tres Leche cake until about 15 years ago when my mother and I were dining out, and she ordered it for dessert by mistake. She wasn’t quite sure what to make of it until she tasted it, and then it became one of her favorites. Naturally, because I wanted to please her, I found a recipe and started making it on my own. It’s now one of my favorites as well. I particularly like this one because it employs the use of coconut milk in place of the evaporated milk, coconut itself, and rounding out the trio, coconut rum! This is a wonderfully refreshing cake to enjoy during the summer. It’s light, delicious, and makes you feel as though you are on a tropical getaway.Coconut Tres Lèche with a Kick

 Cake:

1 (15.25- oz) box white cake mix

Ingredients on box to make the cake (oil, egg whites, water)

1 t. coconut extract

½ t. clear vanilla flavoring

½ c. flaked coconut

1 (14- oz) can sweetened condensed milk

1 (15- oz can) Cream of Coconut*

¼ c. coconut rum

 Coconut Cream Cheese Frosting:

8 oz. cream cheese, room temperature

1 c. powdered sugar

1½ c. heavy whipping cream

2 T. coconut rum

½ t. coconut extract

½ c. flaked coconut to garnish, optional

 Preheat oven to 350°F. Spray a 9”x13” baking dish with Baker’s Joy; set aside.

Prepare cake according to package directions, adding in 1 teaspoon coconut extract and ½ teaspoon clear vanilla flavorings with the liquids. Fold ½ cup flaked coconut into batter and then spread into prepared pan.

 Bake according to package directions. Cake is done when an inserted toothpick comes out clean.

 While cake is baking stir together sweetened condensed milk and Cream of Coconut; set aside. When cake is done, poke holes evenly all over the top using a large fork while it’s still hot. Immediately pour sweetened condensed milk mixture evenly on top of cake, and allow cake to cool completely.

 To prepare frosting: In a bowl of a stand mixer fitted with a whisk attachment mix cream cheese and powdered sugar together until smooth. Add in heavy cream and extract and mix on medium-high speed until stiff peaks form. Spread frosting onto cooled cake and garnish with flaked coconut.

 Chill cake for at least 2 hours before serving. Store airtight in the refrigerator for up to 3 days.

 * If you used 2 tablespoons of cream of coconut out of this can to make yourself a delicious Nashville Bushwhacker, that’s not a problem. It works just as well with 13 ounces as it does with 15 ounces.


 As an Amazon Associate I earn from qualifying purchases.


Thursday, May 30, 2024

I Love Lemons Tablescape

 
It doesn’t seem that long ago, but it has been nearly 10 years since I wrote a post about the play food that I used to love as a child, you can read it here. Despite the fact that I haven’t been a child for a longer than I care to admit, I still love play food. Recently, I was shopping at one of my favorite places, The White Hare, when I found this pitcher of lemonade. It was a part of a set that included glasses of lemonade, but they were mason jars, and that wasn’t the look I was going for. I cannot tell you how long I circled this pitcher before I bought it, their 20% off sale justifying the expense. 
Once I got home with it, I knew I had to set a table around it, and that is how this one was born.
 
A pretty tablecloth can make even the simplest table beautiful. This is one of my favorites, because it always says summer to me. 
I kept the antique crystal candleholders from last time, pairing them with a white ironstone pitcher full of yellow Alstroemerias. 
Bordallo Pinheiro geranium leaf chargers.provide a good base for yellow Waechtersbach dinner plates. They are topped with Bordallo Pinheiro Majolica Green Geranium Leaf salad plates on which I have placed a mini wreath (also from The White Hare) and faux lemon.The bubbly green water glasses are Villeroy & Boch; stemmed juice glasses were inherited from a family friend. 
One of my favorite sets of salt and pepper shakers is this cut lemon pair, adding a touch of whimsy.
  Flatware, that I get a lot of use out of, is Flatware is vintage Noritake Primastone.

 
I hope this table brightened you day.

 As an Amazon Associate I earn from qualifying purchases.

This post is linked to: Tablescape Thursday


Tuesday, May 28, 2024

German Green Beans

 
Last week I posted a recipe for Kielbasa and Sauerkraut, stating that it goes well with German Green Beans. I honestly thought that I had a recipe for German Green Beans here on the blog, but seeing that I don’t, I thought it would be wise to share it today. These go exceptionally well with sausages, pork chops, or any kind of barbecue, and are always a big hit.
German Green Beans

 4 slices bacon

1 medium onion, quartered and sliced

2 T. flour

4 T. dark brown sugar

dry mustard

1 t. kosher salt

¼ t. pepper

½ c. cider vinegar 

2 lbs. Melissa’s fresh green beans

Place cleaned and trimmed green beans into a large pot and fill with water. Add 1 tablespoon salt. Bring a boil, and boil for 8 to 10 minutes until desired tenderness is reached. Drain and set aside.

While the green beans are cooking, fry the bacon in a large skillet until crisp, drain on paper towels, leaving the fat in the pan. Crumble bacon; set aside.

Add the onion to the hot fat, and cook until light golden and tender. Stir in the flour and cook for about 1 minute. Add the sugar, dry mustard, salt, pepper, vinegar, and water; stir, and bring to a rolling boil. Allow to boil for 1-2 minutes to thicken the sauce. Add half of the crumbled bacon and the green beans, and cook until heated through, 4-5 minutes.

Transfer to a serving bowl and top with remaining crumbled bacon.

Feel free to add more vinegar and/or brown sugar to suit your taste.

As an Amazon Associate I earn from qualifying purchases.


Monday, May 27, 2024

Beef Burgers with Bourbon Mushrooms

 
I love a good burger, and have always lamented the fact that, in order to get one, I had to go out for it, because burgers in restaurants always taste better than those that I make at home. Until now. This recipe is an adaptation from one I found in a local publication, Sauce Magazine back in 2016. I amped up the seasoning, increased the amount of bourbon ever so slightly, and the result was phenomenal. If you love burgers, the way that I do, you need to add this recipe to your burger repertoire.
Beef Burgers with Bourbon Mushrooms

1 lb. ground chuck 

4 strips bacon, cooked and minced 

2 T. Worcestershire sauce

1 t. freshly ground black pepper

Brown Sugar Bourbon seasoning

1 lb. crimini mushrooms, thinly sliced

¾ c. bourbon

Kosher salt, to taste

4 slices white cheddar

4 brioche buns, toasted

In a large bowl, mix together beef, bacon, Worcestershire sauce, pepper, and Brown Sugar Bourbon seasoning. Divide into 4 even portions, form into 1-inch thick patties; set aside.

 In a 12” skillet over medium heat, melt butter. Add mushrooms and sauté until the mushrooms are golden-brown, 7 to 10 minutes. Add the bourbon and cook until the liquid is reduced by half, 4 to 5 minutes. Season to taste with salt and pepper. Transfer to a bowl and cover.

 Increase the heat to medium-high, add the remaining 4 tablespoons butter, and cook until butter becomes deep golden-brown, about 5 minutes. Add the patties and cook until seared and cooked through, 3 to 4 minutes per side for medium doneness.

 Divide the cheese between the patties and cover the skillet. When the cheese has melted, place the patties on the toasted buns and top each with the bourbon mushrooms.

   As an Amazon Associate I earn from qualifying purchases.

Sunday, May 26, 2024

Betty Crocker Found Recipes, Reviewed


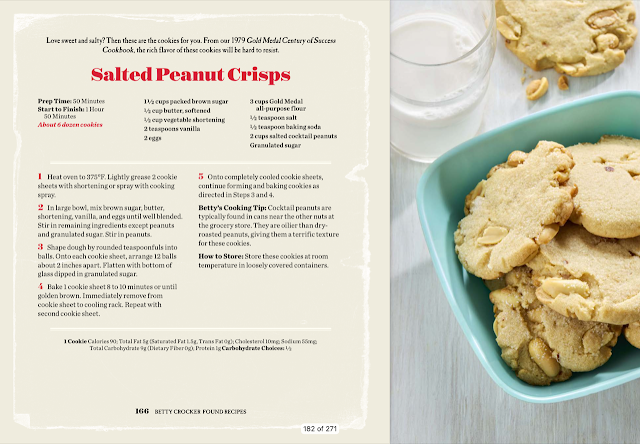
 When we read books of various kinds, if the author is a good one, feelings are evoked. I don’t think I have felt quite so warm and snugly while reading a book as I did while reading this one. Betty Crocker Found Recipes (scheduled for publication November 26th, so plan ahead) is an absolute delight for anyone who remembers her early cookbooks, magazine advertisements, and other bits of ephemera that would feature recipes of one kind or other. Paging through, I remembered meals that my grandmother used to make employing the use these old recipes. Seeing them all in this book, with beautiful photographs to accompany them, made me feel so loved. I know that sounds strange when talking about a cookbook, but that is how I felt. 

From beginning to end, this cookbook is an absolute delight. It is a collection of “found” recipes from the past. They have been re-created with modern kitchens in mind, and all placed into this one book. In addition to re-creating lost recipes, consumers who helped participate in the making of this book described favorite dishes they remembered from their past but for which they had no recipe, and using that descriptive information, Betty Crocker created replicas. I guarantee that you will find many old friends while paging through this book. I was amazed at how many memories came to mind while looking at these recipes. Suddenly, I was transported decades into the past sitting beside family members, now gone, enjoying Sunday dinner at grandma’s table.The book is divided into five sections:

Holiday Celebrations
Memorable Main Dishes
Warm from the Oven Breads
Irresistible Cookies and Bars
Better than Desserts
 

The origins of the recipes are mentioned in a blurb proceeding each one, something I found as fascinating as the recipes themselves. The old advertisements peppered throughout the book were both a visual and nostalgic delight. Also included are individual cook’s (fan's) memories of the recipes that they had requested be included in the book.


If anything is lacking, it’s the absence of vegetable recipes. I happen to like vegetables a great deal, so was disappointed not to see any vegetable recipes contained within.This cookbook is unique, a joy to page through, and no doubt pure delight to cook from. I cannot recommend this highly enough. Young people will appreciate the recipes for their ease, variety, and failing to employee ingredients that are hard to find. Older people are going to love looking back to when they themselves made these recipes, and enjoyed sharing the results with their families.

 Many thanks to NetGalley, publisher Harvest Books, and Betty Crocker for providing me with an advanced digital copy in exchange for an honest review.

As an Amazon Associate I earn from qualifying purchases.


Friday, May 24, 2024

Kielbasa and Sauerkraut

 
Sometimes I just want peasant food. Simple ingredients and relatively few of them, quick and easy prep, one pan, and done. Dishes like this, I find, are great fun when served right out of the skillet from the center of the table. I found this paired particularly well with a side of German green beans. It’s also good mounded in a hoagie roll and served with a glass of hard cider or ale. Kielbasa and Sauerkraut

Adapted from thekitchn.com

 ½ large red onion

1 lb. sauerkraut

14-oz. kielbasa, sliced into 1/2” rounds

1 T. butter

1 T. vegetable oil

2 T. packed dark brown sugar

1 T.  spicy brown mustard

Freshly ground black pepper

Chopped scallions, for garnish

Thinly slice 1/2 large red onion (use a mandoline, if possible). Drain 1-pound sauerkraut.

 Heat butter and oil in a large skillet over medium heat until the butter is melted and the oil is shimmering. Add the kielbasa in an even layer. Cook until browned on the bottom, about 3 minutes. Flip and cook until browned on the second side, about 3 minutes more. Transfer to a bowl or plate using tongs or a slotted spoon, leaving the fat in the skillet.

Cook, stirring constantly, until the sauerkraut is heated through and onion is softened, 5 to 8 minutes. Taste and season with freshly ground black pepper as needed.

Return the kielbasa to the skillet and toss to combine. Garnish with chopped scallions.

As an Amazon Associate I earn from qualifying purchases.

Thursday, May 23, 2024

Italian Cream Cheese Stuffed Celery


 It may sound strange, but stuffed celery is always something that I go for when it’s on a snack tray or a part of a buffet. There is something about the cool crispness of the celery combined with the pungency of the cheese that I find wonderfully satisfying. This recipe for Italian cream cheese stuffed celery is not my own, but one I just had to try for the ease if nothing else. It was lacking in freshly ground black pepper, so I added a hefty amount of that, and thought that made it absolutely perfect. With warm days ahead, this refreshing snack will be welcome.

Italian Cream Cheese Stuffed Celery

Slightly adapted from plainchicken.com

6 or 7 stalks of celery, rinsed and dried

1 (8-oz) block cream cheese, softened

1 (0.60-oz) package Italian dressing mix

½ c. Duke’s mayonnaise

1 cup shredded mozzarella cheese

Freshly ground black pepper, to taste

 Cut each celery stalk into three pieces. Set aside.

Combine cream cheese, Italian dressing mix, mayonnaise, and mozzarella cheese. Stuff celery with cream cheese mixture.

 Garnish celery with dried parsley and paprika, if desired. Refrigerate until ready to serve.

As an Amazon Associate I earn from qualifying purchases. 


Wednesday, May 22, 2024

Deck Gardening 2024

 
What I have learned from decades of talking to gardeners is that whether you have acreage, or a single pot, every spring brings with it hope for a great harvest. Last year was one of my absolute worst. I decided that it would be a good idea to install a drip irrigation system in the container garden that I keep on my deck. Unfortunately, I didn’t have the water pressure to cover all of the pots equally, so some overflowed, and the plants rotted, others didn’t get enough water and they dried out. I won’t do that again. Having now removed all of that tubing, and gleefully tossed into the trash, I’m ready to start anew.

  One thing I’m doing differently this year than I did last is to try raised bed gardening. You don’t have to garden on the ground in order to have a raised bed, you can get a trough planter like this one to raise things up, making it much easier to deal with when it comes to watering, weeding, and harvesting. I’m quite excited about this. I’ve really just starting planting in zone 6B where I live, but I will say that I did plant potatoes on March 17 as I used to do with my dad when I was a little girl, and they are doing well, although in very early stages.Shortly after I planted the potatoes, I decided to not waste a garlic bulb that had sprouted, so I separated the cloves and planted them in my trough garden that will end up being a salsa garden if things go well this year. Take a look at them! Can you believe it?  I feared for their safety when we had two cold nights where temperature zipped into the 30s. I had to very carefully cover them up to avoid damage, but I couldn’t be happier with how well they’re growing. Yes, I know that garlic generally needs to be planted in the fall; I don’t know if this is going to be successful or not, but I love the experimentation, and so far so good.

Another thing that I decided to do is to harvest, dry, and plant seeds from organic fruits and vegetables that I buy just to see what happens.  The other day I was enjoying a Charentais melon from Melissa‘s produce, and decided to save and dry some seeds for planting. I’ve never grown melons before, so I’m very eager to see how this works out. Within a week of planting the seeds, a couple of little seedlings poked up their heads, and I couldn’t have been more excited. You wouldn’t believe how fast my heart was beating. I was reluctant to give over too much space to growing melons when I could use it for a guaranteed success like tomatoes, but a little experimentation is good for the soul.

I’m going to try to provide you with an update every month, perhaps twice a month, so you can see how things are growing.

Interestingly enough, petunias self-seeded into one of the house plants that I had moved outside, and I currently have them blooming in a pot along with a kangaroo paw fern, and a Zinnia blossoming in a dracaena pot. Considering that I did not move the dracaena outdoors during the summer, I’m wondering how the heck that zinnia seed managed to get into that pot, but isn’t that half the fun of gardening? 
See you next month with an update.

 As an Amazon Associate I earn from qualifying purchases.

Tuesday, May 21, 2024

Quiche Florentine

 
You’d be hard pressed, I think, to find someone who hasn’t heard of quiche. What was a bit of a rarity when I was a child is now pretty much everywhere. There’s much to like about quiche. It’s inexpensive, can make use of whatever you happen to have in the fridge, can have crust…or not, and can be served cold or hot. I find it’s a wonderful way to use up ingredients of which I may have over bought, and don’t want to see go to waste. That was the inspiration for this quiche, namely, the bag of fresh baby spinach that had gotten shoved to the back of the fridge and forgotten.Florentine Quiche

 1 9-inch pie crust, blind baked*

1 T. olive oil

2 medium Melissa’s shallots, minced

2 cloves garlic, minced

8 oz. shredded cheese, your choice, I used cheddar

3 c. fresh baby spinach

1 T. flour

½ c. whole milk

½ c. heavy cream

4 large eggs, beaten  

fresh nutmeg

 Preheat the oven to 375°F. Blind bake pie crust. Reduce oven temperature to 350°F.

 In a medium saucepan over medium heat, heat the olive. Add garlic and shallots, and sauté until the shallots are transparent, 2-3 minutes. Add spinach and stir gently until cooked down.

In a small dish, take 2 tablespoons of the milk and whisk together with the flour until the flour is dissolved. Combine the slurry with the rest of the milk, heavy cream, and beaten eggs. Whisk to combine and add salt and pepper. Set aside. Layer the vegetables and cheese in the prepared pie crust. Slowly and carefully pour the liquid over top.

 Bake at 350°F for 35-45 minutes until the center of the quiche is cooked through. Use a pie crust shield to prevent the edges from browning too quickly.

*To blind bake a pie crust,place a piece of parchment paper in the bottom of the pie pan on top of your crust. Place pie weights, dried beans, or rice on top of parchment and bake for 12 minutes. Remove from the oven, remove and set aside the weights and parchment paper. Prick the bottom of the pie crust several time with a fork. Return to the oven for another 10 minutes.

As an Amazon Associate I earn from qualifying purchases.