Showing posts with label grilled cheese sandwich. Show all posts

Monday, July 3, 2023

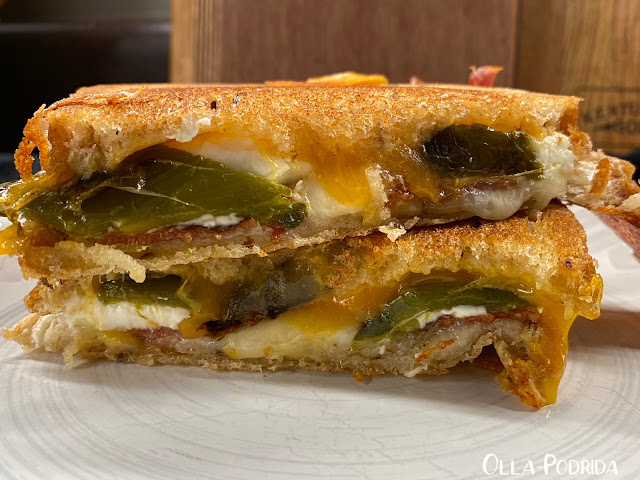
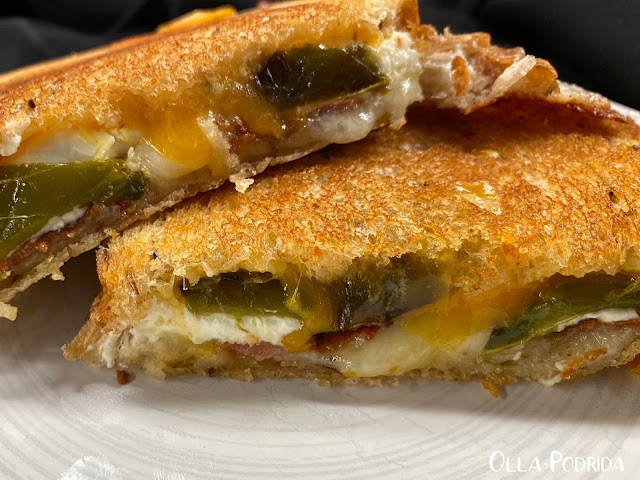
Jalapeño Popper Grilled Cheese

 
If you are as big of a fan of jalapeño peppers, as I am, then you are going to love this clever way to enjoy them in a grilled cheese sandwich. This recipe is from smalltownwoman.com who is clearly a woman after my own heart. While her recipe is designed to serve two, I cut it in half, just made one, and it was sandwich perfection. After having this, I honestly can’t imagine enjoying a grilled cheese without the addition of jalapeños in one form or other. If you like the idea of jalapeño poppers, but jalapeños have too much heat for you that is no problem. Place your fresh jalapeños in a small bowl of water and put it in the fridge. Leave it there for a day or two and the heat will dissipate, leaving only the wonderful flavor of the pepper.

Jalapeño Popper Grilled Cheese

2 jalapeños, sliced lengthwise, seeds and membranes removed

4 oz. cream cheese

4 slices bacon, crispy cooked

2 slices Monterey jack

2 slices sharp cheddar

4 slices Italian bread

Cilantro chopped (optional)

Pats of butter

Preheat oven to 375°F.

 Stuff each jalapeño half with approximately 1 ounce of cream cheese. Bake on a baking sheet for 25-30 minutes. Remove from oven; cool slightly.

 Assemble sandwiches thusly:

Bread

Slice of cheddar

Stuffed jalapeño pieces

Bacon strips

Slice of Monterrey Jack

Bread

 Top each sandwich with several pats of butter. Place in skillet over medium-low heat, butter side down.  Top with more pats of butter. Now grill each side until lightly browned.

 Cheese should be melted and gooey.


Friday, November 20, 2015

Grilled Smoked Gouda and Korean Pear Sandwich


It's Korean Pear season! Are you as excited as I am? You should be. Korean Pears are sweet, juicy, and crunchy, and so are perfect for eating, snacking, and baking. Unlike the more traditional varieties that are either mealy or mushy, and largely insipid, these peel-and-eat fruits are crunchy like an apple, pair (if you'll pardon the pun) nicely with cheeses of all varieties, prove excellent in cooking (you must try this lovely fall pork dish, Pork Tenderloin with Sauteed Korean Pears and Brandy Cream Sauce – delicious!), and make one heck of a tasty addition to a grilled cheese sandwich.

I grew up eating a lot of grilled cheese/tomato soup lunches. I still like the soup-and-sandwich combo, but today mixed things up a bit by serving us each a cup of
broccoli cheese soup and halving a Smoked Gouda and Korean Pear sandwich. The soup had already been prepared, so just needed warming; the sandwich could not have been easier. This recipe makes one large sandwich, perfect for halving and sharing.

Grilled Smoked Gouda 
and Korean Pear Sandwich

2 large slices marble rye
1 tablespoon unsalted butter, softened
1 cup grated smoked Gouda
1
Melissa's Korean pear, peeled, cored, and thinly diced

Spread one side of each slice of marble rye with half of the butter.

Place one slice, butter size down, into a 9” saute pan. Top with half of the shredded cheese, spreading out to cover entire slice. Arrange pear slices evenly on top. Cover pears with remaining cheese. Top with the remaining slice of buttered rye, butter side up. Cover and cook over medium-high heat until cheese starts to get melty and bread browns. Using a spatula, carefully flip bread over to brown the other side. When browned to your liking, remove from pan to cutting board and cut in half. Serve with your favorite soup.
This post is linked to:

Monday, March 25, 2013

Emmentaler on Rye with Sweet & Sour Onions


Grilled cheese sandwiches have been one of my favorite lunches as far back as I can remember.  In my youth, bliss was known as a slab of Velveeta sandwiched between two slices of Wonder Bread. Truth be told, while it’s not often, there are days when I revisit that old favorite just to wax nostalgic about the carefree days when I sat at the kitchen table in my mother’s warm kitchen, munching on a gooey sandwich, swinging my legs back and forth all the while.  These days I look for variety.  I’ve found it in one of my favorite books on the subject, Great Grilled Cheese: 50 Innovative Recipes for Stovetop, Grill, and Sandwich Maker and then I saw this recipe in The Smitten Kitchen Cookbook.  Oh, my!  This sandwich is singular in its deliciousness.  The nutty, melted cheese, paired with the not-too-sweet, not-too-sour onions is a marriage made in heaven.  The onions can be made ahead making this easy to throw together when you want to dazzle someone at lunch.

Emmentaler on Rye with Sweet & Sour Onions

Onions
1 tablespoon olive oil
1 tablespoon unsalted butter
1 large red onion, halved and thinly sliced (about 2 cups)
2 teaspoons brown sugar, light or dark
¼ teaspoon salt, plus more to taste
1 tablespoon balsamic vinegar
Freshly ground black pepper

Sandwiches (Serves 2)
Four
½ inch-thick slices rye bread
2 tablespoons butter, salted or unsalted, softened
¾ cup (about 3 ounces) Emmentaler or another Swiss cheese (I used Gruyere), grated

Cook onions: Heat the olive oil and 1 tablespoon butter in a large skillet over medium-high heat. Add the onion, and sauté for 5 minutes. Add the brown sugar and salt, lower the heat to medium-low, and cook another 10 minutes, stirring occasionally. Add the vinegar, and scrape and stuck onion bits from the bottom of pan with a spoon. Simmer for 1 to 2 minutes, until the onion mixture thickens, and season to taste with black pepper. Cool to lukewarm, or store in an airtight container in the refrigerated until needed, up to 5 days.

Make sandwiches: Generously butter 1 side of each slice of bread. Arrange one slice, buttered side down, on a plate. Spread thickly with jammy onions (about 2 tablespoons per sandwich; you’ll have extra). Sprinkle with half the grated cheese. Arrange a second slice of bread on top of the cheese, buttered side facing up. Repeat with the remaining slices.  Heat a heavy 12-inch skillet to medium-low, or an electric griddle set to 325. Once it’s hot, place the sandwiches on the griddle, and cook them until crisp and deep golden brown, about 5 minutes per side. Slice the sandwiches in half and serve immediately.


This post is linked to:


Friday, November 12, 2010

Crockpot Pulled Pork


Each week I attempt to try at least one new recipe. Thanks to the Internet, my vast selection of cookbooks, magazines, and the newspaper, I have more recipes than I will be able to prepare in a lifetime if I made something different every day. Last night I decided to try one for pork tenderloin. I had thought ahead to thaw the vacuum-sealed tenderloin in the fridge the night before, but was dismayed when I opened the package to find not one, but two of them inside. I'm not sure why they're packaged this way, but, well, they ARE.

This ended up playing into my hands as I used one for the new recipe I'd been wanting to try (Pork Tenderloin with Roasted Apples and Onions) that I found forgettable despite the excellent reviews. The other I threw into the Crockpot to make use of yet another recipe I wanted to try for pulled pork.

Go figure, the easier of the two was the best. It just goes to show you that you can make really delicious food with relatively few ingredients and virtually no effort. Working girls (and guys)? Do you hear me? Easy and good!
 
I found the recipe for the pulled pork here, at Allrecipes, but for the sake of convenience will reproduce it below.

SLOW COOKER PORK TENDERLOIN
Makes 8 servings

1 (2 pound) pork tenderloin
1 (12 fluid ounce) can or bottle root beer
1 (18 ounce) bottle your favorite barbecue sauce
8 hamburger buns, split and lightly toasted

Place the pork tenderloin in a slow cooker; pour the root beer over the meat. Cover and cook on low until well cooked and the pork shreds easily, 6 to 7 hours. Note: the actual length of time may vary according to individual slow cooker. Drain well. Stir in barbecue sauce. Serve over hamburger buns.

Okay, confession time. I used 1 1-lb. pork tenderloin and part of a bottle of Coke, because we didn't have any root beer in the house. I just poured the Coke over the meat until it came a little more than halfway up the side and then poured the rest over a glass of ice and drank it myself!

Once the meat was cooked (and I checked it periodically, pulling at it with a fork until it began to shred), I drained the pork, put it into a mixing bowl,and shredded it with two forks.  Then I added the seasonings I use when I bake a brisket: a few shakes of garlic salt, a few shakes of celery salt, a few shakes of Liquid Smoke -- I LOVE Liquid Smoke! --, and some (but not too much, maybe 1-1/2 teaspoons) Worcestershire Sauce. On top of this I poured about half a bottle of Sweet Baby Ray's barbecue sauce and kept mixing until I liked the consistency.
Add additional barbecue sauce to your own taste.

This recipe is a keeper!


Wednesday, October 27, 2010

Cream of Tomato Soup

 The first soup I remember liking was Campbell's Cream of Tomato.  I don't know if it was the soup, or the toasted cheese sandwich that accompanied it that made it so appealing, but it was one lunch I always enjoyed in my youth, and still do today. It represents a combination of comfort and nostalgia that, as I get older, turn to again and again. These days the soup has become more sophisticated as have the cheese sandwiches, and yet there are days when I yearn for the uncomplicated and that's when I make this delicious and amazingly easy soup. The recipe is pictured below in the handwriting of an old friend.* This makes four nice servings. I caramelized the onions instead of just sauteing them. The soup relies heavily on the garnishes so do not omit them!


*If you find the photo hard to read, see below.

Cream of Tomato Soup

1 #303 can Italian chopped tomatoes (see below)
1 #303 can tomato sauce (see below)
1 cup Half 'n Half
2 teaspoons sugar
Salt & Pepper

Combine all ingredients and heat thoroughly; do not boil.

Garnish:
6 slices crumbled bacon
1/2 cup sautéed onions
1/2 cup sharp cheddar cheese, grated

NOTE: Can sizes used to be designated by number. Approximately 16-17 oz. make up what used to be known as a 303 can. This will be about 2 cups.