Wednesday, August 31, 2022

Saying Goodbye to Summer Tablescape

Throughout the summer, my tables have been in rather quiet neutrals, so I thought I would end my summer of tablescapes with lots of color. Orange, yellow, blue, and green all combine to make this a very splashy and fun table.

The tablecloth is the star here and it is by Tommy Bahama. I believe it’s in the “Tortuga” pattern. On top of it I used water hyacinth placemats to give it that beachy vibe.

The centerpiece is a white pitcher full of orange alstroemeria. I felt quite fortunate to be able to find this lovely orange bunch when I was at the grocery store. I had to dig around because it was way in the back, but I was very pleased with myself for my efforts.


The yellow goblets you have seen many times, they first belonged to my mother, and then they belonged to me. I do believe my mother was sorry that she ever gave them to me, but she never out rightly said so.

The yellow flatware by Noritake was hers as well; it pairs beautifully with the goblets.


I generally don’t get my carrot soup/salad/fruit bowls out at any other time of the year than Easter, but I thought they really deserved a place here with their vibrant orange color, and summer feel.

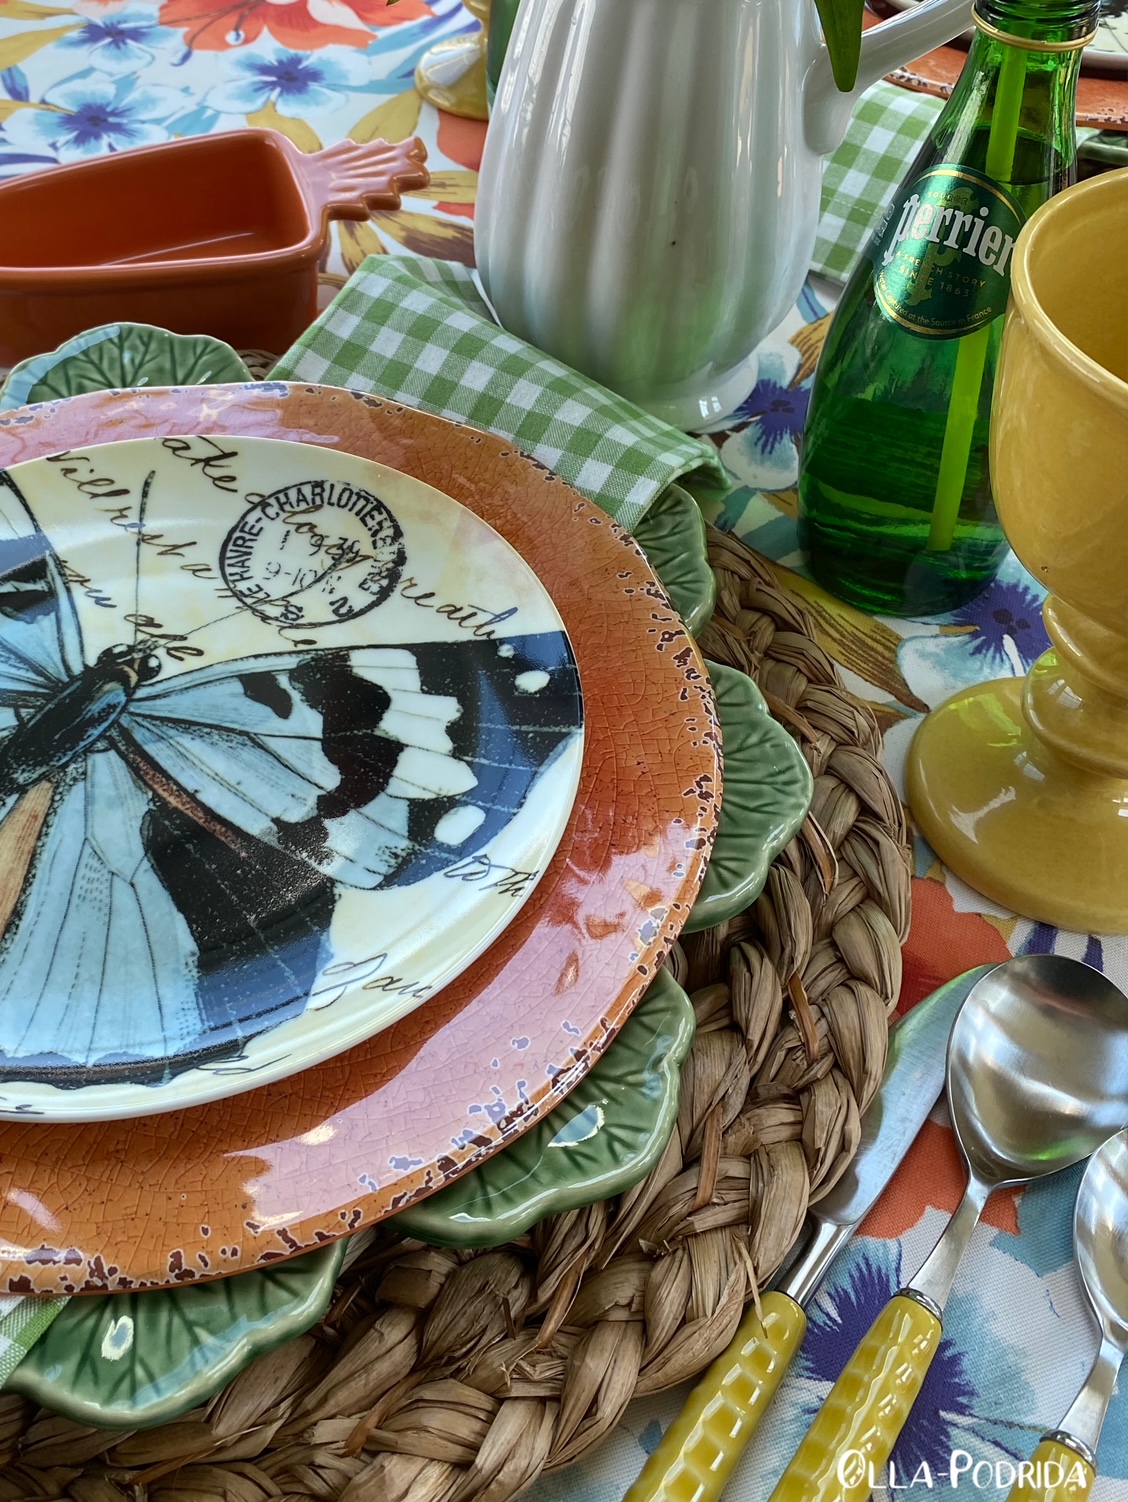
The base of the plate stack is Bordallo Pinheiro geranium leaf chargers. The rustic orange melamine dinner plates are from Williams-Sonoma. The salad plates on top are from Pottery Barn in the “Coastal Curiosity” pattern. The green charger plates beneath belonged to my mother. I don’t know where she got them, and the bottom only says “Italy.” The green gingham napkins are from Pottery Barn as well.


I know I am not the only one who’s looking forward to fall. I’m in the process of swapping out summer tableware for fall tableware. Stay tuned for more tables!


As an Amazon Associate I earn from qualifying purchases.

 This post is linked to: Tablescape Thursday

Tuesday, August 30, 2022

Andalusian Gazpacho

Do you ever have recipes that you seem to favor over others, and that you make again and again? That’s how it used to be with gazpacho and me. I have always been an avid grower of tomatoes, peppers, and cucumbers, and there is nothing better when you’re overloaded with this kind of produce than a bowl of gazpacho. Over the last number of years, for whatever reason, I stopped making it. It wasn’t until I was paging through the lovely (and free) My French Country Home online magazine that I was introduced to it again, Andalusian style. I have always considered gazpacho to be a spoonful of summer, and with this recipe I have once again been proved right.

Andalusian Gazpacho

 6 ripe red tomatoes

2 small red peppers

1 cucumber

2 scallions

1 garlic clove

Generous ½ c. olive oil, extra 4 T. for serving

2 T. red wine vinegar

1 small glass water

2 drops Tabasco

Salt and freshly ground black pepper to taste

8 slices toasted bread, rubbed with fresh garlic

 Peel and seed tomatoes and peppers, saving one of the tomatoes and half of a bell pepper to decorate.

 Peel the cucumber saving a 2½” portion for later.

 Remove the roots from the scallions and set aside; peel the garlic.

 Place all of the ingredients into the work bowl of a food processor. Pulse to combine. Continue to pulse until desired texture is reached. Chill for one hour.

 In the meantime, dice the tomato, pepper half, remaining scallion, and cucumber chunk. After gazpacho has sufficiently chilled, ladle it into soup bowls, top it with the chopped vegetables, and serve with the garlic bread.

 Serves 4-6

 As an Amazon Associate I earn from qualifying purchases.


Monday, August 29, 2022

Hearts of Palm and Olive Salad


This is one of those salads that came into being as a result of cleaning out partially used containers in the fridge. I almost added capers to this, but I had too many of them left over to be able to finish that jar. It is a beautiful salad, hearty, and suitable enough for company. The next time you are looking for inspiration, you might consider shopping your fridge. In the meantime, I highly recommend this salad. 

Hearts of Palm and Olive Salad

For vinaigrette:
1/3 c. cider vinegar
½ t. salt
1½ t. sugar
¼ t.
dry mustard
¼ t. freshly ground black pepper
1 t. garlic salt
½ c. vegetable oil

Place all dry ingredients into the bottom of a medium-size mixing bowl in with together until blended. Whisk in vinegar to blend. Slowly add oil in a stream, whisking constantly to emulsify. Store in the refrigerator until ready to use will keep up to a week.

1 14-oz. jar
Melissa’s Hearts of Palm
6 oz. deli ham, cut in julienne strips
¼ c. crumbled feta
1 c.
mixed olives
1 head Romaine lettuce, cleaned and torn

Prepare vinaigrette; set aside. In a medium bowl combine hearts of palm, ham, feta, and mixed olives. Toss with dressing until well coated. Add Romaine lettuce, toss to combine. Serve.


As an Amazon Associate I earn from qualifying purchases.


Friday, August 26, 2022

Pasta Alla Gricia


I mentioned a couple of weeks ago that I watch a lot of Italian television. One of my favorites, as I also mentioned back then, is a series called "Bulletproof Heart." The lead in the series, Bruno Palmieri, played by Gigi Proietti, a retired journalist who dedicated his retirement to solving cold cases, reminded me very much of an Italian version of one of my former English professors who told me that my eventual husband would be the perfect man for me. I found him quite endearing, particularly enjoying the scenes of him in the kitchen. In the final episode of the series he made something called Pasta alla Gricia that I just had to try. He made his version with rigatoni, but upon doing a little bit of investigation I decided to try the New York Times recipe for it using spaghetti. I made sure to enjoy it, as Bruno always did, with a nice glass of wine.
 

 Proietti may not be a name with which you are familiar, but you may have heard him because in addition to be an actor and singer (he released 11 albums), he also appeared in American films including The Appointment (1969), A Wedding (1978), and Who Is Killing the Great Chefs of Europe? (1978).

Proietti was also a voice dubber of films and television shows into the Italian language. He has dubbed the voices of actors such as Robert De NiroSylvester StalloneRichard BurtonRichard HarrisDustin HoffmanPaul NewmanCharlton Heston and Marlon Brando. His credits also include the role of the Genie in the Italian version of the Aladdin film series, and Draco in Dragonheart. He also provided the Italian voice of Gandalf in The Hobbit film series, as well as Sylvester from Looney Tunes during the 1960s.

 In searching to find out if there was a series 4, I came upon the devastating news that this wonderful, charming actor, passed away in 2020 from a heart attack at the age of 80. RIP Gigi, this is for you.

Pasta Alla Gricia

By Mark Bittmann, and seen in The NY Times

 8 oz. guanciale (cured pig’s jowl)*, cut into ¼” pieces

½ t. finely ground black pepper, plus a pinch

¾ lb. tonnarelli or other long pasta like linguine or spaghetti

¼ c. finely grated pecorino Romano

 Cook the guanciale in a large skillet over medium heat until deeply golden (adjust the heat as necessary to render the fat without burning the meat). The meaty parts should be browned and the fatty parts should be cooked but still slightly transparent. This will take 15 to 20 minutes. When it’s done, add the black pepper and turn off the heat.

 Meanwhile, put a pot of salted water on to boil. When the water boils, cook the pasta until it’s al dente, nearly but not quite done and still a bit chalky in the middle.

 When the guanciale has cooled a bit, and while the pasta is cooking, add 3/4 cup of the pasta cooking water to the pan, turn the heat to high and reduce by about half.

 When the pasta is ready, use tongs to transfer it to the pan with the sauce. Stir the pasta as it finishes cooking, adding more pasta cooking water if necessary until the pasta is done and the sauce thick and creamy. Add half the cheese and a pinch of pepper, and stir vigorously to incorporate.

Divide the pasta among four dishes, and dust each with the remaining pecorino.

 *Nope. Not doing it. I used bacon. You can substitute the same, or use pancetta.

As an Amazon Associate I earn from qualifying purchases.


Thursday, August 25, 2022

Artichoke Bread


As I mentioned some time back, one of my favorite salads is a simple one made up of Romaine lettuce, breadcrumbs, red onion, and tossed with Mayfair salad dressing. It continues to be my favorite, and I have eaten a lot of it these past couple of months. I do find that when having a salad as an evening meal, if it is a salad that is not loaded with vegetables and protein, it often isn’t as filling as it needs to be to get me through to morning. For this reason, I have been experimenting with a wide variety of spreads for using on bread and then heating in the oven. This is one of them. It is supposed to be used on a split loaf of ciabatta bread, but I find that a single slice of rustic bread works quite well for me. The spread keeps in the refrigerator quite well for 7 to 10 days, but I have never needed it to last that long. 

Artichoke Bread

 2 T. butter, room temperature

1 t. Melissa’s minced garlic

12-oz. jar marinated artichoke hearts, drained and chopped

1 c.  shredded cheddar and mozzarella cheese blend

½ c. grated Parmesan cheese

¼ c.  sour cream

2 scallions, finely minced

Salt and freshly ground black pepper

1 small loaf ciabatta bread

 Preheat broiler, and line a large baking sheet with aluminum foil.

 Place all ingredients EXCEPT bread into a medium mixing bowl. Beat with a handheld mixer at medium speed until blended.

 Slice the bread lengthwise. Place the bread halves on the prepared baking sheet, cut side up, and spoon the cheese and artichoke mixture over the top. Broil for 4-5 minutes until the cheese is melted and bread is hot. Cut each half into six pieces and serve immediately.

As an Amazon Associate I earn from qualifying purchases.


Tuesday, August 23, 2022

Jalapeño Poppers for the Fainthearted

Those of you who like the idea of jalapeño poppers, but can’t take the heat, these are for you. In order to remove the heat from jalapeños, all you need to do is soak them in cold water, the longer you do so, the less heat you will have. I wanted my poppers to have no heat whatsoever, so that the delicious flavor of the jalapeño could come through. The beauty of this is that all of the prep work can be done ahead of time. If you have never been able to eat jalapeño poppers before, you need this recipe.

Jalapeño Poppers for the Fainthearted

 1 8-oz. pkg. cream cheese, softened

1 c. shredded cheddar cheese

¼ c. Duke's mayonnaise

1 1-oz. (3 T.) pkg. Ranch Salad Dressing Mix

1½ t. garlic powder

10 Melissa’s jalapeno peppers

1 lb. thin sliced bacon, cut in half

 A day ahead of time place the jalapeños in a medium-size bowl of water and place it in the fridge. The morning of the day that you plan to make these, put on kitchen gloves, cut them in half, and remove the ribs and seeds. Put them back into the bowl, cover them with fresh water, and put them back into the refrigerator for at least three more hours. An hour before assembly, remove them from the bowl and place them cut side down on a double paper towel-lined plate and allow them to dry.

 Preheat an oven to 400°F.

 With a hand-held mixer, mix together the cream cheese, cheddar cheese, mayonnaise, ranch dressing mix, and garlic powder in a medium bowl until evenly blended.

 Divide mixture between jalapeño halves. (I like to pipe the cheese into them because I find it quicker and easier). Wrap with half a bacon strip, and secure with a toothpick. Arrange the wrapped jalapeno halves onto a broiler pan.

 Bake until the bacon is no longer pink and beginning to brown, about 20 minutes.


 As an Amazon Associate I earn from qualifying purchases.


Monday, August 22, 2022

Laundry Room Makeover


I have made a lot of changes to this house, and have enjoyed every one of them. The other day, as I was tripping over junk in the laundry room, nearly plunging down a couple of steps into the garage, I wondered why I hadn’t done anything with that grubby, wretched little pass-through known as the laundry room. I got in touch with my faithful builder, Joe, and asked him to come out and take a look at it to see what we could do. I knew that I wanted cabinets. I was sick and tired of piling cleaning products and laundry detergent on top of the dryer, only to be knocked to the floor, often landing on one of my bare feet.

Here is the result of our conference. It’s amazing what a little paint, crown molding, and Home Depot cabinetry can do. It went from a place I tried to ignore to one I enjoy seeing.

The wall paint is Sherwin-Williams "Foothills;” I have used this same paint in both of my upstairs bathrooms. Despite it being a dark color, it does not make the room look small, particularly when there is the addition of white crown molding.

The shelf is nothing more than a finished board set on these brackets. The cabinets are stock cabinets from Home Depot.

The baskets on the shelf I got at Pottery Barn Kids years ago. They hold cleaning rags and plastic bags; the cute little laundry room sign I found here.

The non-skid floor mat is a welcome addition. It’s easy on the legs, inexpensive, and can be found here.


Because the cabinet above the freezer is difficult to get to, I store things in there that I’m only likely to use a couple of times a year. As a consequence I used a little bit of greenery, and a macramé table runner, to spruce it up.

 
I love my new space!

 As an Amazon Associate I earn from qualifying purchases.

 This post is shared on Metamorphosis Monday.

Friday, August 19, 2022

Chocolate Peanut Butter Cake

Do you ever hear yourself say something, and while you’re saying it you wonder what the heck is happening? I had an experience like this last week when I heard myself tell my son that I would make him a cake that I saw online for him for his birthday. What was I thinking? I’ve told you all that I don’t bake. The fact that I offered to bake doesn’t alter the fact that I really don’t do it. As luck would have it, I did bake the cake, it was delicious, and it looked beautiful! Frankly, I surprised myself.

This is one of those cakes that, unless you are willing to devote an entire day to, don’t even consider making it. I tend to involve myself in such things when there’s a day baseball game. I find that the nerve-racking game can counteract the nerve-racking cake baking process, everything levels out, and I’m relatively calm. It’s either that, or the double martini that I poured before I started baking, but I digress.

This cake is special. It’s time consuming, but there is nothing here that isn’t completely doable for even the most inexperienced baker, of which I am one. It’s a showstopper to be sure. If there is someone special in your life, or someone about to celebrate a milestone event, give this some consideration.

 Chocolate Peanut Butter Cake

As seen on Sally’s Baking Addiction

1¾ c. flour

¾ c. unsweetened natural cocoa powder (not Dutch process)

1¾ c. sugar

2 t. baking soda

1 t. baking powder

1 t. salt

2 t. espresso powder

½ c. vegetable oil

2 large eggs, room temperature

¾ c. sour cream, room temperature

½ c. buttermilk, room temperature

2 t. vanilla extract

½ c. black coffee

1 c. semi-sweet chocolate chips (tossed in 1 T. flour)

 Preheat oven to 350°F. Spray the heck out of three 8” cake pans with Baker’s Joy; set aside.

Make the cake: Whisk the flour, cocoa powder, sugar, baking soda, baking powder, salt, and espresso powder together in a large bowl. Set aside. Using a handheld or stand mixer fitted with a whisk attachment, mix the oil, eggs, and sour cream together on medium-high speed until combined. Add the buttermilk and vanilla, and beat until combined. Pour the wet ingredients into the dry ingredients, add the hot coffee, and whisk or beat on low speed until the batter is completely combined. Fold in the flour-coated chocolate chips. Batter is thin and you may see some air bubbles on the surface—that’s normal.

 Divide batter evenly between 3 pans. Bake for approximately 24–26 minutes. Baking times vary, so keep an eye on yours. The cakes are done when a toothpick inserted in the center comes out clean.

Remove the cakes from the oven and set on a wire rack. Allow cooling completely in the pan. The cakes may slightly sink in the middle as they cool—that’s expected.

PEANUT BUTTER FROSTING

 ¾ c. (1-1/2 sticks) butter, room temperature

1¾ c. creamy peanut butter (Jif recommended)

1¾ c. confectioners’ sugar

1 t. vanilla extract

Pinch of salt

3 T. heavy cream, room temperature

 As the cakes cool, make the peanut butter frosting: With a handheld or stand mixer fitted with a paddle attachment, beat the butter on medium high speed until creamy and smooth, about 2 minutes. With a rubber spatula, scrape down the sides and bottom of the bowl as needed.

 Add the peanut butter and beat until completely combined, about 1–2 minutes. Scrape down the sides and bottom of the bowl as needed to help combine. Mixture will be thin. Add confectioners’ sugar, vanilla extract, and salt and then pour in the heavy cream with the mixer running on low speed.

 After all of the cream has been added, turn the mixer up to medium-high speed and beat for 1–2 minutes, or until fully combined and creamy. Add up to 1/4 cup more confectioners’ sugar if frosting seems quite thin. You should end up with about 3.5–4 cups of peanut butter frosting. This amount makes enough for the filling, crumb coat, and for a little piping on top.

 Assemble cake + apply crumb coat: Place 1 cake layer on your cake stand or serving plate. Using a large icing spatula, evenly cover the top with about 1 cup peanut butter frosting. Repeat with 2nd and 3rd cake layers, spreading about 1 cup of peanut butter frosting in between each layer. Spread a thin layer of frosting on the top and around the sides as a crumb coat. Run a bench scraper around the cake to smooth out crumb coat. Chill uncovered in the refrigerator for at least 30 minutes and up to 3 hours to set the crumb coat.

CHOCOLATE GANACHE

 2 4-oz. quality semi-sweet chocolate bars (8 oz), finely chopped

1 c. heavy cream

Optional garnish: chopped or mini peanut butter cups

 As your crumb coat sets, make the chocolate ganache: Place finely chopped chocolate in a medium heat-proof bowl. Heat the cream in a small saucepan over medium heat until it begins to gently simmer. (Do not let it come to a rapid boil—that’s too hot!) Pour over chocolate, and then let it sit for 2–3 minutes to gently soften the chocolate.

 With a metal spoon or small rubber spatula, very slowly stir until chocolate has melted and mixture is smooth. Ganache is thin. The finer you chopped the chocolate, the quicker it will melt with the cream. If it’s not melting, DO NOT MICROWAVE it. Once ganache mixture is smooth, let it chill for 20-30 minutes in the refrigerator to thicken before spreading on chilled crumb-coated cake.

 Pour/spoon thickened ganache on chilled cake. Smooth the top with a large icing spatula and the sides with a bench scraper.  If desired, pipe remaining peanut butter frosting around the edge of the cake.

 I used Wilton 1M piping tip on the pictured cake. Garnish with peanut butter cups, if desired. Serve cake immediately or chill, uncovered, for up to 4–6 hours before serving. Cake can be served at room temperature or chilled.

 Cover leftover cake tightly and store in the refrigerator for 5 days. I like using a cake carrier for storing and transporting.

 As an Amazon Associate I earn from qualifying purchases.