Showing posts with label Day of the Dead. Show all posts

Tuesday, October 1, 2024

Ghost Bride Martini

 
Sometimes it’s hard to come up with that perfect cocktail for your Halloween, Samhain, Dia de Los Muertos, or other spooky celebration. This recipe, from the recently reviewed Food to Die For, is adapted from one served at the haunted Grand Galvez Hotel in Galveston, TX, and further adapted by me. It honors Audra, the lovelorn bride, who hanged herself in the hotel when her mariner fiancĂ©’s ship went down in a storm and he never returned to marry her. Sadly, he did return a number of days after her death as he had been picked up by another ship. Clearly their love was not to be.

Ghost Bride Martini

1 ½ oz. citrus vodka
¾ oz. Cointreau
¼ oz.
Simple syrup
½ oz. freshly squeezed lemon juice

Run the squeezed lemon around the rim of a
martini glass, invert that glass onto a plate of granulated sugar to coat, and chill.

Mix the vodka, Cointreau, simple syrup, and freshly squeezed lemon juice together in a cocktail shaker filled with ice. Strain into your sugar rimmed glass and serve immediately.

This recipe makes one cocktail. What you see in the glass on this page is a double.

As an Amazon Associate I earn from qualifying purchases.

Wednesday, November 1, 2023

Dia de los Muertos Tablescape

 
It’s only been in recent years that I have celebrated Dia de Los Muertos, a.k.a. Day of the Dead. It’s a Mexican holiday, obviously, and one that I find greatly appealing because it’s set aside solely to honor those close to us who have passed away. The celebration is defined by Calaveras skeletons, lots of color, flowers, and great joy. I tried to depict all of that in this table.I struggled with selecting a table topper. I have a number of them probably more appropriate than this one, but this appeal to me greatly. The pattern is called “Los Santos,” and is from Alexander Henry. I hardly know where to begin to describe everything that is on the table, so I’ll start with the centerpiece.
The orange skull at table center was given to me a number of years ago. It came from Trader Joe’s, and had a succulent in it that has since outgrown the pot, and I now use it to hold flowers. Michael’s had a wonderful selection of items, so the sitting skeletons, the delightful Frida Kahlo tea light holders, the black candles with skeleton hands, and the two skeleton candelabras (brought forwards from my Halloween table) all come from there.
Williams-Sonoma is responsible for the tea towels that I used as napkins here, as are the wonderful, colorful mugs that I absolutely adore. The cookies on the small skull plate are from there as well.
The Frida Kahlo wine glasses, I purchased years ago from artist, Kelly Cameron, who hand-painted the design. One side has Frida, the other a skull. They are beautiful either way. 
The red stemware is from Amazon, as are the two floral black picture frames by Laura Ashley, and the boldly colored orange flatware can be found here.
 
The salt and pepper shakers, viewable at far left, are from World Market, years ago.
 
The wonderful tombstone picture frame (I have a pair of these, but could only find one) I got on Etsy years ago.
I hope you found this table a feast for eyes and soul. If you don’t celebrate this special holiday, please consider it in the future. 

As an Amazon Associate I earn from qualifying purchases.


This post is linked to: Tablescape Thursday 


Friday, October 20, 2023

Spooky Cheese Ball

 
If you are looking for something simple, but effective, for your Halloween party, look no further. This delicious cheese spread can be used at any time of the year, served in a crock as is, rolled in chopped nuts and molded into a cheese ball, or formed into a skull to use as a clever hors d'oeuvre at your Halloween or Day of the Dead party. The beauty of this is that the cheese mixture can be made up to two days ahead of time, even molded into shape and placed on the serving plate, for you to remove, garnish, and serve. Nothing could be easier or more delicious. Spooky Cheese Ball

 1 8-oz. pkg. cream cheese, room temperature

1 2-oz. pkg. dried beef*, finely chopped

6 small pimiento-stuffed olives, finely chopped

2 scallions, finely chopped

1 t. Worcestershire sauce

¼ t. garlic powder

¼ t. onion powder

2 whole olives (for garnish)

2 sliced almonds (for garnish)

8 whole almonds, tip cut off (for garnish)

 Place all ingredients (except those used for garnish) into a medium bowl. Beat with a hand mixture until smooth and creamy. Scoop out of bowl onto square of plastic wrap, cover, flatten slightly, and chill at least 30 minutes, or up to 24 hours.

 Remove from plastic wrap, place onto serving dish, mold into a skull shape with your clean hands, and press olives into the skull for eyes, slivered almonds for the nose, and whole almonds for the teeth. Surround with crackers, and serve.

 *I used Buddig brand.

As an Amazon Associate I earn from qualifying purchases.


Wednesday, November 2, 2022

Soul Cakes


Source: Polka Dot Dinnerware

Happy All Soul’s Day, a.k.a Commemoration of All the Faithful Departed, and the Day of the Dead, a day of prayer and remembrance for the faithful departed. In many Christian traditions a soul cake is made for All Soul's Day to commemorate the dead. They can best be described as a cross between a scone and a cookie (biscuit). They are not overly sweet, so I have been enjoying one with coffee every morning.

Soul Cakes

7 T. butter

½ c. sugar

2 egg yolks

1-1/2 c. + 1 T. flour

1 pinch turmeric

1 t. allspice

½ t. mixed spice

2-3 T. whole milk

¼ c. raisins

 Preheat oven to 360° F. Spray a large cookie sheet PAM, or cover with a silpat; set aside.

 Cream together butter and sugar in the work bowl of a stand mixer until light and fluffy, 2 to 3 minutes. Beat in egg yolks one at a time. With the mixer on low, beat in the flour, spices, and milk enough to form a dough that holds together. Stir in raisins.

 Turn dough out onto a floured surface and roll to nearly ½-inch thick. Cut out with a 2-inch biscuit cutter and place on prepared baking sheet. With the back of a knife, press a cross a cross in the top of each.

 Back for 20 to 22 minutes until golden and firm. These keep for three days.


As an Amazon Associate I earn from qualifying purchases.


Tuesday, November 1, 2022

Day of the Dead Table for Two

If you remember my Festive Fall Table from a couple of weeks back, then you also remember how beautiful the flowers were in the skull vase. They lasted so long that I had to use them again in this Day of the Dead tablescape. It is a simple tablescape, really, but it’s that simplicity that allows the individual elements to come through.

This Calavera fabric from Alexander Henry is quite eye-catching. Because it’s so busy, I tried to keep the table as clutter free as possible, while still driving the point home.

The skeleton candlesticks are new this year and from Michael’s. Aren’t they wonderful? I can see myself using these throughout the year in various mystery tablescapes.

For years I have been stalking the skeleton barware from Pottery Barn, this year I had enough rewards points to finally get a pair of wine glasses. They exceeded my expectations. They are good sized; the skeletons are detailed, and great fun!

The rhinestone studded ruby chargers are usually reserved for Christmas, but I thought they worked well here. They are topped with bright yellow Waechtersbach dinner plates on which I have placed a smaller skull plate that I got a couple of years ago from Pier One.

Gold flatware adds a bit of sparkle to the table.

When coffee or tea is offered up with dessert, I will do so with the addition of skull spoons as well as skull shaped sugar cubes that I found on Etsy.

Framed photos of those past would make a nice addition to this or any other commemorative table. Think of those you’ve lost and celebrate their memories.

As an Amazon Associate I earn from qualifying purchases.

 This post is linked to: Tablescape Thursday

Monday, October 31, 2022

Catacomb Crumble Topping

It was a picture on Instagram wherein I was tagged by my daughter-in-law that sent me to the GhoulatHeart website where I first saw this clever catacomb crumble topping. Things like this really intrigue me, and I knew that I had to make it. There was no time, at this late date of discovery 
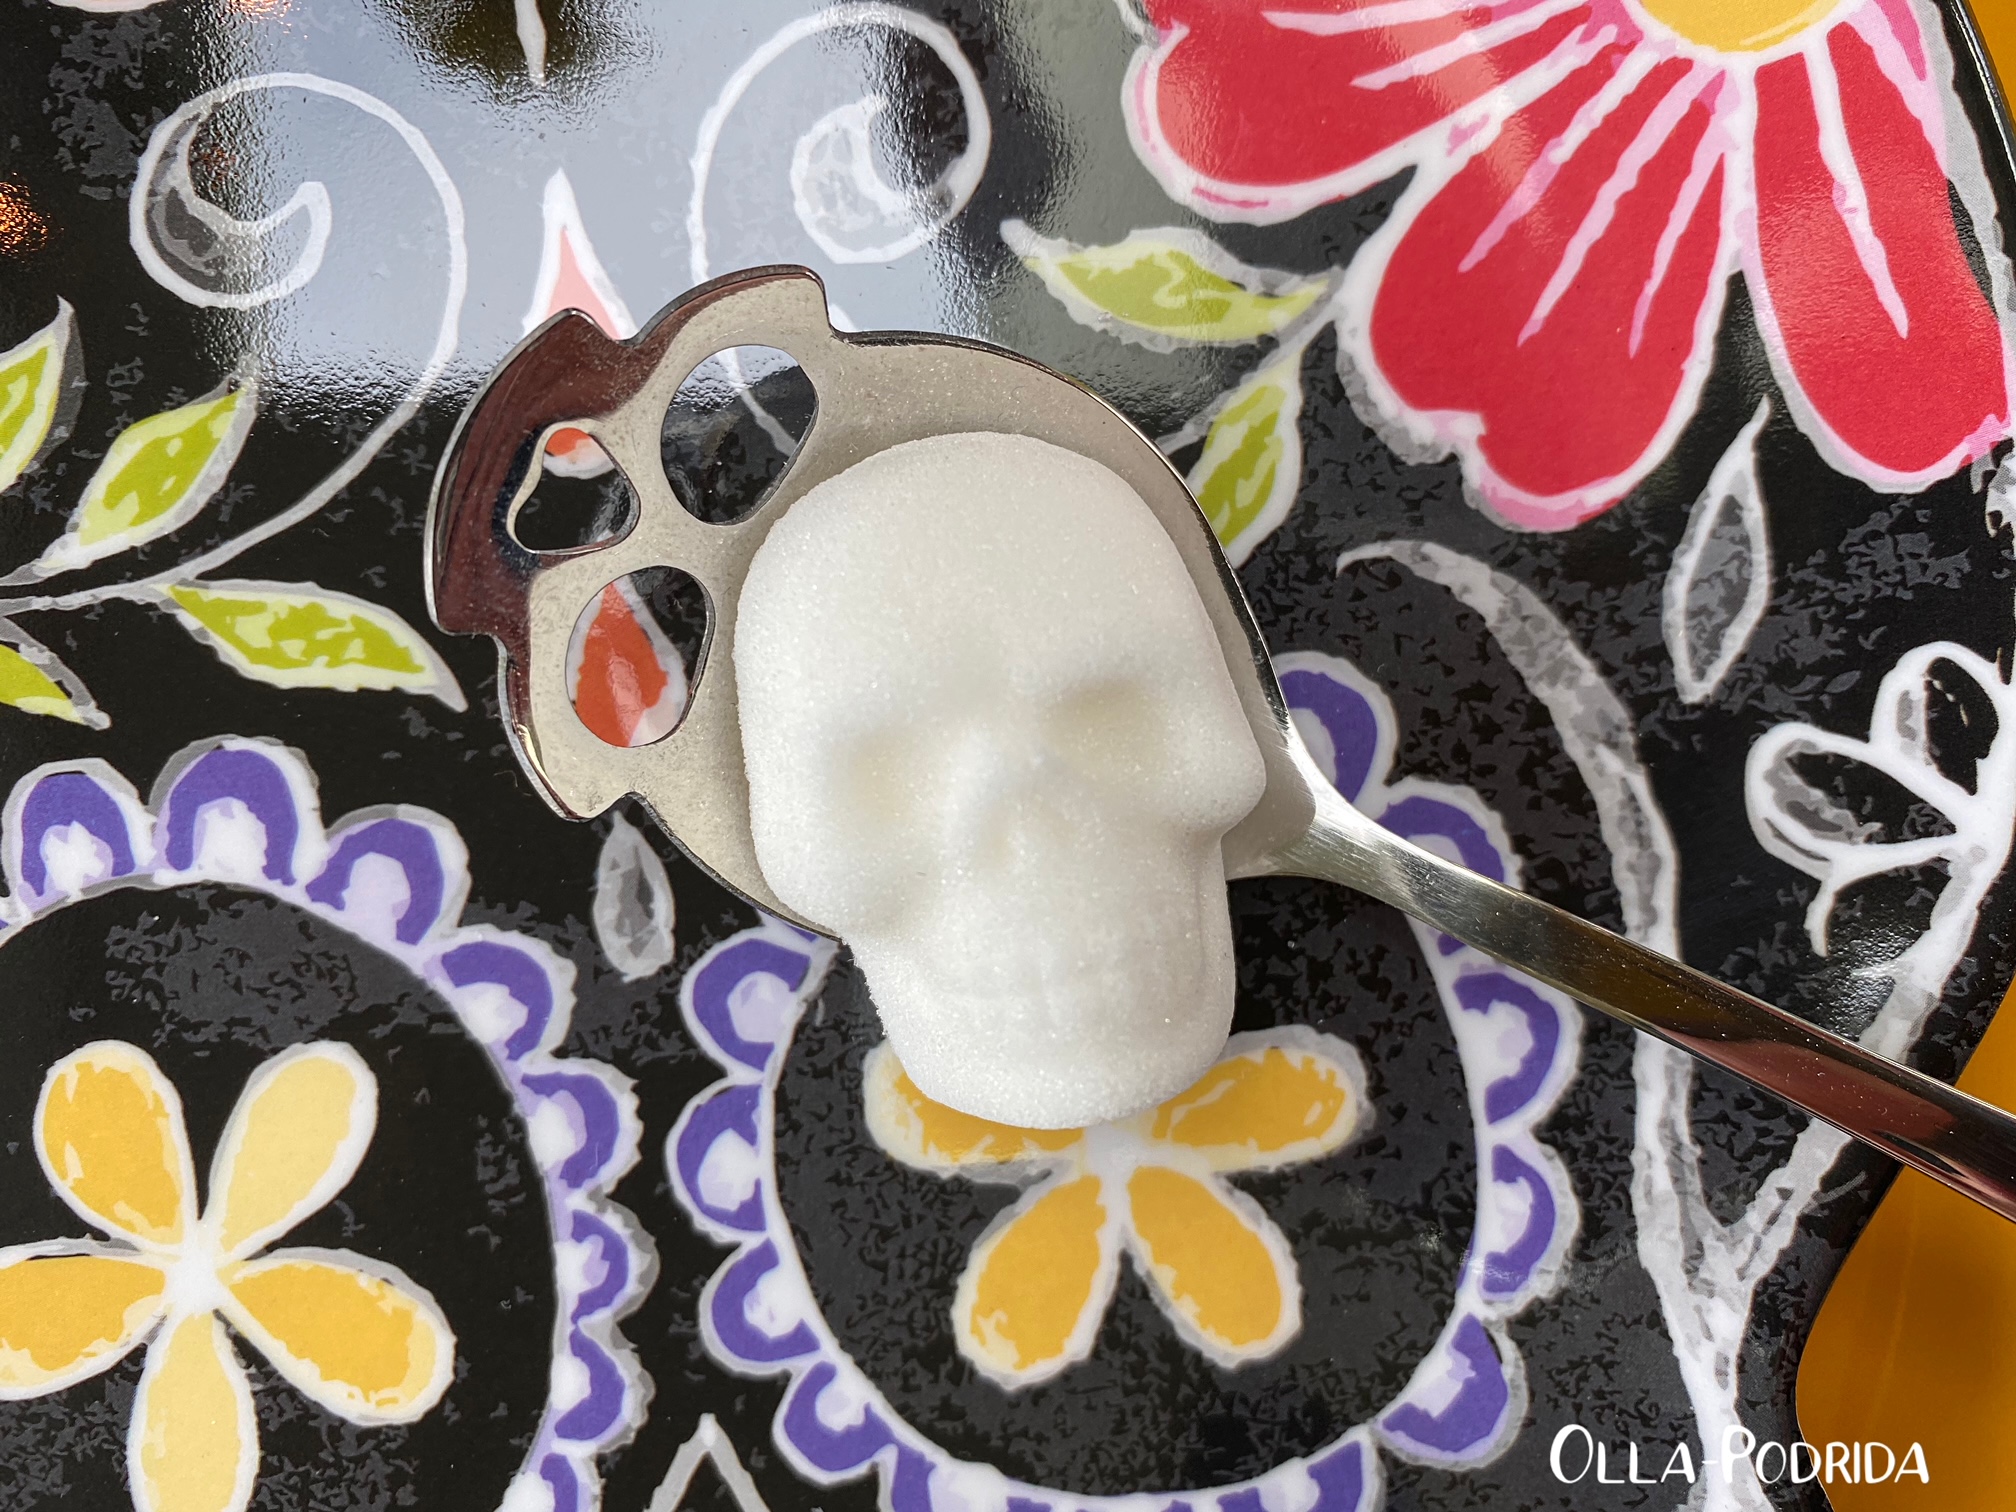
to shop around for small skull molds, so I used what I had that’s a little bigger. I actually prefer the look of mine (the kind that you see on old gravestones), to the more modern version.

Making the streusel skulls.

I’m not going to lie this was labor-intensive. Because my mold was bigger, it took longer in the freezer (more like 30 minutes) than author’s 10 minutes, so my process dragged out quite a long time. I also had only an eight-well mold, so I had to do it four times. Not every time was successful. Gradually I learned to pack the streusel as tightly as I possibly could, and made use of the smaller end of a tart tamper that worked quite well. I also learned that when I went to pop it out of the mold, in my case anyway, to start with the small end and work my way up to the top of the skull.
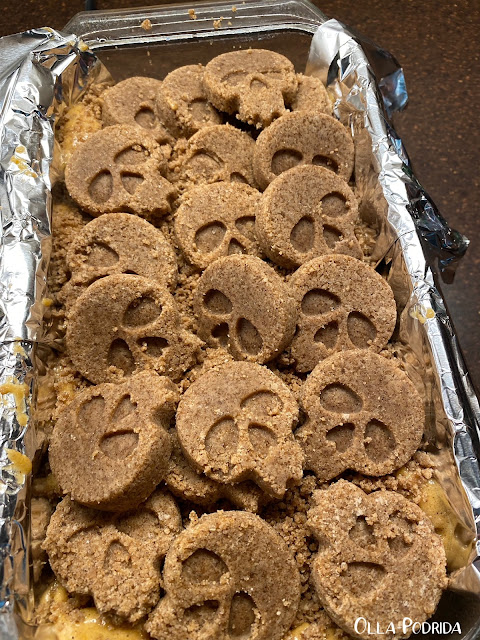
Ready for the oven.

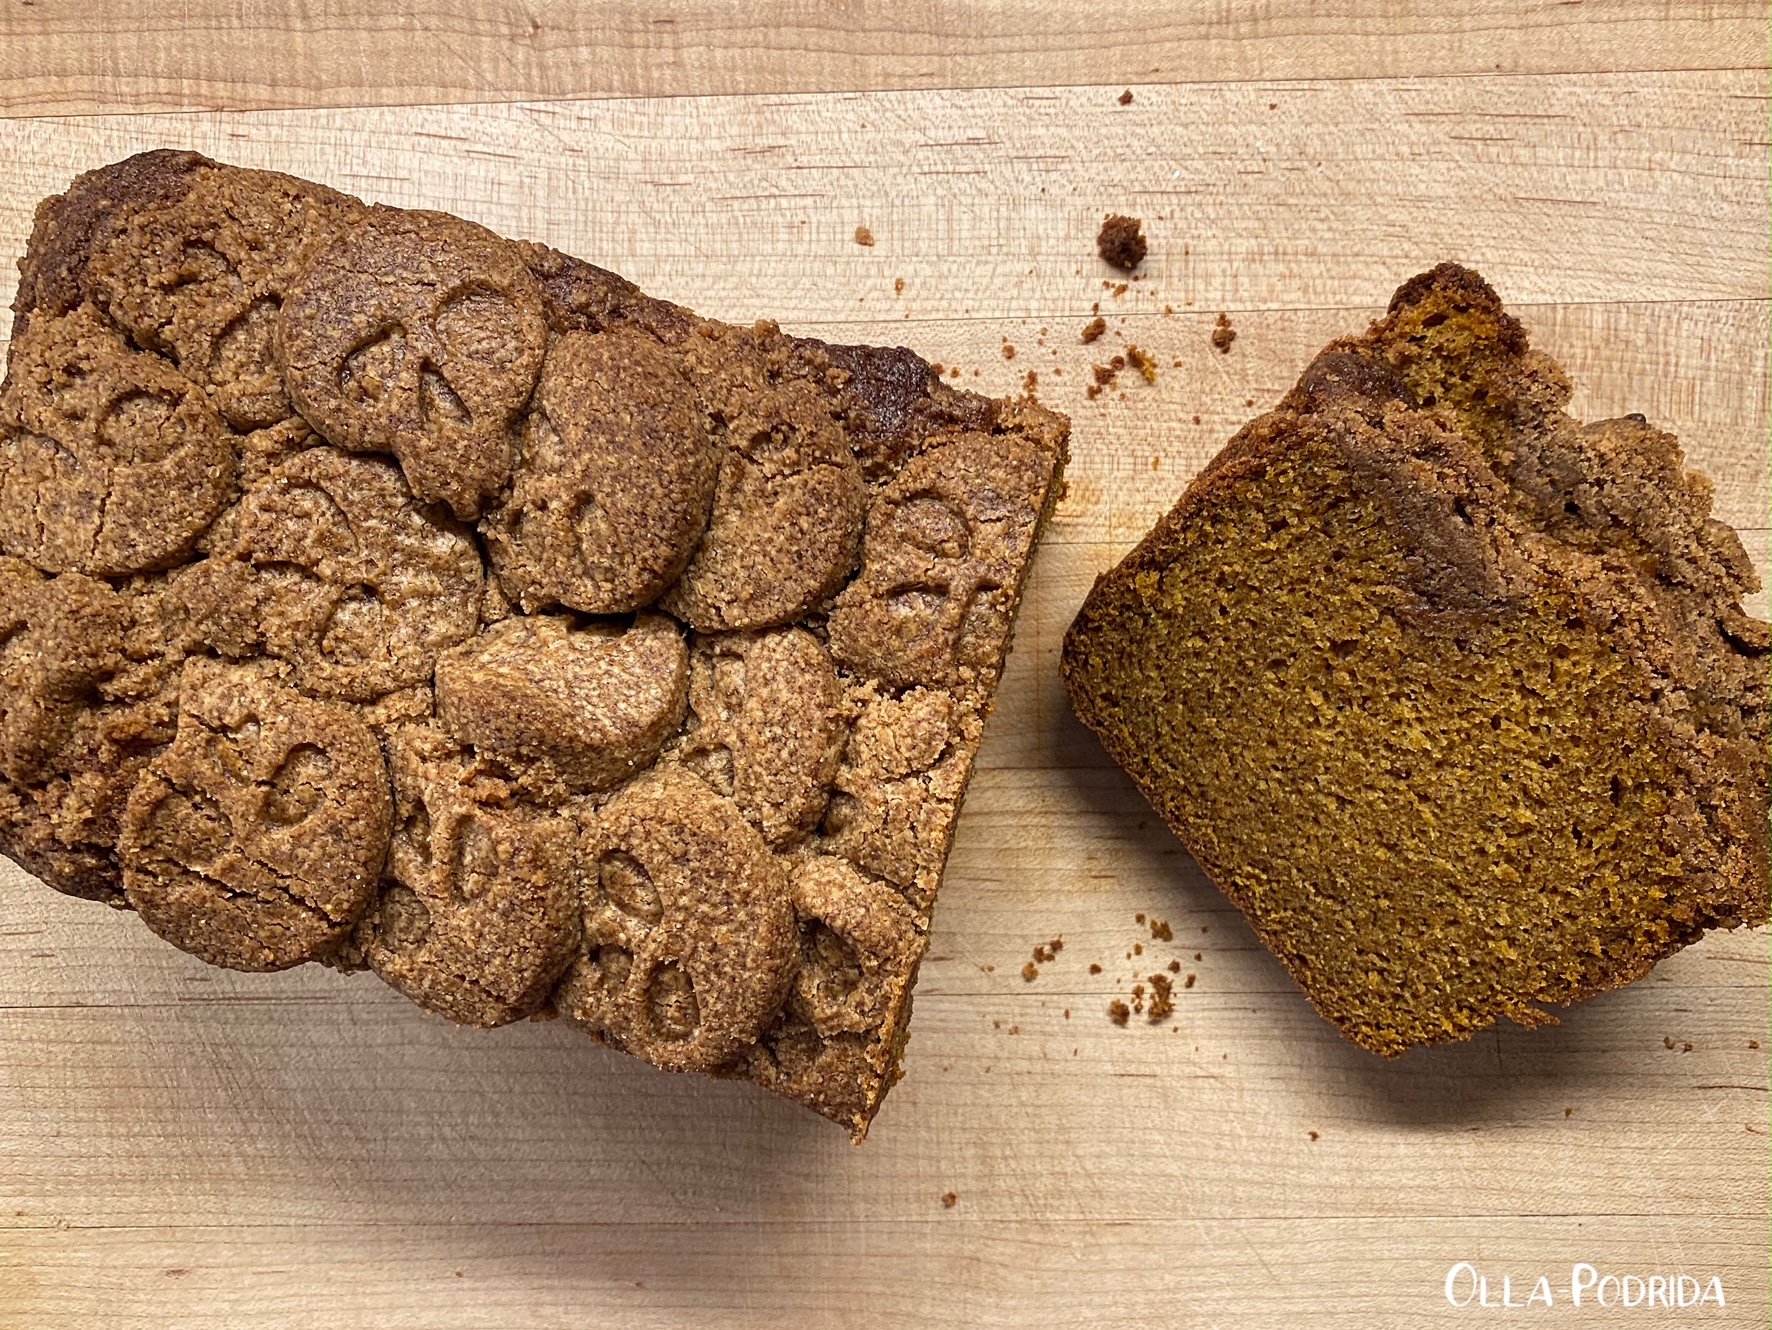
 I absolutely love the look, it made my pumpkin bread look perfect for Halloween, it cut like a dream, and it is delicious! This crumble topping can be used on anything you like from coffee cakes, tarts, quick breads, to cupcakes. Just cover a cupcake with a light topping of crumbly streusel and press a streusel skull in the top. They hold up quite well in the oven (one of my fears was they wouldn’t), and as you can see, it’s quite eye-catching.

Right out of the oven.

Use your favorite pumpkin bread recipe add this for the topping.
 

Catacomb Crumble Topping
As seen on ghoulatheart.com

1 cup all-purpose flour
1/2 cup butter, softened
1/2 cup brown sugar, packed
2 teaspoons cinnamon

Make skull streusel ahead of time and keep refrigerated.

Add streusel ingredients to a medium bowl and use a fork to cut in butter until combined. Transfer 1/2 teaspoon of the streusel mixture into each skull cavity of the
skull mold and use the back of a teaspoon to pack the mixture tightly. Place mold into the freezer for about 10 minutes to set the skulls and tap to remove skulls onto parchment paper. Stores skulls in a plastic container and pop back in the fridge. Repeat until you have about 60 skulls. Reserve the remaining streusel mixture.

Make your favorite pumpkin bread. Sprinkle the crumbly streusel topping over the batter. Add about half the skulls to the top of the loaf. Bake for 30 minutes. Remove loaf from oven and top it with the remaining skull streusel, filling in where the bread has expanded. Return the loaf back to the oven and allow to bake 20 to 25 minutes or until a toothpick comes out clean. Let cool 10 minutes, then remove from pan to cool completely. Wrap and store at room temperature for up to four days, or 10 days in the refrigerator.

Note from Olla-Podrida: I rarely bother with the cut-in method. I placed all ingredients into the work bowl of a food processor and processed until large crumbs formed. Because my skulls were larger, each one took a tablespoon of mixture in order to make a full skull. I tamped it tightly into the mold using a
tart tamper. Unlike the originator of this recipe, I placed the crumbly streusel onto the pumpkin loaf, jammed all of the skulls on top, and baked it just once for 60 minutes at 350°. As you can see, it worked perfectly.

Something of major importance that the originator failed to mention is that your baking pan needs to be lined with either foil or parchment so that you can lift the loaf directly out of the pan. You don’t want to attempt to take it out on its side or invert it.

Have fun on Halloween. Bake something scary!

As an Amazon Associate I earn from qualifying purchases.


Tuesday, October 24, 2017

Dead Guy Stew with Skull Cornbread & VooDoo Butter

I must confess that I am a sucker for packaging, particularly when it comes to the liquor department at my local market. I cruise those aisles every week, even though it's not all that often that I come home with something. Last week a bottle of Dead Guy Ale from Rogue caught my eye. I don't drink ale, mind you, but I had to get a bottle of Dead Guy (Okay, I also got some cans, if you must know.), because I could only imagine how delicious it would be in a soup or stew. How perfect, I thought to myself, would it be to include this in a recipe for Halloween or Day of the Dead, and thus my Dead Guy Stew was born.
In thinking about the Day of the Dead holiday, Mexican in origin, I knew I wanted a stew that was not only rich in taste, but with a nod to the taste of Mexican food rather than a good old-fashioned American variety. I rummaged through my pantry, and pulled out every item that I would normally use in Mexican food, and set to work creating my stew.
Here is the end result, and it is delicious!If your family enjoys a nice hearty stew for dinner, and love the spices of Mexico, they are going to love this too. Naturally, with the holiday in mind, and because I tend to serve stew withcornbread, I did so using my corn my skull mold pan with excellent results, as you can see. Then, using a smaller skull mold I made something with which to slather that delicious cornbread that I decided to call VooDoo butter, named for the spices used.

You can find the recipes below.
Dead Guy Stew

1 16-ounce can refried beans
1 cup Rogue Dead Guy Ale
1 3-pound chuck roast, cubed
1 large onion, diced
1 teaspoon minced garlic
1 package taco seasoning (or make your own)
1 14.5-ounce can diced tomatoes
1 10-ounce can Rotel
Tomatoes with Green Chilies
1 15-ounce can black beans, rinsed and drained
1 cup fresh or frozen corn
Salt and freshly ground black pepper, to taste

In a small mixing bowl, whisk together ale and refried beans. Place all ingredients in the order listed into a greased 6-quart slow cooker; stir to combine. Cook on high six hours. Serve, garnished as you see fit.

NOTE: I seared my cubes of chuck roast before putting them into the crockpot, but I can't imagine that it made any difference, so do whatever is easier.
VooDoo Butter

4 ounces unsalted butter, softened
1 teaspoon sweet chili sauce
1 teaspoon honey
Pinch
Worcestershire powder

Place all ingredients into a medium bowl and beat with a mixer 1 to 2 minutes until combined. Place into decorative molds and freeze until set, or place into a small ramekin and serve table side.


This post contains affiliate links.

This post is linked to:


Tuesday, November 1, 2016

Dem Bones Sugar Cookies


Two years ago when I saw these cookies on the Sprinkle Bakes blog I knew I wanted to make them. So, I ran out and got the pan, put it away, and never gave it another thought until a couple of weeks ago when number one son came over to help me excavate the pantry, and there it was.

Thank goodness I got them made in time for Day of the Dead, even if I did come right down to the wire. Sadly, the bone pan is no longer available (Local readers are welcome to borrow mine.), but I had to post about these delicious cookies because this recipe from the back of the pan packaging is so good and such a dream to work with that doubtless you can use it for cut-out cookies or to fill another Wilton molded cookie pan. This dough and the glaze (and perhaps a sprinkling of sanding sugar for some sparkle) would work perfectly with the Wilton snowflake cookie pan, for example.
Dem Bones Sugar Cookies

1 cup unsalted butter, softened
1 1/2 cups granulated sugar
1 large egg
1 1/2 teaspoons vanilla extract
1/2 teaspoon almond extract
2 3/4 cups all-purpose flour
1 teaspoon salt
4 cups confectioner's sugar
2 to 3 tablespoons white food color
1 tablespoon almond extract
Milk

Preheat oven to 350°F. Lightly spray pan cavities with baking spray.

Cream butter and sugar until well blended. Beat in egg and extracts; mix well. Combine flour and salt; add to butter mixture. Beat just until combined. Press dough into cavities, filling each 2/3 full. Bake 10 to 12 minutes or until light brown around the edges. Cool in the pan for 10 minutes. Turn pan over, lightly tap pan on counter and cookies will pop right out. Cool completely on a wire rack. Allow pan to cool before refilling it.

For glaze: Combine confectioner’s sugar, Icing Color, and almond flavoring in a large bowl. Add 1 tablespoon of milk and stir slowly with a wire whisk.  Gradually add more milk, a little at a time, until the mixture loosens and the glaze falls in a thick ribbon from a spoon. The mixture should not be so thick that it sits on top of the cookie and doesn’t run off the edges. Allow the cookies to dry (about 2 to 3 hours) before transferring them to an air-tight container for storage.

Thursday, October 29, 2015

Skulls & Bones Tablescape


I am embracing neutrals with a pop of color this Halloween. As you may recall from previous posts, I am often inspired by fabric and this year was no different. This MODA Haunted Gala Halloween fabric was the inspiration for this year’s spooky table for two.
I purchased the skull plates during a summer outing with a posse of neighborhood women that you can read about here.
They pretty much set the tone for the table, so for a centerpiece, I used skull vase filler from Pottery Barn.
Placemats and “Spice Route” dinner plates from Pier One form a nice basis for tasty goodies.
For a pop of color I used deep red wine glasses from Crate and Barrel, hanging a little skeleton off of each one.
The ravens are from Decor Steals (one of my favorite purchases) and are put to use throughout the house all year long. They look perfect here, I think.
I bought the little skeleton hand cupcake toppers to grace cupcakes for the season, but then never got around to making them (sheesh!) so used them on top of the napkins.
The flatware is from Pottery Barn and I let it go for a number of months without polishing to provide a decrepit look for the table (that’s’ my story and I’m sticking to it!).


This post is linked to: