Showing posts with label kid friendly. Show all posts

Wednesday, December 11, 2024

Texas Roadhouse Roadkill, my version

 
Have you noticed, like I have, that all of a sudden there seem to be a lot of recipes for Texas Roadhouse Roadkill all over the Internet? I’ve been to Texas Roadhouse only once. It was about 13 years ago, and I honestly have no idea what I ate. It had just opened locally, was jam-packed, and the only impression I got from the place was that I just wanted to get out of there. I will admit to being intrigued with this recipe, so much so that I decided to make it myself, altering it so it met with my standards. I did so by adding the additional step of dipping the patties into an egg wash and then into Italian breadcrumbs. I think that makes beef patties cooked on top of the stove so much better. They seem more like a chopped steak than they do a hamburger. Try this recipe and let me know what you think. The end result does look like a plate of roadkill, but it is awfully good.
 Texas Roadhouse Roadkill, my version

2 lb. ground chuck
2 t.
Worcestershire sauce
1 t. Montreal steak seasoning
½ t. freshly ground black pepper
1 large egg
½ c.
Italian breadcrumbs
2 T.  butter, divided
1 T. olive oil
1 medium yellow onion, sliced
1 8-oz. pkg. crimini mushrooms, sliced
1-2 c. shredded Monterey Jack cheese

In a large bowl, combine ground chuck, Worcestershire, steak seasoning, black pepper, and mix until well blended. Shape mixture into four oblong potions about ½” thick.

Beat egg with 1 tablespoon water until frothy; pour into a shallow bowl. Put Italian breadcrumbs into another shallow bowl. Dip each patty into the egg mixture, and then into the Italian breadcrumbs, turning to coat. Place coated patties on a plate.

In a 10” – 12” skillet, melt 1 T. butter. Add oil, heating until hot. Sauté onions and a sprinkling of salt for 3 to 4 minutes, stirring occasionally. Add mushrooms to the skillet and sauté for another 3 to 4 minutes. Turn out vegetables into a bowl.

Place pan back over heat and melt remaining tablespoon of butter until sizzling, but not brown. Put the crumb-coated patties into the pan and cook for five minutes. Flip to the other side and cook five minutes more. Pour sautéed onions and mushrooms over the top of the burger patties. Cover each one with a generous amount of shredded Monterey jack cheese. Put a lid on the pan and cook until the cheese melts.

 Serve immediately.

As an Amazon Associate I earn from qualifying purchases.

Tuesday, November 12, 2024

Creamy Corn Casserole

 
The cheesy corn casserole is something Midwesterners always enjoy, particularly alongside a plate of Kansas City barbecue. It is the ultimate in creamy, cheesy, comfort food. You can serve it as easily at a picnic as you can alongside something a little more high end at dinner, like I did with Pecan Crusted Salmon.  It can be vegetarian if you leave out the bacon, which is perfectly fine. I don’t know anybody who doesn’t like this; kids particularly seem to enjoy its creamy, corny goodness.
Creamy Corn Casserole

 1 T. olive oil
1 T.
Melissa’s minced garlic
2 14.5-oz. can corn
4 oz. cream cheese
2 T. butter
¾ c. whole milk
¼ t. kosher salt
1/8 t. freshly ground black pepper
¼ t.
smoked paprika
¼ t. Old Bay blackened seasoning
1½ c. shredded cheddar cheese, divided
4 slices bacon, cooked and crumbled, divided
¼ c. sliced green onions

Preheat oven to 350° F. In a large skillet, heat the oil over medium heat and warm the garlic for 30 to 45 seconds.

Stir in the corn, cream cheese, butter, and milk. Reduce the heat to medium low and cook until the ingredients are melted together, stirring occasionally, 5 to 7 minutes.

Stir in the salt, pepper, paprika, blackened seasoning, ¾ of the shredded cheddar, and half of the bacon. Pour into a
1½-quart baking dish and sprinkle with the remaining ¾-cup cheddar and bacon. Bake for 15 to 20 minutes until the top is golden and the edges are bubbly.

 As an Amazon Associate I earn from qualifying purchases.

Thursday, November 7, 2024

Salisbury Steak with Porcini Mushroom Gravy

 
I collect Salisbury steak recipes in the same way that I collect meatloaf recipes. For me, there is nothing more comforting than chopped meat. It’s surprising, considering what they are, that there are so many different varieties of both. This recipe is a riff on Bobby Flay’s Salisbury steak. I ramped up the flavor by using dried porcini mushrooms instead of the button mushrooms that he had suggested. What a wonderful difference in taste. This Salisbury steak, with its porcini sauce, is woodsy, earthy, beefy, and very comforting.Salisbury Steak with Porcini Mushroom Gravy

 1 lb. ground chuck

1 egg, beaten

2 T. grated Parmesan

2 T. Italian breadcrumbs

1 t. Melissa’s minced garlic

1 t. kosher salt

1 T. butter

1 T. olive oil

½ t. freshly ground black pepper

1 .5-oz. pkg. Melissa’s dried porcini mushrooms

½ white onion, halved and thinly sliced

1 c. beef stock

1 T. tomato paste

1 t. Worcestershire

2 T. heavy cream

 Hydrate mushrooms according to package directions, drain; and set aside.

 Mix together beef, Parmesan, breadcrumbs, garlic, egg, salt, and pepper until combined. Form into 4 oval-shaped patties.

 Heat 1 tablespoon of oil in a large skillet, and, once hot, add the patties.

 Cook for 5 minutes, and then flip and cook for an additional 5 minutes; remove from pan.

 Add onion and mushrooms to the skillet, and cook until the onions are tender. Add the Worcestershire, tomato paste, and beef broth. Simmer for a few minutes, and then add the heavy cream.

 Add the patties back to the skillet, and spoon the sauce over the top.

 Simmer for about 5 minutes, and then serve over pasta, egg noodles, or mashed potatoes.

As an Amazon Associate I earn from qualifying purchases.

Monday, September 2, 2024

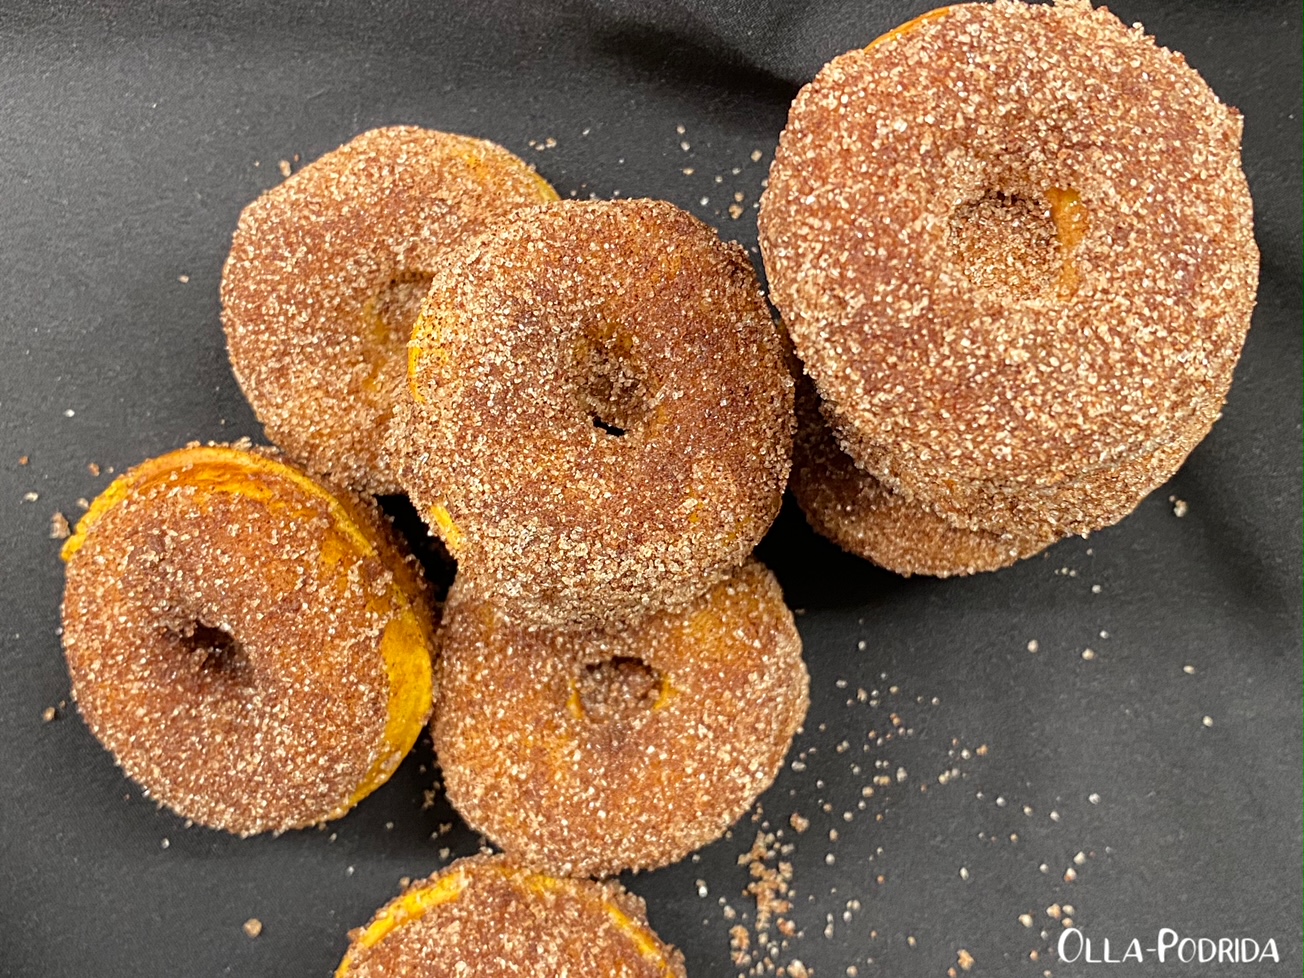
Pumpkin Spice Mini Donuts

 
As happens every year about this time, it is officially pumpkin spice season! I have to say that I always welcome it. I’m quite grateful to live where I do, where each season is clearly defined. After the heat of summer, I welcome cool, crisp fall days, the crackle of a log fire, and everything pumpkin.
 
This year I decided to try something new and put my mini donut maker to work. If you don’t have a mini donut maker, they are great fun. They are super simple to use, small enough to easily store, and knock out donuts as quickly (or even quicker) as you can make waffles or pancakes, and look how adorable they are. They are also quite tasty, and the perfect start to the season.

Pumpkin Spice Mini Donuts

 ¼ c. vegetable oil

1 large egg

¾ c. sugar

¾ c. pumpkin purée

¾ t. pumpkin pie spice

¾ t. salt

¾ t. baking powder

1 scant c. flour*

¼ c. melted butter

½ c. sugar

1 T. cinnamon

 Preheat mini donut maker.

 In a large bowl, whisk together all ingredients EXCEPT flour until smooth. Add flour, stirring until evenly mixed.

 Grease a mini donut pan (if necessary, mine is nonstick, so there was no need), and pipe mixture into wells until each is a little more than half full. Bake for 2-3 minutes, or until indicator light turns on signaling that they are done. Remove donuts and allow to cool.

 While you are waiting, whisk together sugar and cinnamon. In a shallow bowl, microwave butter until melted (30 to 45 seconds depending upon the wattage of your microwave). Dip donuts into butter, covering to coat, and then into the cinnamon and sugar mixture, rolling around to thoroughly coat.

 *A scant up is a cup minus 1 tablespoon.

As an Amazon Associate I earn from qualifying purchases.


Tuesday, August 27, 2024

Chicken Pot Pie

 
I haven’t made chicken pot pie since before my husband passed away, and that was eight years in June. I used to make individual pot pies in medium sized ramekins with no bottom crust, and just a puff pastry topping. It was very similar to the cock-a-leekie pies that we used to get when we were in Scotland. Today I decided that I wanted a genuine potpie with two crusts. I also wanted it loaded with chicken and full of vegetables. To make things easier on myself, I did all of the cutting of vegetables and cubing of chicken the day before, so this went together very quickly. I am now 100% sold on the two crust pot pie, this was magnificent! It is a perfect comfort food. Everyone is going to love it.
Chicken Pot Pie

1/3 c. butter

1 c. sliced carrots

1 c. chopped celery

1 c. sliced mushrooms

½ c. diced yellow onion

1 t. minced garlic

1/3 c. flour

1 t. Montréal Chicken Seasoning

¼ t. kosher salt

½ t. freshly ground black pepper

1 t. dried thyme leaves

1¾ c. homemade chicken stock

1/3 c. whole milk

1/3 c. heavy cream

3 c. cubed cooked chicken

1 c. frozen peas

2 crust pie crust*

 Egg wash: 1 large egg beaten with 1 T. milk

 Melt butter in a 12” skillet over medium heat. Add vegetables (carrots, celery, mushrooms, and onion) and sauté, stirring occasionally, until onions become transparent and butter starts to lightly brown, 10-12 minutes. Stir in garlic.

 Using a wooden spoon stir in flour, chicken seasoning, salt, black pepper, and thyme. When flour has become well incorporated with the vegetables, stir in chicken broth, milk, and cream. Simmer over medium heat for 2-3 minutes and then stir in chicken. Simmer 10 minutes longer until very thick.  Stir in peas. Remove from heat and set aside.

 Preheat oven to 425°F.

 Carefully place one pie crust into a 9-inch deep-dish pie plate. Spoon the chicken and vegetable mixture into the crust. Cover the pie with the second crust and crimp the piecrust with a fork or your fingers to seal the edges. With a small sharp knife, slice a few small slits in the top crust to allow steam to escape.

Using a pastry brush, brush crust and edges with egg wash. Bake for 32–38 minutes or until the top of the crust is golden brown. If edges of crust start getting too brown, cover with a piece of foil or a pie crust shield.

 Remove from oven and cool for at least 10 minutes before serving.

 If there are leftovers, they reheat beautifully.

 * You can make your own if you feel so inclined, I never do.

 As an Amazon Associate I earn from qualifying purchases.

Friday, August 23, 2024

Bacon Tomato Bites

 
This is a recipe of my late mother’s. She made these as far back as I can remember. They were always a huge hit, with everyone asking for the recipe. Everyone, that is, except me because I always thought they looked way too fiddly for my man hands. I got to thinking about these the other day when I was thinking about my mother because I still associate the two, and I thought I would give it a whirl. I used Melissa’s baby heirloom tomatoes because they are larger than cherry tomatoes, and the perfect size to use with the small end of a melon baller, making the cleaning out much less difficult than I anticipated.
 
The filling can be made ahead and refrigerated for stuffing tomatoes within a day or two. The tomatoes can be stuffed and stored in the refrigerator overnight; you decide which you prefer. They work equally well at a brunch as they do at luncheon, picnic, or dinner. I guarantee all who consume these are going to ask for the recipe. As an aside, these little rascals do tend to roll, so serving them in an olive dish just may not be a bad idea.
Bacon Tomato Bites

24 Melissa’s baby heirloom tomatoes
1 lb. bacon, cooked and crumbled
½ c. finely chopped scallions
2 T. grated Parmesan cheese
½ c.
Duke’s mayonnaise
Freshly ground black pepper

Remove stems from tomatoes and, using a sharp knife, cut a thin portion of the top off. Carefully hollow out tomatoes using a small spoon, grapefruit spoon, or the small end of a melon baller, as I did,
leaving a 1/8-inch thick shell. Invert the tomatoes onto a paper towel-lined plate, and allow to drain while you make the filling.

 In a medium bowl combine bacon, scallions, cheese, and mayonnaise; stir until well blended. Fill tomatoes with bacon mixture, top with freshly ground black pepper, and refrigerate for a number of hours before serving.

As an Amazon Associate I earn from qualifying purchases.

Thursday, August 15, 2024

Magical M&M Cookie Bars

 
If you made my [made with limes] Brazilian lemonade, then you found yourself with leftover sweetened condensed milk that you’re probably wondering what to do with. Well, I’ll tell you, you can do the same thing with a partial can of sweetened condensed milk that you can with a full one, in this case, make layered cookie bars.

I have been in a bit of a mood. There are a LOT of reasons for this mood, none of which I will go into here. Suffice to say that EVERYTHING was annoying me, the least of which was my “pummeling pantry” that, every time I opened the door, would hit me with one thing or another.  After four or five times, this becomes annoying. I decided that I was going to take all of those weird things that kept falling out of the pantry, put them together and make cookies out of them.

Months ago I had an intense craving for peanut M&Ms and bought a package that lasted longer than the craving. Every time I opened that pantry door, they either fell on my head, landed by my feet, or mocked me. I decided to get back at them by smashing them to bits with a meat mallet, providing me with one of the layers in these cookies. The next layer was about a half a cup of cocktail peanuts leftover from when I made the Salted Peanut Crisps, lastly was about a cup of chocolate chips that I had wrapped up and rubber banded together in a bag. All of those went together quite well, and I’m very pleased with the results. What I particularly like here is the crunch that you get from the M&M shells. Make these cookies with the kids. They will love smashing the M&Ms, be delighted with the colorful outcome, and no doubt happy with the taste. If you don’t have these particular ingredients, come up with your own. Essentially, you need a graham cracker crust, 3 cups of various chips, nuts, or other bits, and a full can (or not so full can) of sweetened condensed milk. Make yourself some magic.  Magical M&M Cookie Bars

2 c. graham cracker crumbs, more or less
1 stick butter, more or less, melted
1 c. crushed
peanut M&Ms*
1 c. cocktail peanuts
1 c. chocolate chips
1 14-oz., or thereabouts, can sweetened condensed milk

Preheat oven to 350°F. For easy removal of your cookie bars, line a
9” x 9” square baking dish with heavy duty foil making sure to have 2 inches sticking out of either side to facilitate lifting once the cookie bars have cooled. Spray foil and pan with PAM.

Stir together graham cracker crumbs and butter, and press into the bottom of a 9” x 9” pan. Scatter the M&Ms, peanuts, and chocolate chips over the top, then pour sweetened condensed milk overall to cover, or almost cover. Bake for 30-35 minutes until the edges are bubbly. Cool in the pan for about 20 minutes before running a knife around the edge and utilizing the foil to lift it out of the pan to a cutting board where you can then slice it into squares.

 *I put them in a plastic bag and used a meat mallet.

As an Amazon Associate I earn from qualifying purchases.

Monday, August 12, 2024

Snickerdoodle Cobbler

 
No matter how hot it is, once August hits, I move into “fall mode.” I guess it’s because, where I live anyway, spring pretty much starts in April. By August, my garden plants are dried out and dying, and I am sick of the very sight of them. I’ve found that the gobs and gobs of cucumber and melon vines that I lovingly nurtured and encouraged all summer produced nothing but male blossoms, resulting in no fruit from either, and I’m ready to just chuck it all and move on. That’s why not an August goes by that I don’t make pumpkin spice something or begin to embrace apple dishes. 

I found this recipe online, and the ease of it intrigued me. The recipe was poorly
written, the directions largely wrong, so here’s my version. Warm from the oven, topped with a scoop of vanilla ice cream, this would be a wonderful fall dessert, and certainly company worthy. It also makes a pretty tasty breakfast, or at least that’s what I tell myself. J
Snickerdoodle Cobbler
 
 1 17.5oz. pkg. Snickerdoodle cookie mix

1 stick butter, room temperature

1 large egg, room temperature

1 21-oz. can apple pie filling

3 T. caramel topping

2 t. cinnamon sugar (from enclosed packet)

 
 Preheat oven to 375° F. Spray an 8” x 8” baking dish with PAM; set aside.

 Open the packet of cookie dough mix, remove the cinnamon sugar packet; set aside. In a small bowl beat together cookie mix, butter, and egg until well blended.

Dollop half of the dough by spoonfuls across the bottom of the prepared baking dish. Sprinkle with a teaspoon of cinnamon sugar from the packet. Spread apple pie filling over this bottom layer, and dollop remaining cookie dough in spoonfuls over the top.

Sprinkle with another teaspoon of cinnamon sugar from the enclosed packet, and top with a drizzle of caramel topping.

Bake for 40 to 45 minutes until the top is golden brown, and it is bubbly around the edges.

 Remove from the oven and allow to cool for 10 minutes before scooping heaping spoonfuls into bowls and topping with generous scoops of vanilla ice cream.

 As an Amazon Associate I earn from qualifying purchases.


Monday, July 15, 2024

Peanutty M&M Cookies

 
I am quite a zealous shopper. When I get excited about something I want to buy the jumbo size. There are perfectly acceptable reasons to do so: larger sizes tend to be cheaper, I don’t have to worry about quickly running out, and if ever I need that product, I always have it on hand. Therein lies the problem. I always have it on hand. It is always going to be in my pantry, it is always going to be taking up space. It is often going to get knocked to the floor because there’s no room for so many jumbo size products in my not so jumbo pantry.

 You’re probably wondering where I’m going with this. I’ll tell you. I bought the jumbo size package of peanut M&Ms because I love them. I love the combination of salty and sweet. The thing is, after a couple of days I got pretty tired of them, after a week, I was sick to death of them, and after two weeks, I stuffed them into the back of my pantry, physically removing them from my sight. It was that bad. No way was I going to waste the money that I spent by getting rid of them, so I decided that I needed to use them in a way that I don’t normally do, so I took out a little of my frustration with a meat mallet, and shattered quite a lot of them. I then decided to use them in a cookie along with semi-sweet chocolate chips and cocktail peanuts, to see if I could come up with something different. These are good! As someone who loves nuts and a cookie, my opinion is that you can never have too many. Next time I make these, I think I’m going to add more.

Peanutty M&M Cookies

1 c. butter (2 sticks)

¾ c. dark brown sugar

¾ c. granulated sugar

2 large eggs

2 t. vanilla extract

2½ c. flour

1 t. baking soda

½ t. salt

1 c. semisweet chocolate chips

1 c. cocktail peanuts

1 c. crushed peanut M&Ms*

 Cream the butter with the brown and granulated sugars. Add the eggs and vanilla and beat until fluffy.

 In a separate bowl, combine the flour, baking soda, and salt and add to the creamed mixture. Stir in the chocolate chips, peanuts, and crushed M&Ms. Refrigerate for one hour.

 Preheat the oven to 375°F. Spray a baking sheet with PAM or top with parchment or a Silpat.

Using a cookie scoop, drop mounds of dough, 2 inches apart, onto prepared baking sheet. Bake the cookies until they're golden brown, 12 to 14 minutes.

Makes approximately 48 cookies.

*If you like, you can set some of these aside to sprinkle on top of the cookies before baking.

As an Amazon Associate I earn from qualifying purchases.

Thursday, May 23, 2024

Italian Cream Cheese Stuffed Celery


 It may sound strange, but stuffed celery is always something that I go for when it’s on a snack tray or a part of a buffet. There is something about the cool crispness of the celery combined with the pungency of the cheese that I find wonderfully satisfying. This recipe for Italian cream cheese stuffed celery is not my own, but one I just had to try for the ease if nothing else. It was lacking in freshly ground black pepper, so I added a hefty amount of that, and thought that made it absolutely perfect. With warm days ahead, this refreshing snack will be welcome.

Italian Cream Cheese Stuffed Celery

Slightly adapted from plainchicken.com

6 or 7 stalks of celery, rinsed and dried

1 (8-oz) block cream cheese, softened

1 (0.60-oz) package Italian dressing mix

½ c. Duke’s mayonnaise

1 cup shredded mozzarella cheese

Freshly ground black pepper, to taste

 Cut each celery stalk into three pieces. Set aside.

Combine cream cheese, Italian dressing mix, mayonnaise, and mozzarella cheese. Stuff celery with cream cheese mixture.

 Garnish celery with dried parsley and paprika, if desired. Refrigerate until ready to serve.

As an Amazon Associate I earn from qualifying purchases.