Showing posts with label Ina Garten recipe. Show all posts

Thursday, September 15, 2022

Cauliflower Toasts

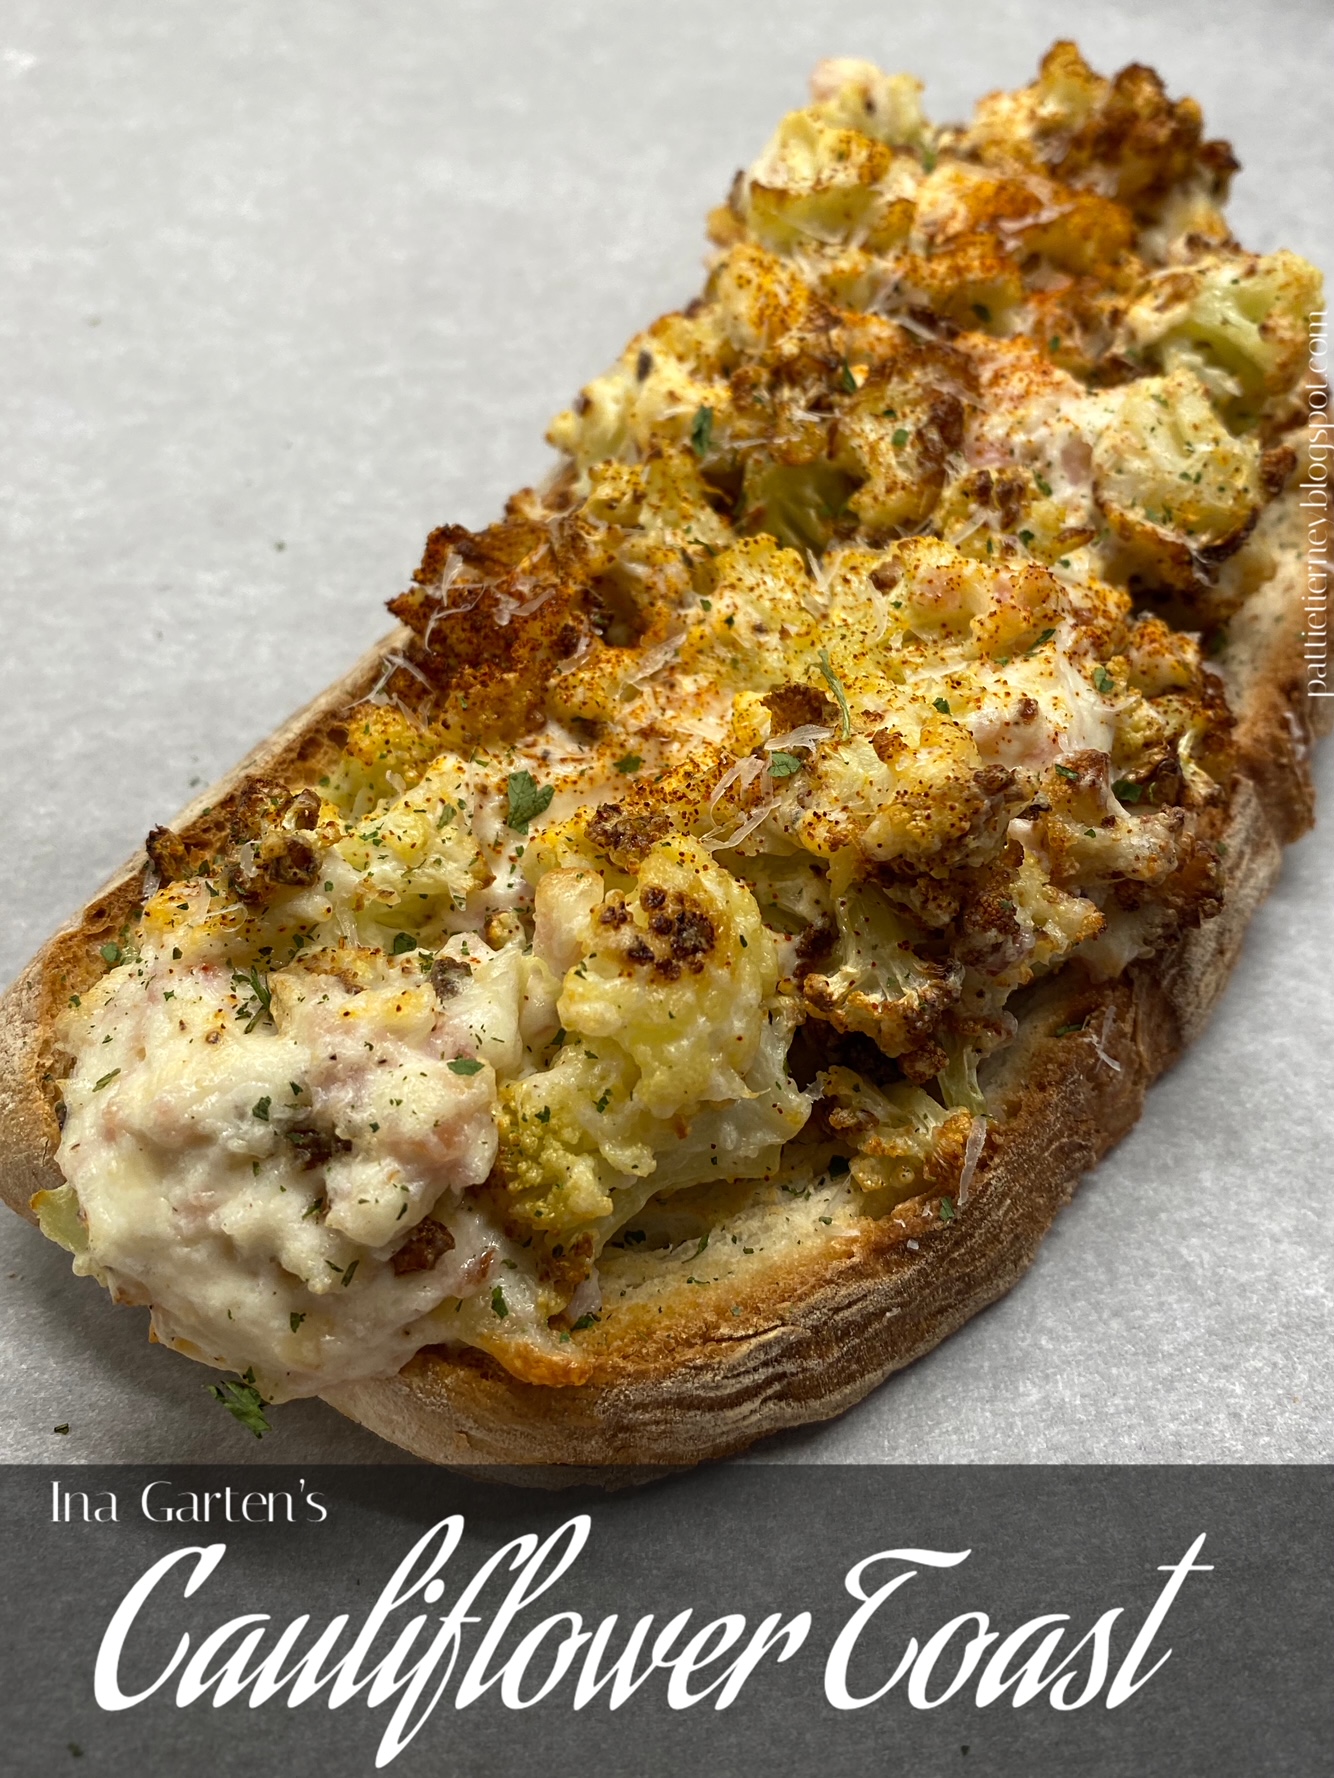
I think we have all probably heard of avocado toast, something I never stop enjoying being the fan of avocado that I am, but I’m wondering how many of you are familiar with Cauliflower Toast. This is from the genius of Ina Garten, and is absolutely delicious! Personally, I can eat the cauliflower on its own just roasted in the oven, tossed with a little olive oil, salt and pepper, and red pepper flakes as she has done here, but when you stir in all of these other ingredients, mound it on toast and broil, it is wonderful! Do what I did, and use a large slice of rustic bread, cut it into quarters, and share it with a friend.

Cauliflower Toasts

 1 small head cauliflower (2 lbs.)

4 t. olive oil

¼ t. crushed red pepper flakes

Kosher salt and freshly ground black pepper

12 oz. Italian mascarpone cheese, room temperature

6 oz. Gruyère cheese, grated

4 oz. thinly sliced prosciutto*, julienned

¼ t. freshly ground nutmeg

6 large slices country-style bread

Paprika

Freshly grated Italian Parmesan cheese

2 T. minced fresh chives

Flaked sea salt, such as Maldon

 Preheat the oven to 400° F.

 Turn the cauliflower upside down on a cutting board. Cut off and discard most but not all of the stems, then cut the florets into small, ½” clusters. Place the florets on a sheet pan, toss them with the olive oil, red pepper flakes, 1 t. salt, and ½ t. black pepper, and spread them out in a single layer. Roast for 25 to 30 minutes, tossing two or three times, until the florets are tender and randomly browned. Set aside to cool for 10 minutes.

 Set the oven to broil and arrange a rack 6 inches below the heat.

 Transfer the florets to a large mixing bowl and add the mascarpone, stirring to coat the florets evenly. Stir in the Gruyère, prosciutto, nutmeg, 1 t. salt, and ½ t. black pepper.

 Toast the bread in a toaster until lightly browned, and place in a single layer on a sheet pan lined with foil. Mound the cauliflower mixture evenly on each toast and dust with paprika. Broil the toasts for 2 to 4 minutes, until browned and bubbling. (Watch them carefully!) Transfer to plates and sprinkle with Parmesan, the chives, and sea salt. Serve hot.

 *I used deli ham. I’m not a fan of prosciutto. It just seems like ham jerky to me.


As an Amazon Associate I earn from qualifying purchases.


Thursday, March 14, 2013

Easy Tomato Soup & Grilled Cheese Croutons


I don't know what it's like where you are, but here in the Mississippi Valley it is unseasonably cold, I'm talking middle-of-winter cold.  At a time when I should be pressing my face against the glass of the local garden center, I am, instead, wearing two sweaters and standing over a big pot stirring soup. Perusing seed catalogs offering a wide variety of Heirloom Tomatoes put me in a powerful mood for tomato soup, so Ina Garten to the rescue with this wonderful, easy, fresh tasting recipe. It's from her latest cookbook, Barefoot Contessa Foolproof,
 and can be steaming in a bowl in a little over 30 minutes. This is my new go-to tomato soup recipe, but it had a trifle too much orzo for me, so the next time, I'd cut the amount to 1/3 or a heaping 1/4 cup.

Easy Tomato Soup & Grilled Cheese Croutons
From Foolproof by Ina Garten

3 tablespoons good olive oil
3 cups yellow onions, chopped (2 onions)
1 tablespoon minced garlic (3 cloves)
4 cups homemade chicken stock
1 (28-ounce) can crushed tomatoes
Large pinch of saffron threads
Kosher salt
Freshly ground black pepper
1/2 cup orzo
1/2 cup heavy cream
Grilled Cheese Croutons to garnish

In a large pot, heat the olive oil over medium heat. Add the onions and cook over medium-low heat for 15 minutes, stirring occasionally, until golden brown. Add the garlic and cook for 1 more minute. Stir in the chicken stock, tomatoes, saffron, 1 tablespoon salt, and 1 teaspoon pepper.  Bring the soup to a boil, then lower the heat and simmer for 15 minutes.

Meanwhile, fill a medium pot with water, add 2 teaspoons salt, and bring to a boil. Add the orzo and cook for 7 minutes. (It will finish cooking in the soup.)  Drain the orzo and add it to the soup. Stir in the cream, return the soup to a simmer, and cook for 10 more minutes, stirring frequently.

Serve hot with Grilled Cheese Croutons scattered on top.


Monday, October 8, 2012

Maple Leaf Cookies


October is my favorite cookie baking month.  It is cool enough to be able to use the oven without sweltering, and it’s far enough away from the holiday season to not be frantic.  I like to bake when I’m relaxed and can actually enjoy the process.  These cookies have become a bit of a fall tradition for me because they are so easy and so much fun to make.  I like to use a shortbread dough, the recipe of which I’ve posted before, it’s Ina’s, and that woman really knows her shortbread!  It is an easy dough to work with, cuts like a dream, and leaves (if you'll pardon the pun) nice edges.

Maple Leaf Cookies

3/4 pound unsalted butter, at room temperature
1 cup sugar, plus extra for sprinkling
1 teaspoon pure vanilla extract
3 1/2 cups all-purpose flour
1/4 teaspoon salt

Preheat the oven to 350 degrees F.
In the bowl of an electric mixer fitted with a paddle attachment, mix together the butter and 1 cup of sugar until they are just combined. Add the vanilla. In a medium bowl, sift together the flour and salt, then add them to the butter-and-sugar mixture. Mix on low speed until the dough starts to come together. Dump onto a lightly floured board and divide into 3 sections.  Using Soft Gel Paste Food Color dye each portion of dough to the intensity that you desire. Form each colored piece of dough into a disk.  Wrap in plastic and chill for 30 minutes.
Remove dough from fridge. Tear each color of dough into four parts and fling them with reckless abandon onto a lightly floured cutting board. 
Roll the dough 1/2-inch thick and cut with a Maple Leaf Cookie Cutter. Gather up the scraps and roll again.  Each time you do this you'll get a new combination of colors.  Place the cookies on an ungreased baking sheet and bake for 20 to 25 minutes, until the edges barely begin to brown. Allow to cool to room temperature.


Sunday, January 22, 2012

Koi Fish Shortbread Cookies

Happy Chinese New Year!  While 2012 is the Year of the Dragon, I hope you won’t mind if I make use of my Chinese Fish Moon Cookie Mold to celebrate the day. Yes, it’s more cookie fun at the O-P abode, and again, with great results.
There is nothing easier than working with these wonderful little wooden cookie molds.  They are amazingly inexpensive, and if you spritz each one with cooking spray before filling, press the dough evenly into the mold, trim off the top, and give it a few good raps on a hard surface, a beautifully detailed, molded cookie will pop right out.  I used a favorite shortbread recipe from the Barefoot Contessa to make these cookies and, for the sake of convenience, have reprinted the recipe below.  I did not, however, find that I needed quite as much time to bake these as the recipe indicates.  Watch these cookies carefully.  They need to set rather than brown.  If you let them go too long you have cute little buttery-tasting fish rocks!
Ina Garten’s Shortbread Cookies

3/4 pound unsalted butter, at room temperature
1 cup sugar, plus extra for sprinkling
1 teaspoon pure vanilla extract
3 1/2 cups all-purpose flour
1/4 teaspoon salt

Preheat the oven to 350 degrees F.
In the bowl of an electric mixer fitted with a paddle attachment, mix together the butter and 1 cup of sugar until they are just combined. Add the vanilla. In a medium bowl, sift together the flour and salt, then add them to the butter-and-sugar mixture. Mix on low speed until the dough starts to come together. Dump onto a surface dusted with flour and shape into a flat disk. Wrap in plastic and chill for 30 minutes.
Roll the dough 1/2-inch thick and cut with a 3 by 1-inch finger-shaped cutter. Place the cookies on an ungreased baking sheet and bake for 20 to 25 minutes, until the edges barely begin to brown. Allow to cool to room temperature.
This post contains affiliate links.

Saturday, November 5, 2011

Thanksgiving Countdown: Zucchini Vichyssoise

Served in "shooter" glasses, I top each one with a single homemade crouton and a flat-leafed parsley leaf from my garden.
Thanksgiving is my favorite holiday.  To me it means not just giving thanks for another year gracing the planet (and those of you who know me know that I haven't always been so certain that I'd make it to the next one), but spending time with family, having a delicious meal, and NO GIFTS!  It means the fragrant aroma of turkey roasting in the oven, a fire crackling in the living room fireplace while we enjoy our cocktails, and another in Franklin stove in the dining room where we'll enjoy our meal.  

I have been serving Thanksgiving dinner for the past 22 years.  I shudder to think that it's been that long, not because of all of the work that I've done, but because it means I'm that old!  I serve a formal dinner that I begin planning at the end of October, and I love every minute of the preparation.  I always begin with soup.  Generally I serve my much-requested Potato-Leek Soup, a recipe I concocted on my own, with a special ingredient that I will take with me to my grave.  Other years I've dabbled with Butternut Squash Bisque, Cream of Artichoke and Jerusalem Artichoke Soup (my personal favorite, perhaps because my husband makes it), and Zucchini Vichyssoise.  Since I grew both zucchini and leeks in my garden this year I've chosen the latter, and will serve it in shooter glasses -- a fun, practical way to serve soup when you have a crowd.

  This is Ina Garten's recipe and can be found in her wonderful cookbook Barefoot in Paris (2004).

Zucchini Vichyssoise

1 tablespoon unsalted butter
1 tablespoon good olive oil
5 cups chopped leeks, white and light green parts (4 to 8 leeks)
4 cups chopped unpeeled white boiling potatoes (8 small)
3 cups chopped zucchini (2 zucchini)
1 1/2 quarts Homemade Chicken Stock, recipe follows, or canned broth
1 teaspoon kosher salt
1/2 teaspoon freshly ground black pepper
2 tablespoons heavy cream
Fresh chives or julienned zucchini, for garnish

Heat the butter and oil in a large stockpot, add the leeks, and saute over medium-low heat for 5 minutes. Add the potatoes, zucchini, chicken stock, salt, and pepper; bring to a boil; then lower the heat and simmer for 30 minutes. Cool for a few minutes and then process through a food mill fitted with the medium disc. Add the cream and season to taste. Serve either cold or hot, garnished with chopped chives and/or zucchini.

NOTE: This soup can be made ahead and frozen with excellent results.

This post is linked to:

Thursday, September 22, 2011

I made pie!


When I asked my husband to bring home apples, I meant bring home APPLES.  Bags and bags of fresh-from-the-farm apples so I can make apple butter, apple sauce, and pie.  Well, today he brought home apples all right, four of them.  So instead of embarking on "The Great Pie Adventure" I decided to try my hand at a small one. A little six-inch mini pie with a lattice crust, to be exact.  This is a first ever for me since actually eating pie has never been my thing.  Truth be told, I always thought pie was the liver of desserts.  I mean it's crust with hot, soggy fruit.  There is something about limp fruit that I never find particularly appealing.  BUT, lest the pie fanatics try to hunt me down and hit me about the head and shoulders with a rolling pin, I am beginning to change my mind, and if not totally embrace eating pie, well, then certainly embrace the artistry that comes from its creation. Looking bubbly and delicious (and it actually was!), the recipe I used is Ina Garten's Deep Dish Apple Pie that I cut way down. I used a purchased crust, fitting what I could into the little blue ceramic pie plate and then rolling out the leftover scraps to make the lattice. This was my first ever lattice crust, so I'm pretty proud!  

Here it is prior to going into the oven brushed with cream and sprinkled with sanding sugar.

If I can do it, so can you!


This post is linked to:


Friday, September 2, 2011

Zucchini Gratin


Year after year I plant zucchini.  I have so many wonderful zucchini recipes to try that I always hope for a bumper crop.  Year after year I'm disappointed.  I just do not understand how some people can have oodles and gobs of them while I struggle for even one.  This year I got lucky.  I got two.  Two, very large, very healthy zucchini were the entire harvest of the four Buick-sized plants that have overtaken my garden.  Deciding which recipe to try was not easy, particularly since I have way more recipes than I do squash, but since Ina Garten has never failed me I chose her recipe for Zucchini Gratin from The Barefoot Contessa Cookbook and was not disappointed.  Unlike my husband, who can take a vegetable or leave it, I could make a meal out of vegetables alone.  This delicious dish and a thick slice of crusty bread was all that I needed to have a very satisfying dinner (and having been so virtuous, how could I say "no" to dessert?).  I hope you give it a try!

Zucchini Gratin

6 tablespoons (3/4 stick) unsalted butter, plus extra for topping
1 pound yellow onions, cut in 1/2 and sliced (3 large)
2 pounds zucchini, sliced 1/4-inch thick (4 zucchini)
2 teaspoons kosher salt
1 teaspoon freshly ground black pepper
1/4 teaspoon ground nutmeg
2 tablespoons flour
1 cup hot milk
3/4 cup fresh bread crumbs
3/4 cup grated Gruyere


Preheat the oven to 400 degrees F.
Melt the butter in a very large (12-inch) saute pan and cook the onions over low heat for 20 minutes, or until tender but not browned. Add the zucchini and cook, covered, for 10 minutes, or until tender. Add the salt, pepper, and nutmeg and cook uncovered for 5 more minutes. Stir in the flour. Add the hot milk and cook over low heat for a few minutes, until it makes a sauce. Pour the mixture into an 8 by 10-inch baking dish. 

Combine the bread crumbs and Gruyere and sprinkle on top of the zucchini mixture. Dot with 1 tablespoon of butter cut into small bits and bake for 20 minutes, or until bubbly and browned.

The Barefoot Contessa Cookbook

This post is linked to:

Wednesday, August 17, 2011

Banana Crunch Muffins


It's been so noisy here all week with the roofers awakening us in the predawn hours that we've just been stumbling around the house muttering, "Coffee! Coffee!" able to do little else.  But this morning, having awakened to bird song, I figured it was time to get caught up with the weekend paper and have a nice hot muffin for breakfast.  This recipe is from Ina [Garten, the Barefoot Contessa] and is delicious!  Do NOT forgo the banana chips on top, they are wonderful.

BANANA CRUNCH MUFFINS

3 cups all-purpose flour
2 cups sugar
2 teaspoons baking powder
1 teaspoon baking soda
1/2 teaspoon salt
1/2 pound unsalted butter, melted and cooled
2 extra-large eggs
3/4 cup whole milk
2 teaspoons pure vanilla extract
1 cup mashed ripe bananas (2 bananas)
1 cup medium-diced ripe bananas (1 banana)
1 cup small-diced walnuts
1 cup granola
1 cup sweetened shredded coconut
Dried banana chips, granola, or shredded coconut, optional

Preheat the oven to 350 degrees F.
Line 18 large muffin cups with paper liners. Sift the flour, sugar, baking powder, baking soda, and salt into the bowl of an electric mixer fitted with a paddle attachment. Add the melted butter and blend. Combine the eggs, milk, vanilla, and mashed bananas, and add them to the flour-and-butter mixture. Scrape the bowl and blend well. Don't overmix.

Fold the diced bananas, walnuts, granola, and coconut into the batter. Spoon the batter into the paper liners, filling each 1 to the top. Top each muffin with dried banana chips, granola, or coconut, if desired. Bake for 25 to 30 minutes, or until the tops are brown and a toothpick comes out clean. Cool slightly, remove from the pan, and serve.

This post is linked to:
Real Food Wednesday
Cast Party Wednesdays
Wow Us Wednesday
Weekday Potluck
For more wonderful recipes from Ina, I highly recommend these books:
Barefoot Contessa How Easy Is That?: Fabulous Recipes & Easy Tips (Fabulous Recipes and Easy Tips)Barefoot Contessa Back to Basics: Fabulous Flavor from Simple IngredientsThe Barefoot Contessa Cookbook

Saturday, March 26, 2011

Cranberry Orange Scones


I was all set for a nice fresh bowl of fruit this morning, when I got up and opened the blinds.  Snow!  At the end of March!  Snow!  Not a lot, mind you, about an inch, along with sleet and drizzle.  It was the type of weather that called for something warm and comforting for breakfast.  I glanced at the recently purchased jar of Double Devon Cream on the counter and said to myself, Scones!

I've been eyeing this recipe of Ina's for some time, and figured why not try it today.  I cut the recipe in half since I was sorely lacking in dried cranberries, doubled up on the orange zest because I love it, and instead of dragging out the stand mixer, I thought I'd give these a try in the food processor.  It worked great!  Not only was it faster, but the texture was light and delicious, while still being suitably, umm, sconey!  My husband, who was just finishing up a breakfast of ham and eggs decided he'd try just a half of one, and quickly went back for the other half. 

The glaze was good, but the quantity unremarkable, so the next time I'm making it a bit thicker and putting on twice as much.

Cranberry Orange Scones

4 cups plus 1/4 cup all-purpose flour
1/4 cup sugar, plus additional for sprinkling
2 tablespoons baking powder
2 teaspoons kosher salt
1 tablespoon grated orange zest
3/4 pound cold unsalted butter, diced
4 extra-large eggs, lightly beaten
1 cup cold heavy cream
1 cup dried cranberries
1 egg beaten with 2 tablespoons water or milk, for egg wash
1/2 cup confectioners' sugar, plus 2 tablespoons
4 teaspoons freshly squeezed orange juice

Preheat the oven to 400 degrees F.

In the bowl of an electric mixer fitted with a paddle attachment, mix 4 cups of flour, 1/4 cup sugar, the baking powder, salt and orange zest. Add the cold butter and mix at the lowest speed until the butter is the size of peas. Combine the eggs and heavy cream and, with the mixer on low speed, slowly pour into the flour and butter mixture. Mix until just blended. The dough will look lumpy! Combine the dried cranberries and 1/4 cup of flour, add to the dough, and mix on low speed until blended.

Dump the dough onto a well-floured surface and knead it into a ball. Flour your hands and a rolling pin and roll the dough 3/4-inch thick. You should see small bits of butter in the dough. Keep moving the dough on the floured board so it doesn't stick. Flour a 3-inch round plain or fluted cutter and cut circles of dough. Place the scones on a baking pan lined with parchment paper. Collect the scraps neatly, roll them out, and cut more circles.

Brush the tops of the scones with egg wash, sprinkle with sugar, and bake for 20 to 25 minutes, until the tops are browned and the insides are fully baked. The scones will be firm to the touch. Allow the scones to cool for 15 minutes and then whisk together the confectioners' sugar and orange juice, and drizzle over the scones.

Barefoot Contessa Family Style: Easy Ideas and Recipes That Make Everyone Feel Like FamilyBarefoot Contessa at Home: Everyday Recipes You'll Make Over and Over AgainThe Barefoot Contessa Cookbook