Showing posts with label Sally's Baking Addiction. Show all posts

Tuesday, November 22, 2022

Harvest Spice Bread

This is a wonderful transitional loaf that will take you from fall into winter. The reason it’s transitional is because it contains 1/2 cup of pumpkin purée that you no doubt have lurking in the back of your refrigerator from other pumpkin things you made in the fall. It also has crisp apples, crunchy carrots, and walnuts. The next time I make this, and I will, I’m going to add rum soaked raisins (or cranberries). I like breads that are packed with goodness, and this particular one lends itself to that very thing.

Harvest Spice Bread

From sallysbakingaddiction.com

1¾ cup flour
1 t. baking soda
¾ t. salt
2 t. ground cinnamon
¼ t. freshly grated
nutmeg
¼ t. ground cloves
¼ t. ground ginger
½ c. vegetable oil
2 large eggs, room temperature
½ c. granulated sugar
 ½ c. dark brown sugar

½ c. pumpkin purée
1 heaping cup (about one large) peeled and shredded apple
¾ c. (about 2 large) peeled and shredded carrots
2 T. milk
1 c. chopped walnuts

Preheat oven to 350° F. Spray a
9” x 5” loaf pan with Baker’s Joy; set aside.

Whisk together flour, baking soda, salt, cinnamon, nutmeg, cloves, and ginger; set aside. In a medium bowl, whisk the oil, eggs, granulated sugar, brown sugar, pumpkin, shredded apple, shredded carrot, and milk together until combined. Pour the wet ingredients into the dry ingredients. Stir with a wooden spoon until combined. Fold in walnuts.

Spread the batter into prepared pan. Bake for 55 to 65 minutes until bread tests done.

Cool completely in the pan on a wire rack before removing and slicing. Cover and store leftover bread at room temperature for up to 4 days, or in the refrigerator for up to 10 days.


As an Amazon Associate I earn from qualifying purchases.


Friday, August 19, 2022

Chocolate Peanut Butter Cake

Do you ever hear yourself say something, and while you’re saying it you wonder what the heck is happening? I had an experience like this last week when I heard myself tell my son that I would make him a cake that I saw online for him for his birthday. What was I thinking? I’ve told you all that I don’t bake. The fact that I offered to bake doesn’t alter the fact that I really don’t do it. As luck would have it, I did bake the cake, it was delicious, and it looked beautiful! Frankly, I surprised myself.

This is one of those cakes that, unless you are willing to devote an entire day to, don’t even consider making it. I tend to involve myself in such things when there’s a day baseball game. I find that the nerve-racking game can counteract the nerve-racking cake baking process, everything levels out, and I’m relatively calm. It’s either that, or the double martini that I poured before I started baking, but I digress.

This cake is special. It’s time consuming, but there is nothing here that isn’t completely doable for even the most inexperienced baker, of which I am one. It’s a showstopper to be sure. If there is someone special in your life, or someone about to celebrate a milestone event, give this some consideration.

 Chocolate Peanut Butter Cake

As seen on Sally’s Baking Addiction

1¾ c. flour

¾ c. unsweetened natural cocoa powder (not Dutch process)

1¾ c. sugar

2 t. baking soda

1 t. baking powder

1 t. salt

2 t. espresso powder

½ c. vegetable oil

2 large eggs, room temperature

¾ c. sour cream, room temperature

½ c. buttermilk, room temperature

2 t. vanilla extract

½ c. black coffee

1 c. semi-sweet chocolate chips (tossed in 1 T. flour)

 Preheat oven to 350°F. Spray the heck out of three 8” cake pans with Baker’s Joy; set aside.

Make the cake: Whisk the flour, cocoa powder, sugar, baking soda, baking powder, salt, and espresso powder together in a large bowl. Set aside. Using a handheld or stand mixer fitted with a whisk attachment, mix the oil, eggs, and sour cream together on medium-high speed until combined. Add the buttermilk and vanilla, and beat until combined. Pour the wet ingredients into the dry ingredients, add the hot coffee, and whisk or beat on low speed until the batter is completely combined. Fold in the flour-coated chocolate chips. Batter is thin and you may see some air bubbles on the surface—that’s normal.

 Divide batter evenly between 3 pans. Bake for approximately 24–26 minutes. Baking times vary, so keep an eye on yours. The cakes are done when a toothpick inserted in the center comes out clean.

Remove the cakes from the oven and set on a wire rack. Allow cooling completely in the pan. The cakes may slightly sink in the middle as they cool—that’s expected.

PEANUT BUTTER FROSTING

 ¾ c. (1-1/2 sticks) butter, room temperature

1¾ c. creamy peanut butter (Jif recommended)

1¾ c. confectioners’ sugar

1 t. vanilla extract

Pinch of salt

3 T. heavy cream, room temperature

 As the cakes cool, make the peanut butter frosting: With a handheld or stand mixer fitted with a paddle attachment, beat the butter on medium high speed until creamy and smooth, about 2 minutes. With a rubber spatula, scrape down the sides and bottom of the bowl as needed.

 Add the peanut butter and beat until completely combined, about 1–2 minutes. Scrape down the sides and bottom of the bowl as needed to help combine. Mixture will be thin. Add confectioners’ sugar, vanilla extract, and salt and then pour in the heavy cream with the mixer running on low speed.

 After all of the cream has been added, turn the mixer up to medium-high speed and beat for 1–2 minutes, or until fully combined and creamy. Add up to 1/4 cup more confectioners’ sugar if frosting seems quite thin. You should end up with about 3.5–4 cups of peanut butter frosting. This amount makes enough for the filling, crumb coat, and for a little piping on top.

 Assemble cake + apply crumb coat: Place 1 cake layer on your cake stand or serving plate. Using a large icing spatula, evenly cover the top with about 1 cup peanut butter frosting. Repeat with 2nd and 3rd cake layers, spreading about 1 cup of peanut butter frosting in between each layer. Spread a thin layer of frosting on the top and around the sides as a crumb coat. Run a bench scraper around the cake to smooth out crumb coat. Chill uncovered in the refrigerator for at least 30 minutes and up to 3 hours to set the crumb coat.

CHOCOLATE GANACHE

 2 4-oz. quality semi-sweet chocolate bars (8 oz), finely chopped

1 c. heavy cream

Optional garnish: chopped or mini peanut butter cups

 As your crumb coat sets, make the chocolate ganache: Place finely chopped chocolate in a medium heat-proof bowl. Heat the cream in a small saucepan over medium heat until it begins to gently simmer. (Do not let it come to a rapid boil—that’s too hot!) Pour over chocolate, and then let it sit for 2–3 minutes to gently soften the chocolate.

 With a metal spoon or small rubber spatula, very slowly stir until chocolate has melted and mixture is smooth. Ganache is thin. The finer you chopped the chocolate, the quicker it will melt with the cream. If it’s not melting, DO NOT MICROWAVE it. Once ganache mixture is smooth, let it chill for 20-30 minutes in the refrigerator to thicken before spreading on chilled crumb-coated cake.

 Pour/spoon thickened ganache on chilled cake. Smooth the top with a large icing spatula and the sides with a bench scraper.  If desired, pipe remaining peanut butter frosting around the edge of the cake.

 I used Wilton 1M piping tip on the pictured cake. Garnish with peanut butter cups, if desired. Serve cake immediately or chill, uncovered, for up to 4–6 hours before serving. Cake can be served at room temperature or chilled.

 Cover leftover cake tightly and store in the refrigerator for 5 days. I like using a cake carrier for storing and transporting.

 As an Amazon Associate I earn from qualifying purchases.


Thursday, September 27, 2018

Giant Chocolate Chip Cookie


Unless it’s a cheeseburger, there is nothing that I like better than a homemade cookie. What I don’t like is making homemade cookies. It is too much tedious work. So, when I found this recipe for one giant chocolate chip cookie I thought it was absolutely for me. The same delicious taste of chocolate chip cookies that I can just cut up into nice wedges. Perfect!

What I didn’t take into consideration is that I can’t cut a pizza or a pie to save my life. While the first slice comes out perfectly, it goes seriously downhill from there. Because I never seem to start exactly in the middle, each shape takes on a different form until I end up with a trapezoid, a polygon, with one remaining lump that most closely resembles a tetrahedron. For this reason, I can only show you a couple of the cookies that I baked. But, they were absolutely delicious, and I highly recommend this recipe.

This is actually the second time I made them. The first time I confused White Lily Baking Flour for White Lily All Purpose Flour, and the cookie expanded across the pizza pan, climbed over the edge and showered down onto the bottom of my oven, where it formed sort of a cobbled layer that burned, causing smoke to billow out the oven vents and into the kitchen. I cleaned this up to the screech of the smoke detector. It was a lovely evening.

I changed up the original recipe a bit in that instead of using one and a half cups of semisweet morsels, I used a half cup of semisweet morsels and one full cup of mini morsels. I think you get a better dough-to-chocolate-chip ratio doing it this way. If you like, you can sprinkle some regular sized semisweet morsels on the top when you pull it out of the oven, and pat them in gently for more chocolate and a more attractive appearance.

Giant Chocolate Chip Cookie
From Sally’s Baking Addiction

2 cups flour
2 teaspoons cornstarch
1 teaspoon baking soda
½ teaspoon salt
¾ cup unsalted butter, room temperature
¾ cup packed brown sugar
¾ cup granulated sugar
1 large egg, room temperature
2 teaspoons vanilla
½ cup semisweet chocolate chips
1 cup mini chocolate chips

Preheat oven to 350°F. Lightly grease a large cookie sheet, or
pizza pan (or cover with parchment or a Silpat).

In a medium mixing bowl, whisk together flour, cornstarch, baking soda, and salt; set aside.

Using a stand mixer fitted with the paddle attachment, cream the butter and sugars on medium speed until smooth, about 2 minutes. Add eggs and beat on high, about 1 minute. Add vanilla extract; mix until combined.

Add dry ingredients and mix on low until combined. Fold in chocolate chips. With floured hands form go into a large, flat round, transfer to prepared pan, and flatten to ½” thick. Scatter and press additional chocolate chips into top, if desired.


Bake for 22 to 25 minutes or until puffed and lightly browned on top. If you want the cookie a little crisper on the edges, bake for a couple of extra minutes. Allow to cool in the pan set on a wire rack before slicing into, hopefully decent looking triangles.

If you prefer the drop style of Chocolate Chip Cookie, you will love these Copycat Doubletree Chocolate Chip Cookies!


This post is linked to:

This post contains affiliate links.

Tuesday, January 23, 2018

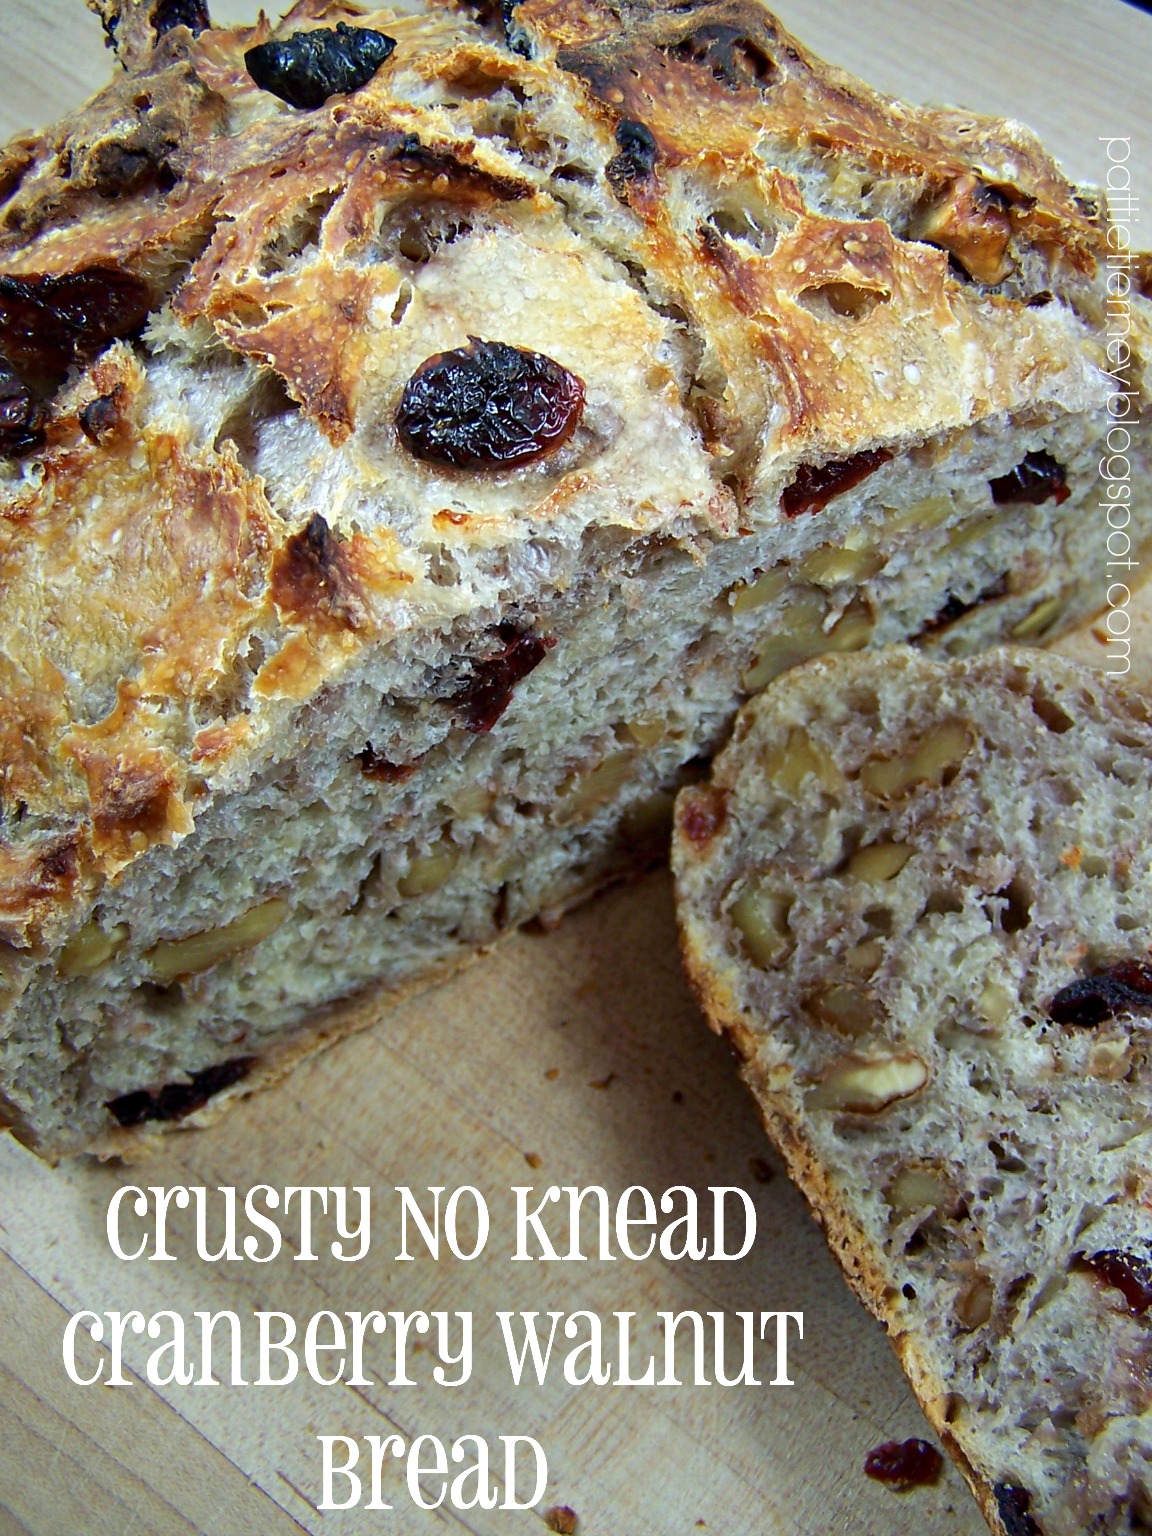
Crusty No-Knead Cranberry Walnut Bread

I think about my late husband every day, but never so much as in January, which would have been his birthday month, and today his birthday. He loved a good loaf of bread, and not a week would go by where I wouldn't find him buying a loaf or two from one of the local bakeries. He liked it with a crispy exterior and a dense and chewy interior. I don't know if it was because I was thinking about him that caused me to make this bread, or because I was just in the mood for dense and chewy home-baked goodness. Either way, when I spotted this recipe I knew I had to give it a try.
The recipe may seem long, but it is very simple to put together. It also yields spectacular results! Honestly, I could not believe it. I had a slice this morning, spread with softened cream cheese, and it was as good, if not better, than any bread I've had from one of the top local bakeries. The fact that I made it at home astounds me. I can tell you that this is going to be the starting point for other fruit/nut/seed varieties that I plan to make. If the thought of making bread seems daunting to you, you need to try this one. The fact that it requires no kneading and precious little work will have you making it again and again.

Happy Birthday, Jim! I miss you, sweetie.
 Crusty No Knead Cranberry Walnut Bread
Adapted from Sally's Baking Addiction

3 cups + 2 Tablespoons all-purpose flour, plus more for hands
2 teaspoons kosher salt
1/2 teaspoon granulated yeast
3/4 cup chopped walnuts
1 Tablespoon honey
1 ½ cups warm water (about 95°F)

Stir the first 6 ingredients together in a large bowl. Stir in the warm water. The dough will be pretty sticky. Don't be tempted to add more flour, sticky is what you're going for. Gently shape into a ball as well as you can. Cover tightly with plastic wrap. Set on the counter at room temperature and allow to rise for 12-18 hours. I tend to keep my house on the cool side (62° during the day and 55° at night) so mine took the entire 18 hours. You'll know the dough is ready when it doubles in size and sticks to the side of the bowl. The top should be covered with air bubbles.

Turn the dough out onto a lightly floured work surface and, using lightly floured hands, shape into a ball. Transfer dough to a large piece of parchment paper.

Using a very sharp knife, gently score an “X” into the top. Cover dough lightly with plastic wrap and set aside while you preheat your oven.

Place your covered Dutch oven into your oven and preheat it to 475° F. When your oven comes up to temperature, set a timer for 30 minutes. After 30 minutes, remove the Dutch oven from the oven, remove the plastic from the top of your bread dough, and carefully place the dough inside by lifting it up with the parchment paper and sticking it all-- the parchment paper included-- inside the pot. Cover with the lid.

Bake for 25 minutes with the lid on. Carefully remove the lid and continue baking for 8-10 more minutes until the bread is golden brown. Remove pot from the oven, carefully remove the bread from the pot, and allow to cool on the counter for 30 minutes before serving.

Cover and store leftover bread at room temperature for 1 week.


This post is linked to:

This post contains affiliate links.


Sunday, October 25, 2015

Sally's Candy Addiction, a delicious review


If you are as much of a fan of Sally McKenney's hugely popular blog, Sally's Baking Addiction, as I am, then you are going to want her latest book, Sally's Candy Addiction. Mouthwatering page after mouthwatering page, here you will find some of the most delicious candy recipes imaginable, 75 in fact, all of them easy and perfectly doable. From truffles to caramels to the turtles my mother used to make for the annual church bazaar, I found myself waxing nostalgic reading the classic recipes, while completely captivated by her take on the new.
Some of the recipes have only two ingredients and are perfect for the novice or budding cook, or for preparing with the pack of Cub Scouts or Brownie Troop that you direct every week.
Mr. O-P made the mistake of buying a bag of Reese's peanut butter chips rather than the cups (that I needed for the recipe here) and, as I plunked them onto a shelf in the pantry, sighed, thinking that I would never use them. But then along came Sally and her recipe for Peanut Butter Chocolate Swirl Bark, and those peanut butter chips were pressed into service. Wow, this bark is the easiest thing you will ever make and inhaling-ly delicious. A batch of this is going to find its way into Halloween bags this year.
 
With detailed instructions on how to temper chocolate, explanations as to the different types of chocolate, including chocolate coating (an ingredient that I have recently come to embrace), this book is a handy reference guide. Additionally there is a valuable section on key ingredients, kitchen essentials, and tips on candy-making basics to help you get started on your sweet journey. 
The book is divided into sections to help you focus on your favorite candy fix: Candy Classics; Chocolate-Covered; Truffles; Caramel, Toffee and Brittle; Nuts and Sweet Things; Fudge; and an entire chapter on recipes using candy as a main ingredient. 
Easy-to-follow, beautifully photographed, and with no chocolaty stone unturned, this book has a recipe for every sweet tooth in your life.


Disclaimer: Many thanks to the lovely people at Race Point Publishing who sent me a copy of the book in exchange for an honest review.