Showing posts with label chocolate chips. Show all posts

Monday, July 15, 2024

Peanutty M&M Cookies

 
I am quite a zealous shopper. When I get excited about something I want to buy the jumbo size. There are perfectly acceptable reasons to do so: larger sizes tend to be cheaper, I don’t have to worry about quickly running out, and if ever I need that product, I always have it on hand. Therein lies the problem. I always have it on hand. It is always going to be in my pantry, it is always going to be taking up space. It is often going to get knocked to the floor because there’s no room for so many jumbo size products in my not so jumbo pantry.

 You’re probably wondering where I’m going with this. I’ll tell you. I bought the jumbo size package of peanut M&Ms because I love them. I love the combination of salty and sweet. The thing is, after a couple of days I got pretty tired of them, after a week, I was sick to death of them, and after two weeks, I stuffed them into the back of my pantry, physically removing them from my sight. It was that bad. No way was I going to waste the money that I spent by getting rid of them, so I decided that I needed to use them in a way that I don’t normally do, so I took out a little of my frustration with a meat mallet, and shattered quite a lot of them. I then decided to use them in a cookie along with semi-sweet chocolate chips and cocktail peanuts, to see if I could come up with something different. These are good! As someone who loves nuts and a cookie, my opinion is that you can never have too many. Next time I make these, I think I’m going to add more.

Peanutty M&M Cookies

1 c. butter (2 sticks)

¾ c. dark brown sugar

¾ c. granulated sugar

2 large eggs

2 t. vanilla extract

2½ c. flour

1 t. baking soda

½ t. salt

1 c. semisweet chocolate chips

1 c. cocktail peanuts

1 c. crushed peanut M&Ms*

 Cream the butter with the brown and granulated sugars. Add the eggs and vanilla and beat until fluffy.

 In a separate bowl, combine the flour, baking soda, and salt and add to the creamed mixture. Stir in the chocolate chips, peanuts, and crushed M&Ms. Refrigerate for one hour.

 Preheat the oven to 375°F. Spray a baking sheet with PAM or top with parchment or a Silpat.

Using a cookie scoop, drop mounds of dough, 2 inches apart, onto prepared baking sheet. Bake the cookies until they're golden brown, 12 to 14 minutes.

Makes approximately 48 cookies.

*If you like, you can set some of these aside to sprinkle on top of the cookies before baking.

As an Amazon Associate I earn from qualifying purchases.

Thursday, October 24, 2019

Chocolate Toffee Bars

This post may contain affiliate links.

 Had I not been so keenly interested in covering this cookie with toffee bits, I may have considered some of the darling Halloween sprinkles that are available in the shops today. But, what can I say? I didn't. No matter, the toffee bit topping was a huge hit with the masses that I am trying to feed these days. Consider this bar cookie when a dessert is in order, time is short, and you’re looking for something easy — perhaps portable — that everyone will love.
Chocolate Toffee Bars

BASE
1 cup unsalted butter, softened
1 cup dark brown sugar, packed
1½ cups flour

Preheat oven to 350° F. Line a 9” x 13” pan with foil, allowing a 2-inch overhang on either end. This facilitates easy removal.

Cream together butter, brown sugar, and flour, until well blended. Press into prepared pan. Bake for 20 to 22 minutes, or until lightly golden. Remove from oven and cool while preparing the topping.

CARAMEL LAYER
1 14-ounce can sweetened condensed milk
¼ cup butter

In a medium pan over medium heat, heat sweetened condensed milk and butter together, stirring constantly for 8-10 minutes until thickened. Spread over cooled base. Bake 10-12 minutes or until golden. Remove from oven.

TOPPING
1½ cups chocolate chips
¾ cup
Heath toffee bits

Sprinkle chocolate chips evenly over the top. Bake a final two minutes until chocolate is shiny and soft. Remove from oven. Spread chocolate evenly with a small
offset spatula; sprinkle toffee bits generously over the top. Cool and cut into bars.


Thursday, September 27, 2018

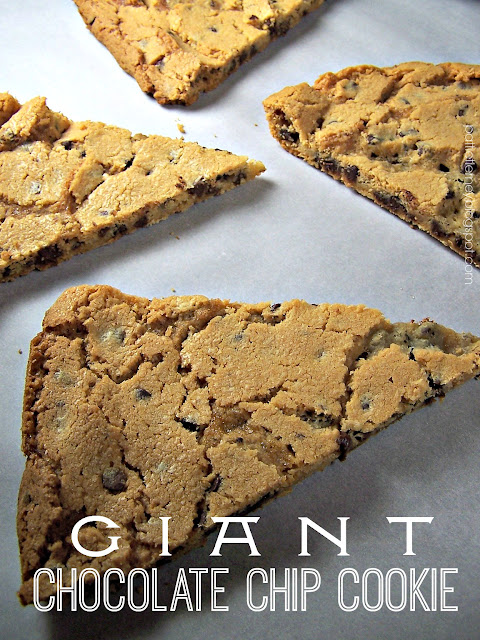
Giant Chocolate Chip Cookie


Unless it’s a cheeseburger, there is nothing that I like better than a homemade cookie. What I don’t like is making homemade cookies. It is too much tedious work. So, when I found this recipe for one giant chocolate chip cookie I thought it was absolutely for me. The same delicious taste of chocolate chip cookies that I can just cut up into nice wedges. Perfect!

What I didn’t take into consideration is that I can’t cut a pizza or a pie to save my life. While the first slice comes out perfectly, it goes seriously downhill from there. Because I never seem to start exactly in the middle, each shape takes on a different form until I end up with a trapezoid, a polygon, with one remaining lump that most closely resembles a tetrahedron. For this reason, I can only show you a couple of the cookies that I baked. But, they were absolutely delicious, and I highly recommend this recipe.

This is actually the second time I made them. The first time I confused White Lily Baking Flour for White Lily All Purpose Flour, and the cookie expanded across the pizza pan, climbed over the edge and showered down onto the bottom of my oven, where it formed sort of a cobbled layer that burned, causing smoke to billow out the oven vents and into the kitchen. I cleaned this up to the screech of the smoke detector. It was a lovely evening.

I changed up the original recipe a bit in that instead of using one and a half cups of semisweet morsels, I used a half cup of semisweet morsels and one full cup of mini morsels. I think you get a better dough-to-chocolate-chip ratio doing it this way. If you like, you can sprinkle some regular sized semisweet morsels on the top when you pull it out of the oven, and pat them in gently for more chocolate and a more attractive appearance.

Giant Chocolate Chip Cookie
From Sally’s Baking Addiction

2 cups flour
2 teaspoons cornstarch
1 teaspoon baking soda
½ teaspoon salt
¾ cup unsalted butter, room temperature
¾ cup packed brown sugar
¾ cup granulated sugar
1 large egg, room temperature
2 teaspoons vanilla
½ cup semisweet chocolate chips
1 cup mini chocolate chips

Preheat oven to 350°F. Lightly grease a large cookie sheet, or
pizza pan (or cover with parchment or a Silpat).

In a medium mixing bowl, whisk together flour, cornstarch, baking soda, and salt; set aside.

Using a stand mixer fitted with the paddle attachment, cream the butter and sugars on medium speed until smooth, about 2 minutes. Add eggs and beat on high, about 1 minute. Add vanilla extract; mix until combined.

Add dry ingredients and mix on low until combined. Fold in chocolate chips. With floured hands form go into a large, flat round, transfer to prepared pan, and flatten to ½” thick. Scatter and press additional chocolate chips into top, if desired.


Bake for 22 to 25 minutes or until puffed and lightly browned on top. If you want the cookie a little crisper on the edges, bake for a couple of extra minutes. Allow to cool in the pan set on a wire rack before slicing into, hopefully decent looking triangles.

If you prefer the drop style of Chocolate Chip Cookie, you will love these Copycat Doubletree Chocolate Chip Cookies!


This post is linked to:

This post contains affiliate links.

Sunday, December 28, 2014

Magic Bars


I am petitioning in favor of the Post-Christmas Cookie.  You know, the one that you wanted to try, or that you really, REALLY, love to bake, but never had a chance to make during the season because you were just so darned busy/stressed/frazzled/overscheduled (please select one, or more, what the heck?).  Yes, if not for very generous bakers and their skilled offspring bringing me cookies, I wouldn’t have had a one.  So, after the day was over, I decided to bake a favorite recipe for bar cookies that dates back to my Home Ec days in high school.  They go by many names, Magic Bars, Hello Dollies, and a host of others, but whatever the name, no one is unfamiliar with this rich and chewy bar cookie.  I make mine a bit different from the original recipe in that I use both semi-sweet and milk chocolate chips.  I also like to make a richer nut mixture by using a mixed nut mix of pecans, cashews, macadamias, almonds, filberts, and Brazil nuts.

Why not join me in my post-holiday baking and give these chewy crowd pleasers a try?

Magic Bars

1 stick butter
1-1/2 cups graham cracker crumbs
(from about a pack and a half of graham crackers)
1 14-oz. can sweetened condensed milk
1 cup semi-sweet chocolate chips
1 cup milk chocolate chips
1 cup flaked coconut
1 cup chopped mixed nuts

Preheat oven to 350°F.

Now you have two options: spray a 9 x 13 pan with non-stick cooking spray, OR (as I did) line it with foil so that about 1-1/2 of foil hangs over the short edges, and then spray the foil with the non-stick cooking spray.  This will allow you to lift the entire thing out of the pan, slide off the foil (which is why it MUST be sprayed as well) and then make perfect little square cuts.

Combine graham cracker crumbs and butter.  If you buy graham cracker crumbs, just empty the correct amount into a medium bowl, drizzle with the butter, and stir until completely coated.  If using a food processor, break up a pack and a half of whole graham crackers, pulse until they become crumbs, and then pour the melted butter through the feed tube during the last stages of pulsing, and, Bob’s your uncle! 

Press crumbs and butter mixture into the bottom of your prepared pan.  Pour sweetened condensed milk evenly over the crumb mixture.  Layer evenly with chocolate chips, coconut, and nuts.  Press down firmly with your hands (Sometimes it helps to lightly dampen your hands to keep the ingredients from sticking.).

Bake for 20-25 minutes until just browned.  Cool.  Firmly grasping foil overhang, carefully lift from pan and place on cutting board.  Peel foil away from the edges and slide it out from under the baked bars.  Cut in even squares.

This post is linked to:


Thursday, December 4, 2014

Oatmeal Lizzies

 Like a cheap pair of underwear, this is a cookie that sneaks up on you. At first, the pleasant taste and crunchy texture seem far from addicting, but like those potato chips in the yellow bag, you can't stop with just one. Ask Mr. O-P whom I had to direct to step away from the cookie plate after consuming nearly half a dozen. Yes, I can hear crunching from the other room.

I don't know the source of this recipe. I'd emailed it to my mother twelve years ago with the not-so-subtle suggestion that she make them. She printed out the recipe and put it in her recipe box which is where it remained until I stumbled upon it yesterday.

It goes together easily. I mixed everything in a stand mixer, didn't bother to chill the dough, and used my beloved cookie scoop to plop hunks of dough onto the greased cookie sheets. I managed to make and bake them while dinner was cooking. These will make a nice addition to the holiday cookie tray.

Oatmeal Lizzies

1 c. shortening (I used Crisco)
1 c. sugar
1 c. brown sugar
1 tbsp. milk
1 tsp. vanilla
1/2 tsp. butter flavoring
2 eggs, beaten
1 tsp. baking soda
1/4 tsp. salt
2 c. all-purpose flour
2 c. quick oatmeal
1 c. semi-sweet chocolate chips
1 c. Heath Bits O' Brickle
1/2 c. chopped pecans

Preheat oven to 350°F.  Grease cookie sheets; set aside.

Cream sugars and Crisco. Add milk, flavorings, and eggs. Slowly add flour, salt, and soda. Stir in oatmeal, chips, and pecans, blending to incorporate. Chill 20 minutes (or not).

Shape into 1-inch balls and place on greased cookie sheet 2 inches apart. Bake 12-15 minutes until lightly browned. Cool on racks and store in air-tight container. Makes 4 1/2 dozen.
This post is linked to:

Saturday, August 3, 2013

Chocolate Scotcheroos


These are Chocolate Scotcheroos.  My aunt made them for my sons and me, and delivered them last week when we all met at my dad's for lunch.  Now, you are probably saying to yourself, what is so special about Scotcheroos? It's an old recipe that has been around for ages.  Well, in addition to their chewy deliciousness, I'll tell you why they are so special. To all of us, these represent love, stability, family, hope, and caring. A tall order for a simple bar cookie made out of cereal, but it's true.

In 2000 I had some scary health issues. My boys were young, and I tried to keep things as normal as possible to avoid worrying them. But sometimes, when in an exhausted and fearful state, it's hard to be normal. My boys grew up with homemade cookies once a week. I wanted them to know what a homemade cookie was, how they were created, and where they came from. But during this time I was too tired to make cookies. I also wasn't the type to ask for or accept help. Ever. My aunt wanted to help, and the only way she saw that she could, was to step into the role of cookie maker, so every week she would come by the house for a visit and cookie drop.  These were one of the boys' favorites.

When she came across the old recipe last week, she decided to make them again, and bring us a pan full. I may not see either of my sons for weeks at a time, but say the word, cookie and they'll be by within the hour. I portioned them out so that we all got some. I'm sure each of us had different memories of this cookie, but for me these will always represent love and caring during a hard time. But they're tasty during good times, too!

Chocolate Scotcheroos

1 cup light corn syrup
1 cup sugar
1 cup peanut butter
6 cups Kellogg's® Rice Krispies® cereal
1 cup chocolate chips
1 cup butterscotch chips

Place corn syrup and sugar into 3-quart saucepan. Cook over medium heat, stirring frequently, until sugar dissolves and mixture begins to boil. Remove from heat. Stir in peanut butter. Mix well. Add cereal. Stir until well coated. Press mixture into 13 x 9 x 2-inch pan coated with cooking spray. Set aside.

Melt chocolate and butterscotch chips together in 1-quart saucepan over low heat, stirring constantly. Spread evenly over cereal mixture. Let stand until firm. Cut into 2 x 1-inch bars when cool.
Note: Before measuring the corn syrup, coat your measuring cup with cooking spray--the syrup will pour easily out of the cup.

This post is linked to:

Monday, July 1, 2013

Toasted Pecan Chocolate Chip Cookies


I am not a particular fan of the chocolate chip cookie.  To me, there’s something off with the chocolate chip-to-cookie ratio.  It’s not that I don’t like chocolate.  No.  I love chocolate, but the dark chocolate in chips seems to overwhelm the delicate deliciousness of the dough and overshadows the taste of the pecans.  So, I’ve developed my own recipe that, in truth, favors the pecans, but it will satisfy you like no other chocolate chip cookie.  First of all, the pecans are toasted to bring out their flavor.  Second, the pecans outnumber the chips two-to-one.  Third, the addition of the pudding mix makes for a crisp on the outside, cakey on the inside cookie that is hearty and delicious.  If you’re wondering about the rather odd amount of pudding mix used, you need to take a look at this post.  That should explain everything.

Toasted Pecan Chocolate Chip Cookies

1 cup plus 2 T. all-purpose flour
½ teaspoon baking soda
½ cup butter, softened
2 T. granulated sugar
¼ c. plus 2 T. dark brown sugar
½ teaspoon pure vanilla
1 package, less 2-1/2 T. instant vanilla pudding mix
1 egg
1-1/2 cups broken pecans, toasted
2/3 cup semisweet chocolate chips

Preheat oven to 375°F. 

Whisk together flour and baking soda in a medium bowl; set aside.  In a large mixer bowl combine butter, the sugars, vanilla, and pudding mix and beat until smooth and creamy.  Add egg, beating to blend.  With mixer on low, gradually add flour, beating to incorporate.  Stir in nuts and chocolate chips.  Using a cookie scoop (or tablespoon), drop mounds of dough onto lightly greased baking sheets, spacing two inches apart.  Bake for 12-15 minutes until golden.  Makes about 20 cookies.

This post is linked to:

Wednesday, December 19, 2012

Salted Peanut Cookies


I am way behind on getting my holiday baking done.  Largely, I think, it has a lot to do with caring for more people than usual, all of whom are situated in different parts of town.  The running back and forth is starting to get to me.  Such exhaustion calls for fortification!  This season I’ve been seeing a recipe for Salted Peanut Cookies making the rounds.  I first had these in the seventies and, honestly, haven’t thought of them since, but there was just something about the combination of chocolate and peanuts that appealed, so I baked up a batch and sunk my teeth into one.  Salted Peanut Cookies, I’ve missed you!

Salted Peanut Cookies

1/2 cup margarine - (1 stick)
1/2 cup butter - (1 stick)
3/4 cup brown sugar, packed
3/4 cup granulated sugar
2 large eggs
2 tsp. vanilla extract
2 1/2 cups flour
1 tsp. baking soda
1-1/2 cups chocolate chips
1 cup salted peanuts

Preheat the oven to 375 degrees.

Cream the margarine and butter with the brown and granulated sugars. Add the eggs and vanilla and beat until fluffy.

In a separate bowl, combine the flour, baking soda and salt and add to the creamed mixture. Stir in the chocolate chips and peanuts.

Drop rounded spoonfuls of batter 2 inches apart onto a baking sheet. Bake the cookies until they're pale golden brown, 12 to 14 minutes.

Makes about 48 cookies.

This post is linked to:


Saturday, March 3, 2012

Halfway Cookies


I stumbled upon this delicious cookie on this site where there is a great tutorial on how to make them.  I was looking for a recipe for a simple, but chocolaty cookie, and this one, topped with a brown sugar meringue was most intriguing.  The high winds (for, what is it now, the tenth day in a row?) kept me inside, so I puttered around the kitchen putting these together.  The pictures don’t do them justice.  They are rich, chocolaty, chewy, with a crunchy, flavorful meringue topping.  Neither one of us could wait until they fully cooled so we had our first bite when the chocolate was still partially melted and oozing invitingly from the cookie.  They are a bit more work than the average bar cookie, but then these are far from average.  I’ve included the recipe below for your convenience, but do check out the site mentioned above, and then make these cookies!
Halfway Cookies
2 cups flour
1 teaspoon salt
1/4 teaspoon baking soda
1 teaspoon baking powder
1/2 cup unsalted butter, softened
1/2 cup granulated sugar
1 1/2 cup brown sugar, separated
2 eggs, separated
1 tablespoon water
1 teaspoon vanilla
12 ounces semi-sweet chocolate chips (I used Ghirardelli 60% Cacao)
Preheat the oven to 350°. Cut two pieces of aluminum foil and fold them to match the width of the pan. Press one piece into the pan lengthwise and the other into the pan crosswise with the ends hanging over the side. This makes it easy to lift the bars out of the pan once they're cooled. Spray the foil with nonstick coating.
Whisk together the flour, salt, baking soda, and baking powder in a small bowl and set aside. Cream together the butter, granulated sugar, and just 1/2 cup of the brown sugar until smooth and creamy, roughly 5 minutes at medium high.
Separate the eggs. Mix the yolks into the butter-sugar mixture one at a time until they are completely absorbed, then mix in the water and vanilla. With the mixer at a low speed, add the flour mixture and beat gently until all the flour has been absorbed.  Do not overmix.
Press the cookie dough gently into the pan with your hands, making sure the surface is even.
Sprinkle the chocolate chips on top of the cookie dough and use your palms to press them slightly into the dough. This will help keep them from moving when you add the meringue.
Using a stand or hand mixer with a clean bowl and a clean whisk attachment, start whisking the egg whites. Gradually increase your speed to medium-high. When the egg whites are very frothy, slowly add the remaining cup of brown sugar a little at a time. Continue increasing your speed to the highest setting. When all the sugar has been added, continue whipping the meringue until it holds a soft peak.  It should look like glossy, soft-serve ice cream.
Scoop the meringue from the bowl and mound it down the middle of the pan. It will be very sticky! Use an offset spatula to gently spread the meringue from the middle to the edges.
Lightly press a piece of parchment or wax paper on the top of the meringue (this makes an even layer and protects the meringue from scorching). Bake for 20 minutes, remove the parchment, bake for an additional 5-10 minutes more, until the edges look toasted and are pulling away from the sides of the pan.
Wait until the pan is completely cool before lifting out the bars and cutting them into squares.
This post is linked to: