Showing posts with label recipe. Show all posts

Monday, November 11, 2024

Creamy Minestrone

 This is one of those recipes that came about as the result of a mistake. I was making a pot of minestrone that I had been craving all week, and at the same time had warmed a bagel that I had recently cut in half and was ready to slather with some chive and onion cream cheese spread.  I scooped out half of the container, and ended up flipping it right into the soup. The soup was hot, the cheese immediately started melting, and there was nothing I could do but stir it in. It’s wonderful!
Creamy Minestrone

1 T. extra virgin olive oil

1 clove garlic

2 bay leaves

3 Melissa’s shallots

2 carrots

2 ribs celery

1 medium zucchini

1 T. vegetable soup base

1 14.5-oz. can fire roasted diced tomatoes

1 15.5-oz. can cannellini beans, drained

1 15.5-oz. can kidney beans, drained

Pinch of sea salt

Freshly ground black pepper

2 large handfuls of curly kale

½ c. ditalini pasta

½ 7.5-8-oz. container Chive and Onion Cream Cheese

 Peel and finely chop the garlic and shallots. Put a stockpot over medium-high heat and warm olive oil.

 Add the garlic and the bay leaves, followed by the shallots.

Trim and chop the carrots and celery into rough ¼” dice, adding to the pan as you go. Chop zucchini into ½” dice; add to the pan. Cook for 10 to 15 minutes, stirring regularly, or until softened and caramelized.

 Add the vegetable stock, tomatoes, beans, sea salt, and pepper.

Remove and finely chop any tough stalks from your greens, shred, and add to the pan and top with 4 c. of boiling water. Add the pasta, cover, and simmer for 10 to 15 minutes, or until the pasta is just cooked and the soup has thickened to your liking. Remove from heat, add cream cheese, and stir until melted and incorporated.

 Season the soup to perfection and serve.

As an Amazon Associate I earn from qualifying purchases.


Friday, November 1, 2024

Pumpkin Muffins with Bourbon Raisins

 
It just wouldn’t be fall without my whipping up a batch of pumpkin muffins. Every year I try to use a different recipe, or add a bit of variety to existing recipes, by switching or swapping out an ingredient or two. This year I decided that different ingredient was going to be bourbon. These are phenomenal! If you don’t like bourbon, it doesn’t matter, it is not overt, it just adds to the overall deliciousness, while enhancing the flavor of the pumpkin. The raisins are plump and fabulous here, particularly considering that I used two different kinds. I guarantee that these are going to be a part of my Thanksgiving table. I believe that I can also guarantee they will disappear in a flash.

Pumpkin Muffins with B0urbon Raisins

½ c. raisins

½ c. golden raisins

½ c. bourbon

2 large eggs

1 c. pumpkin purée

1¼ c. sugar

¾ t. ground cloves

¾ t. cinnamon

½ t. salt

 1/3 c. canola oil

1¾ c. flour

1½ t. baking powder

½ t. baking soda 

The night before, soak the raisins in the bourbon, do not drain.

  12-well cupcake pan with paper liners; set aside.

 In a large mixing bowl, beat the eggs until foamy, stir in the pumpkin, sugar, cloves, cinnamon, and salt.  Add the canola oil and mix well.  In a separate bowl, stir together the flour, baking powder, and baking soda.  Add the dry mixture to the pumpkin mixture with half of the raisin-water mixture.  Mix well, add remaining raisin mixture; stir to mix.  Fill greased muffin pans 2/3 full.  Bake until the top springs back when pressed with fingers, about 25 minutes.

Dust with powdered sugar when they have cooled.

 
This recipe makes 12 to 16 standard size muffins.

 As an Amazon Associate I earn from qualifying purchases.


Friday, October 25, 2024

Ginger Cemetery Cookies

 
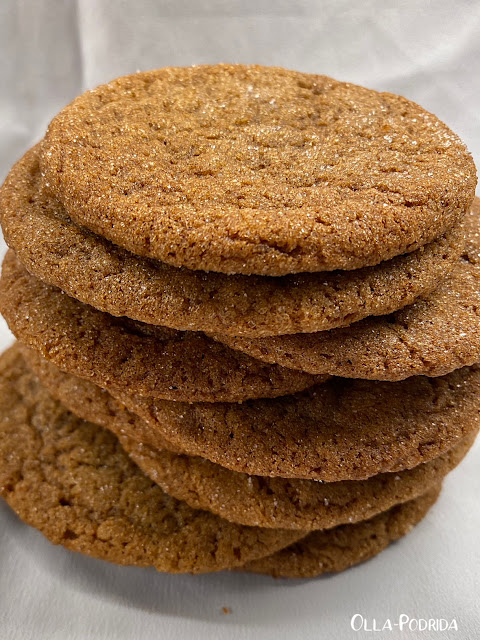
This recipe, from Baking in the American South that I reviewed here, seemed appropriate for the month of October because of the name. But, in truth, there is nothing scary about these cookies at all. The recipe was submitted for inclusion in a 2004 publication, Food to Die For, a fundraising cookbook to aid restoration efforts of the 26-acre Old City Cemetery in Lynchburg, Virginia. The cemetery, now a landmark, is the resting place for Civil War soldiers from over 14 states. The cookies were served at so many cemetery fundraisers, hence the name.Ginger Cemetery Cookies

 12 T. (1 1/2 sticks) unsalted butter, room temperature

1 c. granulated sugar, plus ¼ c. for rolling

1 large egg

¼ c. molasses

2 c. all-purpose flour

2 t. baking soda

1 t. ground cinnamon

1 t. ground cloves

½ t. ground ginger

½ t. kosher salt

 Place the butter and the 1 cup sugar in a large bowl and beat with an electric mixer on medium speed until light and fluffy, 2 to 3 minutes. Scrape down the sides of the bowl with a rubber spatula. Add the egg and molasses and beat until just combined, 30 seconds. Scrape down the bowl and set aside.

 Sift together the flour, baking soda, cinnamon, cloves, ginger, and salt in a medium bowl. Add half of the flour mixture to the butter and sugar mixture, beating on low speed until just combined. Add the remaining flour mixture and beat until just combined. Scrape down the sides of the bowl and stir until smooth. Cover the bowl with plastic wrap and chill for at least 3 hours or preferably overnight.

 When you are ready to bake, heat the oven to 325ºF, with a rack in the middle. Put the 1/4 cup sugar in a small bowl. Roll the dough into 1-inch balls and roll in the sugar. Place 2 to 3 inches apart on 12-by-17-inch ungreased baking sheets and flatten to 1/4-inch thickness with the bottom of a glass.*

Bake, one pan at a time, until firm and crisp, 10 to 14 minutes. Immediately remove from the pan to cool on a wire rack. Repeat with the remaining dough, cooling the pan between batches. Let the cookies cool to room temperature, 15 minutes, before serving. Store in an airtight container for up to 2 weeks.

*I didn’t find that it was at all necessary to add the final step of flattening with a glass. As you can see from my results, they flattened out just fine. Why go to the extra trouble?

 As an Amazon Associate I earn from qualifying purchases.


Monday, September 30, 2024

Pan-Seared Rockfish with Capers and Lemon Butter

 
I decided to try something new from my Wild Alaskan box so chose Pacific rockfish. This is so new to me that not only had I never had rockfish before, I honestly hadn’t heard of it. In case you are as unfamiliar as I, rockfish is a mild whitefish that is somewhere between cod and halibut. It has a flaky texture and a mild flavor, it is perfect when fried, broiled, grilled, or pan sautéed. It is also known as Pacific ocean perch, rose fish, red bream, or red perch.

 I found this recipe on the askchefdennis.com website that looked perfectly doable and decided to give it a try. It was very good. It didn’t blow me over the way the halibut and salmon did, but it was still a lovely entrée. This is a dish that cooks up fairly rapidly, so this is one of those times when mise en place is necessary.

Pan-Seared Rockfish with Capers and Lemon Butter

Slightly adapted from askchefdennis.com

Rockfish

14 oz. rockfish (2 fillets)

¼ c. flour

1 t. sea salt

½ t. black pepper

1 T. olive oil

1 T. butter

Lemon Butter Sauce

1 T. finely chopped Melissa’s shallots

1 T. capers

1 T. butter

2 T. fresh lemon juice

1-2 ounces white wine

1 T. butter

1 t. flour to roll butter in

Italian parsley, chopped, for garnish

 Preheat oven to 250° F. Get a baking sheet handy; set aside.  
Pat rockfish fillets dry with paper towels and season them liberally with sea salt and black pepper.

Dredge the rockfish fillets in flour, getting a good coating on both sides.

 In a large sauté pan add the olive oil and 1 tablespoon of butter. Heat over medium-high until the butter is melted and sizzling, but don’t allow the butter to brown. Lower the heat to medium.

Place the floured rockfish into the hot pan, cooking on the first side for 3-4 minutes. (Don’t be tempted to turn it over too soon, you want that delicious crunch and golden brown color that comes from not moving the fillets around.)

Turn the rockfish over and continue to sauté for another 3-4 minutes. When the pan-seared rockfish is fully cooked, place it on the baking sheet and pop it into your preheated oven while you make the lemon caper sauce.

 In a small sauté pan over medium heat place 1 T. butter, shallots, and capers. Sauté for 1-2 minutes. Add the lemon juice and white wine to the pan. When the liquids are hot, add 1 tablespoon of butter rolled in flour (Beurre manié) to the pan. This will thicken the sauce.

Pour the lemon caper sauce over the pan-seared rockfish. 
Garnish with chopped parsley and serve.
As an Amazon Associate I earn from qualifying purchases.

Friday, September 27, 2024

Better Than T.J.’s Snacky Clusters

 
This is yet another case of the “salty loves sweet, sweet loves salty“ thing that I talked about here. Not too long ago I had been made aware of Trader Joe’s Snacky Clusters. Joe’s are rather small, and, in my opinion anyway, a bit pricey for what you get. Thinking that nothing could be easier than to make these at home, I did. The real bonus here is that you can use those broken chips at the bottom of bags to make this delicious treat. I used essentially the same ingredients as Trader Joe’s, namely, corn chips, potato chips, and pretzel bits, but I decided to go one better and also add some bits of brickle. That took these chocolaty clusters of salty deliciousness right over the top. These are easy to put together, so much so that the kids can do it. In fact, I think they would love, smashing melted chocolate, their favorite salty snack.

Better Than T.J.’s Snacky Clusters

2 c. milk chocolate chip

½ c. broken Fritos 

½ c. pretzel bites 

½ c. broken rippled potato chips 

½ c. Heath Bits of Brickle    

 Cover a cookie sheet with parchment paper (or a Silpat).

Place milk chocolate chips into a microwave safe bowl, and microwave in intervals, stirring after each 30 seconds. I found it took me one minute and 30 seconds to melt them into smooth chocolate.

When chocolate has melted, stir in Fritos, potato chips, pretzel bites, and bits of  Heath Bits of Brickle. Drop onto your parchment paper, and allow a couple of hours to firm. If you’re in a rush, you can place them in the refrigerator for about 20 minutes.

As an Amazon Associate I earn from qualifying purchases.

Tuesday, August 20, 2024

Oven Baked Ribs with Onions and Lemon

 
Not too long ago, I got it into my head that I wanted to have ribs for dinner. I didn’t want to grill them outside because I knew that was a rather lengthy, hands-on process, and the weather was hot. I also didn’t want to make them the way my mother used to because hers, while tender and tasty, looked more anemic than I generally like. So, I consulted my good friend Alycia from Tablescapes at Table 21 and she told me how she did hers. It is a simple process, you can season them up the way you like, and spend your day on other chores while they bake away in the oven. Having done this successfully on numerous occasions, yet still waxing nostalgic for my mother’s ribs, I decided to mix things up and combine Alycia’s technique with my mother’s recipe, and I think this is the best yet.Oven Baked Ribs

 2 to 2 ½ pounds baby back pork ribs

Salt and black pepper

Rib rub

1 lemon, thinly sliced

1 Melissa’s sweet onion, thinly sliced

1 12-18-oz. bottle your favorite Barbecue Sauce

 Preheat oven to 350° F. Line a 9” x 13” pan with heavy duty foil, allowing significant overhang in order to fold over the ribs. Scatter lemon and onion slices along the bottom of the pan, reserving a few for the top. If it hasn’t been done, remove the thin membrane from the back of the ribs.

 Rub the ribs thoroughly, front and back, with the rib rub, and gently lay on top of the slices of lemon and onion. Pour entire contents of bottle of barbecue sauce over the ribs to coat, and scatter reserved lemon and onion slices over the top.

 Loosely close the foil around the ribs, slide into the oven for to bake for 3 hours. After about two hours in, baste with sauce. At the 2½-hour point, open the foil to allow the sauce to caramelize a bit. At the end of three hours, remove from oven, place ribs onto a serving platter and serve.

As an Amazon Associate I earn from qualifying purchases.

Monday, July 22, 2024

Rainier Cherry Turnovers


I love cherries. I particularly love Rainier cherries. Truth be told, I could eat my weight in them. Besides, just eating them as is, this season I decided that I was going to do something different. I decided that I was going to cook them down and turn them into a filling for a cherry turnover. This worked spectacularly. I made enough filling to make eight turnovers (two sheets of puff pastry), but instead just decided to make four and save the rest of the filling to warm and pour over vanilla ice cream. I am in cherry heaven!

Rainier Cherry Turnovers

Turnovers:

1 lb. Melissa’s Rainier cherries, rinsed and pitted

¼ c. sugar

1 T. cornstarch

1 T. unsalted butter

Pinch of salt

1 pkg. puff pastry (2 sheets)

  Egg Wash:


Glaze:

¾ c. powdered sugar

1-2 T. milk

Place cherries, sugar, and salt into a medium saucepan and cook over medium-high heat for 6-8 minutes, mashing down cherries as they begin to soften. (I used an avocado masher.) Stir in cornstarch, and cook over medium heat until thick. Remove from heat and stir in butter; set aside.

Place a Silpat or parchment paper onto a large baking sheet. Lay the puff pastry sheet(s) on top of the Silpat or parchment paper and, using a pizza cutter, cut each sheet pastry into 4 squares.  Place approximately 2 tablespoons of filling into the center of each square (I used a cookie scoop for this).

Whisk together egg and water to make egg wash, and brush each edge so that it will form a nice seal. Fold the pastries over, corner to corner, to form a triangle, and use a fork to press the edges closed.

 Brush the remaining egg wash on top of the turnovers.

Bake 375°F for 20-25 minutes until puffed and golden. Leave on the baking sheet for about five minutes, and then remove to a wire rack to cool.

 Make glaze by combining powdered sugar and milk, whisking until smooth. Drizzle glaze over turnovers. Serve immediately.

As an Amazon Associate I earn from qualifying purchases.

Friday, May 24, 2024

Kielbasa and Sauerkraut

 
Sometimes I just want peasant food. Simple ingredients and relatively few of them, quick and easy prep, one pan, and done. Dishes like this, I find, are great fun when served right out of the skillet from the center of the table. I found this paired particularly well with a side of German green beans. It’s also good mounded in a hoagie roll and served with a glass of hard cider or ale. Kielbasa and Sauerkraut

Adapted from thekitchn.com

 ½ large red onion

1 lb. sauerkraut

14-oz. kielbasa, sliced into 1/2” rounds

1 T. butter

1 T. vegetable oil

2 T. packed dark brown sugar

1 T.  spicy brown mustard

Freshly ground black pepper

Chopped scallions, for garnish

Thinly slice 1/2 large red onion (use a mandoline, if possible). Drain 1-pound sauerkraut.

 Heat butter and oil in a large skillet over medium heat until the butter is melted and the oil is shimmering. Add the kielbasa in an even layer. Cook until browned on the bottom, about 3 minutes. Flip and cook until browned on the second side, about 3 minutes more. Transfer to a bowl or plate using tongs or a slotted spoon, leaving the fat in the skillet.

Cook, stirring constantly, until the sauerkraut is heated through and onion is softened, 5 to 8 minutes. Taste and season with freshly ground black pepper as needed.

Return the kielbasa to the skillet and toss to combine. Garnish with chopped scallions.

As an Amazon Associate I earn from qualifying purchases.