Monday, May 3, 2021

Wedge Salad with Blue Cheese Dressing

This post contains affiliate links.

If you were on planet earth back in the 70s, then you are familiar with the wedge salad. True to its name, the wedge salad is little more than a wedge of iceberg lettuce topped with blue cheese salad dressing, and the extras of your choice. When all of that foo foo lettuce came into vogue in the 80s, the wedge salad fell into disfavor. Not with me. I liked it then and I liked it now. You can’t argue the ease in putting one of these together, but I also love the cold, crunchy lettuce, the smoky crumbled bacon, the fresh chopped tomatoes, and that magnificent dressing.

Happily, I’m not alone. Four-time world barbecue champion Myron Mixon, known for his best-selling barbecue books (
BBQ&A with Myron Mixon, Myron Mixon’s BBQ Rules, Everyday Barbecue, and Smokin’ with Myron Mixon), recently came out with Keto BBQ, Real Barbecue for a Healthy Lifestyle, a new book published by Abrams in which he details how he lost 100 pounds while still enjoying barbecue. But, as he tells us, it’s not just about the barbecue, it’s also about the sides. The wedge salad is one of them. His contention is that the wedge salad’s main function is to deliver blue cheese and bacon to your belly. He’s not wrong, topped with his fabulous blue cheese dressing, it's a wedge at its best. I have made a lot of blue cheese salad dressing in my time, but this is unbeatable. Try it, and wax nostalgic with a wedge salad. Or, if you must, toss it with some foo foo lettuce and enjoy it that way as well.

 Blue Cheese Dressing

1 c. crumbled blue cheese
2/3 c. full fat sour cream
2/3 c. mayonnaise
1/4 c. fresh lemon juice
1 t. garlic powder
Kosher salt and freshly ground black pepper

Optional: two scallions, white and light green parts only, minced, 1/2 teaspoon lemon zest (I added both of these.)

In a medium bowl, whisk together all ingredients to combine. Taste and adjust seasonings. Cover and store in the refrigerator until ready to use. This dressing can be refrigerated in a jar or other container with a lid and stored for up to five days.

Makes about 2 cups.


Disclaimer: I received a complementary copy of Keto Barbecue from Abrams Books as a member of Abrams Dinner Party.


Friday, April 30, 2021

Kentucky Derby Bars

This post contains affiliate links.


Had I not been invited to a Kentucky Derby Party, I would have had no idea that the Kentucky Derby was this weekend. It’s not something that I follow. One year I did get involved, and it seemed like much ado about nothing. I mean it’s not as though the horses run laps, it’s just a short distance and everything is over.

One thing that is going to last are these delicious Kentucky Derby Bars. Rich, chocolaty, nutty, and delicious, this is one dessert that can go the distance.


Kentucky Derby Bars

Crust
3 c. graham cracker crumbs*
½ c. unsalted butter, melted
¼ c. sugar
1 large egg white, lightly beaten

Filling
1 c. firmly packed dark brown sugar
½ c. light corn syrup
½ c. dark corn syrup
¼ c. unsalted butter, melted
3 large eggs
1 t. vanilla extract
 

1 t. bourbon flavoring

¼ t. salt
2 c. pecan halves
2 c. semi sweet chocolate chips


Preheat oven to 350° F. Spray a 9” x 13” baking pan with PAM. Line with aluminum foil allowing 2 inches to hang over either end for easy removal of cookie slab.

CRUST: In the work bowl of a food processor combine crumbs, butter, sugar, and egg white, pulsing until combined. Press into the bottom of the prepared pan. Bake for 12 minutes; cool completely.

FILLING: In a large mixing bowl, whisk together sugar, corn syrups, butter, eggs, vanilla, bourbon flavoring, and salt. Fold in pecans and chocolate chips. Pour mixture over prepared crust.

Bake until center is set, 30 to 40 minutes. Allow to cool 15 minutes before removing from the pan. Cut into squares. Makes 24.

*7 whole crackers equal one cup of crumbs.


Thursday, April 29, 2021

Kiwano Salsa Verde

This post contains affiliate links. 

This salsa verde is different from any that you have tasted before. It’s comprised of a variety of roasted vegetables, and one surprise ingredient: the Kiwano horned melon. If you’re unfamiliar with this fruit, you’re not alone. Once it was only grown in New Zealand, but now it is also grown in California, and made available by Melissa’s Produce.

They are seedy and mild in flavor with a taste of cucumber, melon, and lime. It will add a brightness to your salsa verde that will have your guests wondering why yours tastes so much better than theirs. You can introduce them to this colorful and spiky melon by using the scooped out halves as serving dishes. Turn something ordinary into extraordinary.

Kiwano Salsa Verde

2 lbs. Melissa’s tomatillos, husked
2 Melissa’s shallots, peeled
1 large Melissa’s jalapeño
3 cloves garlic
1 small bunch cilantro
Pulp from 1 Melissa’s Kiwano Melon
½ - 1 t. cumin
Salt and pepper to taste

Turn the broiler on in your oven and move the rack as high as it will go while you prepare your ingredients. Line a jelly roll pan with aluminum foil. Place husked tomatillos, shallots, jalapeño, and garlic onto the pan, and roast until charred, turning vegetables to be sure they are charred evenly.

Place roasted vegetables, all remaining ingredients, and pan juices into the work bowl of a food processor, and pulse until saucy. Taste for seasoning adding more salt, pepper, and cumin, if desired.


Wednesday, April 28, 2021

Sausage and Pepper Pasta

This post contains affiliate links.

The late Mr. O-P was an excellent cook. I really miss the days when someone made a nice meal for me. Jim’s specialty was salmon as well as all types of Italian food. He made a mean sausage and pepper sandwich that I can still taste to this day. I had a hankering for them the other day, but not having bread on hand decided to try something different. Instead of the bread, I decided to toss it with cooked pasta. I think he would have approved.

Sausage and Pepper Pasta

3 links Italian sausage, sliced into ½” diagonals
1 T. olive oil
1 red pepper (or orange or yellow or a combination of all three), thinly sliced
1 3-oz. pkg. Melissa’s shallots, sliced
Pinch red pepper flakes
6 oz. cavatappi pasta
1 32-oz. jar of pasta sauce
1/8 t. dried basil
1/8 t. dried oregano
Salt and pepper to taste
Few gratings of Parmesan cheese

Put a large pot of water on to boil for the pasta.

Heat olive oil in a 12-inch skillet over medium high heat. Add sausage to the hot skillet and cook, stirring until it begins to brown. Add bell pepper and shallots, reduce heat slightly, and cook, stirring, until the peppers are tender, 15 to 20 minutes. Stir in hot pepper flakes, pasta sauce, basil, oregano, and salt and pepper to taste.

Cover and reduce heat to low. Allow sauce to simmer until the pasta has finished cooking.

When the water has come to a boil, add pasta and cook according to package directions. Drain pasta reserving ½ cup pasta water. Stir pasta and pasta water into pasta sauce. Cook until heated through. Serve topped with a few gratings of Parmesan cheese.

Amply serves four.


Monday, April 26, 2021

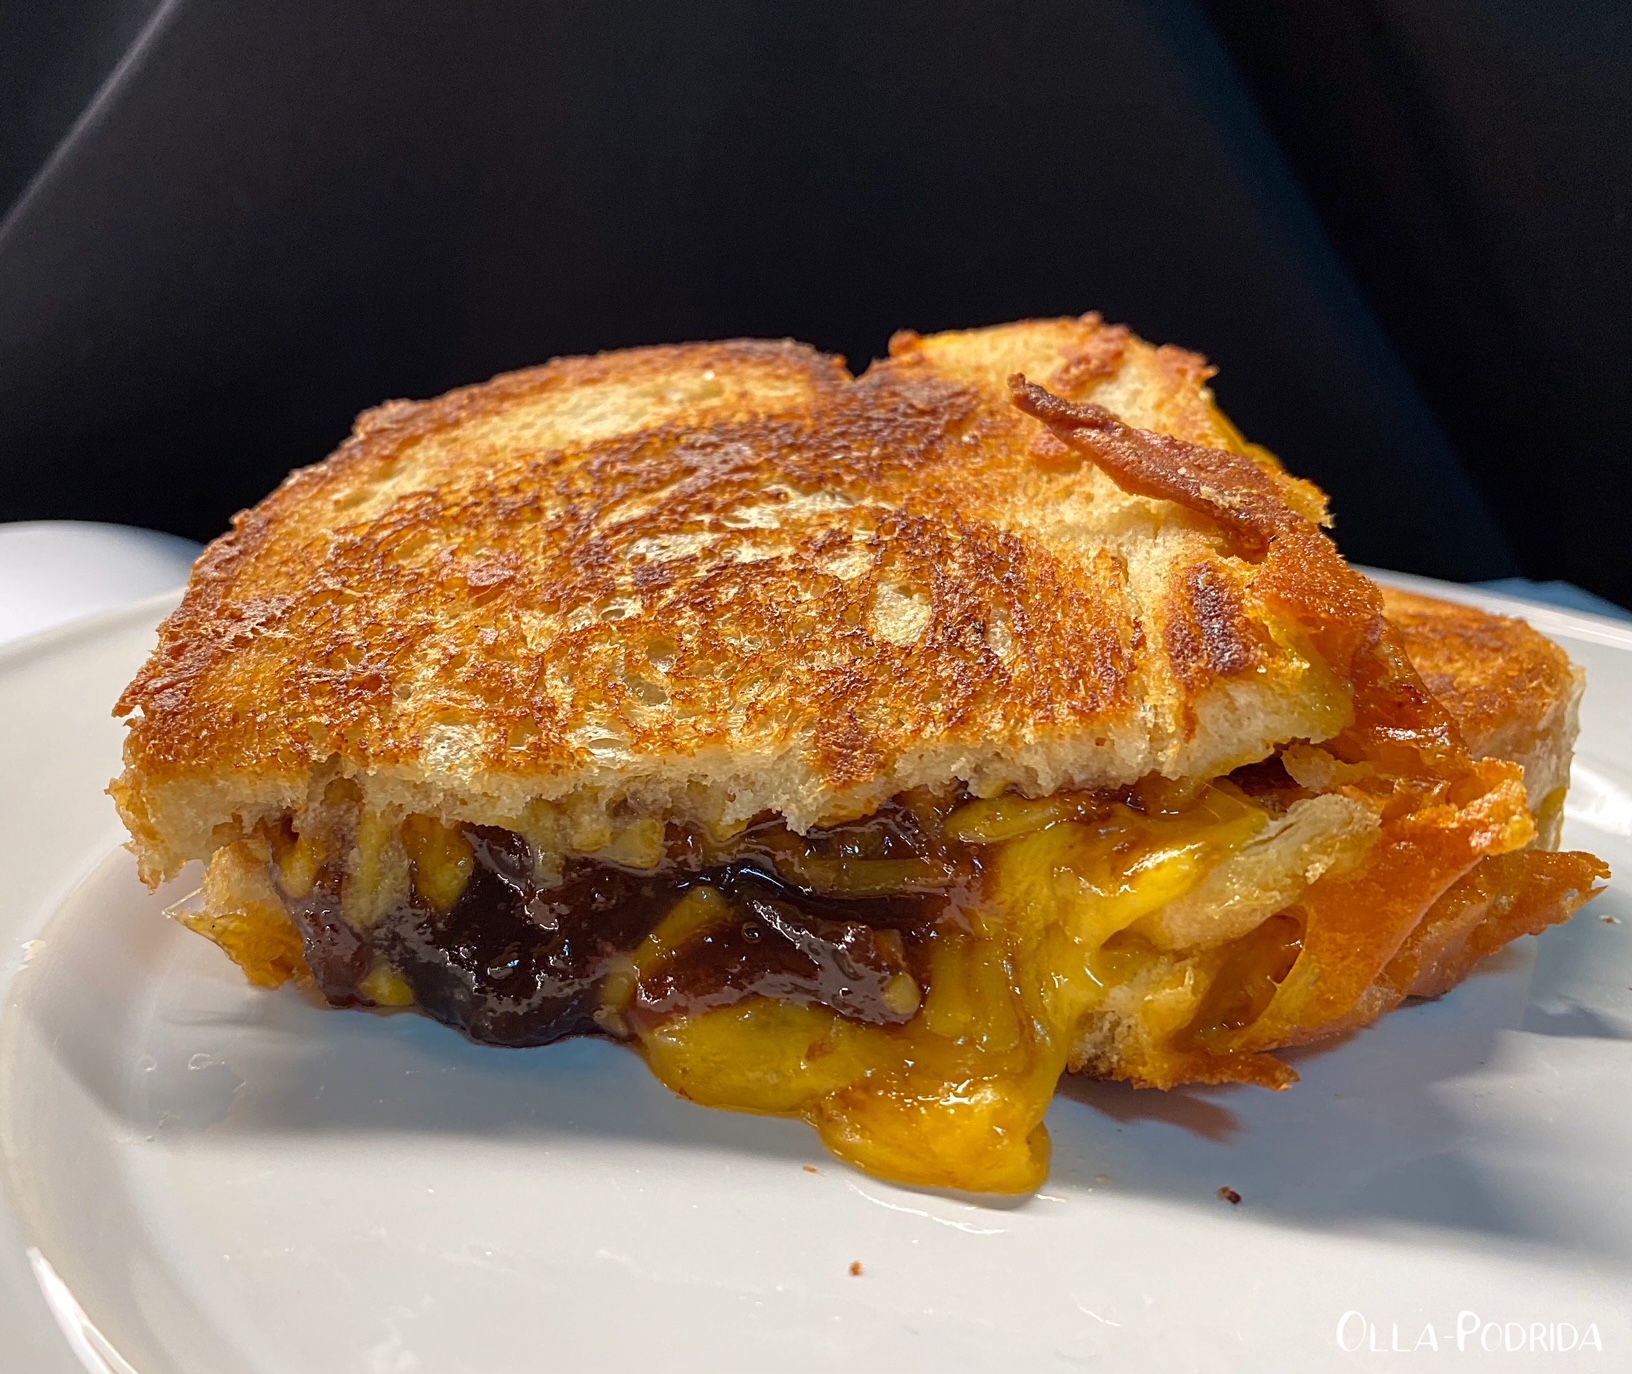
Toasty Cheese and Chile Jam Sandwiches

This post contains affiliate links.

Acclaimed chef, restaurateur, and artist Renee Erickson and I have a good bit in common in that we share favorite places in the world – Rome, Paris, Normandy, and London, to name a few. Her new book, Getaway: Food and Drink to Transport You, available on April 27 from Abrams Books, is a travelogue, guidebook, and cookbook, so you can revisit your favorite destinations, and the food that you consumed there.

I tend to be fairly easy to please. Having spent, all told, nearly a year in England, I found that I really missed the cheese and pickle sandwiches. Erickson’s version is grilled and very delicious. Toasty Cheese and Chile Jam Sandwiches are easy to put together, and sure to be loved by all you plan to serve; this is a taste of England in your own kitchen. 

Toasty Cheese and Chile Jam Sandwiches

1/4 c. mayonnaise
1/4 c. softened unsalted butter
4 thick slices good sourdough bread
1/3 lb. sharp cheddar cheese, coarsely grated
4 T. Fresno chile jam or other hot pepper jelly*

In a small bowl, combine the mayonnaise and butter.

Heat a heavy iron skillet over high heat for one minute.

Take two slices of bread and spread one side of each with the mayonnaise mixture. Place the slices, mayo side down, into the skillet and reduce the heat to medium. Distribute the cheese evenly between the two bread slices.

Making sure to align the bread slices, cover one side of the remaining two slices with the chile jam. Lay jam side down on the cheese. Spread the top of the slices with the remaining mayonnaise mixture.

Cook until the bottoms of the sandwiches are nicely toasted, about four minutes, and then carefully flip. Cover the pan, reduce the heat to low, and continue to cook until the bread is toasted and the cheese is melted, about 4-6 minutes. Cut into halves or slender pieces for sharing and serve right away.

*I made this twice, once with Branston pickle and another time with my mother’s homemade chili sauce. Both were equally good.


 I received a complimentary copy of this book from Abrams Books as a member of their Abrams Dinner Party program.

Friday, April 23, 2021

Pistachio Pesto

This post contains affiliate links.

 I had some pistachios left over from the Pistachio Dream Pie and wanted to put them to particularly good use because those things don’t come cheap. I was in the mood for pesto so figured, why not use them instead of my usual walnuts or pine nuts? I was also low on fresh basil, so made up for it with baby spinach. This is a winner! I saved some of the crushed pistachios to sprinkle on top, gave it a bit of a squirt of fresh lemon juice, and it was some of the best pesto that I have ever eaten.

 Pistachio Pesto

 1/3 c . shelled pistachios
2 cloves of garlic
½ c. grated Parmesan
1 c. packed fresh basil
1 c. packed fresh baby spinach
¾ c.
olive oil

 Place all ingredients into the work bowl of a food processor and pulse until a paste forms. If the pesto looks a bit dry just add some more oil. Keeps in the fridge for 2 weeks. Freezes beautifully.


Thursday, April 22, 2021

Pistachio Dream Pie

This post contains affiliate links.

When I first set up housekeeping, straight out of college, I got my first job as a lowly file clerk. The department was made up primarily of women, all of them older than my parents. An only child, raised around adults, I tended to gravitate toward older people, and really enjoyed talking to these women from whom I learned a great deal. They had a vast amount of experience in cooking and baking, and would often share simple recipes with me. One woman in particular, Genevieve Dienstbach (now long gone), gave me this easy, but crowd pleasing dessert. I made it a lot in the 70s and 80s, and then forgot about it until I was rummaging around in my old recipe box, and found it at the bottom in a crumpled wad. I smoothed it out as well as I could and made it. It’s not fancy, but it is good, simple, comforting, and brought back a lot of memories.

Pistachio Dream Pie

Crust
½ c. (1 stick) unsalted butter, softened
1 c. flour
½ c. chopped pecans

Bottom layer
1 8-oz. pkg. cream cheese, room temperature
1 c. sugar
1 8-oz. container Cool Whip, thawed

Middle Layer
2 3.4-oz. pkgs. instant pistachio pudding
2 ½ c. milk

Top Layer
1 8-oz. container Cool Whip, thawed
1/3 c. chopped pistachios

Preheat oven to 350° F.

In a medium-size bowl, beat together all of the crust ingredients until a smooth dough forms. Spread into the bottom of a 9” x 9” glass baking dish. Bake for 22-25 minutes, until lightly browned. Cool completely.

Beat the cream cheese and sugar together until smooth and creamy, about 2 minutes. Fold the Cool Whip into the cream cheese mixture until combined; spread over cooled crust.

In another bowl, beat the milk and pudding on low speed for 30 seconds, and then increase the speed to medium-high and continue beating for 2 additional minutes. Spread the pudding mixture over the cream cheese layer.

Spread the Cool Whip over the pudding layer and sprinkle with chopped pistachios.

Cover loosely with plastic wrap and refrigerate for at least four hours, preferably overnight.