Showing posts with label retro recipe. Show all posts

Friday, August 23, 2024

Bacon Tomato Bites

 
This is a recipe of my late mother’s. She made these as far back as I can remember. They were always a huge hit, with everyone asking for the recipe. Everyone, that is, except me because I always thought they looked way too fiddly for my man hands. I got to thinking about these the other day when I was thinking about my mother because I still associate the two, and I thought I would give it a whirl. I used Melissa’s baby heirloom tomatoes because they are larger than cherry tomatoes, and the perfect size to use with the small end of a melon baller, making the cleaning out much less difficult than I anticipated.
 
The filling can be made ahead and refrigerated for stuffing tomatoes within a day or two. The tomatoes can be stuffed and stored in the refrigerator overnight; you decide which you prefer. They work equally well at a brunch as they do at luncheon, picnic, or dinner. I guarantee all who consume these are going to ask for the recipe. As an aside, these little rascals do tend to roll, so serving them in an olive dish just may not be a bad idea.
Bacon Tomato Bites

24 Melissa’s baby heirloom tomatoes
1 lb. bacon, cooked and crumbled
½ c. finely chopped scallions
2 T. grated Parmesan cheese
½ c.
Duke’s mayonnaise
Freshly ground black pepper

Remove stems from tomatoes and, using a sharp knife, cut a thin portion of the top off. Carefully hollow out tomatoes using a small spoon, grapefruit spoon, or the small end of a melon baller, as I did,
leaving a 1/8-inch thick shell. Invert the tomatoes onto a paper towel-lined plate, and allow to drain while you make the filling.

 In a medium bowl combine bacon, scallions, cheese, and mayonnaise; stir until well blended. Fill tomatoes with bacon mixture, top with freshly ground black pepper, and refrigerate for a number of hours before serving.

As an Amazon Associate I earn from qualifying purchases.

Monday, August 5, 2024

Asparagus and Pea Casserole


This is a retro recipe, as it is a casserole from the 70s. It is one my mother used to make, and everyone quite enjoyed it. Because it’s from the 70s, it contains the trifecta of things that are bad for you: canned vegetables, condensed soup, and Velveeta cheese. Despite this, it’s tasty, freezes and reheats beautifully, and makes a nice addition to any buffet. And, let’s face facts, with all of the mercury in fish, the toxins in the air, the poisons sprayed on fresh vegetables to act as a retardant, it’s not the condensed soup or the Velveeta cheese that is going to take you out. So just sit back, relax, and enjoy.

Asparagus and Pea Casserole

1 15-oz. can Del Monte asparagus, well drained

1 15-oz. can Le Sueur Very Young Small Sweet Peas, well drained

1 8-oz. can sliced water chestnuts, well drained 

1 10.5-oz. can cream of mushroom soup

½ soup can of milk

  About ½ loaf bread,* crust removed, cut into thirds

Velveeta cheese

 4 T. butter, melted

Preheat oven to 350° F.

 Spray a 9” x 13” casserole with PAM. Layer asparagus, peas, and water chestnuts. Sprinkle with salt and freshly ground black pepper, to taste. Whisk together soup and milk, and spread over vegetables. Cover with 1/4” thick slices of Velveeta cheese. Dip cut bread pieces into melted butter and place on top of cheese. Bake uncovered for 30-35 minutes or until bread is nicely toasted.

I used Aldi’s Seedtastic bread because that’s what I had on hand, but I think the bread of choice here is good old Wonder bread.

  As an Amazon Associate I earn from qualifying purchases.

Tuesday, July 2, 2024

Herbed Chicken Casserole

 
This is a recipe that dates back to the 70s. I remember my mother making it, and, once my young self got past the worminess of the baked chow mein noodles, I loved it. I was recently missing those days, and those casseroles that I so enjoyed, so I decided to make it for myself. I added a bit more seasoning to it than the original called for, and because I had a box of Stove Top Stuffing (sacrilege!) on hand, used it instead of the called for Pepperidge Farm stuffing mix. It was wonderfully comforting. It’s easy to put together, can serve 6 to 8, and freezes quite well. If you’re missing the good old days (and with the current state of things, who isn’t?) give this recipe a try and reminisce.

Herbed Chicken Casserole

3 c. cooked chicken, cubed or shredded
½ c. chopped onion
1/3 c. chopped celery
1 8-oz. can
sliced water chestnuts
¼ c. + 2 T. milk
1 10.5-oz. can
cream of mushroom soup, undiluted
1 10.5-oz. can
chicken with rice soup, undiluted
1 c.
La Choy chow mein noodles
¼ t. Montreal chicken seasoning
1/8 t. freshly ground black pepper

1/3 c. butter, melted
¼ c. sliced almonds
1 c.
Stovetop Stuffing*

Preheat oven to 350°F. Spray an 8
x 8 casserole dish with PAM; set aside.

In a large bowl stir together chicken, celery, water chestnuts, milk, both soups, Chinese noodles, and seasonings. Turn out into prepared dish. In a small bowl mix together melted butter, sliced almonds, and dry stuffing mix. Sprinkle over the top of the casserole. Bake, uncovered, for one hour.

* I used “Savory Herb. You can also use Pepperidge Farm herb stuffing.

As an Amazon Associate I earn from qualifying purchases.

Friday, December 16, 2022

Date Rocks

When I was a little girl I used to enjoy going through my mother’s recipe box. I loved seeing all of the different styles of handwriting, looking at all of the different recipes, and particularly enjoyed the various types of stationery on which they were written. In one of my more creative moments, much to my mother’s dismay, I organized them by stationery category (matching the various types of recipe cards to each other, fold-a-notes, note cards, etc.) rather than by recipe type. It took her quite a while to get things back in order.

One of the recipes that I found, during that particular flight of fancy, was one that had been given to her by her sister. It was for a cookie called Date Rocks. I couldn’t imagine what those cookies tasted like, and wondered if they were as hard as the name indicated. It wasn’t until recently that I came across it again and decided to give it a try. As I often do, I changed things up a bit using Blood Orange Dark Chocolate-Covered Jooliettes Dates in place of plain ones. Wow! These are really delicious.

Date Rocks

 1½ c. brown sugar

1 c. butter, softened

3 eggs, room temperature

1 t. vanilla extract

3 c. flour

2 t. baking powder

½ t. baking soda

1 t. kosher salt

1 t. ground cinnamon

1/8 t. cloves

1 c. raisins

¾ c. Blood Orange Dark Chocolate-Covered Jooliettes Date Nibbles

1 c. walnuts

 Preheat your oven to 350°F. Line baking sheet with parchment paper or a Silpat; set aside.

 In a large bowl, cream together the softened butter and brown sugar. Add eggs and vanilla; beat to combine. Add flour, baking powder, baking soda, cinnamon, and cloves and beat to incorporate. Fold in raisins, dates, and walnuts.

Drop the batter onto prepared sheet (I used a cookie scoop), and bake for 15-17 minutes. Remove to a wire rack to cool.

  As an Amazon Associate I earn from qualifying purchases.


Monday, September 26, 2022

Bavarian Meatballs

I was rummaging around in my mother’s recipe box as I have often mentioned doing, and came across a recipe that I had not noticed before. It had been written on one of those pieces of stationery that fold into an envelope, and are then stamped and mailed. For this reason I know that her friend Shirley Fick sent it to her on the 21st of April 1979, at a cost of 13¢. Because my mother was such a good cook on her own, when she asked for a recipe from someone that meant that she really enjoyed it, so I thought I should try this for myself.

Including sauerkraut in a meatball was new to my experience, but it worked. Surprisingly, it did not do a whole lot to alter the taste, something I found a tiny bit disappointing. I enjoyed mine a couple of times in a variety of ways: first, as you see here on top of egg noodles, second, on top of mashed potatoes, thirdly, on top of mashed potatoes and topped with sauerkraut. I even had leftovers as a meatball sandwich slathered with stone ground mustard and topped with thinly sliced red onion. Clearly this recipe is versatile and I can tell you that I enjoyed them all of these ways.

 Because I always tend to think that I know better than everyone else, I altered this recipe just a tiny bit to give it more flavor. These are easy to make, and something that I think the entire family would enjoy, however you plan to serve them. I do find that they make quite a striking presentation in these beautiful black au gratin dishes.


 Bavarian Meatballs

For meatballs:

½ c. beef stock

1 t. caraway seeds

2 lb. ground chuck

1 lg. egg

1 c. drained, chopped sauerkraut

1 T. dried minced onions

¼ t. lemon pepper seasoning

1/8 t. dry mustard

½ t. salt

¼ t. freshly ground black pepper

3 T. flour

2 T. olive oil

For sauce:

2/3 c. sour cream

2 T. whole milk

½ t. caraway seeds

Pour beef stock over 1 teaspoon caraway seeds and let stand for five minutes. Combine ground chuck, sauerkraut, onions, lemon pepper seasoning, dry mustard, egg, salt, pepper, and stock/caraway seed mixture. Mix well and shape into 18 balls. Roll balls in flour; set aside.

Heat oil over medium/high heat in the bottom of a
12-inch skillet. Add meatballs and brown on all sides. Reduce heat to medium/low and cook slowly for 30 minutes until cooked through. (Meatballs may have to be done in batches.)

Combine sour cream, milk, caraway seeds, and salt in a medium saucepan and heat until hot. Remove meatballs to platter (or individual
au gratin dishes) and top with sour cream.

Garnish with chopped parsley and a few gratings of lemon pepper seasoning.

Makes six servings.


As an Amazon Associate I earn from qualifying purchases.


Monday, June 13, 2022

Pineapple Cheese Ball

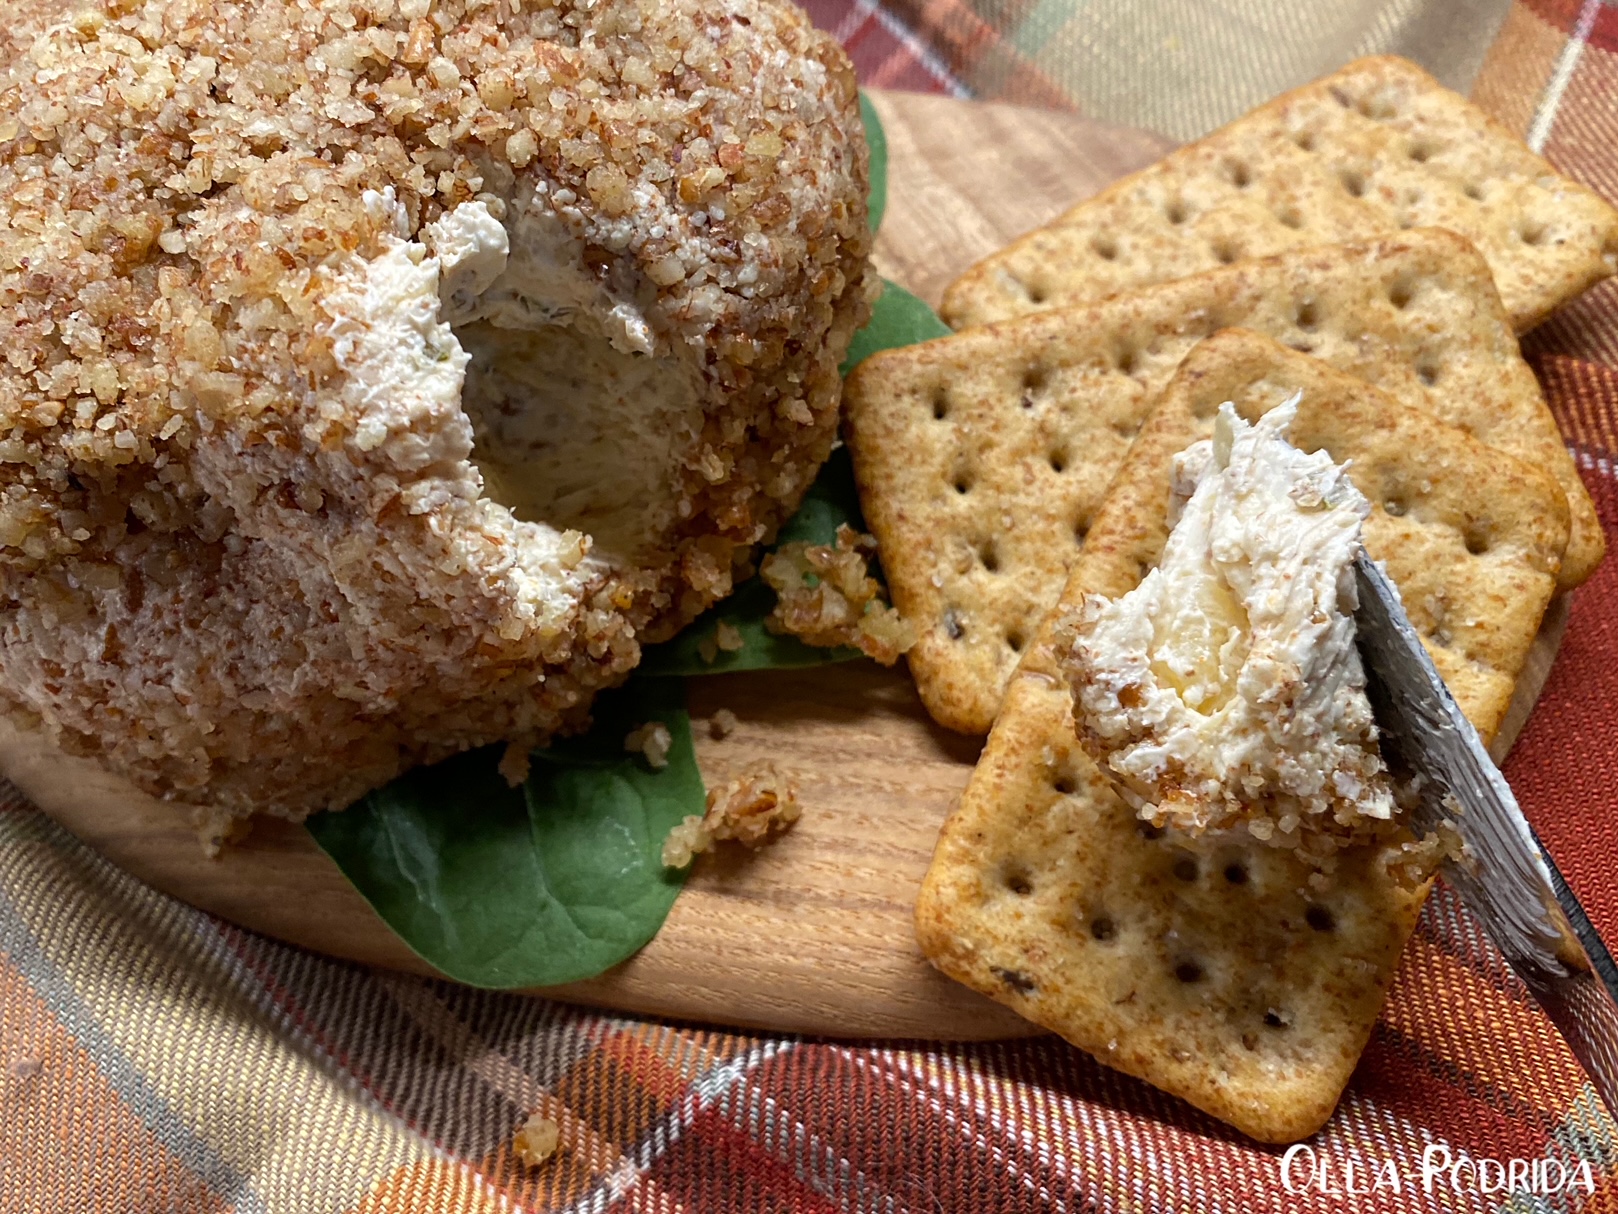
As I’ve mentioned before, I occasionally like to rummage through my mother’s recipe box. I decided to do that last week and came upon a recipe for pineapple cheese ball written in my late aunt’s handwriting. This seemed like the season for it and it sounded refreshing. Her version of this cheese ball called for green pepper. I like green pepper, but I wanted a little more zing, so I substituted the green pepper with pickled jalapeños, and that made a world of difference! This is one of those simple hors d’oeuvres that often goes unnoticed. It looks like nothing special, but the flavor is bright and tropical, with a nice amount of heat. If you are a fan of afternoon tea, this makes an excellent sandwich spread, particularly on a heavily seeded, nutty, whole wheat bread.

Pineapple Cheese Ball

2 8-oz. pkg. cream cheese, room temperature
1 14-oz. can crushed pineapple, drained
2 c. toasted pecans, chopped, divided
2
Melissa’s pickled jalapeños, seeded, stemmed, and minced
1 t.
  seasoned salt

Beat cream cheese until smooth. Add pineapple, 1 cup pecans, the jalapeños, and seasoned salt. Beat until combined. Form into a ball and roll in remaining cup of nuts. Chill overnight. If you want something a bit sweeter, consider replacing the pecans with toasted coconut.


As an Amazon Associate I earn from qualifying purchases.


Tuesday, March 29, 2022

Mandarin Orange Salad


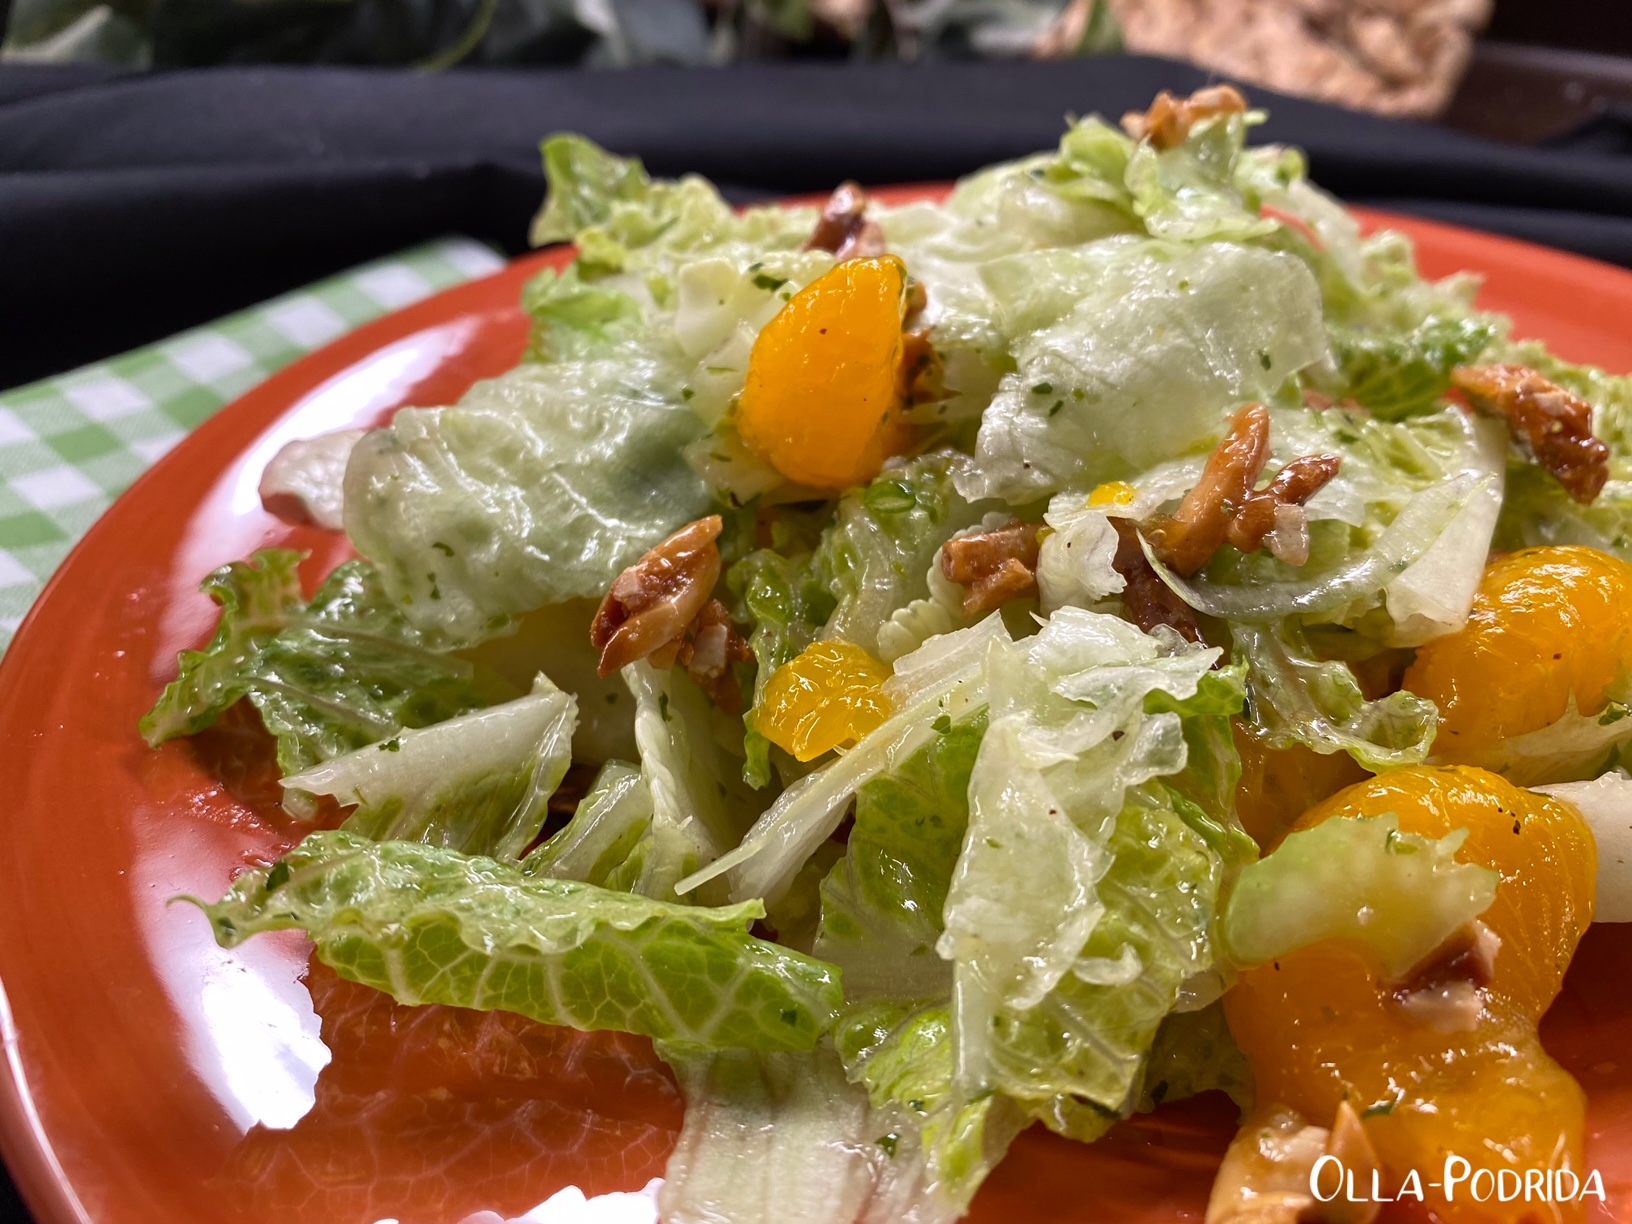
This refreshing beauty of a salad goes back to the 70s, and, perhaps, even before that. I first remember my mother making it back then, serving it alongside one of her legendary prime rib dinners. It’s crunchy and light, with a unique combination of ingredients that makes it very special. If you are looking for something wonderful to serve to your guests, this very well could be it.

Mandarin Orange Salad

½ head iceberg lettuce
One head romaine lettuce
2 chopped scallions
1 c. chopped celery
1 15-oz. can
mandarin oranges, drained
Toffee almonds (recipe below)

Toffee Almonds:
2 T. sugar
1/3 c.
slivered almonds

Place sugar and almonds into a
7-inch sauté pan and set it over medium high heat. Stir occasionally until sugar begins to melt, and then stir constantly, thoroughly coating the almonds in the caramelized sugar. When the almonds turn a rich amber color, turn out onto a cold plate, and separate immediately.

Dressing:

¼ c. vegetable oil
2 T. cider vinegar
2 T. sugar
½ t. salt
Pinch of dry mustard
A few gratings freshly ground black pepper
3 to 4 drops Tabasco
2 T. chopped fresh parsley

Whisk together until thoroughly blended.

When ready to serve, toss toffee almonds, greens, etc. with dressing.


As an Amazon Associate I earn from qualifying purchases.

Tuesday, October 26, 2021

Spellbinders

As an Amazon Associate I earn from qualifying purchases.

Years ago my mother made these cookies and we all thought they were delicious. She only made them once, but they were memorable. She never bothered to make them again because she thought they were trouble, owing to the fact that she arduously drizzled her glaze from the tip of a spoon. Had she known about icing bottles, way back when, these cookies may have made an appearance far more often. When I stumbled across the recipe late last week, I had to make them to see if they really were as good as I had recalled. Yep. No doubt, these are yummy.

Spellbinders

1 ½ c. flour
1 ½ t. baking powder
1 t. soda
1 c. firmly packed dark brown sugar
1 c. butter, room temperature
1 large egg, room temperature
1 c.
quick cooking oats
1 c. sweetened flaked coconut
1 c. salted
Spanish peanuts
½ c. finely crushed cornflakes


Preheat oven to 350° F.

Combine flour, baking powder, and soda; set aside

In the work bowl of a stand mixer cream butter and sugar until light and fluffy, 1-2 minutes. Add egg; beat well. Gradually add dry ingredients, blending well. Stir in oats, coconut, peanuts, and cornflakes. Using a
cookie scoop, drop by onto ungreased cookie sheet. Flatten slightly with bottom of glass dipped in additional cornflakes or sugar. Bake for 15 minutes. Drizzle with glaze in a spiral fashion.

Glaze

Mix 2 tablespoons butter in a 2-cup measuring pitcher. Add 1 cup confectioners sugar, 1 tablespoon hot water, and 1 teaspoon vanilla. Beat until consistency of a glaze. If necessary, thin with a few drops of hot water.


Monday, July 19, 2021

Vegetarian Casserole

This post contains affiliate links.

I’ve mentioned before, and it’s nothing that you don’t already know, that the 70s was the decade of the casserole. Women were rapidly entering the workforce -- in many cases still expected to fix dinner --  and needed something that would go together easily, be shoved into the oven, and come out hot and ready to serve a hungry family or crowd. This recipe is a throwback to that time, something that I think you will no doubt realize when you see some of the ingredients. That should not deter you from making it exactly as written. What I’m saying here is use the condensed soup and the Velveeta, it makes all the difference.

I found this little gem amongst my mother’s recipes, and decided to give it a try. I enjoyed it as a meatless main dish; you can do the same, or serve it as a side. This makes a lot, so is excellent for a brunch or buffet because you can make it the day before baking.

Happy Meatless Monday!

Vegetarian Casserole

1 medium onion, thinly sliced
½ c. (1 stick) butter
2 c. cooked, drained, chopped broccoli (can use frozen)
2 c. prepared
Uncle Ben’s Long Grain & Wild Rice
½ c. sliced water chestnuts
½ c. canned sliced mushrooms
8 oz. Velveeta, cubed
1 can cream of mushroom soup
½ c. milk
Freshly ground pepper to taste
Crushed
Cheez-Its
Sliced almonds

Preheat oven to 350° F. Spray a 9” x 13” casserole dish with PAM; set aside.

Sauté onion in butter; empty into a large bowl. Add broccoli, rice, water chestnuts, and sliced mushrooms; set aside. Place Velveeta, condensed soup, and milk in a small saucepan. Heat, stirring occasionally, until Velveeta has melted. Pour soup/cheese mixture over your bowl of vegetables and pepper generously. Fold ingredients together, and turn into a prepared casserole dish. Place in preheated oven and bake for 20 minutes. Top with crushed Cheez-Its and almonds and bake an additional 10 minutes.


Thursday, April 22, 2021

Pistachio Dream Pie

This post contains affiliate links.

When I first set up housekeeping, straight out of college, I got my first job as a lowly file clerk. The department was made up primarily of women, all of them older than my parents. An only child, raised around adults, I tended to gravitate toward older people, and really enjoyed talking to these women from whom I learned a great deal. They had a vast amount of experience in cooking and baking, and would often share simple recipes with me. One woman in particular, Genevieve Dienstbach (now long gone), gave me this easy, but crowd pleasing dessert. I made it a lot in the 70s and 80s, and then forgot about it until I was rummaging around in my old recipe box, and found it at the bottom in a crumpled wad. I smoothed it out as well as I could and made it. It’s not fancy, but it is good, simple, comforting, and brought back a lot of memories.

Pistachio Dream Pie

Crust
½ c. (1 stick) unsalted butter, softened
1 c. flour
½ c. chopped pecans

Bottom layer
1 8-oz. pkg. cream cheese, room temperature
1 c. sugar
1 8-oz. container Cool Whip, thawed

Middle Layer
2 3.4-oz. pkgs. instant pistachio pudding
2 ½ c. milk

Top Layer
1 8-oz. container Cool Whip, thawed
1/3 c. chopped pistachios

Preheat oven to 350° F.

In a medium-size bowl, beat together all of the crust ingredients until a smooth dough forms. Spread into the bottom of a 9” x 9” glass baking dish. Bake for 22-25 minutes, until lightly browned. Cool completely.

Beat the cream cheese and sugar together until smooth and creamy, about 2 minutes. Fold the Cool Whip into the cream cheese mixture until combined; spread over cooled crust.

In another bowl, beat the milk and pudding on low speed for 30 seconds, and then increase the speed to medium-high and continue beating for 2 additional minutes. Spread the pudding mixture over the cream cheese layer.

Spread the Cool Whip over the pudding layer and sprinkle with chopped pistachios.

Cover loosely with plastic wrap and refrigerate for at least four hours, preferably overnight.


Wednesday, April 14, 2021

Deviled Ham Cheese Ball

This post contains affiliate links.


Remember that deviled ham that I made earlier in the week? It was delicious, but it was a lot. After I enjoyed it on crackers, bagels, and a sandwich, I’d pretty much had enough. Then, I stumbled upon an ancient recipe cut from a newspaper from days gone by. It was so yellowed and crackly that I was lucky to be able to read it. It was for a Deviled Ham Cheese Ball. Think about that for a minute. The zippy tastiness of deviled ham and the creamy deliciousness of a cheese ball, all in one. I had to try it, and am I ever glad that I did. This is the best, most flavorful cheese ball I have ever eaten. Coating it with Melissa’s Green Hatch Pepper Pecans instead of plain ones (that you are welcome to use if spicy bothers you) took this over the top! Give it a try; you know you want some.
 

Deviled Ham Cheese Ball

1 c. deviled ham salad
1 8-oz. pkg. cream cheese, room temperature
1 8-oz. pkg. shredded cheddar cheese
1 sm. Melissa’s shallot, finely minced
1 T. dried parsley flakes
1 T. fresh lemon juice
1 t. Liquid Smoke
1/2 t. celery salt
1/2 t. garlic powder
1/2 c. ground Melissa’s Green Hatch Pepper Pecans

In a medium mixing bowl combine all ingredients EXCEPT nuts. Chill until slightly firm. Form into a ball, roll in nuts, and wrap in plastic wrap to store in the refrigerator several hours or overnight. Serve with crackers.


Tuesday, March 30, 2021

My Mom’s Raspberry Cream Cheese Coffee Cake

This post contains affiliate links.

There are a number of reasons why I am not going to be celebrating Easter this year with a brunch or dinner, none of them particularly interesting. I will say that last weekend I had my aunt over for Palm Sunday brunch, reminiscent of those that my mother used to host. I used a combination of both her and my recipes, as well as her decorative pieces. The food was delicious, and we waxed nostalgic over a box of family photos that I had found in her bottom desk drawer when I cleared out her and dad’s house.

One thing that she served every year without fail was Raspberry Cream Cheese Coffee Cake. People would get pretty surly if she didn’t. One taste and you will know why, it is delicious! Here’s her recipe.

 My Mom’s Raspberry Cream Cheese Coffee Cake

For cake:
2¼ c. flour
¾ c. sugar
¾ c. unsalted butter
½ t. baking powder
½ t. baking soda
¼ t. salt
¾ c. sour cream
1 egg
1 t. almond extract

For filling:
1 8-oz. pkg. cream cheese, room temperature
¼ c. sugar
1 egg
2/3 c. raspberry preserves

For topping:
1/2 c. sliced almonds

Preheat oven to 350°F. Spray the bottom and sides of a 9-inch spring-form pan with Baker’s Joy.

In the work bowl of a food processor combine flour and 3/4 cup sugar. Pulse until blended. Add butter and pulse until mixture resembles coarse crumbs; reserve one cup crumb mixture. To remaining crumb mixture and baking powder, baking soda, salt, sour cream, one egg, and almond extract. Pulse until dough forms (It will be slightly sticky.).

Spread dough over the bottom and up 2 inches of the side of the prepared pan. Batter should be about 1/4 inch thick on the sides.

In a small bowl combine cream cheese, 1/2 cup sugar, and one egg; blend well. Pour cream cheese mixture over batter in pan. Carefully spoon preserves evenly over cheese filling.

In a small bowl, combine the 1 cup reserve crumb mixture and sliced almonds. Sprinkle over top. Bake for 45 to 55 minutes or until cream cheese filling is set, and crust is a deep golden brown. Cool 15 minutes. Remove sides of pan and cool completely. Cut in wedges; serve.


Monday, February 8, 2021

Connoisseur’s Vegetable Casserole

This post contains affiliate links.


Last month in this post I mentioned that I had gone through my mother’s old recipes. In the doing, I discovered quite a few of my own, including this clever little menu card from Thanksgiving 1999 with one of the recipes from that dinner on the reverse. I had completely forgotten that I had done this, and marveled at my own cleverness and creativity. (Insert wry smile here.) 


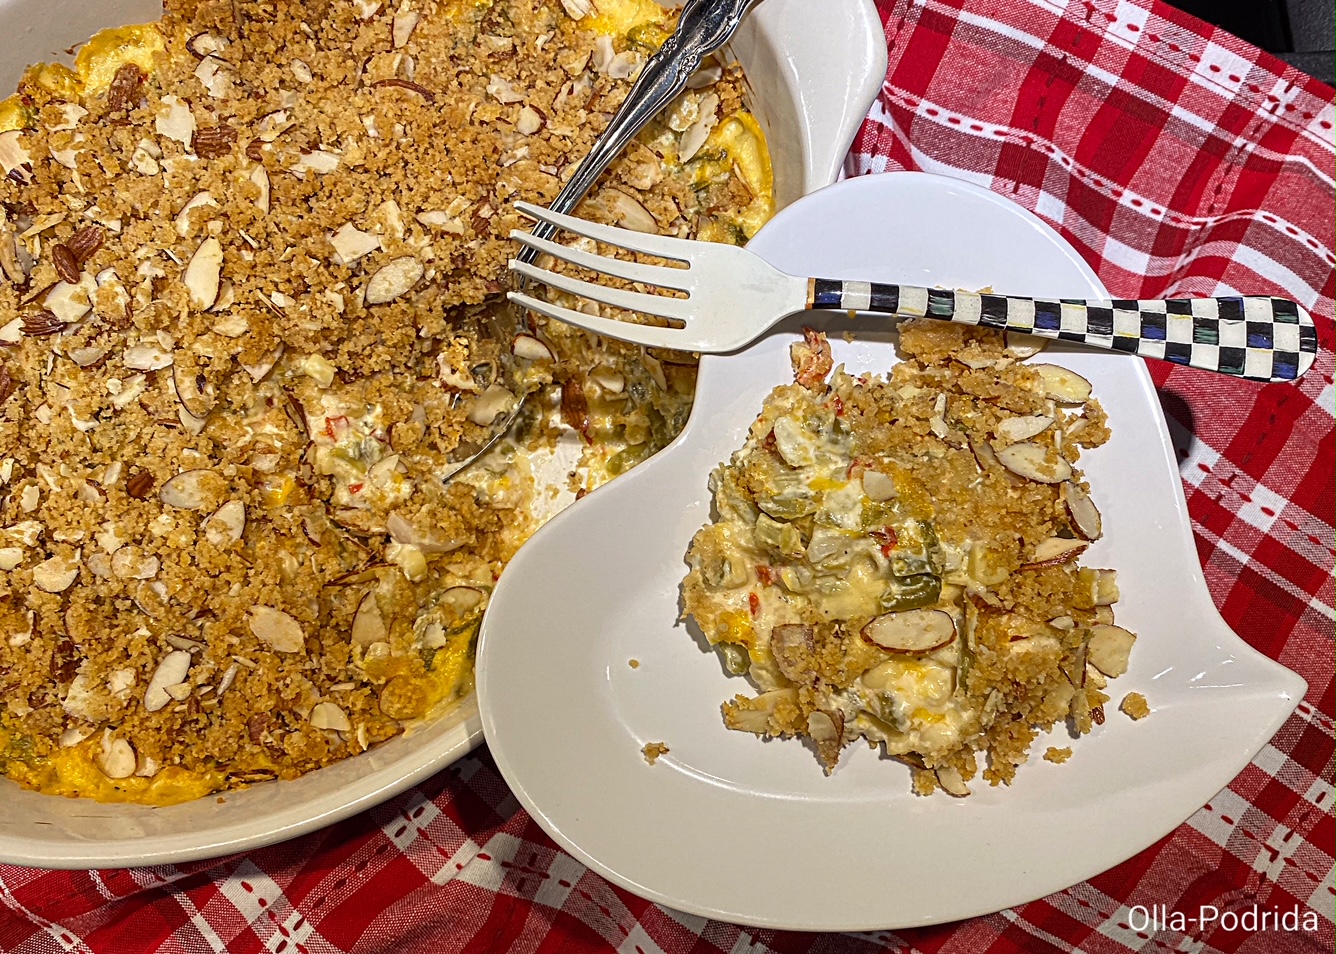
Considering that I hadn’t made this dish in over 20 years, I thought it was time. Because I wasn’t going to be serving a crowd, I made a small casserole of it and put what remained into individual ramekins to freeze and use later. As a lover of both vegetables and casseroles, I really enjoyed this and wouldn’t mind having this as a main dish instead of a side. I’m also going to steal my own idea, and have menu cards with a recipe on the reverse the next time I have a friend or two for dinner. You might consider doing the same. In the meantime, make this casserole.

Connoisseur’s Vegetable Casserole

1 12-oz. can shoe-peg corn (white), drained
1 16-oz. can French-cut green beans, drained
1/2 c. chopped celery
1/2 c. chopped onion
1 2-oz. pimientos, chopped*
1/2 c. sour cream
1/2 c. grated sharp cheddar cheese
1 10.75-oz. can cream of celery soup
1/2 t. salt
1/2 t. pepper

Topping
1 c. Ritz cracker crumbs
1/4 c. (1/2 stick) butter, melted
1/2 c. slivered almonds

Preheat oven to 350 degrees F.

Mix all ingredients except topping.  Place in 1.5-quart casserole.

Combine topping ingredients. Sprinkle topping over casserole. Bake for 45 minutes.

*I used 1/4 c. chopped Melissa’s fire roasted red peppers.