Showing posts with label nuts. Show all posts

Thursday, October 1, 2020

Pony Pie

This post contains affiliate links.

This post contains affiliate links.

This is my third year as a representative of Abrams Books via their Abrams Dinner Party program. What this means is that I get an advanced look at all of their books related to cooking, and get to share them with you. One of the first books I received was Pie for Everyone, Recipes and Stories from Petee’s Pie, New York’s Best Pie Shop by Petra “Petee” Paredez. It’s exceptionally comprehensive providing you with everything you need to know about making pies, the whys and wherefores, suitable vessels, crusts, fillings, techniques, the works! Despite the fact that I’m not particularly a pie person, so many of these recipes caught my eye, because this book deals with not just sweet, but savory as well. The selection of pies also runs the gamut from fruit pies, to custard pies, to meringue topped pies, to deliciously rich and nutty ones like the recipe I’m going to share today. The one that I chose to make, because I was in a chocolate mood is this wonderful Pony Pie, the author’s take on Derby Pie. It is very easy to put together, and if you happen to have a crust on hand, you will have it in the oven in about 20 minutes. I had to bake mine about 15 minutes longer than the time indicated, but it is nutty, rich, and absolutely delicious. If you’re looking for a pie to welcome fall, I doubt you can do better than this one.

Pony Pie
From Pie for Everyone, edited for clarity

1 stick unsalted butter
½ c.
honey
1 c. packed light brown sugar
3 large eggs
½ t. salt
2 T. bourbon
½ c. pecan halves
½ c. walnut halves
½ c. chopped
dark chocolate
1 crust for 9” pie, edges crimped

Preheat oven to 400° F.

In a small saucepan, melt butter over medium heat. Remove from heat and allow to cool for 10 minutes, then whisk the honey into the melted butter; set aside.

In a large bowl, whisk together the brown sugar, eggs, salt, and bourbon. Whisk the honey butter into the sugar mixture until smooth.

Place the walnuts, pecans, and chocolate, into the bottom of your pie shell. Place the pie shell onto a baking sheet (I put a
Silpat on the baking sheet to ensure the pie wouldn’t slip). Pour the filling over the nuts and chocolate. Slide pie onto the middle rack of the oven and bake for 10 minutes. Reduce heat to 350° F and bake for an additional 40 minutes (I needed 55 minutes), or until the center of the pie has puffed up.

Transfer the pie to a cooling rack and allow to cool for 30 minutes before serving. Serve warm or at room temperature. The pie will keep for up to one week at room temperature.

 Editor’s Note: I found that the taste of the bourbon came through much better on the second day.


Sunday, December 28, 2014

Magic Bars


I am petitioning in favor of the Post-Christmas Cookie.  You know, the one that you wanted to try, or that you really, REALLY, love to bake, but never had a chance to make during the season because you were just so darned busy/stressed/frazzled/overscheduled (please select one, or more, what the heck?).  Yes, if not for very generous bakers and their skilled offspring bringing me cookies, I wouldn’t have had a one.  So, after the day was over, I decided to bake a favorite recipe for bar cookies that dates back to my Home Ec days in high school.  They go by many names, Magic Bars, Hello Dollies, and a host of others, but whatever the name, no one is unfamiliar with this rich and chewy bar cookie.  I make mine a bit different from the original recipe in that I use both semi-sweet and milk chocolate chips.  I also like to make a richer nut mixture by using a mixed nut mix of pecans, cashews, macadamias, almonds, filberts, and Brazil nuts.

Why not join me in my post-holiday baking and give these chewy crowd pleasers a try?

Magic Bars

1 stick butter
1-1/2 cups graham cracker crumbs
(from about a pack and a half of graham crackers)
1 14-oz. can sweetened condensed milk
1 cup semi-sweet chocolate chips
1 cup milk chocolate chips
1 cup flaked coconut
1 cup chopped mixed nuts

Preheat oven to 350°F.

Now you have two options: spray a 9 x 13 pan with non-stick cooking spray, OR (as I did) line it with foil so that about 1-1/2 of foil hangs over the short edges, and then spray the foil with the non-stick cooking spray.  This will allow you to lift the entire thing out of the pan, slide off the foil (which is why it MUST be sprayed as well) and then make perfect little square cuts.

Combine graham cracker crumbs and butter.  If you buy graham cracker crumbs, just empty the correct amount into a medium bowl, drizzle with the butter, and stir until completely coated.  If using a food processor, break up a pack and a half of whole graham crackers, pulse until they become crumbs, and then pour the melted butter through the feed tube during the last stages of pulsing, and, Bob’s your uncle! 

Press crumbs and butter mixture into the bottom of your prepared pan.  Pour sweetened condensed milk evenly over the crumb mixture.  Layer evenly with chocolate chips, coconut, and nuts.  Press down firmly with your hands (Sometimes it helps to lightly dampen your hands to keep the ingredients from sticking.).

Bake for 20-25 minutes until just browned.  Cool.  Firmly grasping foil overhang, carefully lift from pan and place on cutting board.  Peel foil away from the edges and slide it out from under the baked bars.  Cut in even squares.

This post is linked to:


Monday, October 6, 2014

Vanilla Walnuts

These days, with storage always at a premium, I tend to read a lot of cookbooks and food magazines in their digital forms, downloading them from the local library website, and reading regional and independent offerings on the Issuu app (a recent discovery that has thrilled me beyond words). Nothing, however, can replace the food section of the Wednesday paper. On Wednesdays I need the tactile, the color pictures, the newsprint-y fingers, and the feel of scissors in my hands as I cut out the recipes that I want to try. It's a homey, satisfying feeling that takes me back to my early days when I used to cut and paste recipes from newspapers and magazines into the homemade cookbooks of my mother and grandmother.

I don't currently have a place to paste them, so I put mine in a basket on the counter in the kitchen where, weekly, the pile grows. Occasionally I rummage through to see if there is something of particular interest to try. This morning a recipe that I'd cut out in September caught my eye. With thoughts toward a harvest salad that I've been ruminating about, I decided to give these vanilla walnuts a try. Mr. O-P looked at me warily. You're not really going to make those, are you?  (Mr. O-P is not a fan of the sugar-coated nut.). But indeed I did, a half batch, and they were wonderful!  So much so, that I was sorry I didn't make the entire batch because the doubting Mr. O-P had to be restrained from devouring the entire batch.

The seasoning on these is just right, and I will admit to being a bit addicted myself. The recipe, from the The Frog/Commissary Cookbook by Steven Poses, Anne Clark and Becky Roller, was published in the St. Louis Post-Dispatch on September 10, 2014.  It is reproduced below. As I mentioned, I cut it in half, very successfully, but made a couple of other changes as well. With the smaller batch, the baking time was only about 22 minutes. I did bake mine in a countertop convection/toaster oven, so that may have made a difference, but do watch them as they bake, and make your own determination. Once they were dry and the sugar had crystallized, I figured the time was up. I also did not use a vanilla bean, as I consider them far too precious for experimentation, so instead used vanilla bean paste, mixing it in with the sugar and corn oil (and I really used canola because I was out of corn oil), as was suggested for vanilla extract in the recipe.

I plan to use these to top a salad (stay tuned for that), but imagine these would be delicious stirred into yogurt, added to granola, used to top ice cream, or chopped finely and added to streusel topping, or a sour cream coffee cake recipe that I have been considering. Or, as like Mr. O-P, you can just gobble them up right from the tray.

Vanilla Walnuts

½ cup granulated sugar
2½ tablespoons corn oil
1 pound walnut halves
1 (4-inch long) vanilla bean,
pulverized or very finely minced to a paste*
¼ teaspoon salt
1/8 teaspoon black pepper
¼ teaspoon ground coriander
¼ teaspoon cinnamon
¼ teaspoon nutmeg
¼ teaspoon allspice

Preheat oven to 325°F. In a large bowl, mix together sugar and corn oil.

Blanch the walnuts for 1 minute in boiling water. Drain well. While still hot, toss with the sugar and corn oil. Let stand 10 minutes.

Arrange in a single layer, if possible, on a rimmed baking tray. Bake 30 to
35 minutes, turning every 5 to 10 minutes, until light brown and crispy.

Meanwhile, combine vanilla bean, salt, pepper, coriander, cinnamon, nutmeg and allspice. Put the still-hot nuts into a bowl and toss with the seasoning mixture. Spread in a single layer to cool. Store in an airtight container.

Yield: 4 cups

*Instead of a vanilla bean, you can substitute 1 tablespoon vanilla extract, blending it first with the corn oil in step 1 before tossing with the nuts. 

This post is linked to:


Tuesday, April 16, 2013

Crockpot Cashew Chicken


I have gone Crockpot crazy!  Lately I have just been so frantically busy that I have happily embraced the one-pot meal. Earlier in the week I had three different slow cookers, of various sizes, all going at once - breakfast, lunch, and dinner. I am loving the ease!  But just because I'm employing the use of one of my favorite appliances does not mean that I'm having boring meals of tenderized mush, relying for flavor on a can of sodium-laden condensed soup. No. I have explored a variety of ethnicities, preparing pepper steak, fajitas, pasta, and this tasty cashew chicken. As with many slow cooker recipes, there is a bit of pre-prep here, but it is well worth the time.

Crockpot Cashew Chicken

2 lbs. boneless skinless chicken breasts, cut into 1" cubes
1/4 cup all-purpose flour
1/2 tsp. black pepper
1/2 tsp. seasoned salt
1 Tbsp. canola oil
3/4 cup soy sauce
6 Tbsp. rice wine vinegar
6 Tbsp. ketchup
3 Tbsp. brown sugar
2 garlic cloves, minced
1/2 tsp. grated fresh ginger
1/4 tsp. red pepper flakes, or to taste
1/2 cup cashews

Combine flour, pepper and seasoned salt in a shallow dish. Dredge chicken, turning to coat all sides. Heat oil in skillet over medium-high heat. Sear chicken pieces until brown, about 1 minute per side. Place chicken in slow cooker.

Combine soy sauce, vinegar, ketchup, sugar, garlic, ginger, and pepper flakes in small bowl; pour over chicken.

Cook on LOW for 3 to 4 hours. Add cashews just before serving over a bed of hot jasmine rice. Serves 4.

This post is linked to:

Friday, April 12, 2013

Toasted Hazelnut Bread


Mr. O-P likes mixed nuts. Well, let me rephrase that. Mr. O-P buys mixed nuts. There's a difference. Once he gets the oil-drum-size container of nuts home, he then painstakingly removes those he doesn't care for - the almonds and hazelnuts, and sometimes the Brazil nuts, depending upon his mood.  He places each type into its own little separate plastic container and passes them along to me as if I'm loaded with recipes and uses for this nut duo/trio. Let's face it, a girl can only use so many nuts. Imagine my delight then, when I stumbled upon this recipe in my Try before I die file. Not only did it make use of hazelnuts, but also employed one of my favorite appliances, the automatic bread machine.

I wasn't sure if I wanted bread or rolls, so decided to make both - a pan of rolls, and a small loaf of bread. When I make it again (and I will), I'm going to make a large loaf and forget the rolls.  This bread was tasty out of the oven, but the next morning made the best tasting toast that I think I've ever eaten.

Toasted Hazelnut Bread

2/3 cup warm milk (70° to 80°)
2 tablespoons butter, melted
1 large egg
1/2 teaspoon almond extract
1/2 teaspoon salt
2 cups bread flour
2 tablespoons granulated sugar
1 package active dry yeast
1/2 cup finely chopped hazelnuts, toasted
***
Egg wash (1 egg + 1 T. Water)

Place the ingredients (milk through the hazelnuts) into the bread machine in the order listed. Select the Dough setting and press Start.

When machine signals that the dough is done, remove to a lightly floured cutting board. Shape dough into rolls or one large loaf (or two small ones, or both -- the world is your oyster). Place shaped dough into greased pans and set in a warm spot to raise until double in size, 30-45 minutes. Brush top with egg wash and sprinkle with Kosher salt or finely ground hazelnuts. Bake at 375°F for 30-40 minutes, or until golden brown and makes a hollow sound when thumped. 


This post is linked to:

Friday, January 18, 2013

Steel Cut Oats with Caramelized Apples

On these very cold mornings I have been starting my day with a hot bowl of oatmeal, McCANN'S Steel Cut Irish Oatmeal being my favorite. It's a good, healthy start, as we all know, but sometimes oatmeal alone can get a little boring without the addition of fruits, nuts, or other such tasty goodies.  Most of the time I add dried fruits,  Melissa’s blueberries and strawberries  being two of my favorites, and toss it in while the oatmeal is cooking, but today I was in an apple-y mood, so decided to caramelize some on the top of the stove while waiting for the oatmeal to cook.  It's easy to do, but if you're unsure how to make the apples, here is a simple recipe.


Steel Cut Oats with Caramelized Apples

1 tablespoon unsalted butter
2 large apples, peeled and sliced (any variety that suits you, or happen to be in your fridge)
1/2 teaspoon ground cinnamon
Few gratings of fresh nutmeg
2 tablespoons dark brown sugar
Pinch of Kosher salt

Melt the butter in a medium-large skillet over medium heat. Stir in the apple slices, cinnamon, nutmeg, sugar, and salt, and toss to coat. Cook, stirring occasionally, until the apples are golden brown and caramelized, about 15 minutes. Arrange on top of steaming bowls of oatmeal. 

Serves 2.


Other fun ideas for oatmeal toppings are:

The Elvis Special - chopped salted peanuts and sliced bananas.

Tropical Isle - chopped macadamias, shredded coconut, and pineapple chunks.

Pumpkin Pie - 1/4 tsp. pumpkin pie spice and 2 T. pumpkin purée.

Gimme Granola - raisins, chopped mixed nuts, flax seed, coconut flakes.

Chocolate Lover's Special - mini chocolate chips and a light swirl of Hershey's syrup.

S'Mores - crumbled graham crackers, mini marshmallows, mini chocolate chips.


Snicker Bar – chopped peanuts, mini chocolate chips, and a teaspoon of dark brown sugar.

I'm sure that you can come up with many more on your own,  based on your family's preferences. The important thing to remember is that you are enhancing the oatmeal, not overwhelming it.

This post is linked to:

Monday, January 9, 2012

Oatmeal Raisin Cookie Pancakes


I love pancakes, but the mister is a pancake purist.  When he sees me pull more than one bowl out of the cupboard and move the box of Bisquick aside in favor of a variety of ingredients, he starts to panic.  I assured him this morning that plain pancakes would be his if he just indulged me momentarily while I tried a revised version of a recipe that I spotted in the December issue of Everyday with Rachael Ray magazine.  He eyeballed the ingredients, shrugged and said that he’d try what I was having.  As it turned out, he was very glad he did.

The December issue of Rachael’s magazine featured a rather unique variety of pancakes.  Trying to get more whole grains into my diet, the oatmeal pancake caught my eye.  It was an altered version of the recipe in the magazine for Classic Pancakes (pictured below), that I further altered with excellent results.


Their recipe, simply called Oatmeal Raisin pancakes (also pictured below), I turned into Oatmeal Raisin Cookie pancakes, by adding a sprinkling of chopped pecans and a pinch of cinnamon (two ingredients that are musts in my oatmeal cookies).  These two ingredients made all the difference.
  

They really did taste like oatmeal raisin cookies.  Your kids (if not your husband) will love them!


Sunday, April 17, 2011

PECAN SANDIES

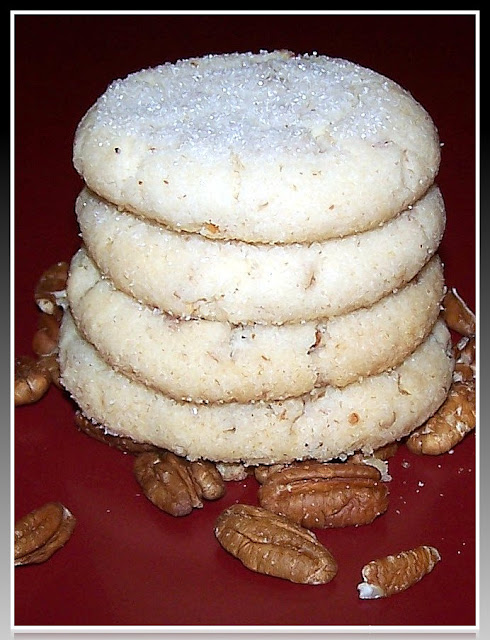
It's not often that I make these cookies and I really can't say why because they are delicious.  They're easy to make, have a wonderful nutty, crunchy/crumbly texture, and a great sugar cookie taste.  The recipe is easy to follow and unlike a lot of recipes where you are overloaded with dough and spend half the day baking them, this makes little more than a couple of dozen.  
The recipe, as you can see, is from the Gooseberry Patch Old-Fashioned Country Cookies Cookbook.  I'm reproducing the page here, so you get a bonus recipe as well (though I've not tried this one and so can't vouch for them.)
During the warm days of spring and summer when you don't want to spend a lot of time dealing with a hot oven, these bake up quickly and will be most welcome at any outdoor event.
Give them a try.  You'll be the hit of the neighborhood!


This is linked to:


Tuesday, March 1, 2011

Cranberry-Nut Rolls

I've been reading a lot of novels lately.  Modern novels, like the cozy genre of culinary mysteries that I so enjoy, seem to contain much more information about food than in times past, including baking methods, detailed instructions, and recipes.  Not only am I hungry for more reading when I finish a book these days, but I'm also hungry for food!  Some of my recent favorites can be found in the collage below, but I think the book that had the biggest culinary impact on me was Judith Ryan Hendricks' Bread Alone.  Reading the book, I could almost smell the bread baking.  Throughout my reading I hungered (if you'll pardon the pun) to make some bread of my own.

So last night, while making meatballs for dinner, cutting out cookies from the shortbread dough that had been in the fridge a bit too long, and testing recipes for peanut butter ice cream topping, I made these rolls.  They are wonderful!  
I'd expected them to be very dense and chewy like the cranberry nut rolls I've gotten from Whole Foods and Breadsmith in the past, but these were lighter.  They reminded me a bit of the Sally Lunn bun that I had at the Sally Lunn's Historic Eating House & Museum in Bath, England years ago, but they're not exactly that either as I find Sally Lunn tends to deflate a bit when speared with a knife.  These are just tasty, wonderful rolls that work equally well for dinner as they do for breakfast.  For the dinner rolls I sprinkled the tops with Fleur de Sel after brushing them with egg glaze.  For the breakfast rolls I sprinkled the tops with the raw sugar the recipe called for; both versions were equally good. 
When I make them again (and I will), I'll soak the cranberries in a bit of orange juice to plump them up and will add some orange zest to the dough.    
This morning I had a sugar-topped roll, slightly warmed in the oven, spread with clotted cream and Sarabeth's Raspberry Key Lime jam. Heaven!
Cranberry-Nut Rolls
From Bon Appetit, November 2009

1 cup coarsely chopped walnuts
3 1/2 cups (or more) bread flour
1 tablespoon (packed) golden brown sugar
1 1/2 teaspoons quick-rising dry yeast (from one 1/4-ounce envelope)
1 1/2 teaspoons salt
1 1/2 cups whole milk
2 tablespoons vegetable oil plus additional for coating bowl
1 large egg
1 cup sweetened dried cranberries
Nonstick vegetable oil spray
1 large egg, beaten to blend (for glaze)
Raw sugar*

Stir nuts in dry skillet over medium heat until toasted, about 5 minutes. Cool.

Mix 3 1/2 cups bread flour and next 3 ingredients in bowl of heavy-duty stand mixer fitted with paddle attachment. Warm milk in small saucepan over low heat until instant-read thermometer inserted into milk registers 95 degrees F. Add oil; remove from heat. Add milk mixture and 1 egg to flour mixture. Mix on low speed until wet coarse ball forms, about 1 minute. Add nuts and cranberries. Replace paddle attachment on mixer with dough hook. Mix dough on low speed until smooth, elastic, and slightly tacky, adding more flour by tablespoonfuls as needed, about 4 minutes. Transfer dough to floured surface; knead 2 minutes.

Lightly oil large bowl. Shape dough into ball; place in prepared bowl, turning to coat with oil. Cover with plastic wrap; let dough rise at room temperature until almost doubled in volume, 1 3/4 to 2 hours.

Line large rimmed baking sheet with parchment paper. Transfer dough to unfloured surface; divide into 12 equal pieces. Using cupped hand, roll and rotate 1 dough piece firmly on work surface until dough piece pops up into cupped hand as smooth round ball, about 6 rotations. (This will make dough ball as smooth as possible; if necessary, wipe work surface with damp paper towel to help create traction.) Repeat with remaining dough pieces.

Transfer rolls to prepared baking sheet, spacing apart. Spray rolls with nonstick spray. Cover loosely with plastic wrap; let rise at room temperature until 1 1/2 times original size, about 1 1/2 hours. Brush rolls with egg glaze; sprinkle with raw sugar. Let rise 15 minutes longer.

Meanwhile, position rack in center of oven and preheat to 425 degrees F.

Place rolls in oven; reduce oven temperature to 400 degrees F and bake 7 minutes. Rotate baking sheet; bake rolls until golden and slightly firm to touch, about 8 minutes longer. Cool completely on rack. DO AHEAD: Wrap in foil, then enclose in resealable plastic bag and freeze up to 2 weeks. Thaw rolls at room temperature. If desired, rewarm rolls wrapped in foil in 350 degrees F oven about 10 minutes.

* Also called turbinado or demerara sugar; available at most supermarkets.


This post is linked to:
Tuesday Night Supper Club