Monday, September 30, 2019

White Queso

Despite my love of queso (and I really do love it), I had never tried white queso. To me, it just appeared bland and uninteresting. I was so happy to be wrong. After a friend told me that white queso was her favorite kind, I had to investigate, discovering this recipe in one of my favorite books Queso! by Lisa Fain, that I reviewed here.

This dip is as delicious as it is easy, and I mean stupidly easy, and who doesn’t like a recipe like that? I am never without cream cheese, and now I will never be without evaporated milk and green chilies, because these three ingredients are all it takes to put this wonderful dip together that you can enjoy on your own, or serve to company. I took this recipe over the top by chopping up
Hatch Green Pecans to put on top. Oh, momma!

I tend to like less traditional dippers, and found my absolute favorite were wedges of apple. Dip whatever you like. Also feel free to take a cookie scoop, and pile a hefty mound on top of a freshly cooked burger. Sensational!
White Queso
From Queso!

1 8-oz. pkg. cream cheese, softened
2 5-oz. cans evaporated milk
1 5-oz. can chopped green chilies (mild or hot, your choice)
1 tsp. Kosher salt

In a medium saucepan over low-medium heat, whisk together the milk and cream cheese until smooth and creamy (about 5 minutes). Stir in green chilies and salt, and pour into a serving dish. Serve with chips or slices of apple.


This post contains affiliate links.


Sunday, September 29, 2019

The Forest Feast Mediterranean, reviewed

In the interest of full disclosure, I am a fan of the books of Erin Gleeson. Before I even opened her latest, The Forest Feast Mediterranean, I knew that I would love it. I wasn’t wrong; I think this is her best yet.
Opening one of her books, if you’ve yet to do so, is a beautiful experience. Her offerings differ from the average cookbook due to the informal, artistic, journal-type treatment. The reader feels as if they are taking a peek into her life by way of her diary.
The main font is fun and casual, the art is simple, but effective, the photos colorful and mouthwatering. All of this combines for a visual treat, and memorable cookbook experience.
Taking this Mediterranean trip with Gleeson and her family is like taking a trip of your own. You join them on this once-in-a-lifetime journey, feeling as though you are there. You get to taste the local cuisine, but more than that, get to make it yourself.
The Snacks and Small Plates chapters were my favorites. They reminded me of all of the wonderful treats that would accompany the cocktails that Jim and I would order at the outdoor drinking establishments when we were in Italy. I love snacks that don’t call for anything more than pantry staples, particularly those that go together in a hurry, and are well received. In which case, I loved the Sauces, Dressed-Up Olives, Garlic Deviled Egg Skewers, and Stuffed Cherry Peppers; I was also intrigued by the Gin and Tonic Bar.
The Small Plates that turned my head included Grilled Vegetable and Cheese Platter, Baked Provolone, Mushroom-Shallot Toast, Broccolini Stuffed Flatbread, and Spinach-Rice Pie. I anticipate having a wonderful time with this cookbook, and given the chance, you will too. Take the journey of culinary excellence. There is something here for everyone.


Disclaimer: I received a complimentary copy of this book from Abrams Publishing Company as part of being a member of #AbramsDinnerParty.

This post contains affiliate links.

Friday, September 27, 2019

Cinnamon Stick Place Cards

Last week I posted a link to one of Sweet Paul’s projects on this blog's Facebook page (Click here to become a follower.), this one to make place cards using cinnamon sticks. I thought it was such a cute and simple idea that I decided to try it for my next tablescape. It was incredibly easy, looked suitably autumnal and rustic, and scented the table with wonderful spicy cinnamon.

I printed out names on
tan cardstock using one of my favorite fonts, Two Peas Mr. Giggles, cut them out with a paper cutter, and carefully stuck them down into the splits in the cinnamon sticks. In a couple of cases, I added a bit of glue (my favorite all-purpose glue is Fabri-Fix), and they worked out very well.
For the future, I would recommend Melissa’s Canella sticks. They are a bit more loosely coiled, and would take well to this kind of treatment.

This is a great craft to do with kids because it’s simple, easy, and makes them a part of your special meal. If you are a Cub Scout den mother or Girl Scout leader preparing for a banquet, this would be a wonderful project in which to get your scouts involved.


This post contains affiliate links.

Thursday, September 26, 2019

How 'bout Them Apples? TABLESCAPE

I had big plans for various table settings this summer, but sadly, did none of them. In my defense, I prepared my dad’s house to put on the market, and sold it. It was a difficult and exhausting time. But, I am beginning to emerge from the darkness, and today felt like celebrating fall with this apple table.
I don’t often use my dough bowl — I’m not quite sure why — but it proved the perfect vessel for this beautiful combination of Granny Smith and Honey Crisp apples from Melissa’s Produce. Interspersed among the apples for a little bit of pattern are the Tennessee Dancing gourds that I grew this year. It is on these colors that I based this table.
The stack of ceramic apple bowls belonged to my mother, as did the wire basket holding Fuji apples, and vibrant red flatware. The smoky stemware belonged to my mother as well. 
The tin chargers come from a favorite local shop, The White Rabbit; the glass crescent salad dishes are vintage, and one of the first things I purchased after graduating from college. I had a small table, and reasoned that these would take up less room than the traditional round salad plates, and I was right. I still love them after all these years.
Number two son gave me the bright green appetizer plates and cocottes; I love that color with the red.
Woven placemats, black plaid plates, and green plaid napkins are all from Pier One.
The cups are vintage, and a part of a bigger set of Galloping Gourmet (Remember Graham Kerr?) cookware that was given away, piece by piece, for free with a $10 or more purchase back in grocery stores in the ‘70s.
I always find a transitional table appropriate for this time of the year. I don’t generally bring out the rusty reds and burnt oranges until October, but look out when I do!
Get the look:


This post is linked to:
Tablescape Thursday
This post contains affiliate links.

Wednesday, September 25, 2019

When Pies Fly, a Review

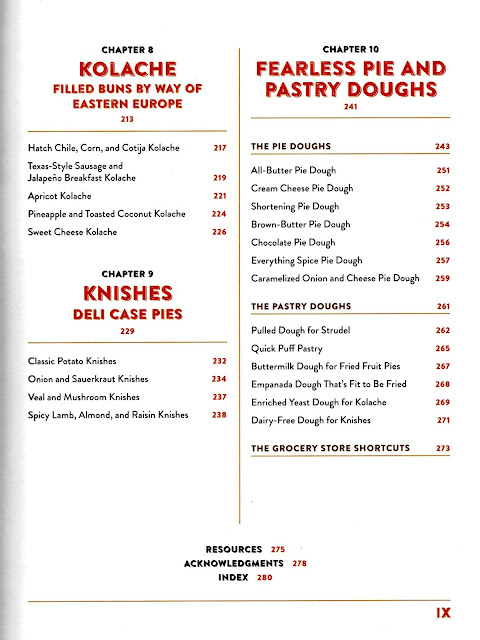
You know when you start to drool (seriously, there was actual drool) while paging through a cookbook that you have a winner. Such is the case with Cathy Barrow’s new release, When Pies Fly. She has outdone herself with this one, doing the impossible, exceeding the fabulousness of her previous book Pie Squared, the definitive book on slab pies. This book has 75 mouthwatering creations for various pastry-wrapped international, as well as traditional specialties. Things such as empanadas (one of my favorite things) knishes (she really had me at knishes) stromboli (yep, love them too), as well as loads of other savory pie-like items. I am a savory more than a sweet person, so I have long been waiting for this book to arrive.
 I haven’t been this excited since the Blues won the Stanley Cup. I nearly wept when I paged through, moaning and groaning to such an extent as to have, no doubt, raised an eyebrow or two in the neighborhood. 
With cheeseburgers being my absolutely favorite food, the Cheeseburger Hand Pies turned my head. They are going to be the first recipe that I try from this book.
If you are uncomfortable making pies, Cathy is going to calm you down. Her rustic pies are perfect for the beginner, her snacking pies will have people flocking to your home for a quick nosh, the single-serve pies are perfect for the man or woman living alone, and there are plenty of delicious sweet pies for those of you who can’t do without dessert.
She offers up a wonderful introduction, has a great section on demystifying pie dough, offers a dairy free option, even quick puff pastry pies, as well as plenty of kolaches, both sweet and savory. 
For the seasoned veteran, there are some pretty fancy crusts here; for pie rookies like me, there are comprehensive instructions, as well as beautiful pictures for every recipe in the book.

 I cannot say enough about this book. Buy one for yourself, buy one for friends, and buy one for every member of your family. In this new book, When Pies Fly, Handmade Pastries from Strudels to Stromboli, Empanadas to Knishes, Cathy Barrow has presented pie making in a fun, doable, and mouthwatering way. Get a copy! I mean it. You will thank me later.


Disclaimer: I received a complimentary copy of this book from Grand Central Publishing in exchange for an honest review.

This post contains affiliate links.

Tuesday, September 24, 2019

Vinegar Pie

As I promised in my review of American Food last Sunday, here is the recipe for Vinegar Pie. There were mixed reviews on this. My aunt, who is a pie person, didn’t like it at all. I am not a pie person, and I thought it was yummy. My aunt’s complaint was that it was a pie “that didn’t know what it wanted to be.” I’m wondering if I would have told her that it was a lemon pie if she would have liked it. I thought it had a sweet, tangy, appealing flavor that immediately excited the taste buds. I will definitely make this again. The pie recipe called for no embellishment, but because I was serving it to company, piped stabilized whipped cream rosettes on top, dusting each with a whisper of ground cinnamon.
 You need no special ingredients to put this together, pantry staples will do, adding to its appeal. If you do chose to make it, you can talk about how it is one of the desperation pies from the old days, mentioned frequently in Laura Ingalls Wilder’s Little House on the Prairie series.
Vinegar Pie from American Food
Makes one 10-inch pie

4 large eggs, room temperature, lightly beaten
1-1/2 cups granulated sugar
1/2 cup (one stick) unsalted butter, melted and cooled
3 tablespoons
apple cider vinegar
1 teaspoon vanilla extract
One pre-baked 10-inch pie crust, cooled

Preheat the oven to 350° F. Whisk together the eggs, sugar, butter, vinegar, and vanilla extract in a large bowl until there are no lumps. Pour the mixture into the piecrust and bake for 15 minutes or until the top is golden brown and the center is set. (It will still be soft.)

Remove to a wire rack and cool completely, at least two hours, or refrigerate. This can be served cold or at room temperature and keeps in the refrigerator for several days.


This post contains affiliate links.

Monday, September 23, 2019

Crisp Baby Yukon Gold Potatoes

I don’t know about you, but sometimes I have a hard time coming up with side dishes to accompany an entree, particularly when it comes to starches, even more particularly when it comes to something new or different. As a main dish is usually a good bit of work, I don’t want my side dishes to be trouble. I like to avoid trouble as often as I can.

Here is a super easy, tasty, and versatile way to prepare potatoes. It can be a tiny bit tedious putting them all face-down on your baking pan, but if you develop a rhythm, you can get that done pretty quickly, and that is the hardest part. These work well as a snack, particularly if you melt cheese on top before serving them. (Yum!) They work well with a hot sandwich with a side of ranch dip or ketchup, or, as you can see here, with an elegant chicken dinner. (The recipe for the chicken can be found
here.)

Add this to your repertoire of potato recipes. It’s perfect for those last-minute meals.
Crisp Baby Yukon Gold Potatoes
Slightly adapted from Epicurious.com

1 1.5-lb. pkg.
Melissa’s Baby Dutch Yellow Potatoes, halved
1 T. canola oil
½ t.
dried thyme leaves
½ t. kosher salt
¼ t. freshly ground black pepper
Few gratings
fresh nutmeg

Preheat oven to 450° F.

In a medium mixing bowl, toss potatoes with oil, thyme, salt, pepper, and nutmeg until coated. Arrange on a foil-lined baking sheet, cut side down. Roast potatoes until crisp and
golden brown on the bottom, 25-30 minutes. Serve with ranch dressing, or your favorite dipper.


This post contains affiliate links.

Sunday, September 22, 2019

American Food, a Review

The subtitle of American Food, one of Abrams’ newest releases by Rachel Horton with illustrations by Kimberly Allen Hall is “A Not-So-Serious History,” the whimsical focus in this delightful romp of American cuisine. Those of us who remember the ‘70s will, particularly, get a kick out of this book. I felt as if I had walked into my past seeing the recipes using Velveeta cheese, mounds of ketchup, and deli meat, those manufactured, artery-clogging ingredients that made everything taste so darned good.
From the colorful, cheerful images, to the wonderful illustrations throughout, this is a must have for anyone interested in American food, or seeking to reminisce about the good old days.
While there is a lot of serious information in this book as far as early history and uses of food, much of it is written tongue-in-cheek, with the intent to inform, but also amuse. Who can resist the colorful table of contents that jumps out at you as soon as you open the book? Ambrosia, Eggs Benedict, Green Goddess, Monterrey Jack, Orange Julius, Queso, Red-Eye Gravy; these are the foods of my youth.
If you are at all familiar with this blog, then you know that Red-Eye Gravy is really my thing. I thoroughly enjoyed the chapter on this, and, knowing nothing of the origin, now feel quite well informed.
One thing I found most intriguing was is the recipe for Vinegar Pie. Despite the fact that I was an avid reader/watcher of “Little House on the Prairie,” I don’t recall any mention of Vinegar Pie. I took an unofficial poll of friends and family, and no one had heard of it, so my plan for later in the week is to give it a try. Naturally, I will report.
Anyone who remembers Clam Night at Howard Johnson’s, eating Velveeta cheese dip, or Mock Apple Pie, will enjoy the wonderful trip down memory lane that this book provides. It is fun to read, whimsically illustrated, and would make a perfect gift. Get one for yourself, get one for a friend, and enjoy the trip together.


Disclaimer: I received a complimentary copy of this book from Abrams Publishing Company as part of being a member of #AbramsDinnerParty.

This post contains affiliate links.

Friday, September 20, 2019

Chicken with Olives & Capers

Delicious, company-worthy food need not take a lot of effort. This beautiful chicken dish, the recipe of which I found in Sweet Paul’s cookbook, Sweet Paul Eat and Make: Charming Recipes and Kitchen Crafts You Will Love, couldn’t be easier. A handful of ingredients, in my case, an hour in the oven, yielded a unique, tender, juicy piece of chicken in a wonderfully different, light lemony sauce. It was so good, that I have decided to always keep a jar of mixed olives on hand so that I can make it whenever I want. My guess is, it would do well to be served on a bed of mashed potatoes so that the juices can be absorbed, flavoring every mouthful of mash. I marinated mine in buttermilk in a covered bowl in the refrigerator for four hours before making this dish. I patted each chicken thigh dry with a paper towel before placing into the baking dish. Wonderful!
Chicken with Olives & Capers


Serves 4
4 large or 8 small organic chicken thighs (about 2 pounds)
1 lemon, cut into wedges
2 tablespoons drained nonpareil capers
Juice of 1 lemon
2 tablespoons extra-virgin olive oil
Salt and freshly ground pepper

NOTE: I had to bake this close to an hour before the skin became brown and got crispy, and the internal temperature reached 165°.


Preheat the oven to 400°F, with a rack in the middle position.

Place the chicken, skin side up, in a baking dish. Scatter the lemon wedges, olives, and capers on top of the chicken.
Pour the lemon juice and olive oil over the chicken and sprinkle with salt and pepper.

Bake until golden, basting with the juices once, for 25 to 30 minutes, or until an instant-read thermometer inserted into the thickest part of a thigh reads 165°F. Serve.


This post contains affiliate links.


Monday, September 16, 2019

Coconut Cream Pound Cake with Toffee Crunch Topping

Ever since making that Coconut Cake with Coconut Buttercream Frosting a couple of weeks ago, I haven’t been able to get coconut off of my mind. Today I wanted something a bit less labor intensive, and, being in the mood for pound cake, came up with this creation, using my wonderful new Nordic Ware loaf pan. I call this Coconut Cream Pound Cake with Toffee Crunch. Marvelous with a morning cup of coffee, but frankly, it’s just plain suitable anytime of the day.
Coconut Cream Pound Cake with Toffee Crunch Topping

½ c. unsalted butter, softened
½ pkg. (4 oz.) cream cheese, softened
1½ cups granulated sugar
3 large eggs
1 t.
coconut extract
1 t. vanilla extract
1 c. all-purpose flour
¾ c. cake flour
¼ t. baking powder
1 c. flaked coconut

Preheat the oven to 325° F. Spray a 9” x 4” loaf pan with
Baker’s Joy; set aside

In the work bowl of a stand mixer, cream butter and cream cheese until well blended, 3 minutes. Add sugar, and beat until light and fluffy, 7 minutes.

While mixer is running, take this opportunity to place coconut into a food processor and pulse 5 to 6 times; set aside. To the mixer contents, beat in eggs one at a time; stir in coconut and vanilla extracts. With mixer on low, beat in flour and baking powder just until moistened. Fold in chopped coconut.


Spoon batter into the prepared pan and bake for one hour, or until knife inserted into the cake comes out clean. Allow the cake to cool in the pan for 10 minutes before inverting onto a cooling rack.

Coconut Glaze

½ c. sifted confectioners' sugar
1 T. half-and-half
¼ t. vanilla extract
1/8 t. coconut extract
¼ c. crumbled
Wickedly Prime Toffee Coconut Cashews

Whisk together all ingredients except cashews. Drizzle over top of cake. Sprinkle cashews over glaze before it sets.


Saturday, September 14, 2019

Deck Garden September Wrap-Up

It’s September (Can you believe it?), so it is time for a deck garden wrap-up. It has been a garden friendly summer. For the most part temperatures have been moderate, rain was plentiful early on, and everything grew like mad. You know that your garden has been a success when neighbors become wild-eyed upon seeing you; faint strains of “no more tomatoes” hang in the air, as they turn on their heels and flee. I think half the neighborhood is suffering from acid re-flux as a direct result of consuming too many tomatoes.
I never thought I would say this, but I am sick of tomatoes, tired of cutting up peppers for the freezer much less eating them, most sorrowful at all of the green beans that went bad because one can only consume so many, and wishing I had a lot more flowers. 
The Cathedral Bells climbed everywhere, teasing me all summer, but didn’t bloom until this morning when I was greeted with the most amazing purple flower. Here’s hoping something will become of the small bird sitting out in the plant so that I can reap rewards for all of my hard work and dedication. This variety is Cobea Scandens, and those seeds can be found here.

The herbs did marvelously, and I did well, I think, growing nothing more than mint (in its own pot), and a big pot of basil, chives, and parsley. With few exceptions, I didn’t find I needed much more. Next year I will add lemon balm, because I do like that in a nice cold brew tea. Note made.
I learn things every year when I garden, but I think the most important lesson learned this year was to carefully read seed packets. I was so charmed by the thought of growing gourds, that it never occurred to me to CAREFULLY read the packet. Had I done so, I would have discovered that I’d purchased seeds for miniature gourds only destined to be 2 inches long. They are adorable, but not exactly what I was hoping for.
Speaking of which, once I harvested the gourds and pulled up the vines, the ruffled pink morning glories that I had forgotten I’d planted (in the hopes of them entwining themselves in a beautiful gourd/flower display) began to grow and bloom. I absolutely love this variety, and will definitely grow them next year. Many people have inquired about this variety. These are Split Second Morning Glory, the seeds can be found here.
Another thing that I learned is that no way do I need as many peppers and tomatoes as I grew. The same goes for the cherry tomatoes. Not that I’m complaining, they provided me with a lot of wonderful, crunchy, flavorful little fruit, but enough is enough. My refrigerator is full of bowls of them, and I just can’t take it anymore. The jury is still out on the cucumbers.

I am letting the big boy tomatoes continue — they look quite lush —but long ago pulled down their trellises, so, while they are vining all over the place, they are providing me with wonderful tomatoes, that I am turning into the best ever marinara sauce.
The ginger is still doing well, and will go into October. 

My notes for next year are this; grow fewer vegetables and more flowers. I didn’t need the 50 jalapeños that I harvested in one week. While I love the peppers, one plant will do, if that, and I’m not going to grow jalapeños. They are easy to grow, and quite prolific, but next year that pot is going to hold either flowers or lemon balm. One of my great joys this season has been all of the butterflies and hummingbirds that have visited.
Next year I hope to have more. I don’t mind planting zinnias, solely for the enjoyment of the goldfinches, who holds onto their strong systems, plucking each petal from every flower head, one at a time, in order to get to the fresh seeds. It’s adorable.

What did your garden do? And what will you do differently next year?


This post contains affiliate links.