Thursday, January 30, 2020

Valerie Bertinelli’s Lemon Ice Box Cake

This post contains affiliate links.
I am a fan of Valerie Bertinelli and her recipes, because it is good home cooking, and who doesn’t like that? However, referring to this as a cake is a bit of a misnomer. What this really is, is a light and fluffy cloud of sweet/tart lemon deliciousness that you will not want to stop eating…ever. It is super easy to put together if you use store bought lemon curd. (I didn’t, I made my own because, to me, it is well worth the 15 minutes. My recipe is below if you feel the same.) So, if you’re longing for spring, fresh fruit, tall pitchers of ice-cold lemonade, this won’t bring it any closer, but it will make the wait much easier to bear.
Valerie Bertinelli’s Lemon Ice Box Cake
Serves 10

You will need:
4 ounces cream cheese, softened
1⁄3 cup powdered sugar
21/2 cups heavy cream
2 teaspoons lemon zest (from 2 lemons)
1/2 teaspoon vanilla extract
1 11-ounce package vanilla wafers
1 cup homemade lemon curd* or
1 11.5-ounce store-bought jar
 lemon curd

Beat the cream cheese and sugar with an electric mixer at medium speed until blended and smooth, 1 to 2 minutes. Add the cream, lemon zest, and vanilla; beat at medium-high speed just until stiff peaks form.

Arrange half of the cookies in a single layer on the bottom of a 13-× 9-inch baking dish**, fitting in as many as possible without overlapping.

Spoon half of the cream cheese mixture on top, and spread evenly with an offset spatula. Dollop 1/2 cup of the lemon curd by spoonfuls about 2 inches apart over the cream cheese mixture.

Use a butter knife to swirl the curd into the cream cheese mixture. Top with remaining cookies and remaining cream cheese mixture. Dollop and swirl remaining lemon curd over the cream mixture.

Cover with plastic wrap, and refrigerate until the cookies soften, about 3 hours.

*Microwave Meyer Lemon Curd
Slightly adapted from My Baking Addiction

1 cup granulated sugar
3 large eggs
1 cup fresh Meyer lemon juice (from 5 Melissa’s Meyer lemons)
1 tablespoon lemon zest
1/2 cup unsalted butter, melted

In a large microwave-safe bowl (I used Duralex), whisk together the sugar and eggs until smooth and thoroughly combined. Whisk in lemon juice, lemon zest, and melted butter.

Cook in the microwave on full power for one-minute intervals, stirring after each minute. This process will take about 3-5 minutes depending upon the wattage of your microwave. (Three minutes worked for me.) The lemon curd is done when it coats the back of a metal spoon.

Remove from the microwave, push through a fine, mesh sieve, and pour into sterile jars or a container.

Allow to cool to room temperature, and then cover it with a lid and store it in the refrigerator for up to 2 weeks. The curd will thicken as it cools.

**I used a 9” x 9” dish because I wanted mine thicker. It was perfect, as you can see.


Wednesday, January 29, 2020

J’s Pitaria House Salad

This post contains affiliate links.
I love salads, all kinds, from sweet to savory. I like simple chopped salads, I like lettuce-free vegetable salads. I also quite enjoy Greek and other Mediterranean-type salads, so when I spotted this one in a recent issue of the St. Louis Post-Dispatch, I had to make it. It is refreshing, crunchy, and loaded with flavor and nutrition. I served mine in a clear bowl so all of the pretty layers could be seen. I also emulsified my vinegar and oil in a Ninja personal blender, adding salt, pepper, and a smidge of prepared yellow mustard. If during these gray days of winter, like me, you’re dreaming of a getaway cruise down the Mediterranean, your face warmed by the sun, make this salad. Even though you’re not there visiting, at least you can savor the flavor.
J’s Pitaria House Salad

Yield: 1 large serving (2 smaller servings)

1 medium, ripe Roma tomato
½ large red bell pepper
1/3 of a 10- or 12-inch English cucumber
½ small red onion, 2-inches or less in diameter
¼ c. feta crumbles
1/3 c. fresh chopped parsley
2 to T. extra virgin olive oil
1/6 of a large lemon, seeded, cut lengthwise into a wedge

Wash and core, then cut the tomato into 3/8-inch cubed pieces. Place in the bottom of the serving bowl.

Cut the bell pepper in half lengthwise, remove seeds and ribs, and then dice into ½-inch square pieces. Cover the chopped tomatoes with pepper pieces.

Cut the English cucumber into quarters and then into 3/8-inch pieces. Spread evenly over the peppers.
 
Cut the red onion into chunky pieces, about 3/8-inch. Layer on top of the cucumbers. Scatter the feta cheese over all.

Trim the woody stems from the parsley bunch, then finely chop leaves and fine stems. Place a mound in the center of the salad.
 Drizzle extra virgin olive oil over all. Add the lemon wedge to the bowl and serve. 


Tuesday, January 28, 2020

Little Red Hen Book of Chicken Recipes

This post contains affiliate links.
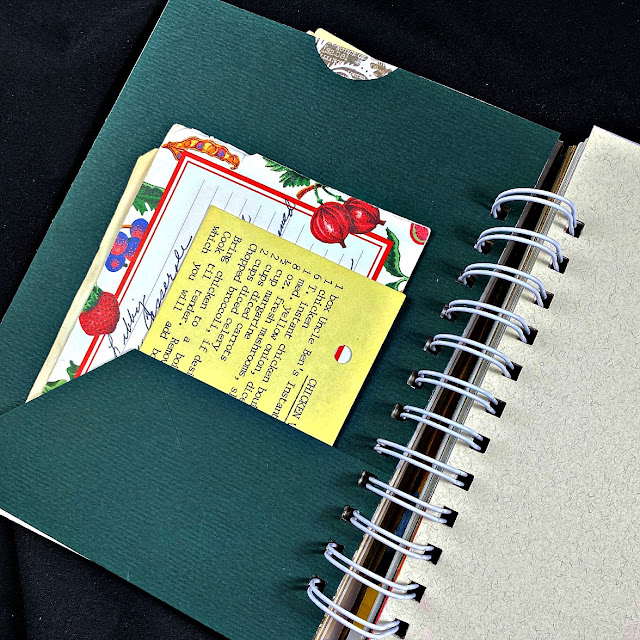
If you are looking for a new way to share recipes, a clever wedding shower or hostess gift, or a project to simply do for your own organization and enjoyment, have I got an idea for you! Recently, I have become interested in bookmaking. No, I’m not playing the ponies, I am physically creating books. I hope, one day, to get very good at it, if for no other reason than to justify the purchase of all of the book making tools. In the meantime I have started out small. This is a project that you can do without having any experience or equipment at all.


This is what’s known as a cinch-bound Little Golden Book junk journal. I have a cinch binder, but you can do the same kind of thing by simply punching holes in the book cover and holding it together with binder rings. I have done that with my garden journal for this year because I want the opportunity to add more pages to it, and that can’t be done when a book is more permanently bound like this one.


My favorite book when I was a little girl was The Little Red Hen, so that was the Little Golden Book that I chose. I cut the binding off, but kept all of the pages intact, and the entire story is scattered throughout the book, now full of coffee and tea-dyed papers, scrapbook papers, lined paper, vintage ledger paper, recycled window envelopes and folders, dictionary pages, and more, each page of which is now waiting for further embellishment.
These pictures reflect what I have done thus far. As I create new pages, I will share those with you, so you can get an idea as to how to make one of your own. Because of the title, I decided to use this as a book that holds all of my favorite chicken recipes. Cute, no?

More to come!


Monday, January 27, 2020

Rigatoni and Meatball Soup

This post contains affiliate links.
Remember my friend, Kathy? The one who talked me into buying the Nordic Ware Heritage Bundt Pan, and making the Cranberry Orange Bundt Cake? She seems to get me into a lot of trouble. The other day on Facebook, she tagged me in a recipe for rigatoni and meatball soup. Italian food is one of her favorite things, and she thought the soup looked wonderful. Naturally, I had to make it for her. I adapted it to suit my own tastes and favorite ingredients (like I do), and took some over to her. She proclaimed it “Fabulous! The best soup [she] has ever eaten.” I can’t argue with that. Take it from Kathy, this soup recipe is a good one!
Rigatoni and Meatball Soup
Adapted from The Cozy Apron

Meatball Ingredients:
1 lb. ground chuck
½ c.
Italian breadcrumbs
1 large egg, beaten to blend
1 t. kosher salt
1 t. dried basil
1 t. dried oregano
1 t. dried parsley
1 T. dried minced onion
½ t. freshly ground black pepper
½ T.
Melissa’s minced garlic
2 T. whole milk
2 T. olive oil, for sautƩing

Soup Ingredients:
Olive oil (about 2 T.)
1 3-oz. pkg.
Melissa’s shallots, chopped
1 t. dried basil
1 t. dried oregano
1 t. dried parsley
Pinch salt

Pinch freshly ground black pepper
Pinch red pepper flakes
6 cloves garlic, thinly sliced
2 T. tomato paste
¼ c. dry red wine
1 28-oz. can diced tomatoes
6 c. chicken stock
1 T. chopped flat-leaf parsley
8 oz. uncooked
rigatoni, cooked 2 mins. less than package instructions
2 c. grated mozzarella cheese (¼ c. per serving)

Preparation:
Crumble ground chuck into a large bowl. Add remaining ingredients; gently mix together just until combined. Using a tablespoon, scoop up portions of the mixture, and roll between your palms to form meatballs.

Place a large soup pot over medium-high heat and drizzle in about 2 tablespoons of the olive oil. Once the pot is hot, add meatballs, and brown on all sides. When the meatballs are browned, transfer to a plate or bowl to hold; drizzle in a touch more olive oil (if needed), and add the shallots.

SautƩ the shallots, scraping up the good bits from the meatballs as much as possible; add dried basil, dried oregano, dried parsley, a pinch of salt, pepper, and red pepper flakes; stir for a couple minutes until things soften.

Add garlic and stir until it becomes aromatic (about 1 minute), add tomato paste, and stir to incorporate, about 30 seconds or so; add the red wine to deglaze, and after about 20 seconds, add tomatoes, chicken stock, and flat leaf parsley.

Simmer the soup for about 15 minutes; then, using a blender or a hand-held immersion blender, puree the soup until smooth.

Add the reserved meatballs, and bring to a gentle simmer; simmer, uncovered, for 15 minutes more until the meatballs are tender.

To serve, place ½ cup of the cooked rigatoni into a bowl, and ladle in some of the soup (about 1½ cups) along with 4 meatballs; top with ¼ cup grated mozzarella cheese, and either enjoy immediately, or place under the broiler for a minute to melt and slightly brown the cheese.


Friday, January 24, 2020

Chocolate Cream Cheese Pound Cake

This post contains affiliate links.
When a friend of mine tagged me in a Williams-Sonoma Facebook post featuring a Nordic Ware Heritage Bundt pan she had no idea what she had set in motion. For the first time ever I own a Bundt pan that is not only beautiful, but actually releases the cake with its lovely, swirled design. After the great success I had with the Cranberry Orange Bundt Cake, I was eager to try another one. When I stumbled upon this recipe I had to give it a try. The original actually calls for a tube pan, but I used this anyway, and, as you can see, it worked just perfectly. I also, as I am wont to do when making a chocolate cake of any kind, added some espresso powder to boost the flavor. This is a wonderful, dense, and chocolaty pound cake. I drizzled ganache over the top, but I think it would be equally good with a dusting of powdered sugar and a scoop of ice cream.
Chocolate Cream Cheese Pound Cake
Yield: 16 servings

For the cake:
1 lb. unsalted butter, softened
3 c. sugar
8 oz. cream cheese, softened
6 large eggs
3 c. flour
½ c.
dark cocoa powder
½ t. salt
1 t. baking powder
½ t. espresso powder
½ c. whole milk, warm
1 t. vanilla extract

For the ganache:
1 c. semi sweet chocolate chips
1 c. heavy cream

For the cake: Preheat oven to 325°F. Butter, cream cheese, and eggs should be at room temperature. Cream together butter, sugar, and cream cheese until light and fluffy. Add eggs one at a time, beating well after each addition. In a bowl, combine flour, cocoa, salt, baking powder and espresso powder. Add alternately with milk to creamed mixture, beginning and ending with dry ingredients. Stir in vanilla. Pour into greased and Bundt pan. Bake for 1 hour and 20 minutes, or until a toothpick inserted into the center comes out clean. Remove the cake from the oven and cover with foil until completely cool.

To make ganache:

Place chips and cream in a
microwave safe bowl, and heat on high at 30-second intervals, stirring after each, until the chocolate is melted and cream is incorporated. Drizzle immediately over the cake.


Thursday, January 23, 2020

Easy Baked Rum Raisin Rice Pudding

This post contains affiliate links.
It used to make me giggle when my grandmother could predict the weather on the basis of whether or whether or not her “rheumatism was acting up. Well, I’m not laughing now. Our fluctuating temperatures and barometric pressure has both my sinuses and arthritis giving me grief, so the last thing I want to do is cook. But, a girl’s gotta eat, and this girl wanted comfort food. Thank goodness the freezer is full of individual containers of my homemade chicken noodle soup. That, a buttery crusty roll, and a heaping scoop of rice pudding may not have made me feel better physically, but it soothed my soul.

If you like rice pudding like I do, but don’t want to have to stand over the stove and stir endlessly, then I think you will enjoy this baked version. It goes together in a snap, all you have to do is allow it to bake, and then reap the reward of creamy deliciousness. If you don’t like raisins, leave them out, but I encourage you to include the rum no matter what.
Easy Baked Rum Raisin Rice Pudding
 
1/3 c.
basmati rice
¼ c. granulated sugar
½ c.
golden raisins
2 T. dark rum
2 c. heavy cream
2 c. whole milk
½ T. butter, plus more for greasing pan
Few gratings fresh nutmeg
1 T. vanilla extract
1/8 T. ground cinnamon

Preheat oven to 350° F. Grease a
1 1/2-quart, deep baking dish with butter.  Sprinkle rice, sugar, raisins, rum, cream, and milk, into the bottom of the prepared dish and stir to combine. Bake for 30 minutes. After the 30 minutes are up, remove from oven, and add vanilla and cinnamon, stirring to combine.  Return to the oven to bake for an additional 60 minutes. After 60 minutes, remove from the oven and stir. If the pudding is still soupy, bake an additional 5-15 minutes until it becomes thick and creamy. Allow to sit for 15 minutes before serving. This is good both warm and cold, so refrigerate any leftovers to enjoy the next day. Serves six people amply.


Tuesday, January 21, 2020

Baked Zucchini and Feta Squares

This post contains affiliate links.
I’m sure I’m not alone in saying that I often buy things at the grocery store, come home with them, and then wonder what on earth my intention was with this purchase. Such was the case with a three-pack of rather large zucchini that were annoyingly taking up space in the vegetable bin of my fridge. After a while, I got tired of moving it around, so decided to actually do something with it. Zucchini, you might say to yourself, is not a problem. It is versatile, can be used for dishes both sweet and savory, and there are always many recipes to be found. It can easily be dealt with simply by sautĆ©ing it, grilling it, or broiling it. It be turned into carb-replacing noodles, or grated and folded into a batter to make flavorful quick breads or cake. The thing is, I had done all of that.

Fortunately, an issue of
Sweet Paul magazine was at my side wherein I discovered this toothsome recipe for zucchini squares. These are so good that I could have eaten the entire pan in one sitting. They are wonderful served warm from the oven accompanied by meat, fish, or chicken. They can be served at room temperature, so a great dish for a brunch or buffet. They can also be cut into smaller squares (or circles using a 1½” round biscuit cutter) to be used as appetizers. If you have vegetable haters in your family, this dish may just change their minds.
Baked Zucchini and Feta Squares

3 slices bacon, cut into small pieces
1
Melissa's shallot, finely chopped
1 garlic clove, finely chopped
2 scallions, thinly sliced
4 medium zucchini, grated
1 c. feta cheese, crumbled
½ c. Parmesan cheese, grated
½ c. whole milk
Salt and Pepper
6 eggs
½ cup flour

Preheat oven to 350ĀŗF. Line a 9-inch x 9-inch baking dish with parchment paper.

In a 9” sautĆ© pan, cook the bacon until crispy; remove and set aside. In the same pan in the bacon drippings, cook onion, garlic, and scallions until soft.

Place onion mixture into a large bowl and add cooked bacon, zucchini, feta, and Parmesan. Season with salt and pepper.
In a separate, bowl beat together milk, eggs, and flour. Stir into the zucchini mixture.

Pour into the prepared baking dish, use a spatula to smooth out the batter. Bake for 40 to 45 minutes or until set. Cool and cut into squares.
  
MAKES 12 SQUARES


Monday, January 20, 2020

Juniper Baked Pimiento Cheese Dip

This post contains affiliate links.
If you are anything like me, i.e. someone who enjoys reading new recipes, then you are probably as eager as I am every Wednesday for the food section in the local paper, whether you read it digitally or a hard-copy. And, if, also like me, you are a fan of pimento cheese, have I got a recipe for you!

Juniper, a Southern Table and Bar, in downtown St. Louis offered up their recipe for this zippy, flavorful pimiento cheese that is baked. Like all pimiento cheese, it is easy to put together, and, as I always do, make it easy on myself by using
Melissa’s Fire Roasted Sweet Bell Peppers rather than roasting my own (as they suggested in their recipe). One taste, and this quickly rose to my top five favorite pimiento cheeses, in a list that boasts more than two dozen varieties.

Here is my adaptation of their recipe. While this one is baked, it is just as good cold, and has as many uses as you can imagine, including being stuffed into celery, dolloped on top of a burger or hotdog, added to a steaming bowl of chili or tomato soup, or simply as the hot dip that it was intended. Juniper includes pickles among their dippers, as well as a type of bread that is similar to pita or to the Indian bread naan. Choose your favorites here. There is no end to the way that you can enjoy this.
Juniper Baked Pimiento Cheese Dip
Slightly adapted from the original in the St. Louis Post-Dispatch

Yield: 8 servings (as if!)

1
Melissa’s Fire Roasted Sweet Bell Pepper, minced
¼ pound yellow cheddar cheese
¼ pound white cheddar cheese
¼ cup
Duke’s mayonnaise
½ teaspoon Dijon mustard
¾ teaspoon
smoked paprika (no substitutions!)
Pinch of cayenne pepper
1 tablespoon
Crystal hot sauce
1 tablespoon garlic-dill pickle juice
Salt to taste
2 tablespoons cornbread crumbs
2 tablespoons minced fresh Italian parsley

The dip is baked and served in cast iron at Juniper, which helps it retain heat. You may use individual 6- or
8-ounce ramekins for this appetizer. Adjust the timing of the baking accordingly.

Preheat the oven to 350ĀŗF, or 325ĀŗF for glass pans.

Grate the cold cheddar cheeses using the large holes on a box grater or a food processor fitted with a grating disc. Toss the cheeses together in a mixing bowl. Add the diced red peppers and fold into the cheese.

In a separate mixing bowl, blend the mayonnaise, Dijon mustard, smoked paprika and cayenne pepper. Stir the mix into the cheeses. Add hot sauce and pickle juice and stir to blend evenly. Taste. Add salt if needed.
 
Transfer the mixed dip into a 1-½ quart baking dish. Bake for 15 minutes, then remove and top with cornbread crumbs. Return to the oven and bake an additional 5 to 7 minutes.
Remove to a wire rack to cool slightly. Top with chopped parsley. Serve with assorted pickles, breads or crackers.


Thursday, January 16, 2020

Easy Homemade Strawberry Ice Cream

This post contains affiliate links.
I am not a particular fan of ice cream, so I tend to not keep it on hand. That said, when I do get a hankering for it, I want it, and I want it now! Fortunately, it is so easy to make myself, that it’s never a problem to satisfy that craving, as long as I have an hour or two to give it a chance to firm up in the freezer. The other day I had a serious craving for strawberry ice cream. You may not think that’s unusual, but let me tell you it is so unusual that I don’t think I’ve ever had strawberry ice cream before. Naturally, I had to make some, and it was so good! This recipe is super simple, and requires no tricky custard making on top of the stove. You simply whip cream, and fold it with the rest of the ingredients, and then put it into the freezer until it’s ready. Yum!
Easy Homemade Strawberry Ice Cream

1 14-oz. can sweetened condensed milk
1 T. vanilla extract
1 c. frozen strawberries, rough chopped
Red food coloring, optional
2 cups heavy cream

Combine the sweetened condensed milk and vanilla in a large bowl; stir in strawberries and food coloring, if desired. Beat 2 cups heavy cream until stiff peaks form. Fold into strawberry mixture. Pour into a
9” x 5” loaf pan. Cover, and freeze 6 hours or until firm.


Tuesday, January 14, 2020

Cranberry Orange Bundt Cake

This post contains affiliate links.
I have a friend who, like me, doesn’t like to bake. As a consequence, we torment each other with various delicious looking recipes for baked goods. When she sent me the recipe for this orange cranberry cake, featuring this beautiful Nordic Ware Heritage Bundt pan, I couldn’t resist. Not only did I buy the pan and the release spray, I also made the cake. I sent her pictures along the way, because she was as curious as I was as to whether or not this pan, like so many others have failed to do, would release the cake in one piece, to be consumed in all its elegant glory, instead of finding itself as a layer in a trifle.
As you can see from the pictures, happily it did come out just beautifully. But, I’m not going to lie, this cake was a lot of work! Because baking gets on my nerves, I did it in stages throughout the day. Measuring dry ingredients and setting them aside, getting out wet ingredients, setting them aside, making the cranberries, making the orange sugar, you get the picture.
It was worth every ounce of energy that I put into it. Not only am I extremely proud of my efforts, but my friend deemed it as “fabulous” as it is beautiful. It is loaded with flavor (I must confess that I replaced the orange juice in the glaze in the original recipe found here, with orange liquor, because I can never leave well enough alone) — sweet, tart, refreshing, complex, and certainly elegant enough to serve for company. Make it if you dare!
Cranberry Orange Bundt Cake

Cake

2½ c. flour
¾ t. baking powder
¼ t. baking soda
½ t. salt
1 1/3 c. sugar
2 T. fresh orange zest
10 T. unsalted butter, room temperature
2 large eggs, room temperature
1 c. low-fat buttermilk, room temperature
¼ c. cup freshly squeezed orange juice
1 t. vanilla extract
1¼ c. fresh cranberries, chopped

Sugared Cranberries

2 T. sugar
2 T. water
½ c. fresh cranberries
¼ c. sugar

Glaze

2/3 c. powdered sugar
1/8 t. salt
1½ T. fresh orange juice

Preheat oven to 350°F and spray a 10-cup Bundt pan generously with nonstick spray. Whisk together flour, baking powder, baking soda, and salt in a medium bowl; reserve one tablespoon flour mixture to toss with cranberries.

Combine sugar and orange zest in a food processor and pulse for 1 minute; combine with butter in a large mixer bowl and beat on medium speed until pale and fluffy. Reduce speed to low and add eggs one at a time. Combine buttermilk, orange juice, and vanilla in a small bowl. Beat in flour mixture in three additions, alternating with buttermilk mixture (begin and end with flour mixture), just until incorporated. Toss cranberries with reserved flour mixture and gently fold into batter.

Spoon batter into prepared Bundt pan and smooth with an offset spatula. Tap pan sharply to reduce air bubbles. Bake for 45 to 50 minutes, until cake is golden, springs back to the touch, and a tester inserted in the center comes out clean or with a few crumbs attached. Cool in pan on a wire rack for 15 minutes; carefully invert onto rack and cool completely.

While the cake bakes, make the sugared cranberries. Place a wire rack over a parchment-lined baking sheet. Combine sugar and water in a small saucepan and bring to a simmer, stirring until the sugar is completely dissolved. Add cranberries to the saucepan and coat completely in the simple syrup. Use a slotted spoon to transfer the cranberries to the wire rack. Separate the cranberries into a single layer, spaced 1-inch apart. Let dry for 1 hour, then roll the cranberries in sugar to coat. Transfer to a clean baking sheet and let dry for 1 hour before using.

For the glaze, whisk together powdered sugar, salt, and orange juice in a small bowl. Drizzle glaze over cooled cake and let set before topping with sugared cranberries and serving. Store leftovers in an airtight container at room temperature.