Thursday, November 30, 2023

Pecan Cream Pie with Windmill Cookie Crumb Crust

 
This is another recipe from Thanksgiving, and you’re going to need to refer to my posting for Monday of this week to understand why the photos aren’t the best. Essentially I was frantic, I had company, and this was the best I could do.
 
I am not a fan of pie of any kind, so instead of sticking with the traditional pumpkin (I don’t like it at all) or pecan (my late dad’s favorite and one I’ll tolerate), I decided to go in a completely different direction and make a pecan cream pie. It was very good. But, this is less about the pie than it is about the crust.  I decided that I wanted to make a graham cracker crust not realizing that I didn’t have graham crackers. What I did have, however, was a package of those windmill cookies. I love those things and have done since my youth. So this pie has a windmill cookie crust. My son loved it so much that he said he will never make a graham cracker crust again. Here’s the recipe for both pie and crust.  You can make any kind of filling that you want, but you MUST make this crust!

 Pecan Cream Pie with Windmill Cookie Crumb Crust

 Pie

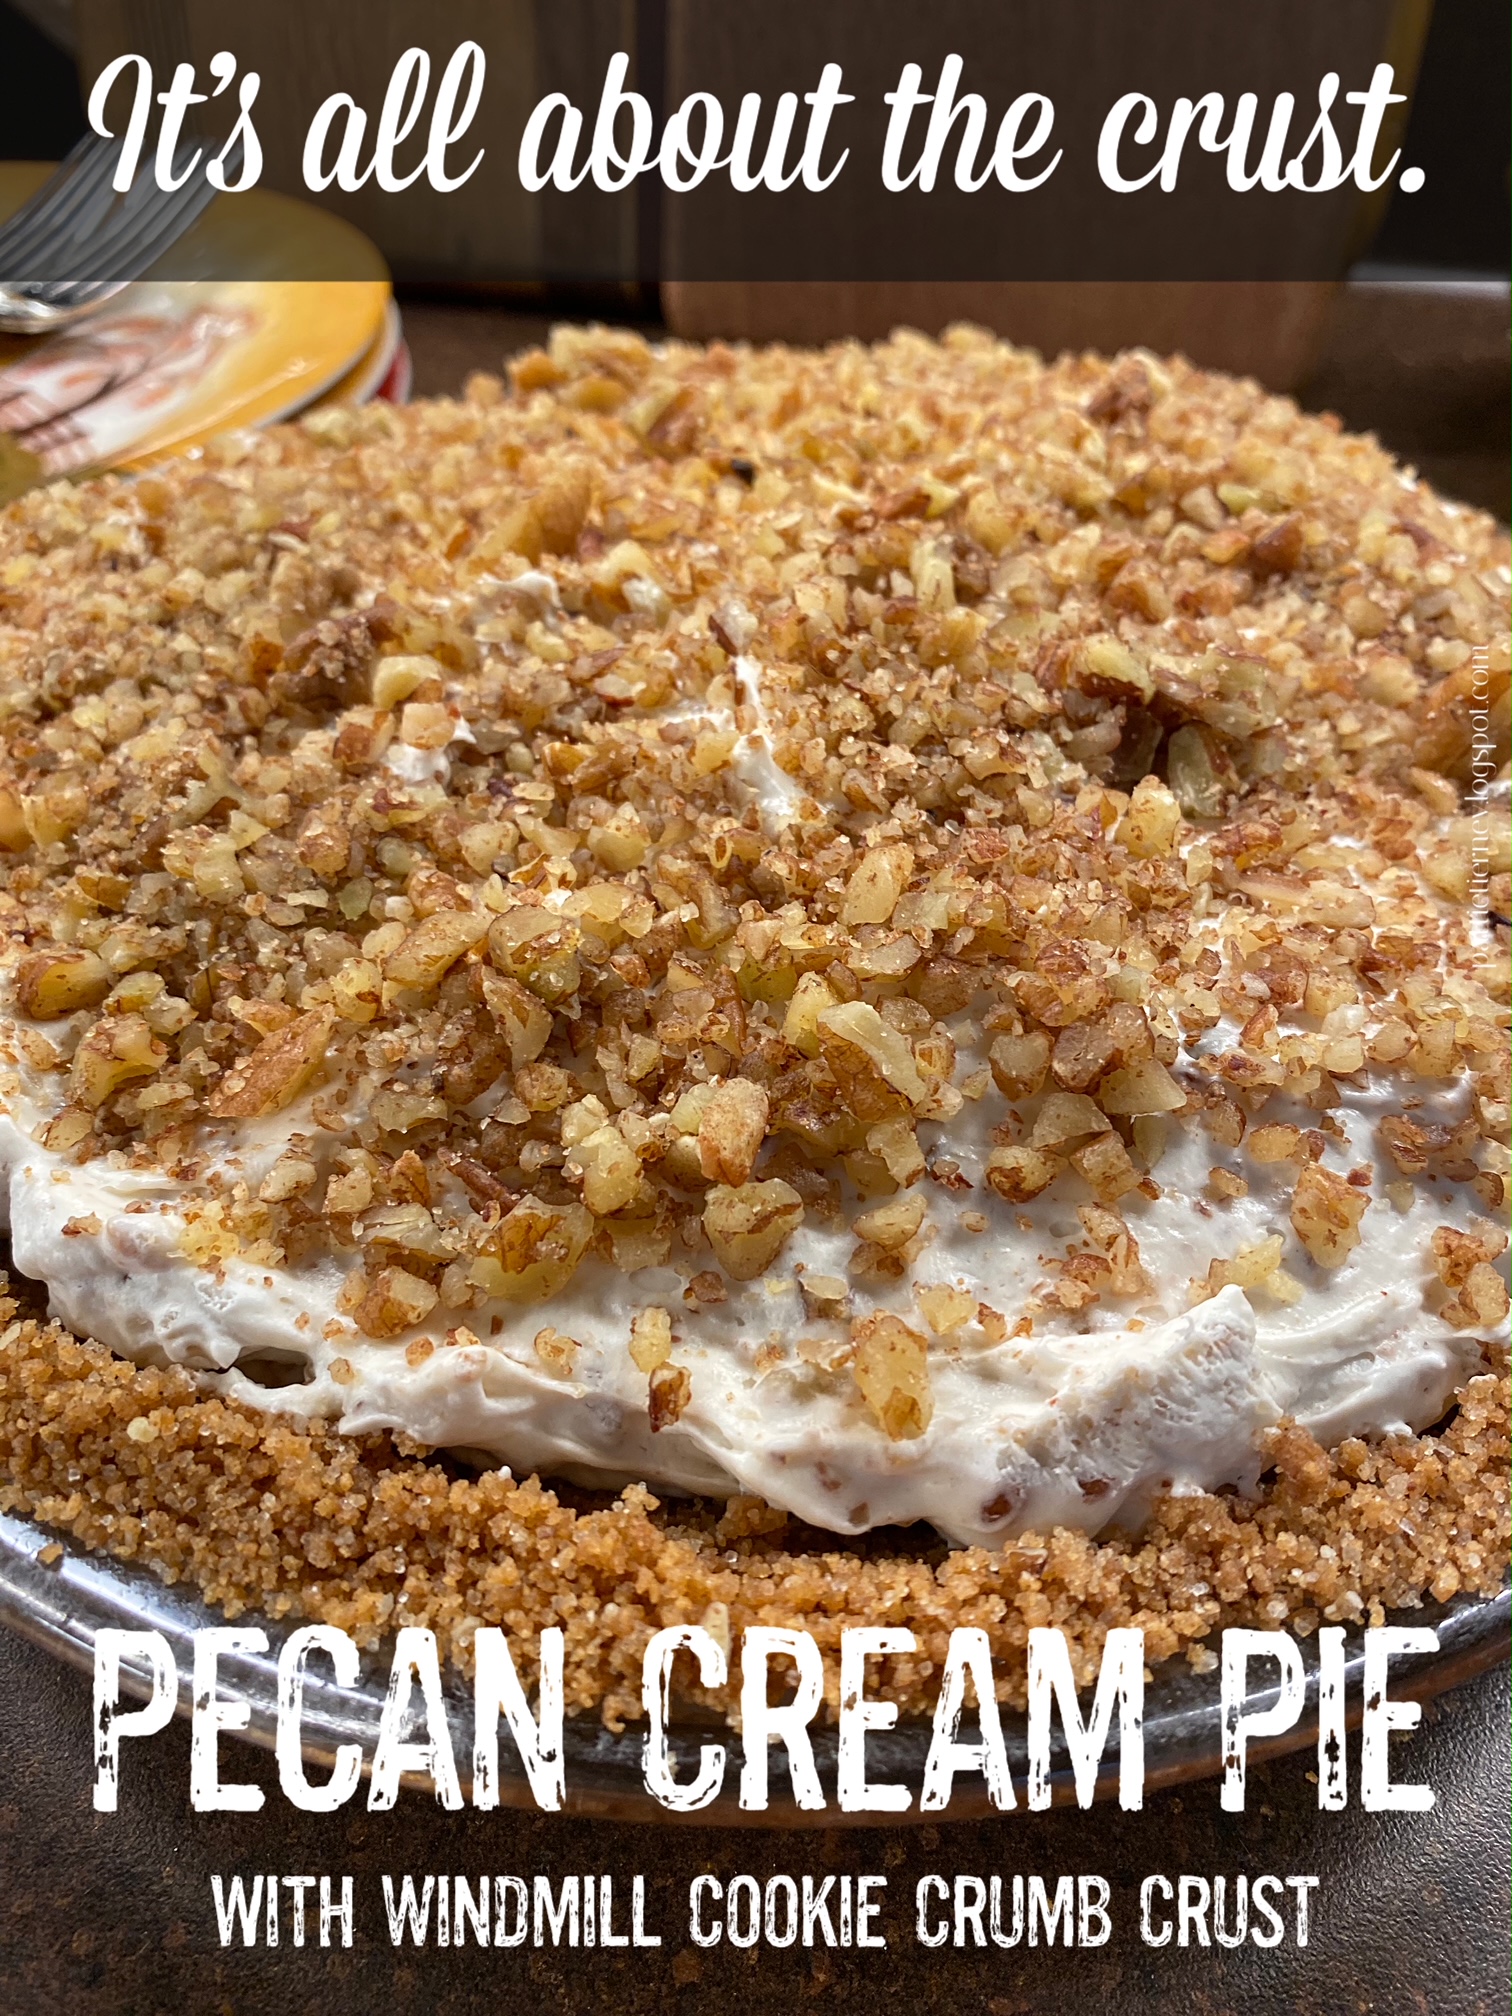
 1 recipe Windmill Cookie Crumb Crust

1 c. heavy whipping cream

¼ c. powdered sugar

2 8-oz. pkgs. cream cheesesoftened

½ c. light brown sugar

¼ c. pure maple syrup

1½ c. finely chopped pecans, divided

¼ t. salt

Make pie crust according to recipe (below). Chill before adding the cream pie filling.

 In the work bowl of your stand mixer, place heavy whipping cream and powdered sugar. Beat until stiff peaks form.

 In a separate mixing bowl place softened cream cheese, brown sugar, and pure maple syrup. Beat together until combined and creamy.

 Fold the whipped cream into the cream cheese mixture until combined. Stir in 1 cup of the chopped pecans. Spread the filling mixture into the pie crust. Sprinkle the remaining pecans (½ c.) on top of the pie.

 Cover the pie with a lid or plastic wrap and refrigerate for 8 hours, or overnight, before serving.

 Crust

 1½ c. Windmill Cookie crumbs

⅓ c. granulated sugar

½ c. salted butter, melted

 Pulse the cookies in a food processor or place them in a Ziploc bag and crush them with a rolling pin until they form a fine, even crumb. Add the granulated sugar and combine evenly.

Melt the butter in a heatproof bowl in the microwave. Pour the melted butter into the crumb mixture and pulse until combined.

 Press the graham cracker mixture evenly across the bottom and up the sides of a 9-inch pie plate.

Use your fingers or the flat bottom of a measuring cup to pack the crust tightly and evenly into the pie plate.

 Chill in the freezer for 10 to 15 minutes before filling with a no-bake pie filling.

 Alternately, bake in a 350°F oven for 6 to 8 minutes or until the crust is lightly browned. Allow to cool completely before adding pie filling.


As an Amazon Associate I earn from qualifying purchases.


Tuesday, November 28, 2023

The Anguish and Delight of Holiday Crafts

 
If I ever again mention that I am going to make some jeweled, felt ornaments, somebody slap me. I was digging through my craft drawer and came across a Bucilla kit that I had purchased some time ago. (As an aside, I think I paid around $25 for it at the time; it is now going upwards of $50 on eBay, some listings are as high as $100!) At the beginning of the year, I told myself that I needed to see such projects through. You can see how well that worked out, it’s November. Still, I decided this would be the perfect project for this month. After all, it has a Christmas theme, and these would be excellent to work on in the evening when I’m watching television. They were a lot of work. The pie was an absolute nightmare! Essentially, the instructions read: cut out pieces, embroider, and sew together. This is three-dimensional! Its completion involved so much more than that. At any rate, they don’t look half bad, and I’m rather proud that I did see them through. I decided to keep the plum pudding for myself because I think it would go well on my Charles Dickens themed Christmas tree. The others I believe I’m going to list in my Etsy shop.Are you working on any craft projects currently? What are you making?


Monday, November 27, 2023

Spinach Madeleine

 
Putting a Thanksgiving dinner on the table is a lot of work. When you factor in anxiety based upon trying all new recipes, it doesn’t allow much breathing space to take photos of the food. As a consequence, I’m asking you to forgive the quality of photos here, but this is a recipe I had to share because it was so good.

I decided to have Cajun Thanksgiving this year; my menu was as follows:

 Cup of Gumbo

Cajun Turkey Breast

Dressing

Bourbon, Bacon, Mac & Cheese

Spinach Madeleine

Cajun Deviled Eggs

Spirited Cranberry Sauce

Cornbread

Pecan Cream Pie
 
  It’s not often that I try all new recipes for a meal, but because I was serving a small number of people who are very tolerant of what I do, I decided to go for it. Never before had any of us had mac and cheese as a part of a Thanksgiving dinner, nor had we had deviled eggs. The deviled eggs were so good that they are going to return for Christmas. Everything was a big success, but what we all particularly enjoyed was the spinach. It was so easy to put together, make ahead, and one of those things that sent us back for seconds.

The recipe, as far as I know, first appeared in a 1959 Junior League Cookbook, River Road Recipes: The Textbook of Louisiana Cuisine. It is now prepared at The Gregory Restaurant in Baton Rouge as a part of their Cajun Thanksgiving menu. The only thing I changed here was to use Panko instead of breadcrumbs, and we all loved the added crunch.

Spinach Madeleine

 2 10-oz. pkg. frozen, chopped spinach

4 T. butter

½ c. evaporated milk

3 T. flour

½ c. reserved spinach liquid

2 T. chopped Melissa’s shallot

1 t. Melissa’s minced garlic

6 oz. jalapeno jack cheese

1 t. Worcestershire sauce

½ t. freshly ground black pepper

½ t. garlic powder

Salt to taste

½ c. Panko breadcrumbs

¼ c. melted butter

 Preheat the oven to 375°F. Spray a 1½-quart casserole with PAM; set aside.

 Cook spinach according to package directions. Drain the cooking liquid off the spinach, and reserve.

 In a medium saucepan over low heat, melt butter. When butter has melted add the flour, stirring the mixture until it is blended and smooth without being brown. Stir in the shallots, and cook them just until soft. Pour in the evaporated milk and the ½ cup reserved spinach liquid, stirring constantly. Continue cooking and stirring the mixture until it is smooth and thick.

 Add the cheese, Worcestershire sauce, and all the seasonings to the mix. Continue stirring until the cheese is completely melted; stir in spinach. Pour the mixture into prepared baking dish. (At this point, you can put the mixture into the refrigerator if you make it ahead of time. When you’re ready to bake it, bring the casserole to room temperature beforehand.) Combine the breadcrumbs and melted butter. Sprinkle the breadcrumbs on top. Pop the dish into the oven just long enough to make it bubbly and golden.

As an Amazon Associate I earn from qualifying purchases.


Thursday, November 23, 2023

Thanksgiving Tablescapes Through the Years


The big day is finally here! As you read this, I am frantically preparing for company. I’m having a small crowd this year, minuscule, in fact, but the stress level is always high no matter how many I serve. For those of you who are relaxing and enjoying the day, you may find an interest in looking at the Thanksgiving tables that I have done in the past. Some items show themselves repeatedly, others occasionally, and some only once. It was a nice walk down memory lane for me, a bit bittersweet if I’m honest. Still, it’s always important to celebrate if you can, be grateful for what you have, and keep moving forward. Click on the title beneath each picture to get to the tablescape.


 Happy Thanksgiving!

Tuesday, November 21, 2023

Garlic Parmesan Roasted Carrots

Funny thing about these carrots; I made a lot of them at once, because I am the kind of person who tends to reheat vegetables and have them on subsequent days to save myself some trouble. What I found is that while I enjoyed them on the first day, I really liked them better on the second day, warmed up in the microwave. They just seemed sweeter and more flavorful. However you want to make these, they are super simple, can be prepped beforehand, covered, and held in the refrigerator until you’re ready to roast, and pair with almost any main dish.
   Garlic Parmesan Roasted Carrots

Adapted from Diethood

2 lbs. carrots, peeled, scrubbed, cut into 3” pieces

4 T. butter, melted

1 T. Melissa’s minced garlic

1 t. dried thyme

1/3 c. grated Parmesan cheese

2 T. fresh parsley, minced

Aromat Seasoning, to taste

Kosher salt and freshly ground pepper, to taste

 Preheat oven to 425°F. Line a baking sheet with foil; set aside.

Pour melted butter to a large bowl, then add garlic, thyme, Aromat, salt, and pepper, and stir to combine.

 Add carrots and toss to coat. Add Parmesan and toss once more.

 Spread carrots out on prepared baking sheet. Bake until tender, about 25 minutes, stirring once halfway through. Adjust seasoning as needed and sprinkle with parsley.

As an Amazon Associate I earn from qualifying purchases.


Monday, November 20, 2023

The Fruitcake Bowl

 
Long before we got together, the late Mr. O-P was making fruitcake. It was as much of a tradition for him as was putting up a tree. I had never made a fruitcake before, so this tradition was new to my experience. It is an arduous task, I can tell you. It’s also an expensive one. Over the years as I watched him make this, I had suggested he get a larger bowl. He was a bit of a messy cook under normal circumstances, but this generally made for a kitchen disaster.One spring I was out shopping with my mother, and spotted what I thought would be the perfect fruitcake-making bowl. I made the purchase, lugged the stoneware behemoth to the car, sneaked it into the house, and waited to present it to him at my parents’ annual brunch on Easter Sunday, filled with Easter grass and goodies. It wasn’t the right season, I know, but when you find special things, you need to buy them.

His reaction was a bit different than I had expected. For one thing, it’s heavy. I mean really heavy. When I put it on his lap, I thought the weight was going to send it right onto the floor. The bowl is 14” wide by 9” tall, and weighs 15 pounds. It’s also a real booger to store. He mentioned all of this on the way home in the car. I tend not to think about such things in the throes of shopping passion.

I won’t say that I regretted this purchase, although I did, but because I had bought it, and designated it as the official fruitcake bowl, it became so. Every November it had to be hoisted up from the basement, washed, and pressed into service. I still have that bowl, and let me tell you bringing it up from the basement at my advanced age is not easy. Combine that with the mixing of the fruitcake ingredients, and you’ve got quite the cardio workout.

This is my first year making fruitcake on my own. The year after Jim passed away number two son, Andrew, came to make it with me. After that, I thought I would probably never make a fruitcake again, because the process made me a bit melancholy. This year I cast that aside, dug in, and I’m rather proud of myself. I used this fruitcake as the cover picture for my Christmas card the first year I celebrated as a widow. The recipe was inside. You can also find it here.

As I write this, the bowl is safely stored away on a shelf in the basement, and I’m ready to collapse in a heap. My family likes fruitcake, so they’re eager for their portions come Christmas. Do you have any similar baking equipment that means something special to you? Tell me about it.


Friday, November 17, 2023

Make Your Own Seasoned Salt

I’m beginning to feel as if I am easily influenced. I say this because a friend suggested that I might like a YouTube channel called Homeworthy. (She was right, of course.) This channel offers homeowner-conducted tours of various and unique houses around the world. The one that spoke to me the most was the home of Louisiana textile artist, Rebecca Vizard. Not only did I come away from that video with a major girl crush on Vizard, but her home is one that I could completely relax in and feel comfortable, and I don’t say that often, if ever.

Screen shot from YouTube Homeworthy.   
Her home, like a fine wine, evolved and improved with age. I have said before that I can walk into someone’s home and know immediately if I can be friends with that person. When I saw Vizard’s home, I wanted her to adopt me. It is a true reflection of the ever-changing lives of herself and her family. Warm, welcoming, fascinating, and unique, it was full of fabulous pieces of furniture, each with its own story, as well as a vast array of curiosities.

Photo from Woodworks by Clarice on Etsy.
One of the things that impressed me was the fact that she and her husband make their own seasoned salt in a weathered wooden bowl on their dining table. (The salt is for sale here.) I always love learning new things, and this intrigued me. Yet again, I spent a late night, searching the Internet, including a brief exchange with Vizard herself (This was thrilling, I can tell you.) wherein she advised I use sea salt, rather than kosher in my batch. Sea salt, I soon learned, is not inexpensive, but I did manage to find reasonable bags of Maldon, Himalayan, and Celtic. Having placed that order, I set out to find the perfect wooden bowl. Most unexpectedly I found one on Etsy that shipped from the UK. (On sale! Woot! Woot!) Not only do I feel as though the UK is my home away from home, but I was thrilled to have a piece by a UK artist. I now have my seasoning salt on my dining table, periodically add fresh herbs, and give it a stir. This has been a wonderful learning experience, and a fun project, with a usable result. What more could a person ask?

 As an Amazon Associate I earn from qualifying purchases.

Thursday, November 16, 2023

Turkey's Delight Tablescape

 
Over the course of the past two weeks, I went from not hosting Thanksgiving to hosting Thanksgiving. I’m not unhappy about doing it, because there will just be a few of us, but all of a sudden I am thrown into party planning mode. I’ve decided to do a Cajun Thanksgiving, so will largely be trying all new recipes. The only thing I’m sure about thus far is the table. While this is just a table for two, it will translate into a table for four quite easily.
  
A chocolate brown tablecloth provided the base for this table setting. The turkey at center was my inspiration for all of the colors that I used. It, and the garland, I purchased as a part of a store display many years ago. To add a bit of sparkle, I intertwined lighted maple leaves.

 
I started off with woven placemats topped with gold chargers. From there I chose richly colored gray stoneware plates with a fluted edge. They are by Stone Lain and are the “Lusso” pattern. The turkey plates are from Pottery Barn purchased years ago.

 
I chose gold flatware to give the table a bit of a metallic look, and to complement the chargers. I carried the gold into the lighting at the table, placing metallic gold candles into rustic metal pilgrim candle holders that I purchased in a country shop about 20 years ago. I love mixing old with new.

 
The napkins and mini copper mugs filled with mixed nuts I got from Pottery Barn last year. That way I can rightly claim that I am serving everything from soup to nuts.

The whimsical turkey mugs are completely impractical, but I have loved these now for 25 years. I bought them at a local florist.

 
The wine glasses “Gallia” by Rogaska, I inherited from my mother. The colored liqueur glasses are by Val St. Lambert Crystal - Berncastel Cut, and will be used for serving homemade cranberry liqueur.

 
If any of my new recipes come out well, I’ll be sure to share them with you. I will say that I’m starting our Cajun Thanksgiving dinner with a cup of gumbo, the recipe of which you can find here.

 
Happy Thanksgiving, everybody!

 As an Amazon Associate I earn from qualifying purchases.

 This post is linked to: Tablescape Thursday


Tuesday, November 14, 2023

Sir Walter Cocktail

Is anyone watching “Payback” on BritBox? It’s a compelling crime drama starring Morven Christie and Peter Mullan. There are six episodes in season one, each of which is around 46 minutes long. It’s not as intense as other crime dramas that I’ve watched, but it’s one of those shows that fills me with anxiety. I decided that I needed an appropriate cocktail to get me through. Because this is a Scottish production filmed in beautiful Edinburgh, a place I have visited and enjoyed, I decided to make myself a Sir Walter, a.k.a. “Swalter” cocktail, allegedly named for Sir Walter Scott. It is nose-numbingly powerful, at least for an amateur tippler like me. It’s tasty though, and I was able to get through even the most intense moments of the series in fine form.

Sir Walter Cocktail

1 t.
Grenadine
1 t. Curaçao
1 t. fresh lemon juice
1½ oz. brandy
1½ oz. rum

Shake well with ice and strain into a chilled cocktail glass


As an Amazon Associate I earn from qualifying purchases.