Wednesday, July 31, 2019

Pesto Cucumber-Avocado Soup

Remember last week when I told you to be sure to make the Lemon Basil Vinaigrette because you would need it again? If not, go back and look, I’ll wait. Here’s the reason that you need it, to add a wonderful fresh pesto taste to this delicious cold summer soup. There is nothing better on a hot day than a cup of cold soup, and this one is cooling, refreshing, loaded with nutrition, and lots of flavor. It’s like summer in a cup.
Pesto Cucumber-Avocado Soup

1 large, ripe avocado, peeled and pitted
1 large cucumber, unpeeled, and cut into large chunks
1½ c. homemade chicken stock (canned, if you must)
1 Melissa’s shallot, quartered
2½ T. fresh lemon juice
1 t. fresh lime juice
½ c. plain Greek yogurt
Pinch Kosher salt
Pinch red pepper flakes

Place avocado and cucumber into a large capacity food processor fitted with a metal blade, and process until smooth.  With machine running, gradually pour chicken stock through feeder tube; process until smooth.  Add shallots, citrus juices, yogurt, Lemon Basil Vinaigrette, and process until combined.  Season to taste with salt and pepper.  Chill for at least 2 hours (the longer the better). To serve, ladle into cups or bowls and top with basil chiffonade, croutons, or drizzles of the vinaigrette.

Tuesday, July 30, 2019

Zippy Cucumber Salad with Red Onion

As you may have noticed from my deck garden update, I have a huge cucumber plant that is providing me with loads of cucumbers. (I noticed one of them making himself quite comfortable in the chair that I used to sit in, but I digress...) Many cucumbers have been distributed around the neighborhood, others are being turned into cold soups, and a variety of pickles and relishes are surely in my future, but today I’m enjoying a salad that must be made ahead (Don’t you love that?), and is very tasty indeed.
Zippy Cucumber Salad with Red Onion

2 large cucumbers, sliced thin (I used a
mandolin)
½ red onion, sliced thin (see above)
1 t. kosher salt
½ c. sour cream
2 T. white sugar
2 T. cider vinegar
¼ t.
Old Bay seasoning
1 T. fresh, chopped chives
1 T. fresh, minced parsley
¼ t. paprika

Spread cucumbers out onto a paper towel-lined cookie sheet; season with the salt and allow them to rest for 30 minutes. Squeeze excess moisture from cucumbers.

While cucumbers are resting, in a large mixing bowl, whisk together sour cream, sugar, vinegar, Old Bay, chives, parsley, and paprika. Fold drained cucumber and red onion slices into the sour cream mixture. Cover and refrigerate for at least eight hours, or overnight. Serve garnished with a few more chopped chives, if desired.


This post contains affiliate links.

Wednesday, July 24, 2019

Deck Garden Update for July

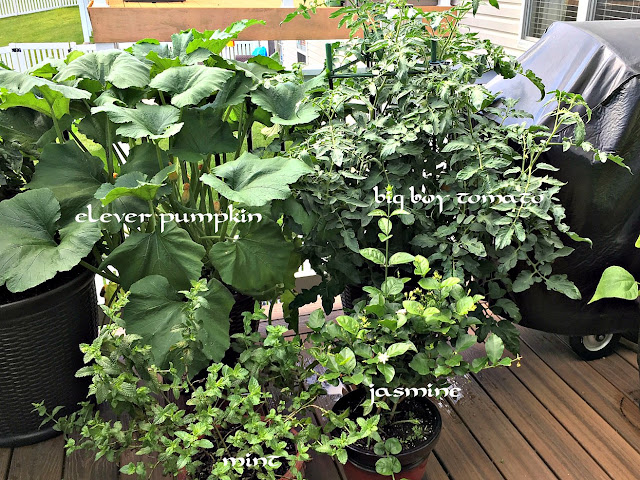
I thought I would give you a July update on the deck garden before I am completely overtaken by the plants. 
Seriously, there are mornings when I wake up and I expect the plants to be tapping on the window. I now have slightly less than one square yard of space in which to navigate among them; this is no exaggeration.
If you’re interested in the expandable trellis, click here. I really like it, and of particular interest are the  clips that accompany this that allow you to clip up branches without damaging them.
I ended up buying 30 extra clips to use on all of my plants. You can see some of them in action on the photo of my green bean plant.
My first harvest was a green pepper, my second jalapeƱos.
I have lots of them on the plant, so need lots of recipes.
Another great producer are the cucumbers.
Those things are everywhere! As you can see from this picture, this bad boy decided to relax on the chair that I used to sit in when I could find it among the foliage.
I plan to harvest at both full-size and at pickle spear size to make pickles.
The Jasmine has doubled in size since I bought it, and it shooting out branches on all sides. Somehow the thought of de-tangling all of this at year’s end seems daunting. On the plus side, it does scent the garden with the most wonderful fragrance.
The string beans are doing well, and I’m able to harvest about one serving per day.
My large pot of herbs is doing wonderfully, and I find myself using much more of them because if the ready access.
The ginger is hanging in there. 
The X-rated pumpkin is growing well, and looking as though it is planning its escape!

The gourds are growing like mad, spilling over the side of the deck, and starting to threaten the Meyer Lemon tree on the patio below.
The Stella Dora Lily that I ripped up out of my mother’s garden is doing well, despite the fact that it can rarely be seen. I have found a spot in the front yard where I will move it in the fall. Mother’s hostas are similarly thriving, and will soon need transplanting.


This post contains affiliate links.


Tuesday, July 23, 2019

Pesto Salad with Lemon Basil Vinaigrette

I have become absolutely obsessed with this salad! Fortunately, my basil plants are flourishing, and I can whip up a batch of this dressing every couple of days. The kitchen smells fantastic while I’m making it, and the taste is that perfect summertime fresh. This is my “go to” salad for summer. Make up this dressing and see what I mean. Not only will you love the salad, but you will also love another recipe that I’ll be posting later in the week that makes use of this dressing as well. Summer produce at its finest! Take advantage of it while you can.
Pesto Salad with Lemon Basil Vinaigrette

1 head romaine, torn into bite-size pieces
½ cup toasted walnuts
¼ cup grated Parmesan cheese
2 Tablespoons fresh basil chiffonade*
½ cup homemade croutons
Lemon Basil Vinaigrette (recipe below)

Place romaine, walnuts, Parmesan, basil, and croutons in a large bowl. Toss with Lemon Basil Vinaigrette.

Lemon Basil Vinaigrette

2 tablespoons freshly-squeezed lemon  juice
1 cup tightly packed fresh basil leaves
2 tablespoons red wine vinegar
½ teaspoon salt
¼ teaspoon red pepper flakes
¼ teaspoon garlic powder
1 Tablespoon grated Parmesan
½ cup olive oil

In a blender or food processor, blend together juice, basil leaves, red wine vinegar, salt, red pepper flakes, garlic powder, and Parmesan. With the motor running, gradually pour in oil, continuing to blend until everything is emulsified.

Taste and season as desired. If it's too tart for your taste, add a teaspoon of sugar.

*place 4-5 fresh basil leaves on top of each other, roll lengthwise into a tube, and slice across into strips.


Sunday, July 21, 2019

Coffee/Tea Pot Napkin Rings...This Week's Find

For someone who only used napkin rings at Christmas time (at least that I can recall), my mother sure had a lot of them. Today’s find is a recent unveiling of these darling teapot/coffee pot-shaped napkin rings. In looking at these, and setting them up to photograph, I wonder how many of you have napkin rings that you don’t use. I think we should all make a vow to remedy that.
I really like this cute set. Initially, I looked at them as tea pots, and something that I would use with tea, but the rather rustic finishing (the barn red speckled in white) made me think of them in another way, namely as something that you would use at a formal campsite. (Are there formal campsites? My guess is that today, there are!)
At any rate, I plan to use them in the fall. I particularly like the way they look with these black-checkered napkins. I need to go through my more primitive dinnerware, and come up with something suitable for a camp out in the woods. I can almost smell that coffee brewing over the crackling campfire.

To see last week’s unique find, click here.


This post contains affiliate links.

Thursday, July 18, 2019

Chicken Croquettes with Creole Sauce

The other day I tried a new recipe for a slow cooker chicken dish, and it was less than impressive. In fact, it had absolutely no taste at all. I had put two nice, large, beautiful chicken breasts into the crockpot when I made the dish, and wondered what I was going to do with them now. Sure, I could make chicken salad, but that just seemed so “been there, done that.” So, like I do, I started rummaging around on the Internet and stumbled upon a Chicken Croquette with Creole Sauce recipe by Paula Deen. Hers didn’t look like they were going to be flavorful enough for me, so I adapted the recipe, and let me tell you, these are sensational! I made mini chicken croquettes to serve on top of salad, medium-sized chicken croquettes to serve in a trio as a main dish, and burger-sized patties to serve as a sandwich. (I also put some into the freezer for later.) They are delicious no matter how you serve them, and I really do believe that this is my new favorite sandwich. Whatever you choose to do, do choose to make these.
Chicken Croquettes with Creole Sauce
Adapted from Paula Deen

4 tablespoons butter, divided
1/3 cup minced red bell pepper
1/3 cup minced celery
1/3 cup minced
Melissa’s shallots
1 tablespoon chopped, seeded jalapeƱo*
2 cups chopped, cooked chicken
1 cup
Panko breadcrumbs
¼ cup chopped, fresh chives
½ cup mayonnaise
1 extra large egg
2 tablespoons Dijon mustard
1 tablespoon Worcestershire sauce
½ teaspoon kosher salt
¼ teaspoon
Creole seasoning

In a 9” sautĆ© pan, melt 2 tablespoons butter over medium heat. Add red bell pepper, celery, shallots, and jalapeƱo, and cook until tender, about five minutes.

In a large bowl, combine the chicken, Panko, red bell pepper mixture, and chopped chives. Set aside.

In a small bowl, combine mayonnaise, egg, mustard, Worcestershire, salt, and Creole seasoning. Add to the chicken mixture, folding gently to combine. Form the mixture into 10 patties (or mini patties, or large burger-sized patties). In a 12” skillet, melt the remaining 2 tablespoons butter over medium heat. Cook the chicken cakes until browned, 3 to 5 minutes per side, and serve with Creole Sauce (recipe below).

Creole Sauce

1 clove garlic, minced
½ cup mayonnaise
½ cup sour cream
1 tablespoon Dijon mustard
1 tablespoon fresh lemon juice
½ teaspoon Creole seasoning

In a small bowl, combine all the ingredients. Cover and chill

*If you like the taste of jalapeƱo, but don’t like the heat, par boil your fresh jalapeƱos for 2 to 3 minutes, plunge into cold water, and then use.

This post contains affiliate links.

Monday, July 15, 2019

Cherry Crumb Cake with Almond Crumb Topping

My plan was to bake today, even though, as you all know, I am not much of a baker. My plan was not that my air-conditioner go out. But still, with a bag of ripening cherries, the baking must go on!

I made use of a recipe from the Bake from Scratch website, adding my own crumb topping. For me, it’s all about the crumb topping, so I want a lot of it, and I want it to be flavorful. Brunch, lunch, dinner, or late night snack, you’re going to love this delicious crumb cake.
Cherry Crumb Cake
Adapted from Bake from Scratch

½ cup butter, softened
½ cup granulated sugar
¼ cup firmly packed brown sugar
2 eggs
1 teaspoon
vanilla extract
1 teaspoon almond extract
1½ cups flour
1 teaspoon baking powder
¼ teaspoon kosher salt
¼ cup buttermilk
1 pound
Melissa’s Bing cherries, stemmed and pitted
Almond Crumb Topping (recipe below)

Preheat oven to 350° F. Spray a
9” springform pan with Baker’s Joy (or grease and flour), covering thoroughly; set aside.

In the work bowl of a stand mixer fitted with a paddle attachment, cream butter and sugars until light and fluffy, 3 to 4 minutes. Add eggs one at a time, beating well after each addition. Beat in extracts.


In a medium bowl, whisk together flour, baking powder, and salt. With mixer on low speed, gradually add flour to butter mixture alternately with buttermilk, beginning and ending with flour, beat just until combined. Pour batter into prepared pan, smoothing top. Top with an even layer of cherries, sprinkle crumb topping over all.

Bake until a wooden pick inserted into the center comes out clean, 55 to 60 minutes. Allow to cool in the pan for 15 minutes before removing. Let cool on a wire rack. Cover and store at room temperature for up to two days or refrigerate for up to six days.


Almond Crumb Topping

1½ cups flour
1 cup sugar
1 stick butter, melted
½ cup slivered almonds
½ teaspoon kosher salt
½ teaspoon ground cinnamon
1 teaspoon vanilla extract
1 teaspoon almond extract

Combine all ingredients in a food processor, pulsing until mixture is crumbly.

Fruit-filled coffee cake lovers will also enjoy this Raspberry Cream Cheese Coffee Cake.


This post contains affiliate links.


Thursday, July 11, 2019

Sag Aloo

I am a fan of “Gavin and Stacey.” It is a British comedy/drama that centers around the title characters, he from Essex, she from Wales, and how they come together, joining two very different families. It is funny, pleasant, poignant, sad, touching, and my “go to” show any time I’m feeling down. I think I have watched this three-season program all the way through 4 or 5 times.

One of my favorite scenes is when Gavin’s best friend, Smithy (played by James Corden), and Gavin’s family are ordering Indian takeout. One of the dishes ordered is Sag Aloo, a dish with which I was unfamiliar. Naturally, I had to investigate. It turns out it is a delicious potato and spinach side dish, that is easy to make (although there is a bit of chopping) and suitable for any meal of the day. I enjoyed it with Firecracker Salmon on (you guessed it) the Fourth of July, and this morning again with an omelet (also significant in “Gavin and Stacey”) for brunch. It is delicious!


The original recipe called for red chili peppers, I didn’t have any of those so I used one of my homegrown jalapeƱos. The original recipe also called for black mustard seeds, and I only had brown, so I made that substitution as well. I’m going to be eating a lot of this because it makes a plain dinner quite exotic and fancy.
Sag Aloo

2 T. canola oil
1 3-oz. pkg.
Melissa’s shallots, finely chopped
2 cloves garlic, minced
1 T. minced fresh ginger
2 c. cubed, peeled potatoes (I used Yukon Gold)
1 jalapeƱo, halved, seeded and sliced
1/2 t.
brown mustard seeds
1/2 t. cumin seeds
1/2 t. turmeric
1/2 t. kosher salt
2 handfuls fresh, washed baby spinach

Heat oil over medium high heat in a 10-inch sautƩ pan. Add shallots, garlic, and ginger, and sautƩ for 2-3 minutes.

Stir in potatoes, jalapeƱo, mustard seeds, cumin seeds, turmeric, and salt, and continue cooking and stirring for 5 minutes more.

Add 1/2 cup water, cover, and cook for 8 minutes.

Check to see that the potatoes are done to your liking by spearing them with the point of a knife. If so, add spinach, give it a stir, cover, and let the spinach wilt into the pan. Remove from heat and serve.

This post contains affiliate links.

Tuesday, July 9, 2019

Tex-Mex Squash Casserole

Despite my rather impressive container garden, that is particularly lush this year, I have never had any luck growing zucchini. Other people complain about having way too many, I’ve always complained about having none at all. For those of you who have an abundance, or, for those of you who, like me, rely upon Melissa’s Produce for your supply, here is a recipe we all can enjoy.

I have fallen in love with baby squash. If you follow me on Facebook you will know that I roasted some for a snack during the Stanley Cup Playoffs. Nothing is easier, and, dipped in your favorite sauce, it’s incredible! Because of their tender skin, no peeling is required. You just pop off the stems, and quarter them to use in casseroles like I did here.

I am a vegetable fan, so I had a hard time stopping myself from eating the entire pan. If you have meat eaters in your family, I would imagine that shredded chicken, or seasoned ground beef, would be an excellent addition to this, and make for a hearty, nutritious, crowd-pleasing meal. Personally, I thought it was perfect as it is.
Tex-Mex Squash Casserole
Adapted from Homesick Texan

2 tablespoons unsalted butter
4 cups cubed
Melissa’s baby squash
1 3-oz. pkg. Melissa’s shallots
1 jalapeƱo, seeded and diced
2 cloves garlic, minced
1 teaspoon ground cumin
1 teaspoon chili powder
1/2 teaspoon cayenne pepper, optional
1/2 teaspoon kosher salt
1/2 teaspoon black pepper

2 tablespoons flour
1 cup chicken broth
1 can
Ro-tel tomatoes, drained
1/2 cup half-and-half
1/2 cup sour cream
1/2 cup chopped cilantro*
1 cup grated pepper jack cheese
1 cup grated cheddar cheese
2 cups crushed tortilla chips

Preheat the oven to 350° F. Lightly grease a
9” x 13” casserole dish; set aside.

Heat the butter in a large skillet over medium heat. When butter is melted, add squash, shallots, and jalapeƱo, and sautƩ until the shallots are translucent and the squash is soft, about 10 minutes. Add garlic, cumin, chili powder, cayenne (if using), salt, pepper, and cook for a minute. Stir in flour and cook until a light brown paste forms, another minute.

Add broth and tomatoes and stir until the mixture thickens, 1-2 minutes. Add the half-and-half, sour cream, and cilantro, and turn off the heat. Taste and adjust seasonings.

Cover the bottom of the greased casserole dish with crushed tortilla chips. Pour the creamy squash mixture on top, and then cover the whole dish with the grated cheese. Bake, uncovered, for 30 minutes, or until the top is brown and bubbling.

*Use it if you like it, if not, don’t


This post contains affiliate links.

Monday, July 8, 2019

BLT with Creole Mayonnaise

I know some of you have already been enjoying your tomato harvest, but where I live, red tomatoes don’t generally show themselves until July. My tomato plants are loaded with green tomatoes, only just now beginning to turn red. When they finally do, I am going to have a bumper crop!

I was so desperate for a BLT that I went to the local farmers market, and picked up a couple of Arkansas tomatoes so that I could dig into their juicy goodness. I don’t know anyone who doesn’t like this sandwich, particularly the way I make it, with a hefty dollop of Creole mayonnaise slathered onto the bread. If you’ve never tried this on your BLT, you are missing out. It is zippy, spicy, and delicious, but not so much so as to overpower the delicate fresh taste of your homegrown tomato, or smoky goodness of the bacon.

Here’s my recipe for Creole mayonnaise. It’s good on chicken sandwiches, turkey sandwiches, stirred into egg or chicken salad, pimiento cheese (I know, sacrilege!), even veggie sandwiches, but I think it’s at its absolute best on a BLT.
Creole Mayonnaise

1/2 cup mayonnaise
1/2 tsp. finely minced garlic
1/4 tsp.
Creole mustard
1/4 tsp. Worcestershire sauce
1/4 tsp. hot sauce
1 teaspoon
Creole seasoning

Blend all ingredients together in a non-reactive bowl, and store in the refrigerator for one hour to allow the flavors to meld before using. Will last in the refrigerator, covered, for up to five days.


This post contains affiliate links.

Friday, July 5, 2019

Garlic Bread Dip

I’m not proud of this, but sometimes I have dip for supper. These days I’m busy and I just don’t want to be bothered. I wake up in the morning with the best of intentions of making an excellent meal, and by day’s end, whatever I can heat up in the oven and hold on my lap while watching the ball game works for me.

As you may know from my earlier post about
Cheesy Garlic Bread, I do love my bread and cheese, particularly when garlic is involved. I recently ran across this recipe, cut it in half, altered it, and it made the perfect high-calorie, artery-clogging, dinner for baseball-watching me. I dipped ribs of celery and toasted bread cubes into it, but dip whatever you like. It’s going to be good no matter what.
By the way, if you have any dip left over, it is marvelous piled on top of fresh mushrooms and broiled. I used a cookie scoop to top these mushrooms, and broiled them until the tops were pleasantly bronzed. Delish!

Garlic Bread Dip

1 8-oz. pkg. cream cheese, softened
1 c. sour cream
1 T.
Melissa’s roasted, chopped garlic
1 c. shredded mozzarella cheese
1½ c. Shredded Italian Blend Cheese
1 c. grated sharp cheddar cheese
Paprika
Garlic powder
Chopped fresh parsley
Toasted bread cubes or your dipping favorites

Preheat oven to 350°F. Spray a 1-quart baking dish with Pam. I used
this one.

In a medium bowl and with a hand-held electric mixer, combine cream cheese, sour cream, garlic, mozzarella, Italian cheese blend, and cheddar cheese. Beat until all the ingredients are well blended. Spread in your prepared
baking dish and bake for 20 minutes or until hot, and mixture bubbles around the edges. Remove from oven and sprinkle with onion powder, paprika, and chopped parsley. Serve.

Can’t get enough baked dip? Try this Hot Corn Dip with sweet, fresh, summer corn.


This post contains affiliate links.

Wednesday, July 3, 2019

Sweet and Tangy Root Beer Meatballs

Last night before I went to bed, I had great ambitions for today.  In addition into cleaning and straightening, I told myself that I was going to try a new recipe for a Spanish Beef and Noodle dish, so got out a 1-pound package of ground chuck and put it in the refrigerator to thaw. After I went to the dentist today (good check up, my teeth are sparkling), and got home (having had to take numerous detours because of construction), my enthusiasm had waned. These meatballs (also a new recipe) seemed so much easier to deal with, and I enjoyed them with some bagged salad, and a scoop of Bob Evans’ mashed potatoes. Dinner!
Sweet and Tangy Root Beer Meatballs
 
1 lb. ground chuck
½ c. Italian breadcrumbs
1 large egg
1/3 c. milk
2 T. dried minced onion
1 T. dried parsley flakes
1 t. kosher salt
1/8 t. freshly ground black pepper
1/8 t. freshly grated nutmeg

Preheat oven to 350° F. Spray a 7” x 11” baking dish with Pam; set aside.

Mix together above ingredients until thoroughly combined; form into small to medium-size meatballs, placing each into prepared dish as you do.

Whisk together the following ingredients and pour the mixture over the top of the meatballs:

1 c. tomato sauce
1 c.
Rogue root beer
2 T. Worcestershire sauce
1 t. prepared mustard
¼ t.
dried minced garlic 

Bake for 60 minutes until the liquid is bubbly, and meatballs are done. Remove from oven and allow to rest 10 minutes before serving.

If you think Italian-style when you think meatballs, you will love these.


This post contains affiliate links.