Thursday, April 30, 2020

Air Fryer Breaded Mushrooms

This post contains affiliate links.
I know there are many of you out there who are far more intrepid than I, and you people have been ordering in, picking up, and otherwise consuming restaurant food. I applaud you; I haven’t built up the courage to do that quite yet. As a consequence, I find myself craving some of my local favorites, including deep-fried mushrooms. Now, I am not about to deep-fry anything in my home. I don’t like the mess, I don’t like the smell, I don’t like having to deal with that oil when all is said and done. So, I got to thinking, that it would surely be possible to make similar mushrooms in an air fryer. They would be lighter in both taste and calories, and no doubt be easier (and cleaner) to make. These are the result of a number of experiments, and I think they are real winners! If you haven’t gotten yourself an air fryer yet, I strongly recommend that you do. I also recommend this one. It is a combination toaster oven/confection oven/air fryer. Because all these features are combined into one, you get a lot of bang for your buck, and it takes up the space of only one appliance rather than three.
Air Fryer Breaded Mushrooms

1 8-oz. pkg. button mushrooms
Water
3 T. flour
1 egg, lightly beaten with 1 T. water
½ T. dried parsley
½ t. garlic salt
1/8 t. Creole seasoning

Place parchment or waxed paper on a large plate or tray; set aside.

Create a dipping station by filling four bowls accordingly:

#1 water

#2 flour

#3 egg mixture

#4 Combined panko and Italian bread crumbs, parsley, garlic salt, and Creole seasoning

Dip each mushroom in bowls in order, i.e. water, then flour, then eggs, and lastly the bread crumb mixture.

Make sure to coat the mushroom completely in each step. As you do, place each on the wax paper-lined plate.

Place coated mushrooms in fridge for 30-45 minutes to allow coating to set.

Place mushrooms in a single layer in the air fryer pan. Lightly spray with olive oil spray. Cook at 400°F for 7 minutes total, flipping them over halfway through the cooking time.


Tuesday, April 28, 2020

Homemade Hamburger Helper (You’ll never buy boxed again!)

This post contains affiliate links.
You may want to dine gourmet every day, but do you want to cook that way? I don’t think so, at least I don’t, and I think I’m speaking for more people rather than just me. But, with simple tweaks, you can enhance and enrich the flavors of even the simplest dishes, and make your comfort home cooking seem so much more special.

One of the ways in which I like to enhance the taste of almost anything made with beef is through the inclusion of freshly brewed, strong coffee. This simple, ubiquitous ingredient is one of the best flavor answers that you can imagine; it’s no doubt one of the cheapest. I’ve used it here in this homemade version of hamburger helper, and thoroughly enjoyed my blast-from-my-past comfort food. Don’t ever buy the boxed mix again; save yourself from all of those harsh chemicals and preservatives!
Homemade Hamburger Helper
(You’ll never buy boxed again!)

1 lb. ground chuck
1 T. Ketchup
1 t. Dijon Mustard
1 t.
Frank’s Hot Sauce
1 t. garlic powder
1 t. onion powder
½ t.
Montreal Steak Seasoning
½ t. salt
½ t. freshly ground black pepper
1½ c. uncooked elbow macaroni pasta
2½ c. beef broth
1 c. freshly brewed coffee
1/2 c. sour cream (Do not use Light)
4 slices American cheese, torn into pieces
2 c. grated sharp cheddar cheese

Cook beef in a large skillet over medium high heat until no longer pink. Drain on a paper towel-lined plate, and return to pan.

Reduce heat to low and add ketchup, mustard, hot sauce, seasonings, macaroni, broth, and coffee to the pan and stir well to combine.

Cover and simmer for 12-15 minutes until macaroni is cooked through.

Remove pan from heat and stir in the sour cream.

Return the pan to the warm burner and stir in the cheeses until well combined.


Monday, April 27, 2020

Sour Cream Tzatziki

It’s funny, isn’t it, the things that excite you when your self-quarantining. I noticed today that my cucumber seeds had sprouted, and I was absolutely delirious with joy; I’m not sure how I feel about that. Nonetheless, it got me thinking about all of the ways in which I would like to use those cucumbers, one of which is to make Tzatziki. Fortunately, I didn’t have to wait until mid-summer to do so, I cleverly had a cucumber waiting for me in the fridge. I loved the crispness of the cucumber, combined with the peppery garlic, and summer freshness of the dill, all blended together with sour cream. I know this is normally made with yogurt, but the sour cream recipe is just as good, if you don’t have yogurt on hand. Frankly, I prefer it.
Sour Cream Tzatziki

½ cucumber, grated
1 T.
dry dill
1 garlic clove, grated
1 T. fresh lemon juice
Pinch of
sea salt
¾ c. sour cream

Place cucumber into a
sieve, and a sprinkle with table salt. Allow to drain for a half an hour. Press cucumber down into the sieve to extract the remaining water, and place in a medium bowl. Add remaining ingredients, and stir to combine. Refrigerate for at least four hours to meld the flavors. Ideally, it’s best refrigerated overnight before enjoying.

Serve with your favorite dippers.


Friday, April 24, 2020

Chocolate Chip Gooey Bars

This post contains affiliate links.
I don’t like rectangles. The reason that I don’t like rectangles is because they’re not squares. I like squares. Squares are comfortable. So, whenever a recipe calls for a 9” x 13” pan, I use a 10” x 10”. Sure, it has a little less area over all, but that just means that your baked good is going to be a bit thicker. When you’re baking a cake, or brownies, or making some type of candy, wouldn’t you rather it be thick than thin? Wouldn’t you like more dessert deliciousness per mouthful? I think that you would. I think anything baked in a square pan always comes out better than a rectangular pan, not to mention that it is much easier to line with parchment or foil to facilitate easy lifting from the pan, and consequently, makes it much easier to slice into neat little (or big) squares.

This recipe for Chocolate Chip Gooey Bars is one that I adapted to the 10” x 10” pan. Stop what you’re doing and make these. They are astoundingly good. They’re very rich, so you will be satisfied with a small piece (if you can stop yourself), and your family will adore you.
Chocolate Chip Gooey Bars
Adapted from The Baking Chocolatess

Bottom Layer
1 yellow cake mix
1 large egg
½ c. butter, melted
  
Cream Cheese Layer
1 8-oz. pkg. cream cheese, softened
2 large eggs
1 t. pure vanilla extract
1 1-lb. box powdered sugar
½ c. butter, melted
1 c. semi-sweet chocolate chips

Icing
1 c. semi-sweet chocolate chips
1 c. milk chocolate chips

Preheat oven to 350°F. Spray a 10” x 10” baking pan with Baker’s Joy. Line with foil, allowing a 2” overhang on each end; set aside.

In a large bowl, beat together cake mix, egg, and butter.

Pat cake mix mixture into the bottom of prepared pan; set aside.

In another large bowl, beat cream cheese until smooth; beat in eggs and vanilla. Add powdered sugar and beat until creamy.  Reduce speed of mixer and gradually add melted butter, beating well. Fold in chocolate chips. Pour cream cheese filling onto cake mixture and spread evenly. Bake for 50 minutes.

Remove from oven and scatter the milk and semi-sweet chocolate chips on top of the bars. Allow to soften 2-3 minutes and then, using an offset spatula, spread the chocolate to cover.

Allow to cool for at least an hour and then cut into bars.


Thursday, April 23, 2020

Roasted Cauliflower with Brown Butter, Tart Cherries, and Pine Nuts

This post contains affiliate links.
The other day I was talking to a friend about cauliflower. Don’t ask me why. Truthfully, I have been having a lot of weird conversations with people lately. I think it has a lot to do with being stuck in. At any rate, she told me that one of her favorite recipes for cauliflower came from a book by Melissa Clark. She sent me a copy of the recipe, and it did look good. But, as I’m wont to do, I thought I could make it a little bit better. I haven’t tried the original recipe, mind you, but anytime I can swap raisins for tart cherries you’d better know that I’m going to do it. I also added a pinch of dry mustard that wasn’t in the original recipe and that gives it that little extra something that makes it ever so good.
Roasted Cauliflower with Brown Butter, Tart Cherries & Pine Nuts
Adapted from a recipe by Melissa Clark

1 medium head cauliflower (about 1 ¾ lb.),
cut into bite-size pieces
2 T. olive oil
½ t. fine sea salt
Freshly ground black pepper
1 3-oz. pkg.
Melissa’s pine nuts
4 T. butter
1 3-oz. pkg.
Melissa’s dried tart cherries
Few gratings fresh nutmeg
Pinch
dry mustard
2 T. capers
2 T. chopped parsley for garnish

Preheat oven to 425°F. Toss cauliflower, oil, salt, and pepper together on a rimmed baking sheet until coated. Roast until the cauliflower is caramelized, 30 to 45 minutes, tossing it halfway through.

Meanwhile, heat a 9-inch sauté pan over medium heat. Add pine nuts and cook, stirring frequently, until toasted, about five minutes. Transfer the pine nuts to a plate.

Return skillet to medium heat and melt butter. Continue cooking and swirling the butter until it is brown and nutty, 5 to 7 minutes. Remove the skillet from the heat and continue to swirl as the butter will continue to cook as it cools.

Bring one cup of water to a boil in the microwave. Add the cherries and let them soak for 5 minutes. Drain through a fine mesh sieve. Pat the cherries dry and add them to the butter along with the nutmeg and dry mustard. Stir well.

When the cauliflower comes out of the oven, toss it with the brown butter mixture, toasted pine nuts, and capers. Serve immediately topped with parsley and more salt.


Tuesday, April 21, 2020

Olive Salad Three Ways

It’s human nature to want what you can’t have, and today I really wanted one of those authentic New Orleans muffaletta sandwiches. As I was rummaging through my pathetically overstuffed fridge, I thought, why not make my own? I think the biggest secret to making one that is super delicious is to have good, fresh olive salad, the tangier, the better. So I made some olive salad (using up more of those wonderful olives that I bought sometime back), and the results were phenomenal.
This is something you need to try, not just for the sandwich, but also for the versatility. The next morning, while I was toasting a bagel, I decided I wanted a tasty topping, so I made my own muffaletta cream cheese by adding ¼ cup of olive salad to 8 ounces of cream cheese and beat it together. Wonderful!
The next day, I wanted an easy pasta dish, so I added a half-cup of the muffaletta salad to cooked pasta, added a bit of pasta water to make it creamy, squeezed in a little fresh lemon juice, and it was superb.

Make this easy recipe, and it will serve you in a variety of ways. Having this on hand makes future meals easy, and doesn’t that sound pretty good right now?
Olive Salad Three Ways
Adapted from Allrecipes.com

1 (6 oz.) can black olives, drained
1 (5 oz.) jar pitted green olives, rinsed and drained
1 (6.5 oz.) jar marinated artichoke hearts, undrained
1 small red onion, chopped
¼ c. red wine vinegar
½ c. olive oil
½ t. celery seed
1 t. dried oregano
1 t. dried basil
¾ t. freshly ground black pepper

Place the black olives, green olives, artichoke hearts with their juice, and onion into a food processor. Pour in the vinegar and olive oil, and season with garlic, celery seed, oregano, basil and black pepper. Cover, and process until finely chopped. Refrigerate until ready to use.


Buy Olive Oil from a source you can trust. The good old U.S.A.!

Monday, April 20, 2020

Bacon Vodka Olives

This post contains affiliate links.
Olive fans, here is another wonderful olive recipe for you. This is super simple to make, is a most appreciated hostess gift, or something special to nosh on all on your own.

There’s no detailed recipe. You need only as many olives as will fill as many containers as you would like to make. Once you have filled each container to the top with your choice of olives, you just pour in the vodka, and wait. Because my chosen vodka here is a bit pricey, you may want to use jars that are on the small side, like these.
Bacon Vodka Olives
Adapted from Donna Hay

Assorted jars or other favorite glass containers

Varied mix of your favorite olives — Kalamata, Castellano, ripe, even caper berries if you have them*
Bakon Vodka, pricey but worth it

Fill a jar or container with olives. Fill to cover with vodka. Allow to marinate overnight, or several days. Pop open and enjoy!

*Do you have any of those little pearl onions? Toss them in, too. Seriously, anything that would work well in a cocktail would do well here. What the heck, toss in some cloves of garlic, imagine the Bolognese!


Friday, April 17, 2020

No Bake Creamsicle Cheesecake with Almond Cookie Crust

This post contains affiliate links.
Despite the fact that it was a meal for one, I made a traditional Easter dinner. I think it did me a bit of good spending time making a potato casserole, a vegetable casserole, baking a ham, and making a wonderful springtime dessert; it took me the better part of the day. It was chilly so I had a fire going, binge-watched one of my favorite “comfort” shows, and really enjoyed myself. I think it helped to pull me out of the funk that I seem to be drifting in and out of with shocking regularity.

I wanted a light, springtime desert, and found it in this one. You have to plan ahead, because it needs to be in the refrigerator 6-8 hours or, preferably, overnight. But it’s well worth the wait. It is so refreshing, seasonal, and satisfying; it’s like eating a cloud. If, like me, you fondly remember the Creamsicles we had back in school, you will love this cheesecake. It is not at all the heavy, dense texture of a traditional cheesecake, but lighter, like chiffon, with the perfect combination of vanilla and orange to satisfy those fond memories.
NO BAKE
Creamsicle Cheesecake 
with Almond Cookie Crust

CRUST:
1 9-oz. pkg.
Stella D’oro Almond Delight Cookies
¾ c. granulated sugar
4 T. butter, melted

VANILLA LAYER
2 8-oz. pkg. cream cheese, room temperature
¾ c. granulated sugar

ORANGE LAYER
1 3.3 oz box orange gelatin
1 c. boiling water*

CREAM MIXTURE
¼ t. vanilla extract
½ c. powdered sugar
1 pt. heavy cream

Put almond cookies in food processor and pulse until finely chopped. Add sugar and butter, and pulse to incorporate.
Spray bottom and sides of a 10” springform pan with PAM. Press crust mixture into bottom and slightly up sides. Place in freezer for 1 hour.

Beat cream cheese, sugar, and clear vanilla flavoring until smooth; set aside.

In a medium bowl, combine gelatin and boiling water, whisking to dissolve; set aside to cool. I mean it! Cool! Warm will NOT do.

When gelatin mixture has cooled, beat together heavy cream, powdered sugar, and vanilla until stiff peaks form. Add 1/2 of the whipped cream mixture to cooled gelatin, whisking to incorporate; set aside. Fold remainder of whipped cream mixture into cream cheese mixture.

Spread 1/2 cream cheese mixture over crust. Top with 2 cups of orange whipped cream mixture. Repeat once more, so it should be cream cheese mixture, orange mixture, cream cheese mixture, and finally, orange mixture. Got it? Great!

Refrigerate 8 to 10 hours, or overnight before enjoying.

This was so good that I had to hide it from myself. I am NOT kidding! Pathetic, isn’t it?

*When I make this again, I’m going to use ½ c. boiling water, and ½ c. Grand Marnier. Imagine!


Wednesday, April 15, 2020

Clean that Grungy Oven Door with Ease!

This post contains affiliate links.
Over the weekend, I threw out a question on Facebook asking everyone what he or she was doing. That morning I was listening to Sister Sledge and cleaning the door of my toaster oven with a dishwasher pod. Apparently, not many people had heard of this method of cleaning both toaster oven doors, and regular oven doors, so I’m going to share it with you.

There isn’t much to it, all you need is a
Finish Dishwasher Pod (the kind with the red bead in it) -- I will tell you to wear gloves, though I don’t -- dampen the pod, and then just use it as you would any type of scouring pad. As you can see from these pictures, it works quite well. This particular toaster oven had gotten so grungy that I started using it for craft projects, and stored in the garage. I was quite pleased at how well it cleaned up. You can also use this method for the tray in the bottom.

I know with all of us home, there are days when we’re looking for something to make us feel productive. Do this, and you will have met your productivity quotient for the day. Then go off and have fun.


Monday, April 13, 2020

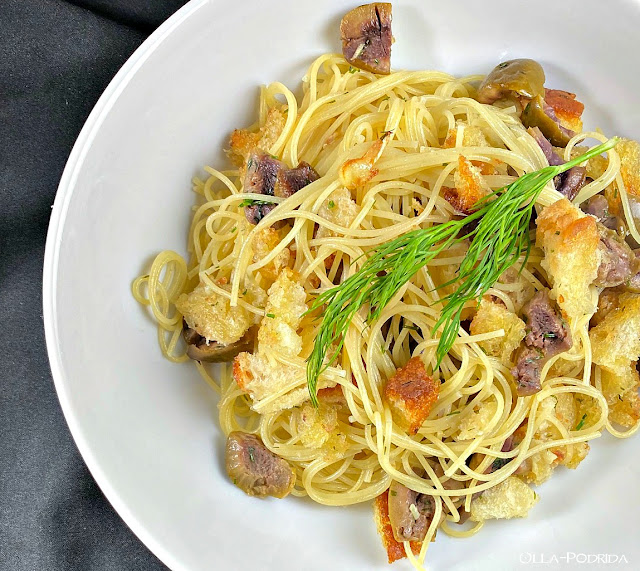
Garlic and Green Olive Pasta with Dill

This post contains affiliate links.
Remember that willful jar of olives that I bought some time ago, and told you about here? The one I drove around town in an effort to open? Once I did get it open, I was off and running making one olive dish after another. You’re going to see a couple of them this week, including this quick, easy, and tasty pasta dish. It’s great as a light starter when served in small portions, or satisfying as a main dish when served in larger ones. I can never get enough olives, so if you’re the same, give it a try. By the way, fresh dill is an absolute must here. I liked this so well, that I plan on having a lot of dill in this summer’s garden.
Garlic and Green Olive Pasta with Dill
As seen in Sweet Paul

¼ c. olive oil
4 garlic cloves, thinly sliced
2 thick slices country-style bread, broken into small pieces
20
green olives, pitted and broken into pieces
2 T. fresh dill
1 lb. cooked spaghetti
Salt and white pepper

Heat oil over medium heat in a large pan. Add garlic, bread, and olives.

Cook the mixture until the bread and garlic turn golden, taking care not to burn the garlic.

Add dill and cooked pasta, and mix well. Season with salt and pepper and serve.

Serves 2-4.


Saturday, April 11, 2020

Flaky Pie Crust Made Easy

This post contains affiliate links.
After seeing how flaky and gorgeous the crust was on the quiche that I made earlier, a number of people asked me for the recipe. The recipe isn’t all that special; there is honestly nothing to it. It’s a recipe that is available almost anywhere online, but the key, I have come to learn, is not as much the recipe itself, as it is the baking, and by that I mean pie weights. Nothing beats pie weights for weighing down the crust. Trust me when I tell you that I have used a variety of dried beans in the past, popcorn kernels (you can imagine how foolish that was), and when I didn’t have either of all those things, I filled the crust with oven safe measuring spoons. None of those yielded the flaky crust that I got here.

Generally speaking, I am one of those people who buy crust because it’s convenient and easy. I have total trust anxiety when it comes to rolling it out; I am just not good at doing it. So another important aspect is, after you have taken your dough out of the food processor and put it onto plastic wrap, flatten it as much as you can, I am talking flat! Make about an 8-inch disc. That way you will only have to roll it out 2-4 inches all the way around to get something that comfortably fits a 9-inch pie pan.
Simple Pastry Crust for Quiche
Makes one crust for 9” pie plate

1¼ c. all-purpose flour
1 stick unsalted butter, cold, cubed
¼ teaspoon kosher salt
3 to 5 tablespoons ice water


In the work bowl of a food processor place flour, cubes of butter, and salt. Pulse until crumbly and then slowly, through the feed tube, pour in the ice water, a tablespoon at a time. Start out with about 3 tablespoons of water. When the dough pulls away from the side of the work bowl, and you can pinch of piece, squeeze it between your thumb and index finger, and, if it sticks together, you’re finished. Place it on a piece of plastic wrap, flatten it into an 8-inch disc, seal it completely in the plastic wrap, and place it in the refrigerator for at least an hour, but closer to one day.

When you’re ready to bake, roll out the pastry on a piece of parchment paper to a generous 12” circle (If you want an overhang to fold under to make a fancy schmancy edging, otherwise 10” will do). Fold the
parchment paper over carry it over to your pie plate, put it face-down, and slowly peel the parchment paper off. Fit it into the bottom of the pie plate and up the sides. Don’t stretch it, or it’ll shrink. Just pat it lightly into place. A tart tamper can often help here. At this point you can make any type of decorative edge that you desire, or simply cut off any excess and imprint with a fork all the way around, which is something that I generally do. Then, take a sharp-tine fork, and poke holes in the bottom. Place it into the freezer for an hour.

Shortly before you’re prepared to bake your quiche, preheat the oven to 425°F. Remove the piecrust from the freezer, line the bottom and up the sides, and over the edges (to prevent the burning) with aluminum foil, and cover the bottom with
pie weights. Place on the bottom rack in your oven, and bake for 15 minutes. When the 15 minutes are up, remove the foil and pie weights, and bake for five minutes more to bake the bottom through. Now you’re ready to make your quiche.

If you would like the recipe for the Easy Gruyere and Brie Quiche shown in the photo above, you can find it here.

Friday, April 10, 2020

Cooking with Coffee

This post contains affiliate links.
I am still shaking my head over the whole stockpiling toilet paper thing. I mean, come on, if worse came to worst, you could always fill a squirt bottle with water and you have your own personal bidet. If you leave a bit of the Dawn washing liquid in that bottle before you fill it, you have your own personal power wash. And who’s to say that isn’t better for the environment anyway, much less your nether regions, but I digress. I was thinking about what my personal stockpiling item would be (not that I advocate stock-piling under any circumstance), and mine would definitely be coffee. As such, I decided to go through the blog and see how many times I used coffee in cooking and baking. The numbers surprised me. Here is a nice collection of recipes containing that most wondrous of ingredients. Clicking on the name beneath each picture will take you straight to the recipe. Have fun!

What would your stockpiling item be?