Friday, June 29, 2018

My Grandma’s Vanilla Sauce


This is my grandmother’s vanilla sauce. It is thick and luxuriant, and enhances absolutely everything with which it comes into contact. My mother and grandmother both used to use it on strawberry shortcake. When I was a kid, I didn’t much care for strawberries. So, I would crumble the shortcake, drizzle a little strawberry juice (no pieces of fruit for me), and then ladle on the vanilla sauce. It was heaven in a bowl!

I never quite learned how to make vanilla sauce, because I didn’t know the secret back then on how to keep eggs from curdling when adding them to a hot liquid. My grandmother's recipe, recently excavated from my
mother's recipe box, was little help. Aside from the list of ingredients (not in order), it provided no instruction whatsoever; reading this recipe makes me wonder how anybody could possibly make a decent vanilla sauce.

But, that's the way all of my grandmother’s recipes work. She knew how to cook, she didn’t use a recipe, and it was difficult for her to write anything down because she knew what she did, but found that it wasn’t all that easy to explain.

This afternoon, while watching the ball game (reflected in the door of the microwave over the stove), I stirred up a batch of this vanilla sauce after making a batch of strawberry scones. I figured that, in order to have the absolute ultimate strawberry shortcake, why make a plain old shortcake? I will ladle this luscious sauce over fresh strawberry-studded
strawberry scones!

Here is my grandmother's vanilla sauce recipe, deciphered. This is what I did. You can watch television reflected in the microwave, or not. It won’t make a difference either way.
 
My Grandma’s Vanilla Sauce

2 Tablespoons flour
1½ – 2 Tablespoons cold water
2 cups whole milk
½ cup granulated sugar
1 large egg
1 Tablespoon butter
1 teaspoon vanilla extract

In a small bowl, whisk together flour and water to form a slurry; set aside.

In a medium saucepan over medium heat, whisk together milk and sugar. Heat to a simmer, whisking occasionally. In a small, separate bowl, beat egg until well blended. Take the hot whisk from the milk mixture and whisk the egg mixture. Move the whisk back and forth between these two mixtures 3-4 times in order to temper the eggs to prevent them from curdling. Slowly pour tempered egg into the hot milk and sugar, whisking constantly. Add the slurry. Cook over medium heat until it reaches the thickness desired. Remove from heat and stir in vanilla and butter. Cool.


If you prefer a more sophisticated sauce with a bit of adult refreshment added, this Whiskey Caramel Sauce can do amazing things to strawberries and shortcake!


This post is linked to:

This post contains affiliate links.


Thursday, June 28, 2018

Oreo Cookie Bars


This past Tuesday was my dad's birthday. I went out to his house loaded with meals for his freezer, a delicious dessert, birthday goodies, and lunch for us both to enjoy. It took me an entire day, well into the night, and two runnings of the dishwasher in order to prepare all that I took. At one point, early in the day, I had entertained the idea of making a homemade German Chocolate Cake. It’s my favorite, and one that my mother used to make me every year on my birthday. But after some thought, I realized that, it alone, would take me too much of the day, so I opted for something simple.

As you all know, I don’t bake. I do, however, print out and save recipes for various baked goods that I think might please one person or other. This recipe for Oreo Cookie Bars, looked simple enough, and tasty. As it turned out, they were both. Because I made these late in the day, and was too exhausted to thoroughly read the instructions, I made the mistake of trying to cut them before I chilled them. Do not do that! The filling squished out and I had a right mess. Fortunately, I only attempted to cut a couple before I realized the error of my ways, and shoved the whole pan right into the fridge.

Personally, I think these taste better the second day, so I’m going to file these under the categories of
easy and make ahead. My dad enjoyed them, as did my number one son and his family. In fact my son reported that “The kids heard choirs of angels when they took their first bites.” How could a recommendation possibly be any higher than that? So, if you have a dad to please, children, or grandchildren, this appears to be a winner! And that “make ahead” thing is always aces in my book.
Oreo Cookie Bars
Adapted from Your Cup of Cake

1 box chocolate cake mix, any brand
2 large eggs
1/3 cup canola oil

Cream cheese filling:
6 tablespoons unsalted butter, room temperature
8 ounces cream cheese, softened
1 teaspoon vanilla extract
2 1/2 cups powdered sugar

Preheat oven to 350°F. Line a 9“ x 13“ pan with parchment paper. Spray parchment paper with Pam or Baker’s Joy (I used the latter).

In a large mixing bowl combine cake mix, eggs, and oil. Beat until blended. Dough will be thick. Using a large spoon or ice cream scoop, drop globules of dough, evenly spaced, into the bottom of your prepared pan. Using moistened hands (I ran mine under cool water, and shook them off) press dough evenly along the bottom and into the corners of the pan. (If you used too much water on your hands, blot excess with a dry paper towel.)

Place pan into the middle of your preheated oven and bake for 10 minutes. Remove from oven to a wire rack and allow to cool.

Meanwhile prepare filling: Beat butter and cream cheese until smooth. Add vanilla and powdered sugar, 1/2 cup at a time. Set aside.

Invert cooled cake onto a parchment-lined cutting board. Measure and mark 6 1/2 inches in from the side on both top and bottom so as to provide a guide for cutting it in half evenly. Frost one of the halves with cream cheese filling. Carefully place the other half on top and press down gently. Put in the refrigerator to chill for one hour, and then cut into bars. These are very rich, so you might want to cut them into smaller rather than larger squares. You can, after all, always have two!

Store, covered in the refrigerator, and serve cold. These are very refreshing on a hot day. Kids love them!

Another delicious kid pleaser is this recipe for easy Chocolate Peanut Butter Éclair Dessert Squares.


This post is linked to:

This post contains affiliate links.

Wednesday, June 27, 2018

Pimiento Cheese Spread


You do not have to read this blog long before you come to the realization that I am a woman who loves her Pimiento Cheese. But, I am also a woman who likes Pimiento Cheese Spread. Aren’t they the same thing, you ask? Indeed not, is my haughty reply. Pimiento Cheese has few ingredients, is simple, without complexity, and elegant in its pureness. Pimiento Cheese Spread is anything but pure. It’s more like your trampy cousin from Poughkeepsie. You know, the one the family doesn’t talk about. Yep, that’s Pimiento Cheese Spread.

Whereas Pimiento Cheese needs to be folded gently together with a spatula, Pimiento Cheese Spread can be whipped with the whisk attachment of your Mixmaster. The idea is to beat those ingredients into submission to form a wonderful creamy spread. Not all of the components can be identified like they can be in Pimiento Cheese, but that doesn’t matter. This spread is creamy, spicy, loaded with flavor, and works equally well as a dip, a sandwich spread, a sandwich topping, spread on crackers or warm toast, and is mighty tasty on a toasted bagel or apple wedge.

I like mine with a bit of a kick, so you may want to tone things down a bit. That’s all right, it doesn’t matter. There is an artistry to making cheese spreads, and it is extra special when you make it all your own.

Here is the recipe that I used, change it up as you see fit.
 
Pimiento Cheese Spread

2 cups shredded extra sharp cheddar cheese
1/2 cup diced
Melissa's Fire Roasted Red Peppers
4 ounces cream cheese, softened
1/2 cup Duke's mayonnaise

1/4 teaspoon garlic powder
1/4 teaspoon onion salt
1/4 teaspoon paprika
1/4 teaspoon Old Bay seasoning
A pinch of cayenne pepper
A few gratings of freshly ground black pepper
1 tablespoon juice of pickled jalapeños

Toss all of the ingredients into a medium to large bowl, and beat it into submission. You can use a whisk, you can use your hands, I used the whisk attachment on my KitchenAid.
 

If you are more of a don’t-add-anything-extra traditionalist, then you will no doubt enjoy Tupelo Honey Café’s Pimiento Cheese. I think it is my very favorite…I think.


This post is linked to:

This post contains affiliate links.

Tuesday, June 26, 2018

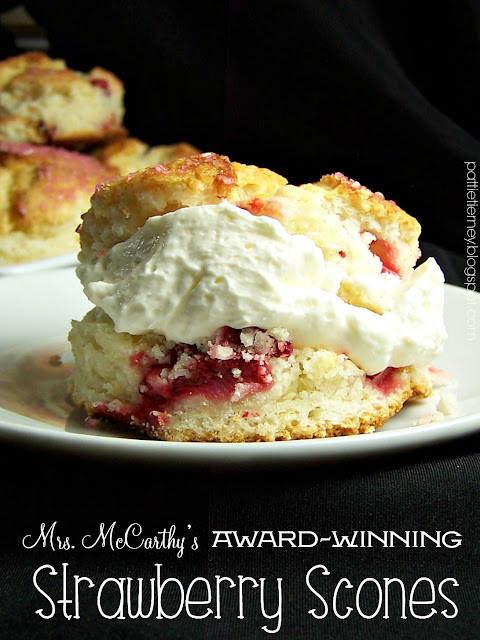
Mrs. McCarthy’s Award-Winning Strawberry Scones


If you are a fan of G.K. Chesterton’s Father Brown books, or the TV series based upon these books, then you are no doubt familiar with Mrs. McCarthy, and her award-winning strawberry scones. This is not Mrs. M.’s recipe, of course, because Mrs. M. is fictional. This is, however, my version of what I think her award-winning scones would be. They are flavorful, crunchy on the outside, and with a tender crumb on the inside. They are versatile (as Mrs. M. would want) working equally well with fresh, seasonal strawberries, or dried strawberries, if the fresh ones aren’t in season. Mrs. M. would want her strawberries straight from the vine — the very best local berries available.

If you are a fan of the series, or even if not, you must try these delicious scones.

Mrs. McCarthy’s Award-Winning Strawberry Scones

 2 cups sifted cake flour
1/4 cup sugar
2 tsp. baking powder
1/2 tsp. salt
6 T. unsalted butter, cut into 1/2-inch pieces
1/2 tsp. orange or lemon zest
1/2 cup diced fresh strawberries OR 
1 egg
1/2 tsp. vanilla
1/3 cup heavy cream

Heavy Cream
Sanding Sugar (All I had was pink, Mrs. M. would not have approved!)

Preheat oven to 375°F with rack in middle. If using fresh
strawberries, allow to drain on a paper towel-lined plate while you prepare the dough.

In the work bowl of a food processor combine flour, sugar, baking powder, salt, butter, and lemon zest.  Pulse until mixture resembles coarse meal; empty mixture into a large bowl. (If using dried strawberries, add them now and toss to coat.)

In a small mixing bowl whisk together egg, cream, and vanilla flavoring.  When thoroughly blended, pour it over the flour mixture in the large bowl and fold until it just comes together.  Add 1-3 more teaspoons of cream, if needed.

Turn out dough onto a lightly floured surface. If using fresh strawberries, scatter them on top and, with floured hands, fold the dough over the berries and knead lightly 4-5 times. Press into a 1/2-inch thick rectangle. Cut out rounds with a 2" biscuit cutter and arrange 2 inches apart on a Silpat-lined baking sheet. Gather scraps together and cut out additional scones.

Brush tops of scones with cream and sprinkle liberally with sanding sugar. Bake scones, rotating baking sheet halfway through, until edges are golden, 25 to 30 minutes. Cool on a rack before serving.

Makes 8-10


You’ll find another British scone recipe in these Royal Baby Scones.

This post is linked to:

This post contains affiliate links.

Monday, June 25, 2018

And the Winner is...


Thanks to all who weighed in when I posted the question about color choices for my great room (That you can see here.). The one that I ultimately chose (and I knew from the first swipe of the brush that this was THE color) was Armory. It was the darkest of the three, and I chose it because of its richness, depth, and the power that this color possessed. This photo gives you an idea as to what it looks like, but, in no way, can this photo do the color justice. It is gorgeous! Amazingly enough, the room (approximately 20‘ x 30‘) looks bigger with the dark walls than it ever did with the white. I was also surprised at how attractive it looked against the dark wood. I never would have expected that. I have a big job ahead of me accessorizing all of these big walls, but that’s half the fun, isn’t it?
At this point, I have nothing on the walls, except in one spot, where I was sure that I would want to retain a picture/birdcage combination, so I had the painter leave those nails in place. Yeah, you guessed it, now I don’t like it at all. So, I will need to fill, patch, and paint.
This little section is my “Jim spot.” Without realizing it, everything that I placed on this table was his when I met him. I like the combination of things, and it gives me such a good feeling. I need to try to figure out what to hang over this side table. At this point I am trying to decide between my birdcage or Jim’s picture of Ann of Cleves. Thoughts?
Now I need some more help. A couple of years ago, I bought this wine cart. I fell in love with it when I saw it at a local consignment store, and the price was so low that I simply could not resist. Once I got it home, I realized that I had no good place to put it. At one point, I used it for a coffee station in the guest bedroom, but, starting from scratch in the great room, I decided to pull it out where I could use it on a more regular basis. What are your tips, thoughts, or ideas, on how to style a wine cart? Weigh in, people! I NEED you!
Lost two years ago to the day. I miss you, baby!

This post is linked to:

This post contains affiliate links.

Friday, June 22, 2018

Salted Margarita Pie


Have you noticed that I complain a lot about the weather? If you haven’t, then brace yourself, because I’ve got a whole lot of sweaty anger heading your way. Let me first say that I am not a fan of summer. All of the other seasons suit me just fine, but summer, no. It’s not that I don’t attempt to get into the spirit of things, I do. I plant things and eagerly watch them grow, I get outside and grill, I dine alfresco as often as possible, and I try, I really, really try to enjoy that season. But the fact is, I don’t. I particularly don’t this year when we went straight from January into the middle of August, temperature-wise. We hit the 90° mark in early May and have not left it since. Hot weather makes me crabby. I don’t mind the cold, there’s always more that I can put on to warm up in winter, as I’m sipping boozy cocoa in front of a cheery fire, reading a good book. In summer, well, there’s only so much you can take off before somebody reports you to the police.

Where am I going with this, you may ask? Well, I’ll tell you. Many margaritas have been consumed in this house since early May. Generally, that’s a drink I reserve for Mexican restaurants in late August, but now, I keep a pitcher of them at the ready in the fridge. I have come to enjoy that citrus-y goodness so much that I decided to turn it into a cool and refreshing pie.

There are a lot of recipes around for Margarita Pie, and I studied those before I came up with this one. My new favorite crust, for just about anything that calls for a crumb crust, is pretzel. I love the sweet and salty combination, and it works beautifully here. I also decided that most of the margarita pie recipes didn’t have enough alcohol in them to suit me, so I upped that a bit as well. I also added the zest of a lime, and what margarita doesn’t have salt on it? So I added that as well. Here is my version of Margarita Pie. It is cool, and refreshing, and somehow makes summer seem not quite as miserable as it really is.
One thing to note -- I piped whipped cream on top of this pie before putting it into the freezer to make it attractive, and because, who doesn’t love whipped cream? But, I would not do this again. It was clearly a matter of form over function because, with its lack of alcohol content, the whipped cream freezes firmer than does the pie. Therefore, while the pie is ready to consume straight out of the freezer, the whipped cream is not. I sent two pieces of pie home with my number one son the other day so that he and his wife could try it out. (I love having taste testers.) They loved the pie, but Christopher, my son, said that he didn’t wait for the whipped cream to soften; he just plucked pieces off and ate them separately from the pie. So, let this be a warning to you. If you plan to top your pie with whipped cream, don’t freeze that cream with the pie, dollop it on separately.
Salted Margarita Pie

1/2 cup unsalted butter
1/4 cup granulated sugar
1 1/4 cups crushed pretzels

1 14-oz. can sweetened condensed milk
1/3 cup of freshly squeezed key lime juice
2 ounces tequila
1 ounce triple sec
1 teaspoon freshly grated lime zest
4-6 drops green food coloring (optional)
2 cups whipped cream

Fleur de sel,* for garnish
Whipped Cream, for garnish
Lime zest, for garnish


Preheat oven to 350°F.

Put the pretzels into the work bowl of a food processor and pulse until they have been reduced to fine crumbs. Add sugar and melted butter, and pulse until combined. Press into a nine-inch pie pan. Bake in preheated oven for 10 minutes, remove from oven and allow to cool.

In a large mixing bowl whisk together condensed milk, lime juice, tequila, triple sec, zest, and food coloring (if desired). In a separate bowl whip cream to stiff peaks. Fold whipped cream into filling mixture. Pour into pie crust and freeze for a minimum of 4 hours.

Serve topped with
whipped cream, a sprinkling of lime zest, and a sprinkling of fleur de sel.

*If you don’t have Fleur de sel you can use margarita salt.

If you prefer to enjoy your key lime juice in cheesecake form, then you must try this mouthwatering Key Lime Cheesecake.


This post is linked to:

This post contains affiliate links.

Thursday, June 21, 2018

Red Pepper Cheese Ball

Ahhh, the seventies! If you’re as old as I am, then you probably remember them as fondly as I do. One thing I remember in exquisite detail are the parties that my parents used to throw for their friends. My mother loved to cook, and made the most fabulous meals, but back then I didn’t care about wonderful dinners, I was all about snacks. 

One thing I remember particularly liking was her Party Cheese Ball, a recipe provided, back then, by Kraft Foods, in an effort to sell their cheese. You all know what I’m talking about — cream cheese, grated cheddar, seasonings, all rolled together and coated with crushed pecans. Allowed to come to room temperature, it is ambrosia on a cracker. 

I was thinking about her cheese ball the other day, wondering why I hadn’t made one in decades, firstly, and wondering, secondly, how much better it would be with bits of roasted red pepper scattered throughout. I was right, of course, red pepper makes everything better; it’s like the vegetable version of bacon. At any rate, thinking about my mom, I made this Red Pepper Party Cheese Ball. It is wonderful with any kind of cracker, delicious with crudités, and darned good when spread on wedges of apple. The fact of the matter is, with a cheese ball, you can never go wrong. Never!
Red Pepper Cheese Ball

1 8-ounce package cream cheese, softened
1 cup shredded sharp cheddar cheese
1/4 cup crumbled feta
1/2 tablespoon minced shallots
2 T. Melissa’s Fire Roasted Red Bell Peppers, minced
1 teaspoon Worcestershire sauce
1/2 teaspoon freshly squeezed lemon juice
Pinch of cayenne
1 cup finely ground toasted pecans.

Place all ingredients, except pecans, into a medium mixing bowl, and beat to within an inch of its life. (Or, you can do what I did, and toss everything into the food processor.) Scrape onto a piece of plastic wrap, and form into a ball as you are securely covering it. Place into the refrigerator for an hour to chill, then remove and roll in the pecans, pressing them firmly into the cheese ball, covering it completely. You can serve it at that point, or keep it for up to three days. If you’re having a larger crowd, you can double this recipe and make a cheese boulder. Either way, people are going to love it.

If you prefer your cheese warm and dip-able, try this Baked Pimiento Cheese. Heaven!


This post is linked to:
This post contains affiliate links.

Wednesday, June 20, 2018

Mushroom Toast


I still had mushrooms left over from last week’s Festival of Fungus, so decided to make a brunch dish using up those that remained. I had seen a recipe in the Chicago Tribune for Mushroom Toast, and I was intrigued. I loved the idea of a nutritional, vegetarian breakfast that can go together without too much trouble, and that is a hearty and satisfying way to start the day.

My version fulfilled all of those requirements plus was absolutely delicious. Better, in fact, than I expected it to be. While I didn’t include it in the recipe, because mushrooms tend to be beefy, I always season them with a few sprinkles of Montreal Steak Seasoning. It takes a tasty mushroom over the top with wonderful flavor. I do this every time I cook a mushroom, no matter what type of dish I am making. If you haven’t tried this yourself, you absolutely must! It will make a big difference, and the people you are serving them to will notice as well. It just gives them that certain je ne sais quoi. Try it, and if you’re a mushroom fan like I am, try this recipe as well. I had mine for a late breakfast, but it works equally well at lunch or dinner. Versatile!
Mushroom Toast

1 tablespoon olive oil
1 tablespoon unsalted butter
1/4 cup finely chopped Melissa’s shallots
8 oz. fresh cremini mushrooms, cleaned, sliced
1 clove garlic, minced
2 tablespoons sherry
1/2 cup heavy cream
2 handfuls fresh, baby spinach
Kosher salt and freshly ground black pepper
4 slices rustic sandwich bread

Heat oil and butter in a 9” skillet over medium heat. Add shallots and cook, 2 minutes. Add mushrooms and cook, stirring regularly, until mushrooms become soft, 8-10 minutes. Stir in garlic. Turn up heat to medium/high and add sherry, scraping up the tasty browned bits from the bottom. Pour in cream and cook until thickened, 1 minute. Add spinach and cook until wilted. Season with salt and pepper to taste.

Lightly toast bread. Butter with salted butter. Heap mushroom mixture onto toast.

I spreading goodness on toast is your thing, as it is mine, then you will love these Pimiento Cheese Toasts!


This post is linked to:
This post contains affiliate links.

Tuesday, June 19, 2018

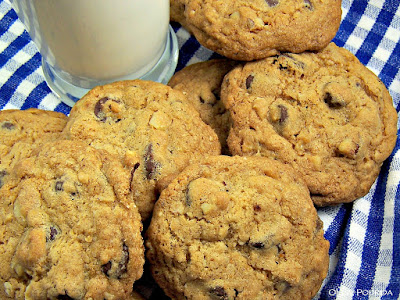
Mountain Cookies


What is it about men? They always seem to want to offer we single women advice. What is with that? Frankly, I’m doing just fine on my own, and neither need nor want their advice. After a recent, friendly, but annoying interaction with a male acquaintance, doing his best to raise my hackles by trying to tell me what to do, I knew that a cookie was in order. It couldn’t be any ordinary cookie; it had to be one with loads of taste, lots of substance, and ingredients that would replenish both body and soul. This Mountain Cookie came about as a result. You can make it normal size, or one of epic proportions. It’s up to you. Largely, it just depends upon how annoying the men in your life happen to be.
Mountain Cookies

2 1/4 cups all-purpose flour
1 teaspoon baking soda
1/4 teaspoon ground cinnamon
1/2 teaspoon espresso powder
1 teaspoon salt
2 sticks unsalted butter, softened
3/4 cup packed brown sugar
3/4 cup granulated sugar
2 large eggs
1 1/2 teaspoons vanilla
2 tablespoons milk
1/2 cup rolled oats
1 3/4 cups chocolate chips
1/2 cup raisins
1/2 cup sweetened flaked coconut
1 cup coarsely chopped pecans

Preheat oven to 350°F. Line baking sheets with parchment; set aside.

In small bowl, combine flour, baking soda, cinnamon, espresso powder, and salt; mix well.

In large bowl, beat butter and sugars until creamy. Add egg, vanilla, and milk; mix only until incorporated. Gradually beat in flour mixture and oats. Stir in chips, raisins, coconut, and pecans. Drop by rounded tablespoonfuls onto baking sheets.

Bake 12 to 15 minutes or until edges are crisp and browned but centers are still soft. Do not over bake. Cookies should be very brown on the outside but still chewy in the center. Let cool on baking sheets 5 minutes. Remove to wire racks; let cool completely.

For an equally satisfying chocolate chip cookies without the raisins, try Copycat DoubleTree Chocolate Chip Cookies.


 Even MORE recipes can be found here:

This post is linked to:

This post contains affiliate links.