Tuesday, May 30, 2023

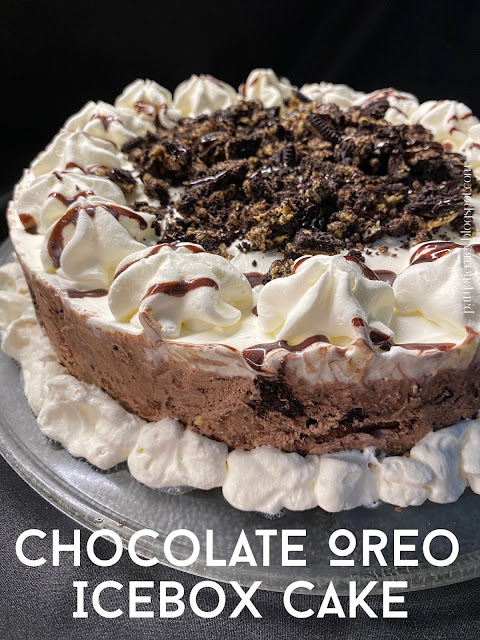
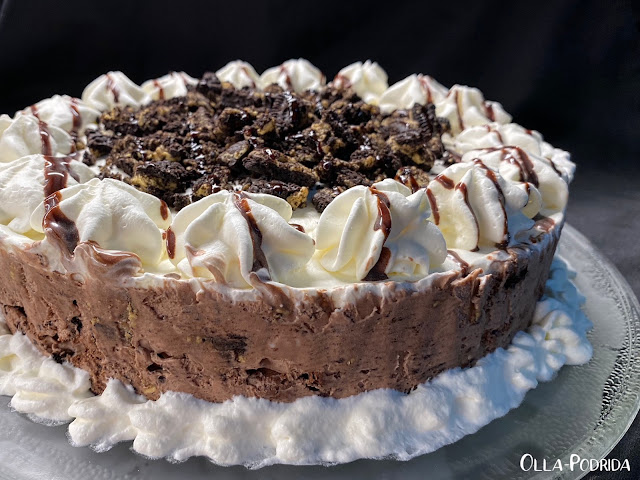
Chocolate Oreo Icebox Cake


This is a recipe that I have wanted to try for a long time, but never so much as after I tried the new Java Chip Oreos. If you haven’t tried those, you absolutely must! They are so good. The chocolate cookie with java filling and crunchy toffee bits is cookie perfection. Naturally, you can make this recipe as originally written, with plain Oreos, but why would you do it when Java Chip Oreos are available?

Chocolate Oreo Icebox Cake

Slightly adapted from beyondfrosting.com

FOR THE CAKE

8 oz. cream cheese, room temperature

1½ c. heavy whipping cream

1 t. vanilla extract

1 c. powdered sugar

2 T. cocoa powder

1 t. espresso powder

24 Java Chip Oreos, crushed

1 box (14.4 oz) chocolate graham crackers

 FOR THE TOPPING:

1¾ c. heavy whipping cream

1¼ c. powdered sugar

Hershey’s Syrup, for drizzle

6 Java Chip Oreos, crushed

 Line the bottom of a 9-inch springform pan with parchment paper. Align the chocolate graham crackers in the bottom of the pan, cutting crackers as needed to fit, but the more large/whole pieces you have, the better structure they will provide.

 Place the Oreos in a large Ziploc bag and use a rolling pin or another heavy object to crush, not pulverize, the Oreos; set aside.

 Using an electric mixer, beat the cream cheese for 2 to 3 minutes until it is completely smooth. Add ¼ cup of the heavy whipping cream and beat until the cream cheese resembles a liquid mixture. Then add remaining heavy whipping cream and vanilla extract and beat on medium-high speed. Once the mixture reach soft peaks. Then add the powdered sugar and cocoa powder and beat until stiff peaks form. Fold the crushed Oreos to the chocolate mousse until well incorporated.

 Divide the chocolate Oreo mousse in half. Spread half of the mousse over the bottom layer of graham crackers. It helps if you hold the graham crackers in place with your fingers if they are sliding around. Next, add a second layer of graham crackers and spread the remaining mousse. Finally, add the third and final layer of the graham crackers.

 FOR THE TOPPING

Place the mixing bowl and whisk attachment in the freezer for 5 to 10 minutes to chill. Pour the heavy whipping cream into the chilled bowl and use an electric mixer to beat the heavy cream at medium-high speed until soft peaks start to form. Slowly add the powdered sugar and continue beating at high speed until stiff peaks form. Frost the top with a thin layer of whipping cream, and then pipe a border around the outside edge.

 Cover this with aluminum foil and freeze for 2 to 4 hours or you can choose to keep this in the refrigerator, but allow at least 4 hours for the graham crackers to soften.

Prior to serving, remove the icebox cake from the freezer and allow it to thaw for 20 minutes. Crush 6 Oreos and sprinkle over top of the cake. Drizzle Hershey’s Syrup over the Oreos.

As an Amazon Associate I earn from qualifying purchases.

Monday, May 29, 2023

Ruth's Chris Chopped Salad Copycat

 
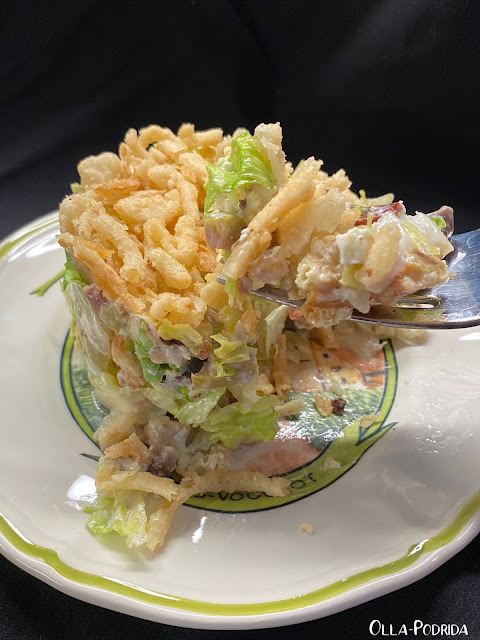
I have never had the pleasure of eating at Ruth’s Chris Steakhouse. It’s not that I haven’t wanted to; it’s just that the opportunity never arose. Truth be told, the late Mr. O-P used to be quite the steak maker, and often when we dined at area steakhouses, we would return home disappointed. I do like to keep my eye out for copycat recipes, though, and this one intrigued me. First of all, I love a chopped salad. I know it’s old school, but I don’t care. There’s just something simple, homey, crunchy, and delicious about a chopped salad, not to mention the fact that it’s easy to get onto a fork and into your mouth rather than, as has happened with some of those froufrou salads, wear it like a chest plate. Second, I love the way this is served. Ruth’s Chris garnishes with two halves of a cherry tomato. I didn’t have any, so I just left it as is.

 If you’ve never used a ring mold, let me tell you it is the simplest thing ever. Just put it on your serving plate, fill it with salad, and tamp it down, and slowly lift up the ring and there is your beautiful salad. It also works quite well with rice.

 This is an exceptionally good combination of ingredients. Make it fancy, serve it simply, or enjoy it as a main dish. Don’t let this one get by without giving it a try.

Ruth's Chris Chopped Salad Copycat

As seen on lakesidetable.com

 Salad Dressing

½ c. sour cream

2 fresh lemons, juiced

1 t. kosher salt

½ t. garlic powder

1 c. finely chopped fresh basil

Salad

½ head Iceberg lettuce chopped

6 slices bacon cooked and chopped

1 small radicchio, chopped

1 c. croutons, chopped

½ c. green olives, chopped

½ c. Melissa’s heart of palm, chopped

2/3 c. blue cheese, crumbled

4 medium mushrooms, chopped

2 boiled eggs, chopped

½ red onion, minced

Topping & garnish

1 c. crunchy fried onions

8 cherry tomatoes, halved

 Salad Dressing

Mix all the salad dressing ingredients together and set aside.

 Salad

Gently mix all of the ingredients together except for the crispy fried onions and cherry tomatoes.

 Pour salad dressing over the salad and mix together until thoroughly combined.

 Divide salad between 4 plates and top with crispy fried onions and garnish with cherry tomatoes.

 OR place the metal salad ring mold on the salad plate and fill it with salad. Then with the bottom of a glass, gently tap the salad down to compress it. This will help it keep its shape.

Remove the glass and top the salad with crispy onions. Then using the bottom of the glass again to keep the salad on the plate, bring the ring up, and remove the ring.

 Garnish with tomatoes.

As an Amazon Associate I earn from qualifying purchases. 
Friday, May 26, 2023

Starbuck’s Iced Cinnamon Dolce Latte Copycat

 
There’s an old movie from 1966 starring Cary Grant, Jim Hutton, and Samantha Eggar, called “Walk, Don’t Run.”  It takes place during the summer Olympic Games in 1964 and focuses on the housing shortage. Two men, Grant and Hutton, are forced to share a small apartment in Tokyo with the innocent and lovely Eggar. In one scene that I remember to this day, Cary Grant is making coffee, because it became obvious to him early on that neither Hutton nor Eggar could do it well enough to suit him. This was in the days of percolators (remember those?), Grant opens up a can of coffee grounds, pours it into the basket of the percolator filling it up, and levels it off with his index finger. Later, when he drinks this hearty brew he says, “That’s what I call coffee.” I have to agree.
My methods are a bit more modern and sophisticated than were his, but I want coffee strong enough to stand a spoon up in it. That’s why I never go to coffee houses. They never make the coffee strong enough to suit me, and I always question the cleanliness of their equipment.

Despite that, I must say that I am fascinated by some of their concoctions. Because drinking cold brew every afternoon at 3 PM has become as much a part of my lifestyle as waking up in the morning, I was eager to try a copycat recipe that I found on the web for Starbuck’s Iced Cinnamon Dolce Latte. It’s simple enough, just add a tablespoon (I use more) of cinnamon syrup to cold brew coffee, top it off with a splash of cream, and you have a wonderful, refreshing beverage. I drink cold brew all through the winter, outside temperatures don’t dictate whether I drink coffee or not. If you only drink it during the summer, you'll need to add this one to your repertoire. It’s really good.

Starbuck’s Iced Cinnamon Dolce Latte Copycat

 1/3 c. water

1/3 c. brown sugarpacked

   2 t. vanilla extract

1 t. cinnamon

Double shot espresso

Ice

¼ c. whole milk

 In a small saucepan, combine the water, brown sugar, vanilla, and cinnamon. Cook for 3-5 minutes until it comes to a simmer. Remove the syrup from the pot into an airtight container.

 Fill your favorite glass with ice. Add espresso and 1-2 tablespoons of cinnamon sugar syrup. Stir vigorously for 30 seconds. Pour in milk and enjoy.

As an Amazon Associate I earn from qualifying purchases. 

Thursday, May 25, 2023

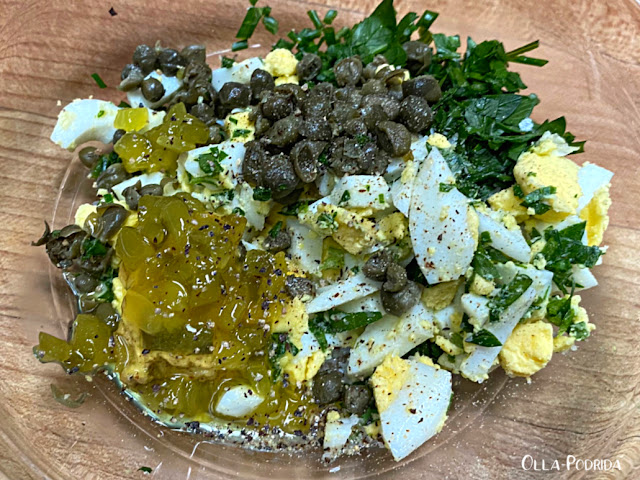
Egg Salad with Herbs, Capers, and Black Olives

I love olives. Stuffed or plain, pitted or un-, green or black, I love them all. I have cooked with them, I have baked with them, I have altered them, there is no way that I don’t enjoy them. My favorite cocktail is a dirty martini, so I even enjoy the juice. What I’m trying to say here is that, for me, olive shopping is a thing, and many times (way too many times) I get a little over enthusiastic. When I do, I am looking for ways to make use of them. Today I got the idea to put them in egg salad, something that I have been craving. What a delicious difference! There are so many tasty ingredients in this egg salad that it is loaded with flavor. Add this recipe to your egg salad rotation. You cannot help but love it.
 Egg Salad with Herbs, Capers, and Black Olives

3 hard boiled eggs, chopped
1 heaping T.
Duke’s mayonnaise
1 T. sour cream
1/3 c.
sliced black olives
1 rib celery, chopped
1 scallion, chopped
1 T. chopped
Melissa’s pickled jalapeños
1 T. chopped capers
1 T. chopped parsley
1 T. chopped dill
1 t. fresh lemon juice
Salt & pepper, to taste

Place all ingredients into a medium bowl and gently fold together until thoroughly blended. Refrigerate, covered, for at least an hour in order to meld flavors.

As an Amazon Associate I earn from qualifying purchases.

Tuesday, May 23, 2023

Tartar Sauce

 
Over the years I really never gave much thought to tartar sauce, most probably because I found the name repellent, and refused to eat it as a youth. It wasn’t until we were living in England, and regularly having fish and chips, that I decided to give it a try. Once I did, and realized what a lovely enhancement it was to a nice piece of fried haddock, I decided to make it on my own. I have been doing that for many years now, totally ignorant to the fact that there are more recipes than just one.
 
 I recently had the opportunity to get an advanced look at The Hog Island Book of Fish and Seafood (Released TODAY!), and the first thing I did was to try the recipe for tartar sauce. It was unique to my experience for a variety of reasons, one of which is that it included a hard-boiled egg. Wow! What a difference an egg makes; this is so good that it nearly stands on its own. It would be a wonderful dip for crudités, or even spread on a cracker. That said, I did use it, as intended, when I had fish and chips and absolutely loved it. This is but one of many delicious sounding and unique recipes in this book. Make the tartar sauce; buy the book.

Tartar Sauce
From The Hog Island Book of Fish and Seafood by John Ash
Makes about 2 cups

1 c.
mayonnaise
1 large hard boiled egg, chopped
1 T. sweet pickle relish
2 t. drained
capers, chopped
1 T.
Dijon mustard
1 T. finely chopped fresh chives
1 T. finely chopped flat leaf parsley
Kosher salt and freshly ground pepper


In a small bowl, gently stir the mayonnaise, egg, relish, capers, mustard, chives, and parsley together. Season to taste with salt and pepper. Transfer to an airtight container and refrigerate for at least one hour before using. Store refrigerated for up to three weeks.

As an Amazon Associate I earn from qualifying purchases.

  Disclosure: I received a complimentary copy of this book from Abrams Books as a member of their Abrams Dinner Party 2022-2023.  

Monday, May 22, 2023

Pesto Lasagna

 One of the things that I really enjoy about summer is growing basil. It’s easy to grow, super easy to propagate, the smell is fresh, heady, and wonderful, and I am a sucker for good pesto. I like it so much that I could eat it with a spoon and, just between you and me, I have.

When I saw this recipe for pesto lasagna, I knew that I had to give it a try. I had pesto in the freezer from last summer, and was saving it for something special, and this was it. I altered this recipe slightly, because I am not about to boil lasagna noodles. The first time I ever made lasagna, it was a total disaster, and the noodles were to blame. Once bitten, twice shy. Now I am a fan of the no boil variety, and use them in every kind of lasagna that I make. I do tend to make it a day ahead of time, cover it, and stick it in the fridge, so that the noodles get a good opportunity to soften up. You don’t have to, that’s just my preference.

If you’re looking for a wonderful main dish for meatless Monday, this is it. Cheesy, light, and delicious, I do believe this is one that the whole family will enjoy.

Pesto Lasagna

Slightly adapted from threeolivebranch.com

 Béchamel Pesto Sauce

3 T. butter

3 T. flour

3 c. whole milk

½ t. salt

¼ t. freshly ground black pepper

Few gratings fresh nutmeg

1½ c. basil pesto*

Cheese Mixture

15 oz. ricotta cheese

⅓ c. freshly grated Parmesan cheese

1 large egg

½ T. dried basil or 2 T. fresh, chopped

½ t. garlic powder

½ t. salt

½ t. freshly ground black pepper

 Lasagna

6 No Boil Lasagna Noodles (approximately)

3 c. shredded mozzarella cheese

6 T. freshly grated Parmesan cheese

 Make the Pesto Béchamel Sauce

In a medium or large pot, melt the butter over medium heat. When melted, add the flour and stir to combine. Cook 30-60 seconds. Whisk in the milk, salt, black pepper, and nutmeg. Cook at a simmer, stirring occasionally, until the sauce slightly thickens, approximately 7-10 minutes.

Remove the sauce from the heat. Add the pesto and stir to combine. Season to taste with salt and black pepper.

 Prepare Cheese Mixture

In a medium bowl, combine all of the cheese mixture ingredients. Season to taste with salt, basil, and pepper.

 Assembly

When ready to bake, preheat oven to 375°F.

Spread ½ cup of the pesto sauce across the bottom of a 9” x 9” baking dish.

 Lay three strips across the bottom of the dish, slightly overlapping. Break noodles in thin strips to fill in the edges. Dollop 1 cup of the cheese mixture over the noodles, and gently spread across the noodles. Sprinkle 1 cup of shredded mozzarella on top of the cheese mixture, followed by 2 Tablespoons of Parmesan. Scoop and gently spread 1 cup of the pesto sauce across the cheeses.

 Repeat another layer of noodles, cheese mixture, mozzarella, Parmesan, and pesto sauce. You should be out of the ricotta cheese mixture at this time.

 Prepare the top layer by laying out the third layer of noodles. Top with the remaining pesto sauce, approximately 1.5 cups (unless you want to save some for serving).

 Sprinkle with the remaining 1 cup of mozzarella and 2 Tablespoons of Parmesan.

 Cover with foil and bake for approximately 50 minutes. The edges of the dish should be bubbling and the top cheese melted. Remove the foil and finish baking 10-15 minutes or until the top is lightly browned. (Want a darker top? Remove the cover earlier or turn on the broiler for a few minutes).

 Remove from oven and let sit 15 minutes before cutting and serving.

 *Homemade is best, but this one is decent in a pinch.

As an Amazon Associate I earn from qualifying purchases.


Thursday, May 18, 2023

Rooting for Spring Tablescape


You may (or may not) have noticed that I’d taken a bit of a break. That’s because I decided, at long last, to clean. I am not a cleaner. My mother LOVED to clean; me, not so much. She came to help me clean before a party once, and said that she really enjoyed cleaning at my house because she could really see results. That pretty much says everything.

 
Why do I mention that, you ask? Because I was inspired by the great outdoors, and my budding vegetable container garden, to create this table. For those of you who enjoy vegetable gardening as much as I do, this one’s for you.

This past week I decided to tackle the conservatory. I divided it into quadrants, so as not to be overwhelmed.  For those of you who have plants, and I am talking a lot of plants, you know how time-consuming it is to care for each one individually, particularly if you grow citrus indoors, and that citrus has scale. Scale produces a type of sap, called “honeydew,” that is a clear, sticky substance that, I soon came to realize, pretty much had stuck to everything from the floor, sofa, cushions, to the windowsills, etc. I spent a good portion of last week on my hands and knees, with Dawn and a soft sponge, scrubbing. On the plus side, those trees are now outside and being treated, and the conservatory is sparkling clean, and all the plants look beautiful and healthy.

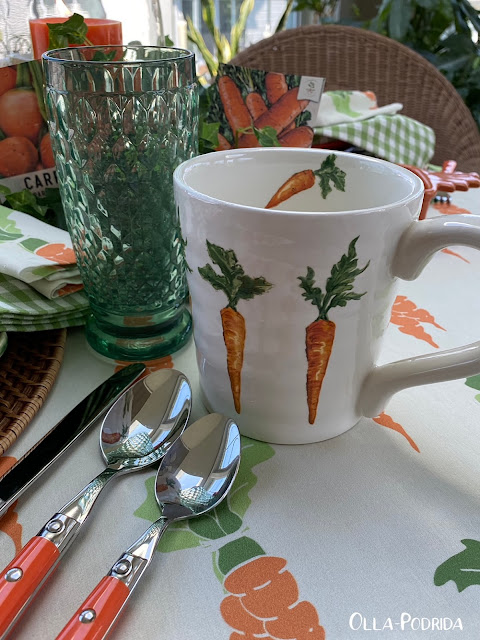
I became enamored with the carrot theme around Easter and that inspired the purchase of the Maxcera carrot mugs, the Spoonflower carrot fabric (that had me hemming napkins and the table topper), as well as digging out my plates for the summer, including this set from Williams-Sonoma featuring beautiful carrots.

 
The carrot fabric napkins that I made paired nicely with the green checked napkins that I had gotten from Pottery Barn. Naturally, I had to have orange flatware to go along with it. (Imagine how lovely these would look with dark blue, not to mention fall colors.)

Carrots have those wonderful green tops, so I thought my Villeroy and Boch glassware appropriate.

 
The Chantal carrot bowls (purchased at Home Goods more than a decade ago) alongside are favorites of mine. They are whimsical and fun, and perfect for serving small salads be it fruit, coleslaw, or leafy green. The Blenko pitcher reinforces the carrot orange. 
The chargers are my favorite Bordallo Pinheiro geranium leaf chargers. They are topped with wonderful bright oval orange plates.

 
The simple centerpiece features a nice variety of carrot seed packs to drive the theme home.

As an Amazon Associate I earn from qualifying purchases.
This post is linked to: Tablescape Thursday 

Wednesday, May 10, 2023

The Original Coronation Chicken

 
I don’t know about the rest of you, but I pulled an all-nighter in order to watch the coronation live. It’s not often that we can see history in the making, and this was spectacular! I had a friend who was doing the same, and we were messaging back-and-forth about every little detail. She asked me if I had made Coronation Chicken for the occasion, and wanted to know if she could have my recipe. She was surprised when I told her that I had never made Coronation Chicken. After the extravaganza that was the coronation concert, I decided to do a little research. It seems it was first created in 1953 by Le Cordon Bleu London, in celebration of the coronation of Queen Elizabeth II. It was initially called “Poulet Reine Elizabeth,” and was served with rice, green peas, and pimientos. I prefer mine on a lightly toasted croissant. However you’d like to enjoy yours, be sure to give this traditional taste treat a try. I’m not going to lie, it’s a bit of work, but it’s truly the best chicken salad that I have ever eaten.
The Original Coronation Chicken

 1 T. extra-virgin olive oil

1 Melissa’s shallot, finely chopped

1 bay leaf

2 t. mild curry powder

1 t. double-concentrated tomato paste

2 oz. red wine

2 oz. water

1 T. fresh lemon juice

¼ t. brown sugar

¾ c. mayonnaise

½ c. Crème fraîche (or unsweetened whipped cream)

1 T. dried apricots, finely chopped

6 c. cubed cooked chicken

Salt & pepper to taste

3 T. toasted sliced almonds

  Heat the extra-virgin olive oil in a large frying pan over medium-low heat. Add in the shallot, bay leaf, and curry powder, and gently cook for 2 minutes. Add the tomato paste, red wine, and water, and bring to a gentle boil.

Add the lemon juice, and a pinch of sugar, then season with salt and freshly cracked black pepper to taste.

 Simmer for 2 minutes, until the sauce is slightly reduced, then remove from the heat. Strain the sauce through a fine sieve and allow it to cool.

 In a large bowl mix together the prepared sauce with the mayonnaise, Crème fraîche, and finely chopped apricots.

Add in the cooked chicken breast, and mix gently all the ingredients together. Finally, add toasted sliced almonds.

 Serve the coronation chicken with a salad, rice, or as a filling for jacket potatoes and sandwiches.

As an Amazon Associate I earn from qualifying purchases.