This post is linked to: Tablescape Thursday
As an Amazon Associate I earn from qualifying purchases.
I got to thinking about the whole dining out experience, and how I tend to
enjoy the sociability more than I do the food. It’s gotten to the point where I
can make restaurant quality food at home, fresher, with quality ingredients,
for a fraction of the price, and I know how that food’s been prepared. Generally,
I tend to order Cajun shrimp pasta out, but decided it was time to make it at
home. This is an easy recipe that can be on the table in under an hour. Give
some thought to how you want to spend your money. I certainly have, and that’s
why I’ll be doing more restaurant-style cooking at home.
Serves 2
8 oz. penne rigate pasta
2 T. butter
1 T. extra-virgin olive oil
1 Melissa’s shallot, diced
2 cloves garlic, minced
¼ c. diced Melissa’s fire roasted red bell peppers
1 c. sliced crimini mushrooms
½ lb. medium shrimp, peeled and deveined
1 c. Alfredo sauce, jarred* or homemade
¼ c. grated Parmesan cheese
1/3 c. heavy cream
½ t. Cajun seasoning, more or less, to taste
Pinch cayenne pepper, more or less, to taste
Salt and pepper, to taste
Chopped parsley, for garnish
Cook pasta according to package direction. While pasta is cooking, melt butter together with olive oil in a 10" skillet over medium heat. Stir in onion, and saute until translucent, about 4 minutes.
Stir in garlic, red peppers, and mushrooms; cook over medium-high heat until mushrooms have softened, about 3 minutes. Stir in shrimp and cook until firm and pink (3 minutes) and then add the Alfredo saucer, Parmesan, and cream. Simmer, stirring constantly, for about 4-5 minutes until thickened.
Stir in Cajun seasoning, cayenne, and salt and pepper, to taste. Stir drained pasta into sauce and serve immediately. Sprinkle with parsley, for garnish, if desired.
*I used Rao’s.
As an Amazon Associate I earn from qualifying purchases.
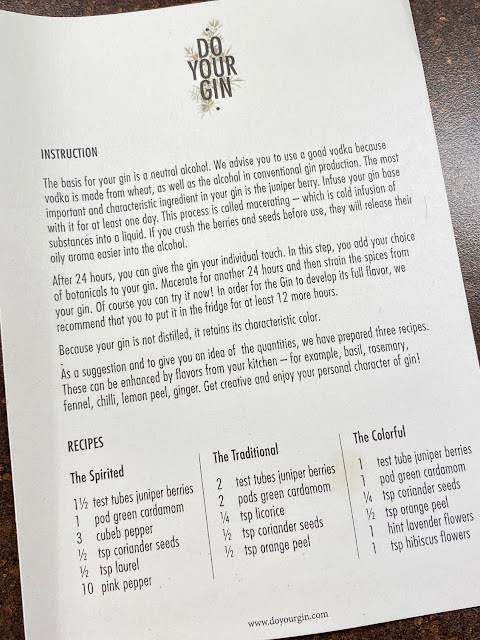
As I mentioned last week, I made gin. Let me tell you, this is a short process. It only takes a couple of days, and I couldn’t be happier with the results. While experimentation is encouraged, three recipes are included to guide you along the way. I chose the “traditional” version, adding cardamom pods, orange peel, and licorice to the infusion of vodka and crushed juniper berries. Because I was feeling a bit whimsical, I also added a pinch of hibiscus flower as well. Here is the result.
I had such good luck with this, that I am going to be making more in the
future, and doing a bit more experimenting. If you know of anyone who likes gin,
this Gin Making
Kit would be an excellent gift. Father’s Day
will be here before we know it, so keep this in mind for those gin-loving dads.
As an Amazon Associate I earn from qualifying purchases.
1 c. cold unsalted butter
¾ c. powdered sugar
1 t. pure vanilla
1¾ c. flour
3-4 T. chocolate jimmies
In the work bowl of an electric mixer beat together, butter, powdered sugar, and vanilla extract until creamy, scraping down the bowl as needed. With the mixer, set on low, add the flour, ¼ cup at a time, mixing until it forms a dough. Add the chocolate jimmies, and beat to combine. Line a baking sheet with parchment paper, or a Silpat; set aside.
Form into a ball with your hands, and transfer it to the prepared baking sheet. With a rolling pin (or your hands), roll (or pat) it into a 10” x 12” rectangle that is 3/8” – 1/4” thick. Place in refrigerator and chill for one hour.
After one hour, remove dough from refrigerator, and preheat oven to 325° F. As oven is preheating, cut the dough into bite-size squares and separate on the baking sheet leaving a half-inch space between each. Bake for 10 to 12 minutes (or longer depending upon the size of your squares) until the bottoms just begin to brown. Allow cookies to cool for 10 minutes on the cookie sheet before transferring them to a wire rack to cool completely.
If desired, melt some chocolate chips in the microwave or over
boiling water and drizzle on top of the cookies.
As an Amazon Associate I earn from qualifying purchases.
Of all the days of the week, Sunday is the day that I spend the
most time in the kitchen. I’m not sure why that is, but that seems to be the
case. This past weekend, I whipped up a wide variety of things that should take
me the rest of the week, with plenty to go into the freezer for weeks to come. One of my favorite dishes was this creamy taco soup. I adapted it from a number
of recipes I found online, adding my own personal touch, and lots of
tasty toppings. Hearty and robust, the flavors just don’t stop. The kids are
going to love this one, it's like a taco in a bowl.
2 T. olive oil
½ c. diced green pepper
1 yellow onion, chopped
1 lb. ground chuck
2 T. taco seasoning
4 c. beef broth
1-2 Melissa’s pickled jalapeños*, minced
2 14.5-oz. cans fire-roasted tomatoes
1 15.5-oz. can pinto beans, drained and rinsed
1 12-oz. can corn, drained
8 oz. cream cheese, cubed and softened
Kosher salt and freshly ground black pepper, to taste
In a large pot over medium-high heat, heat the oil. Add bell pepper and onion, and cook until onion is translucent, about 5 minutes. Add garlic and cook 1 minute more.
Add ground chuck and cook until browned; stir in taco seasoning.
Once meat has browned, add broth, jalapeños, tomatoes, pinto beans, corn, and chilies. Bring to a bowl, then reduce heat and let simmer for 15 minutes. Stir in cream cheese until melted, then season to taste with salt and pepper.
Top as you see fit.
*Optional
As an Amazon Associate I earn from qualifying purchases.
I don’t know what you did over the weekend, but for me, it was a
weekend of wild discovery. One of the things I discovered was that I own a
blender. Seriously, I did not know. I happened to be rummaging around in a
kitchen cabinet that I tend to avoid due to its chaotic nature, and found a
blender container. I wondered why I had this container with a strange lid until
I realized that it goes with my mini ninja chopper (that I have had for about
15 years). What a surprise!
This discovery was quite fortuitous because I also became acquainted
with the absolutely delightful Kevin Lee Jacobs and his YouTube channel by the
same name. From there, I discovered that Gordon Ramsay wasn’t quite the jerk
that I thought he was, and, finally, from there I discovered the pure
deliciousness of broccoli purée soup (which is where the blender came in).
I was looking for a new way to prepare broccoli, and that’s how I found Kevin.
Kevin made a broccoli purée that he made look wonderful, attributing his find
to Gordon Ramsay. I knew that I had to give this a go because it seemed like
the perfect starter for a St. Patrick’s Day meal. Once I found that I did
indeed own a blender, the rest is history.
There really isn’t much of a recipe for the soup, although I’ll
try to write one up below. I tend to always use a bit of nutmeg when I’m
working with any type of cruciferous vegetable (or spinach), so I added some
here, making this recipe my own. Essentially, you just cook broccoli, blend it
up with a little of the cooking water, season it, and serve. What could be
simpler than that?Puréed Broccoli Soup
1 large head broccoli
6-7 c. cold water
1 T. sea salt
4 gratings fresh
nutmeg
Freshly ground black pepper
In a medium stock pot, add salt to water, and bring to a rolling boil. While
water is heating, cut florets off of the head of broccoli, rinse well, and
drain. Once water has reached a boil, put all of the broccoli in at once, and
set a timer for four minutes. When the four minutes are up, drain the broccoli,
but reserve 2 cups of the broccoli water. Place drained broccoli into a
blender, add the nutmeg and a half cup of the broccoli water, and purée. Add
more water, as needed, to reach the desired texture. That’s it!
You can top it with a swirl of heavy cream or a little dollop of sour cream (as
I did) and a few gratings of cracked pepper. Gordon Ramsay serves his with a
slice of goat cheese at the bottom, so I suppose you could do that as well.
Personally, I thought it was perfect as is.
As an Amazon Associate I earn from qualifying purchases.
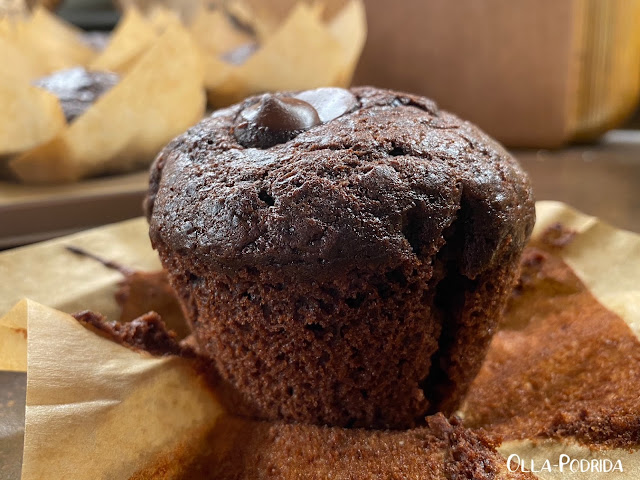
Do you ever have one of those days when you’re really in the mood for chocolate cake, but you don’t want to trouble yourself to make chocolate cake? Yesterday that was me. Chocolate cake seemed like so much trouble because chocolate cake always begs for chocolate frosting, more specifically chocolate buttercream frosting, and I had neither the time nor inclination. As a consequence, I pulled out my file of chocolate recipes (Doesn’t everyone have a file of chocolate recipes?) and came upon this one. It sounded easy enough, it didn’t call for any special equipment, most importantly, I didn’t have to trouble myself to get out a stand or hand mixer. I altered the recipe a tiny bit — in my opinion all chocolate recipes require espresso powder to really amp up that deep chocolate taste. I also like the slightly larger dark chocolate chips because, well, who doesn’t want more chocolate?
These are delicious! Be sure to make them using the tulip baking cups because that allows you to use a 12-well muffin tin, but get larger muffins. They’ll turn out perfectly, and look how pretty they are.
Adapted from momlovesbaking.com
2 c. flour
1 c. sugar
½ t. salt
1 t. baking soda
1 t. espresso powder
1¼ c. Nestle’s 53% cacao dark chocolate chips
2 large eggs, room temperature
¾ c. sour cream
½ c. vegetable oil
1 c. milk
1 t. pure vanilla extract
Preheat oven to 425°F. Line a 12-count muffin
pan with tulip style
cupcake liners; set aside.
In a large bowl whisk together flour, sugar, salt, cocoa powder, baking soda, and espresso powder until thoroughly combined. Stir in 1 cup of the chocolate chips; set aside.
In a medium bowl whisk together eggs, sour cream, oil, milk and vanilla until combined. Add the wet ingredients to the dry ingredients and gently stir until combined. Do not overmix.
Spoon the batter into the prepared muffin pan.
Use the remaining ¼ cup of chocolate chips to add a few on top of each muffin
before baking. Bake for 5 minutes at 425°F; reduce oven temperature to 350°F
and continue to bake for 20 minutes or until a toothpick inserted in center of
muffin comes out clean. Allow to cool 10 minutes. Muffins taste best served
fresh on the same day, but you can store them at room temperature in an
airtight container for up to 5 days.
As an Amazon Associate I earn from qualifying purchases.
Photo credit: The White Hare |
As an Amazon Associate I earn from qualifying purchases.
This post is linked to: Tablescape Thursday