Thursday, March 31, 2022

Blueberry Butter Dip Biscuits

 
You are no doubt aware, if you have read this blog the past couple of weeks, that I have recently become absolutely obsessed with butter dip biscuits. I tried the original version and I loved them, then devised my own Cheddar Bay version (ditto), and then came across a recipe for a blueberry version with a glaze topping. Honestly, I don’t know which one of these I like the best. They are all amazingly delicious, simple to make, and I cannot stop eating them! Fortunately, they freeze beautifully. Take one out of the freezer, pop it into an oven at 350°, and let it bake for 15 to 20 minutes. It tastes like fresh.

Blueberry Butter Dip Biscuits
As seen on The Country Cook

½ c. (1 stick) unsalted butter
2½ c. flour
¼ c. sugar
1 T.
aluminum-free baking powder
½ t. salt
1¾ c. buttermilk
 c. fresh blueberries
1 c. powdered sugar
2-3 T. milk

Preheat oven to 350° F. Spray a
9” x 9” baking pan with nonstick cooking spray.

In a microwave safe bowl, melt butter. Pour melted butter into the bottom of your baking dish.

In a medium bowl, whisk together flour, sugar, baking powder, and salt. Make a well in the center and pour in the buttermilk. Stir with a fork until a sticky dough forms. Carefully fold in blueberries.


Pour into prepared baking dish, right on top of the melted butter. Some of the butter will run over the top of the dough, that’s perfectly fine. Spread out the batter evenly, and cut into nine squares.

Bake for about 25 to 30 minutes, rotating once during baking. The top should be golden brown and a toothpick inserted in the center should come out clean.

While your biscuits are baking, in a medium bowl, whisk together powdered sugar and milk. Drizzle on top of the warm biscuits. Allow the biscuits to cool slightly and serve.


As an Amazon Associate I earn from qualifying purchases.


Tuesday, March 29, 2022

Mandarin Orange Salad


This refreshing beauty of a salad goes back to the 70s, and, perhaps, even before that. I first remember my mother making it back then, serving it alongside one of her legendary prime rib dinners. It’s crunchy and light, with a unique combination of ingredients that makes it very special. If you are looking for something wonderful to serve to your guests, this very well could be it.

Mandarin Orange Salad

½ head iceberg lettuce
One head romaine lettuce
2 chopped scallions
1 c. chopped celery
1 15-oz. can
mandarin oranges, drained
Toffee almonds (recipe below)

Toffee Almonds:
2 T. sugar
1/3 c.
slivered almonds

Place sugar and almonds into a
7-inch sauté pan and set it over medium high heat. Stir occasionally until sugar begins to melt, and then stir constantly, thoroughly coating the almonds in the caramelized sugar. When the almonds turn a rich amber color, turn out onto a cold plate, and separate immediately.

Dressing:

¼ c. vegetable oil
2 T. cider vinegar
2 T. sugar
½ t. salt
Pinch of dry mustard
A few gratings freshly ground black pepper
3 to 4 drops Tabasco
2 T. chopped fresh parsley

Whisk together until thoroughly blended.

When ready to serve, toss toffee almonds, greens, etc. with dressing.


As an Amazon Associate I earn from qualifying purchases.

Sunday, March 27, 2022

50 Things to Bake Before You Die, a Review

I think that we are all familiar with the “bucket list” books. You know what I’m talking about, books with titles that start with “1000 Things to…Before You Die.” There are books on things to do, places to go, things to see, restaurants to visit, there are similar books for nearly every state and major city in the country. Sure, a lot of those things are doable, and many of them are fun, but 1000? Really? Isn’t that a bit much? Here’s a book that doesn’t overwhelm you with the numbers, features things you can do from home, and ways to please and delight friends and family in the doing.
50 Things to Bake Before You Die by Allyson Reedy features 50 recipes for cakes, pies, brownies, cookies, and other sweet treats. One recipe looks better than the other, all of them look totally doable even for the inexperienced baker, and each recipe is well worth trying. Lest you think Reedy to be a “morbid chick” as she puts it, with her juxtaposition of baking and death, she wants to assure her reader that, because we’re all on a clock, we should bake, eat, and enjoy. She further admonishes would-be bakers to not beat themselves up if the end results don’t look picture perfect. It’s all about the taste.
Both professionals and the author herself took the photos that appear in this book. Notes from the creator precede each recipe. It’s important to mention, I think, that these favorite recipes of Reedy’s are from some of the greatest bakers and chefs, from small town cafés to fancy restaurants to TV show hosts. In doing so, the author provides a wide range of favorites, as well as for varied tastes and techniques.
Having purchased, given away, and re-purchased a Madeleine pan. I chose to make the Madeleines from chef and restaurateur Daniel Boulud. Because I am a lover of lemon, I changed his recipe slightly by adding a little bit of lemon oil to increase the taste. They were delicious! Next up, I tried the brown sugar peach cobbler. I am a nut for peach cobbler, and wasn’t about to wait until July when fresh peaches became available, so I made do with frozen; again, really delicious.Strawberry Hand Pies, from Tracy Wilk of #BakeItForward called to me because Wilk described herself as a pie hater. I often describe myself in the same way, once referring to pies as “the liver of desserts.” She clarifies by saying that she is a “bad pie hater.” I don’t need that type of clarification; I’m not a fan in general. Still, her refreshing and honest attitude had me making these pies (shortening the process by replacing her crust with puff pastry), and they were fun to make and delicious as an afternoon treat.
The book is divided into five chapters: Cookies, Cakes, Pies & Tarts, Things You Eat with Your Hands, and Things You Probably Shouldn’t Eat with Your Hands. It is refreshing, honest, offers up a variety of thoughts and opinions, features desserts from all categories, some more difficult than others, and provides the baker with some tasty goals while he or she is here on planet earth. If it is lacking anywhere, it is in failing to provide a much-needed index, something I have noticed lacking in many modern cookbooks. If you can live with that, then you will certainly enjoy this book.

As an Amazon Associate I earn from qualifying purchases.

 Disclosure: I received a complimentary copy of 50 Things to Bake Before You Die from Ulysses Press in exchange for an honest review.


Friday, March 25, 2022

Chili Cornbread Bake


One of the things I like about spring is its versatility. One day I’m outside enjoying the sun and 83° temperatures, the next I’m curled up in front of a fire watching a British mystery on TV and having comfort food. Yesterday was one of those fire and comfort food days. I chose a recipe that looked both tasty and comforting, and for which I had all of the ingredients. While it’s probably not company worthy, it is certainly family friendly.

Chili Cornbread Bake

Chili:
1½ lbs. ground chuck
1 medium onion, diced
2 cloves garlic, minced
1 T. chili powder
1 t. ground cumin
½ t. dried oregano
½ t. kosher salt
Freshly ground black pepper, to taste
1 10-oz. can diced tomatoes and green chilies (
Rotel)
1 8-oz. can of tomato sauce
1 14.5-oz. can cream style corn, divided

Cornbread topping:
2/3 c. flour
½ c. yellow cornmeal
1/3 c. sugar
1 T. baking powder
½ t. salt
1 large egg
1 c. shredded cheddar jack cheese, divided
¼ c. whole milk
1 T. fresh cilantro, minced
1-2
Melissa’s pickled jalapeños, sliced

Preheat oven to 375° F. Spray a 2-quart baking dish with PAM.

Heat a large nonstick skillet over medium high heat. Brown ground beef, onion, garlic, and seasonings, stirring occasionally. Stir in diced tomatoes and green chilies, tomato sauce, and ½ can of cream style corn. Pour mixture into prepared baking dish

Make the cornbread topping:

In a medium bowl whisk together flour, yellow cornmeal, sugar, baking powder, salt, ¾ c. cheese, milk, and the remaining half can of cream style corn. Pour over beef mixture, and spread to the edges. Sprinkle with remaining ¼ cup cheese. Bake for 25 minutes or until the cornbread is baked through and make sure it’s hot and bubbly.

Top with sour cream, chopped cilantro, and slices of jalapeño.


As an Amazon Associate I earn from qualifying purchases.


Monday, March 21, 2022

Butter Dip Cheddar Bay Biscuits

The week before last, on March 3rd to be precise, I made the recipe for Butter Dip Biscuits. Ever since then I have been obsessed with these delicious, super easy-to-make biscuits. Something told me that the recipe would be a trifle forgiving if I wanted to play around with it, so I did. I decided that I wanted to make the very popular Cheddar Bay Biscuits (The Red Lobster copycat) in Butter Dip Biscuit form. Success! Like the plain variety, these are crunchy on the top, chewy on the bottom and sides, and fluffy in the middle. Next up, I’m going to try a sweet version. In the meantime, you have to try one of these recipes.

Butter Dip Cheddar Bay Biscuits

½ c. (one stick) butter
2½ c. flour
1½ T. granulated sugar
1 T.
aluminum free baking powder
1½ t. salt

¼ t. garlic powder

¼ t. onion powder

¼ t. Old Bay Seasoning

1 t. dried parsley flakes
1 c. shredded extra-sharp cheddar cheese

1¾ c. of buttermilk

Preheat oven to 450°F.

Place stick of butter into an 8” x 8” microwave-safe baking dish. Microwave for one minute until butter has melted; set aside.

In a medium bowl mix together flour, sugar, baking powder, salt, garlic powder, onion powder, Old Bay, and cheese. Make a well in the center and pour in buttermilk. Stir with a fork until a loose, sticky dough forms. Pour biscuit dough into baking dish, on top of the melted butter. Smooth out the top as well as you can and cut the dough into nine squares using a sharp knife (this will help with cutting later when they are done).

Bake for 20 to 25 minutes, rotating the dish once during baking.

These can be stored on the counter, covered, for up to two days. They will last for a week if stored in the refrigerator. You can freeze them for up to three months.


As an Amazon Associate I earn from qualifying purchases.

Friday, March 18, 2022

Shrimp Louie Salad


Jess Damuck is a recipe developer, food stylist, and self-proclaimed salad freak. All of this shines through in her first book, published by Abrams, Salad Freak. Subtitled “recipes to feed a healthy obsession,” she is certainly not wrong. In this book, recipes range from the simple to the complex, and span meals from breakfast to dinner, even a late night snack.

There were quite a few recipes that immediately drew my attention, but I absolutely had to make this one first. This salad is wonderful and refreshing, and perfect for a summer lunch with the ladies, or dinner on the patio.

Shrimp Louie Salad
Edited for clarity

3 lemons
2 bay leaves
1 t. black peppercorns
1 lb. shrimp
2 large eggs

Two heads little gem lettuce*
1 cup cherry tomatoes
1 avocado
2 Persian cucumbers

¼ c.
mayonnaise
1 t. tomato paste
1 t. white vinegar
1 t. Tabasco sauce
Kosher salt and freshly by pepper to taste

Fresh dill, for garnish

Prepare an ice bath. Fill a medium pot with water 2 to 3 inches below the rim and add 2 halved lemons, 2 bay leaves, and 1 teaspoon black peppercorns. Bring to a boil, then reduce to a gentle simmer. Add 1 pound of shrimp and cook until bright pink and cooked all the way through – six minutes for fresh, at about nine minutes right from frozen.

Transfer the shrimp to the ice bath and empty out the pot then refill it with fresh water and return to a boil. Add the eggs. Cook for 10 minutes, then transfer to the ice bath.

Separate the leaves of two heads lettuce and tear them into bite-size pieces; wash and spin dry.

Arrange the lettuce on serving plates or a large platter. Cut one cup cherry tomatoes in half. Cluster the tomatoes in one area of each salad plate, and scatter a few about the plate. Cut one avocado in half and remove the pit. Use a spoon to peel off the skin and cut each half into four wedges. Arrange on the plates. Slice two Persian cucumbers on the bias, and cluster in one section of each plate.

Peel the shrimp but leave their tails intact. Arrange the shrimp on the plates. Peel the eggs and cut into quarters. Arrange them on the plates. Pick some small pieces of dill to scatter around the plate, along with plenty of fresh pepper and lots of lemon wedges.

In a small bowl, combine ¼ c. mayonnaise, 1 teaspoon tomato paste, 1 teaspoon white vinegar, and 1 teaspoon Tabasco sauce, and season with salt and pepper. Transfer to a pretty little bowl for serving alongside the salad.

*Little Gem was not available in my area, so I substituted with spring mix.
 

Disclaimer: I received a complimentary copy of Salad Freak from Abrams Publishing Company as part of being a member of #AbramsDinnerParty.

 As an Amazon Associate I earn from qualifying purchases.


Thursday, March 17, 2022

Colcannon

One of the things that I really like about St. Patrick’s Day is not what you might expect. I am not talking about the corned beef here, although I dearly love it, no, I am talking about colcannon. What is colcannon you may ask? It is a delicious cabbage, leek, and potato side dish that, along with the corned beef, covers all of your Saint Patrick’s Day bases. It is simple to prepare, and so good that you will wonder why you haven’t made it in the past.

Colcannon

4 slices bacon, chopped
4 T. butter, divided
1 6-oz. pkg.
Melissa’s cleaned and sliced leeks
1 small head Melissa’s organic cabbage
1 1.5-lb. bag Melissa’s Baby Dutch yellow potatoes

In a 12-inch skillet, cook the bacon until done, but not crisp. Add 2 tablespoons of butter and the package of leeks. Continue sautéing, over medium heat, until the leeks are limp. Add cabbage and remaining butter. Continue to cook over medium low heat until cabbage is limp.

While leeks and cabbage are cooking, bring a
large saucepan with salted water to a boil over high heat. Add potatoes and cook until fork tender 20 to 25 minutes. Drain potatoes, return to pan, and place pan on top of warm burner with flame turned off to allow steam to evaporate. Mash potatoes the way that you normally would (hand mixer, potato ricer, whisk, you get the picture). Fold ¾ of the leek/cabbage mixture into mashed potatoes, blending thoroughly. Serve immediately, topped with the extra leek and cabbage mixture.


As an Amazon Associate I earn from qualifying purchases.


Monday, March 14, 2022

Irish Pimiento Cheese

I am Irish and I love pimiento cheese, and, in thinking about these two facts, I decided it was time to make an Irish version of pimiento cheese. There’s nothing wrong with being a purist, but this is really delicious. Considering it contains whiskey, I would say this is for adults only. As with all pimiento cheese, this is excellent on crackers, with crudites, or mounded on top of a burger.

Irish Pimiento Cheese

 8 oz. extra-sharp cheddar cheese, grated

¼ c. cream cheese (2 ounces), softened, diced

1/3 c. finely diced Melissa’s roasted red peppers

3 T. Duke’s mayonnaise

2 T. Irish whiskey

2 T. minced scallions, green parts only (natch)

¼ t. smoked paprika

Salt and freshly ground black pepper, to taste

Place all ingredients into a large mixing bowl. Using a spatula, fold and mix until it is smooth and spreadable, about one and a half minutes. Transfer to a plastic or glass container, cover tightly, and store in the refrigerator for up to one week.


 As an Amazon Associate I earn from qualifying purchases.


Wednesday, March 9, 2022

Cheese and Spinach Pie

I was rummaging around in my mother’s old recipe box, as I occasionally find myself doing, and came across one of her handwritten recipes. It was written on the front and back of two 3" x 5” index cards. The fact that my mother had written this out by hand in such length indicated to me that she really liked it. The recipe was for Cheese and Spinach Pie. The recipe called for a homemade double crust piecrust. Nope. Not having it. I don’t make piecrust unless I absolutely have to (a gun is being held to my head, for example), and it seemed to me that using it in this recipe would be way too carb-laden. So I kept the filling as is, and decided to use puff pastry instead. The result was wonderful.

 This is like nothing I have ever experienced before. My friend Alycia (of the Tablescapes at Table/Twenty One blog) asked me if it was more like quiche, or more like spanakopita. Truth be told, it’s not like either one of those things. This is something unique. I enjoyed it as a main dish for dinner one night, and the next day I had it for breakfast. Naturally, it would work well for lunch. It keeps in the refrigerator, for a couple of days, but when you reheat it, make sure you do so in the oven so as not to make the crust soggy.

Cheese and Spinach Pie

3 T. butter
1 medium onion, minced
2 garlic cloves, minced
1 10-oz. pkg. frozen chopped spinach, thawed and drained
1 8-oz. pkg. shredded mozzarella cheese
1 15-oz. container ricotta cheese
¾ c. dried breadcrumbs
1 t. chopped fresh dill (or ½ t.
dill weed)
5 large eggs, separated
1 t. salt
Pepper, to taste
One sheet frozen puff pastry

In
4-quartsaucepan over medium heat, melt butter. Cook onion and garlic in melted butter until tender, stirring often, about 10 minutes. Remove from heat and stir in spinach, mozzarella, ricotta, breadcrumbs, dill, four egg yolks, and salt.

Beat five egg whites until stiff peaks form. With wire whisk, gently fold egg whites into cheese mixture until well blended; set aside

Preheat oven to 400° F. Roll one sheet of puff pastry into a 12” x 12” square. Place it into a 9-inch deep-dish pie pan. Spoon spinach mixture into the center of the puff pastry, and smooth out. Lift each corner of the puff pastry over the filling to the center until all corners meet. Combine remaining egg yolk with 1 teaspoon of water and brush over pastry.

Bake for one hour or until knife inserted into center comes out clean.


As an Amazon Associate I earn from qualifying purchases.


Monday, March 7, 2022

Apple Pecan Spice Cake with Toffee Glaze

I tend to indulge, perhaps overindulge, myself in magazine subscriptions. What can I tell you? I love periodicals. One of the magazines to which I subscribe is Bake from Scratch. I’m not quite sure why I subscribe to this one because, as I have mentioned before, I don’t bake, but there are so many wonderful things to look at in every issue that my subscription continues on. Last month, I found myself being unable to resist the “Bundt of the Month,” and had to make it. What a wonderful cake! Not all Bundt cakes or company worthy, but this one certainly is. The toffee glaze alone I could eat with a spoon.

Apple Pecan Spice Cake with Toffee Glaze

Ever so slightly adapted from Bake from Scratch


1¾ c. firmly packed dark brown sugar

1 c. canola oil

¾ c. sour cream, room temperature

3 large eggs, room temperature

1 T. vanilla extract

3 c. all-purpose flour

1 t. baking soda

1 t. kosher salt

1 t. ground allspice

1 t. ground cinnamon

¾ t. ground nutmeg

¼ t. ground cloves

2 c. (¼-inch) diced peeled Melissa’s Granny Smith apples (about 2 large apples)

¾ c. roughly chopped toasted pecans

Toffee Glaze (recipe follows)

 Preheat oven to 325°F.

In the bowl of a stand mixer fitted with the paddle attachment, beat brown sugar, oil, sour cream, eggs, and vanilla at medium speed until well combined, 1 to 2 minutes.

In a medium bowl, whisk together flour, baking soda, kosher salt, allspice, cinnamon, nutmeg, and cloves. With mixer on low speed, gradually add flour mixture to sugar mixture, beating just until combined. Fold in apples and pecans. (Batter will be thick and it may seem like you have too many apples, but it will be fine.)

 Spray a 10-cup Nordic Ware Bavaria Bundt Pan with baking spray with flour. Using a pastry brush, spread any excess spray in pan, blotting brush with a paper towel as needed. Using a ¼-cup spring-loaded scoop, transfer batter to prepared pan. Tap pan on counter several times to spread batter into grooves and release any air bubbles. (The pan will be quite full, but the batter will not overflow.)

Bake until a wooden pick inserted near center comes out with a few moist crumbs, 1 hour and 5 minutes to 1 hour and 15 minutes. Let cool in pan for 10 minutes. Using a small offset spatula, gently loosen cake from center of pan. Invert onto a wire rack placed over a rimmed baking sheet, leaving pan on cake; let stand for 10 minutes. Remove pan, and let cool completely.

 Spoon part of Toffee Glaze all over cooled cake. To coat sides, drizzle with additional Toffee Glaze, and spread with back of spoon. Garnish with pecans and sea salt, if desired. Let stand for 15 minutes; transfer cake to a serving plate. Serve with any extra Toffee Glaze.

  Makes 1 (10-cup) Bundt cake

 Toffee Glaze

 1 c. firmly packed dark brown sugar

⅔ c. dark corn syrup

⅓ c. heavy whipping cream

¼ c. unsalted butter, cubed

¼ t. kosher salt

½ t. vanilla extract

In a medium saucepan, bring brown sugar, corn syrup, cream, butter, and salt to a boil over medium-high heat; cook, whisking constantly, for 2 minutes. Remove from heat; whisk in vanilla. Transfer mixture to a medium heatproof bowl. Let cool for 20 minutes. Use immediately.

Thursday, March 3, 2022

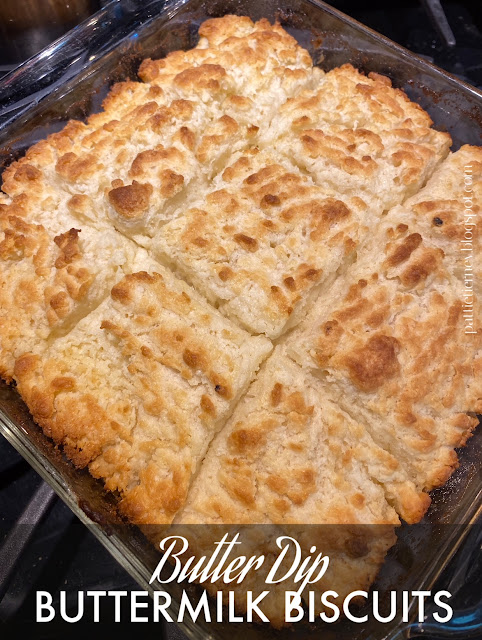
Butter Dip Buttermilk Biscuits

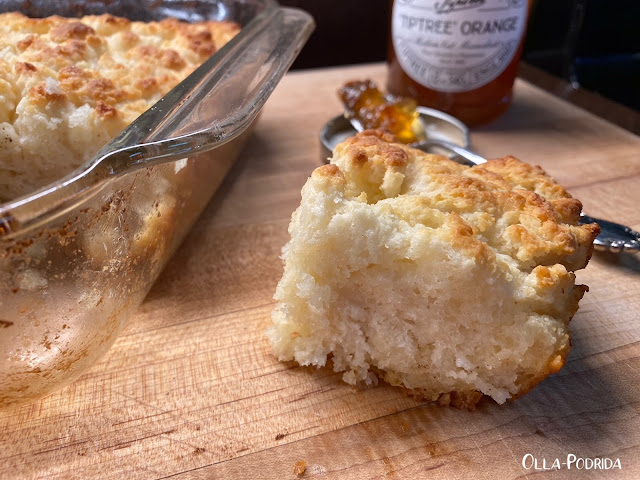
I love biscuits, but I don’t make them all that often. They’re not difficult to make, but there’s something about putting the demo out, cutting each biscuit into a perfect round, and carefully lifting it onto the baking sheet that I find annoying. Quite by chance I came upon this recipe. Imagine, I thought to myself. A biscuit requiring no cutting out whatsoever. immediately, I tried them. Wow! This recipe really knocked me out. Nothing is easier than stirring together a few ingredients, and dumping it into a pan full of melted butter. I dutifully cut the dough into even squares, and slid them into the oven. I don’t know that I have had a better biscuit. Crunchy on the top, chewy on the bottom and sides, and the interior is like a fluffy biscuit cloud. They make phenomenal egg and sausage sandwiches. Make these! I’m not just kidding around here.

Butter Dip Buttermilk Biscuits
Slightly adapted from thecountrycook.net

½ c. (one stick) butter
2½ c. flour
1½ T. granulated sugar
1 T. baking powder
1½ t. salt
1¾ c. of buttermilk

Preheat oven to 450°F.

Place stick of butter into an 8” x 8” microwave-safe baking dish. Microwave for one minute until butter has melted; set aside.

In a medium bowl mix together flour, sugar, baking powder, and salt. Make a well in the center and pour in buttermilk. Stir with a fork until a loose, sticky dough forms. Pour biscuit dough into baking dish, on top of the melted butter. Smooth out the top as well as you can and cut the dough into nine squares using a sharp knife (this will help with cutting later when they are done).

Bake for 20 to 25 minutes, rotating the dish once during baking.

These can be stored on the counter, covered, for up to two days. They will last for a week if stored in the refrigerator. You can freeze them for up to three months.


Tuesday, March 1, 2022

St. Patrick's Day Lunch

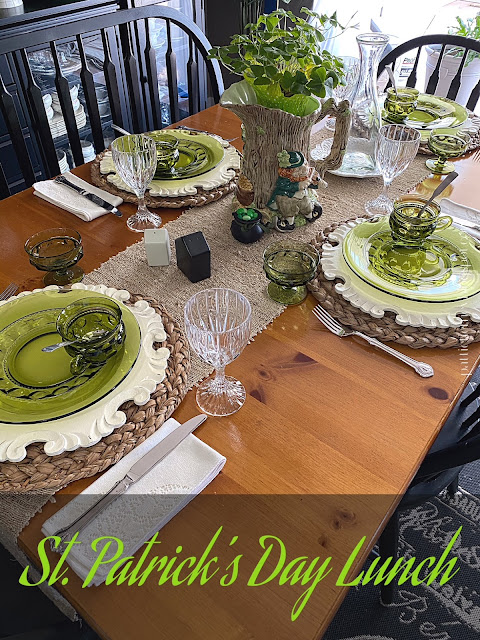
It’s March! Can you believe it? I’m wondering what happened to February, and yet Valentine’s Day seems so long ago. Now that they are both behind us, it is time to think spring and St. Patrick’s Day! Not all inviting dinner tables need to be over the top, some can be beautiful in their simplicity, and such is the case with this table set for a holiday luncheon.

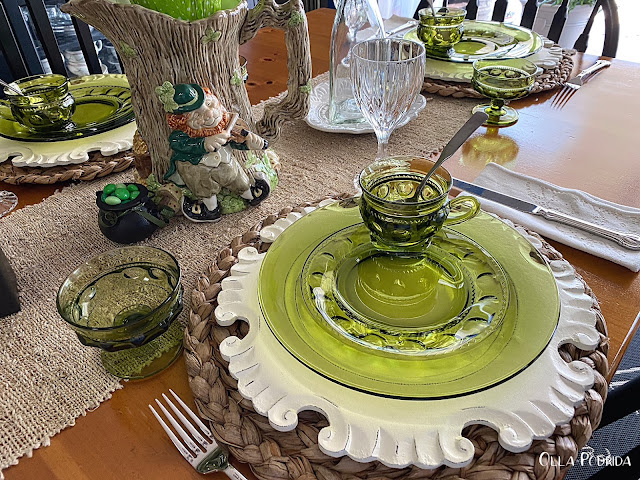
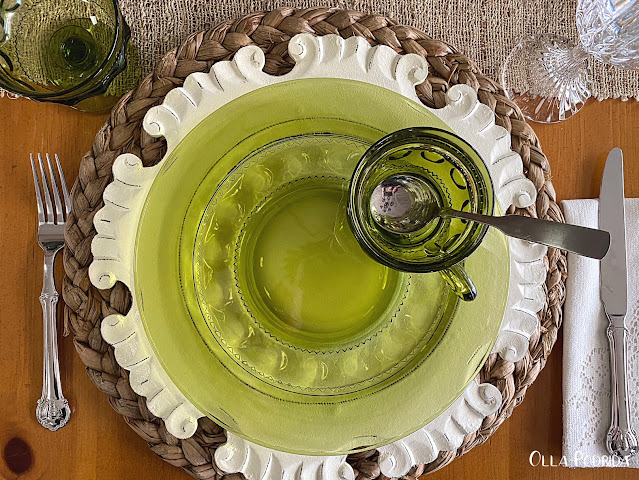
This table is simple, but sweet. It features green luncheon plates with matching soup cups, as well as stemmed fruit bowls, that I inherited from my second mother, Betty, when she passed away a number of years ago. Mother, Betty, and I would get together once a month. I would take the ladies on “field trips” every other month, driving them all around the city to places they wanted to see, but wouldn’t go to on their own. Each outing had to consist of a stop at a bakery. I can’t tell you how many bakeries we visited. It was great fun. Ahead of time I would make up an itinerary, include the menu of the restaurant where we were going to dine, and send it to them in an appropriately decorated envelope.

On alternate months we would dine at each other’s homes; Betty always served us using this set of dinnerware. I can’t tell you how much I miss our get-togethers, but when I’m feeling down, I get out this set of dinnerware and reminisce.

The centerpiece of this table is one I use every year. It is the leprechaun pitcher from Fitz & Floyd, filled with a pot of fresh shamrocks. A small pot of green and white M&Ms – mint flavored – sit at the base representing the pot of gold.

Crystal glasses by Mikasa were gifted to me by a friend. The table runner is from Pottery Barn; the placemats are woven water hyacinth. The white chargers (that I use again and again, and will never regret purchasing) are from Pier 1. The understated cottage salt and pepper shakers are by Magnolia Home.

Keep this simple table in mind when you get ready to set one for yourself, friends, or family. You don’t have to be over-the-top spectacular to be inviting.

  This post is linked to: Tablescape Thursday