Sunday, October 30, 2011

Happy Halloween!

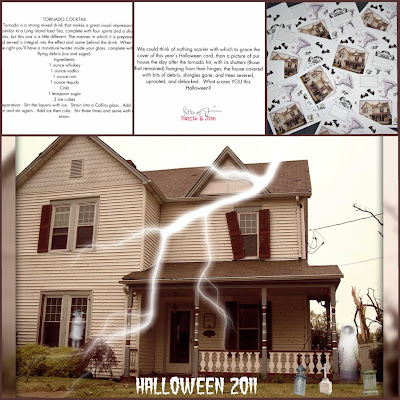
This picture of our house after the tornado (with a few embellishments) served as the perfect cover for our Halloween card this year.
By now you know my penchant for collecting and sharing items with recipes on them, from the Recipe Tea Towels  that you read about earlier this month to the Recipe Postcards that I told you about last month. I also make my own greeting cards and, yes, I always manage to work a recipe into them as well.  So, to wish you a Happy Halloween, I'm sharing the card that I designed for the holiday, interior and exterior, along with the envelope in which it arrived.

Have a frightening day everyone, and enjoy!

This recipe for a Tornado Cocktail appeared on the inside top of the card.
The greeting inside.
The envelopes just before they went into the mail.  If you detected a theme here, you're right!  I also paid homage to the World Champion St. Louis Cardinals, by including the Rally Squirrel circling the large tornado.


Have a Happy Halloween!

This post is linked to:
Metamorphosis Monday-BNOTP
Brag Monday-The Graphics Fairy
Amaze Me Monday-
Dittle Dattle

Thursday, October 27, 2011

Spider Web Brownies


Here's a dilemma for you: You're minding your own business, happily puttering away in the kitchen, experimenting with a couple of new recipes for you and your husband to try for dinner.  You look your absolute WORST  -- and I'm talking unsuitably dressed to take out the trash, and your hair looks like a fright wig -- when a visitor shows up at your back door and stays for dinner.  Yikes!  While the thought of this is actually scarier than the way I looked, it happened last week, and had me a gnat's wing away from a stroke.  Sure, I can always add another potato and bag of frozen vegetables to the pot, but what about dessert?

Thank goodness I keep Ghirardelli Double Chocolate Brownie Mix (the best of the boxed mixes in my opinion) just for situations like this.  I followed the package directions, but poured it into a 9" round pan that I'd planned to invert onto a plate so the flat side would be up.  While this was baking I whipped up some orange confectioners' sugar icing with the idea that I'd pipe it on in concentric circles, drag a toothpick through it, and have a wonderful spider web brownie to serve.  Well, it didn't exactly work out that way.  The icing was too thick, and much to my dismay did not move when I dragged my trusty, never-failed-me-before toothpick through.  Okay.  Do.  Not.  Panic.  I dumped the remainder of the orange icing on top, spread it to the edges with an offset spatula, stuck the whole thing in the fridge to set and melted some 60% cacao bittersweet chocolate chips (also Ghirardelli) in a small mixing bowl sitting a bit cockeyed on a small saucepan over simmering water.  Another trusty icing bottle to the rescue, I filled it with the melted chocolate, made more concentric circles (I was getting dizzy), held my breath and grabbed another toothpick.  This time it worked and I was very pleased with the results.  Not bad for a delicious, seasonal, chocolate-y dessert in a pinch.


 Now to replace that box of brownie mix to divert future disasters.  What are your pantry "must haves"?


This post is linked to:
Friday Potluck
Fun With Food Friday
Foodie Friday
Food on Friday
Friday Favorites
Friday Fat Camp
Fantabulous Friday
I'm Lovin' It Friday

Seasonal Sundays
Sunday's Best

Wednesday, October 26, 2011

A "Poe"-tic Luncheon


One of the great things about having an October birthday is the availability of all sorts of seasonal goodies.  Year after year, I am gifted with some of these goodies, this year's treat came from my parents who gave me two sets of Edgar Allen Poe "Curiosity" plates from Pottery Barn.  Aren't they just perfect for Halloween? (Or, for that matter, any type of literary luncheon, book club meeting, or gathering of a group of fans of the macabre or Edgar Allen Poe.  Oooh, a Vincent Price or horror film festival would be another good usage -- the mind whirls!)  They were barely out of the box before I started inviting people. beginning with this little ladies lunch for three.  Last week I gave you all of the recipes to recreate this on your own.  This week I'm giving you a look at the table.  With just the three of us we employed only one end of the table, but considering I didn't go hog wild I think it worked out just fine.  The haunted house, scary tree, ghosts, and fence have all been gifts from my youngest son over the years, coming from one of my favorite mall shops, Illuminations, now sadly gone from this area.


Runners - Pottery Barn
White dinner plates - Old Time Pottery
Napkins - World Market
Salad plates - Pottery Barn
Cups - Amazon
Glassware - La Rochere
Flatware - Fiestaware
Pumpkin Salt & Pepper - Pier 1
Placemats - Pier 1


This post is linked to:


Tuesday, October 25, 2011

Macaroni and Cheese with Basil Crumb Topping


I make no apologies for loving Macaroni and Cheese; it is comfort food at its finest. Over the years in my quest for the quintessential version, I've come across a number of excellent recipes. Nothing can beat the over-the-top lusciousness of Lobster Mac and Cheese, but that's a special occasion variety and not something in which to indulge with any regularity lest I become spoiled. So, one of my new favorites is a recipe that I stumbled across just last week in Cuisine at Home. Intrigued by the addition of adding chopped fresh basil to the crumb topping, I decided to give it a try. Not only was I pleased, but so were our fellow diners.  So, grab up that basil before the first frost and give this worthy version a try!

Macaroni and Cheese with Basil Crumb Topping
Cuisine at Home

1/2 lb. dry elbow macaroni
3 tablespoons unsalted butter
2 tablespoons all-purpose flour
2 cups whole milk, warmed
1/2 cup chicken broth, warmed
3 oz fontina cheese, shredded
3 oz white Cheddar, shredded
3 oz white American cheese, shredded
2 tablespoons Parmesan, grated
2 teaspoons prepared yellow mustard
1 teaspoon Worcestershire sauce
Salt, pepper, nutmeg, and Tabasco to taste
2 slices soft white bread
10 leaves of fresh basil
1 tablespoon olive oil

Preheat oven to 400; coat 1 quart baking dish with non-stick spray.

Cook macaroni in boiling salted water in saucepan for 1 minute less than directed on the package. Drain and set aside; return pan to medium-low heat.

Melt butter in the pan, then add flour, stirring until pasty. Gradually whisk in milk and broth, increase heat to medium, and bring to a simmer. Cook until slightly thickened, about 4 minutes. Reduce heat to low, stir in cheeses until smooth, then add mustard, Worcestershire, and seasonings. Fold in macaroni and transfer to prepared baking dish.

Process bread, basil, oil, salt, and pepper to taste in a food processor until fine; sprinkle over macaroni. Bake until sauce is bubbly and crumbs are browned, about 15 minutes.

This post is linked to:

Monday, October 24, 2011

Pumpkin Spice Donuts


Ever since making Cinnamon Sugar Donuts with a borrowed donut pan I have been obsessed with having one of my own.  I finally bought one and have a dozen recipes that I want to try.  Considering the season, I thought I'd break it in with a batch of Pumpkin Donuts based upon a recipe that I found at Tasty Kitchen for Pumpkin Mini Muffins.  It stood to reason that if this recipe made great little donut-type mini muffins that it would work just as well for donuts.  It did.  I made these this morning while my husband was showering.  By the time he got to the kitchen, all dressed and spiffy, the coffee was ready and a batch of warm cinnamon and sugar-coated donuts were waiting for him on a plate.  Move over Krispy Kreme, I don't need you any more!  Yes, I still love your pumpkin donuts, but these homemade gems are lighter, BAKED instead of fried, made with all-natural ingredients and are so delicious I'm sure to make them again and again.  And with pumpkin as one of the main ingredients they just HAVE to be good for you...right?

[Baked] Pumpkin Spice Donuts
Makes 12 donuts

For Donuts
1 3/4 cups all-purpose flour
2 teaspoons baking powder
1/2 teaspoon salt
1/2 teaspoons cinnamon
1/2 teaspoons nutmeg
1/2 teaspoon allspice
1/8 teaspoons ground cloves
1/3 cup vegetable oil
1/2 cup brown sugar
1 egg
1 teaspoon vanilla extract
3/4 cup canned plain pumpkin (not pumpkin pie filling)
1/2 cup low-fat milk

For Coating
1 stick of unsalted butter, melted
2/3 cup granulated sugar
2 tablespoons cinnamon

Directions

Preheat oven 350 degrees F. Spray each cup in a 6-cavity donut pan with baking spray.

In a medium bowl, whisk together flour, baking powder, salt and spices (through cloves). In a separate, large bowl whisk together oil, brown sugar, egg, vanilla, pumpkin, and milk until smooth. Add dry ingredients to wet ingredients and mix until just combined -- do not over mix!

Divide batter evenly among sections.  (I filled up a disposable pastry bag and used a large round tip that made this a breeze.) Bake at 350 degrees F for 15-17 minutes or until a toothpick comes out clean.

While the donuts bake, melt butter in one bowl and combine granulated sugar and cinnamon in another Remove donuts from oven and cool for 2 minutes, then invert pan onto a cooling rack. Dip each donut in melted butter, then roll in cinnamon sugar to coat.

Pour yourself a cup of coffee (in a Dracula mug, if you have one) and enjoy!


This post is linked to:


Sunday, October 23, 2011

Hearty Steak Soup in a Bread Bowl


I am convinced that any type of food served in an edible container will always be a winner.  Case in point, anything at all in a chocolate cup, brandied mashed sweet potatoes in orange cups, and any type of soup in a bread bowl.  Am I right?  There is just something about knowing that you can eat both the food and the container that makes it so much fun.  The main dish at the luncheon I served a couple of days ago was a hearty steak soup -- most welcome since the weather took a rather surprising cold turn.  The soup on its own is delicious, but served in a bread bowl where you can scoop up both soup and bread to savor at once is comfort food heaven.

The bowls I picked up at St. Louis Bread Company (Panera to anyone who lives outside of the St. Louis metro area), the soup is my own recipe.  As is the case with any soup, it's really all about using what you have, experimenting with various tastes, and coming up with something that is pleasing to your palate.  So consider this recipe as more of a guideline than God's word.


Hearty Steak Soup

1/2 cup butter
1/2 cup flour
2 pounds ground chuck
1 large onion, diced
60 oz. beef stock*
1 cup diced carrots
4 ounces button mushrooms, quartered
1/2 cup chopped celery
1 cup diced potatoes
1 cup fresh green beans, cut in half
1 15-ounce can diced tomatoes
2 cups frozen corn
1 cup frozen peas
1/2 teaspoon crushed dried thyme
1 teaspoon Worcestershire sauce

Melt butter in large stock pot.  Add flour stirring constantly for 2-3 minutes.  Slowly add stock and continue stirring until the roux is fully incorporated.  Add vegetables.  Cook over medium heat until vegetables are tender.  Meanwhile, in large skillet or saute pan, brown ground chuck and onion.  Drain.  Add to vegetable mixture and simmer until you achieve desired thickness.  If need be, mix up a tablespoon of cornstarch and tablespoon of cold water and stir in.  Season to taste with freshly ground pepper, steak sauce, or your favorite steak seasoning mixture.

 If using a bread bowl to serve this soup, you might want it a bit thinner as a lot of the juice is absorbed by the bowl. 

*canned, homemade, or made from Better than Bouillon Soup Base


This post is linked to:
 On The Menu Monday-StoneGable


Saturday, October 22, 2011

Witch Finger Cookies


As a little side to go with yesterday's Pumpkin Spice Mousse, I made these witch finger cookies.  They are nothing new, I've seen them all over the web and in many variations.  They are, however, tasty and a LOT of fun to both make and eat.  Oh, did I mention easy?  They're that too. 

A tray of Witch Finger Cookies ready for the oven.
Witch Finger Cookies
Makes 30

1/2 cup butter, softened
1/2 cup confectioners' sugar
1 egg, beaten to blend, use half (eyeball it)
1/2 teaspoon almond extract
1/2 teaspoon vanilla extract
1 1/3 cups all-purpose flour
1/2 teaspoon baking powder
1/2 teaspoon salt
1/3 cup whole almonds

Combine the butter, sugar, egg, and extracts in the mixing bowl of a stand mixer. Beat until light and fluffy.  With mixer running on low speed, gradually add flour, baking powder, and salt.  Mix until combined.  Do not over mix!  Remove to a piece of waxed paper, form into a disc, cover and refrigerate for 20 to 30 minutes.

Preheat oven to 325 degrees F. Lightly grease baking sheets, or use parchment or a Silpat. Remove dough from refrigerator and pinch off pieces about the size of a walnut. Use the waxed paper to roll the dough into a thin finger-shaped cookie. Press one almond into one end of each cookie to give the appearance of a long fingernail. Squeeze cookie near the tip and again near the center of each to give the impression of knuckles. Using a toothpick, cut into the dough at the same points to help give a more finger-like appearance. Arrange the shaped cookies on the baking sheets. Bake in the preheated oven until the cookies are slightly golden in color, 20 to 25 minutes.


Variations:

Green food coloring can be added for a more "witch-y" finger
Ends can be dipped into red jam to look like blood
Almonds may be affixed with red decorating gel 


Friday, October 21, 2011

Pumpkin Spice Mousse

I invited my mother and Betty, a long-time family friend, to what we like to call "lunch and knitting"  yesterday.  I'm the only one who knits, they just happily chatter away, occasionally making a stitch or two, stopping periodically to sniff the air and wonder what I'm preparing for lunch.  They are a good, appreciative audience, always enjoying how I've set the table, loving the food, and showering me with so many compliments that, if I were any kind of person, I'd be red with embarrassment, rather than sucking them up greedily.

I'll be sharing all of the recipes with you over the next couple of days, but today it's all about the dessert.  Witch finger cookies brought smiles, curiosity, and conversation.  After all, who could not make a comment about these?  The pumpkin mouse, well, Betty said it best when she said, "I love this so much I could smear it all over my body."

This recipe is from an old (November 1998) issue of Gourmet Magazine.  I find it very easy to make, and think it is wonderful when the gingersnaps are replaced with those little Heath bar bits (equally yummy whether you use the chocolate coasted ones, or not...but go for the chocolate, you know what I've told you about the whole pumpkin-chocolate combination).

Pumpkin Spice Mousse

1 1/2 teaspoons unflavored gelatin (less than 1 envelope)
1 1/2 tablespoons cold water
3 large egg yolks
3/4 cup sugar
1 1/2 cups canned solid-pack pumpkin (slightly less than a 15-ounce can)
3/4 teaspoon ground cinnamon
1/4 teaspoon ground ginger
1/8 teaspoon ground cloves
1 1/2 cups well-chilled heavy cream
1 1/2 teaspoons vanilla18
Gingersnaps


In a medium metal bowl sprinkle gelatin over cold water to soften 1 minute. Whisk in yolks and sugar and set bowl over a saucepan of simmering water. Cook egg mixture, whisking constantly, until an instant-read thermometer inserted 2 inches into mixture registers 160 degrees F. (Tilt bowl to facilitate measuring temperature.) (NOTE:  Be sure to set the mixture over simmering water.  If you try to bring the water to a simmer while whisking the yolks, it will take forever.) Remove bowl from pan and with an electric mixer beat egg mixture until cool and thickened, about 5 minutes (mixture will be very sticky). Beat in pumpkin and spices. Chill pumpkin mixture, covered, until thickened and cool but not set, about 1 hour.

In a bowl with cleaned beaters beat cream with vanilla until it just holds stiff peaks and fold into pumpkin mixture gently but thoroughly. Coarsely crumble 2 gingersnaps into each of 6 Martini glasses (or other 6- to 8-ounce stemmed glasses). Transfer mousse to a large pastry bag fitted with a large plain tip and pipe decoratively over cookies in glasses (or simply spoon mousse into glasses). Chill mousses, uncovered, until firm, about 3 hours, and up to 1 day (loosely cover after 3 hours).

Just before serving, garnish mousses with remaining 6 whole gingersnaps (Or those yummy Heath bar bits.  You'll thank me later.).

Come back tomorrow for the recipe for the Witch Finger Cookies --  Spooky!

Monday, October 17, 2011

Nuts to You Hazelnut Sandies

If you've ever found yourself at either Sam's or Costco, chances are you've seen those very large containers of mixed nuts.  My husband buys these with reckless abandon.  Unfortunately he really doesn't like mixed nuts, what he likes are cashews and pecans.  The other nuts in the mix -- almonds, hazelnuts, and Brazil nuts, he carefully extracts and places in their own, labeled, individual containers.  He then places these containers into the corner cabinet and forgets about them.  When they start stacking up like cord wood and begin to fall onto my head whenever I reach for a set of mixing cups, I know it's time to take action.  

I use almonds frequently for green beans amandine.  I use all almonds and Brazil nuts when I make granola -- delicious!  The hazelnuts, however, tend to get overlooked.  So today with all of the excitement of the Cardinals winning the National League Championship, and the newly adopted Rally Squirrel mascot, I felt a cookie was in order, so created these.  I could tell they were a success when a friend of ours came for dinner and gobbled up half of the plate, and this was before I dipped one side in chocolate.  They are easy to make, the dough rolls out very well (particularly with my new marble rolling pin -- thanks, Carol!), and they won't last long, so don't worry about having too many.  

Oh...GO CARDS!!!

Image from Rally Squirrel T-shirt available at Dierbergs markets.

 Nuts to You Hazelnut Sandies

2 cups flour
3/4 cup butter
1-1/2 cups powdered sugar, plus more for dusting
2 Tablespoons whole milk
2 cups hazelnuts

Preheat oven to 400F. Put the hazelnuts into the work bowl of a food processor and pulse until finely ground.  Check periodically and don't overdo it or you'll end up with hazelnut butter.  Pour the ground hazelnuts onto a foil-lined baking sheet and toast them for 5 to 10 minutes, until they start  to brown. Remove and set aside.

Reduce the heat of the oven to 325F. In a large bowl, whisk together the flour and sugar. Add the butter and cut in using a pastry blender or two knives until the pieces are the size of peas.  Turn mixture into the bowl of a stand mixer.  Add the hazelnuts and mix together on medium speed.  Slowly pour the milk into the bowl and mix only until a dough forms.  DO NOT OVER MIX!  If you do, the cookies will be tough. Roll out the dough on a floured surface to 3/8" thickness and cut the cookies with a 2 or 3-inch round cutter.  The number of cookies you get from this mixture will vary depending upon the size of the cutter and thickness of the dough. Place them on a parchment paper-lined baking sheet and bake for 15-19 minutes until the edges are golden. Dust powdered sugar on the cookies as soon as they come out of the oven, and again while they are still warm.

This post is linked to:
Your Recipe...My Kitchen
Tasty Tuesdays
Tuesdays at the Table
Delicious Dishes
Tasty Tuesday
Tuesday Night Supper Club
Made From Scratch Tuesday
Tempt Your Tummy Tuesday
Real Food Wednesday
Tuesday's Tasty Tidbits
Totally Tasty Tuesdays

Crazy Sweet Tuesdays