Monday, May 30, 2016

Utterly Decadent Toffee Bars


If you saw yesterday's post, then you also saw a delicious looking bar cookie nestled among cocoa nibs. If you did not see the blog post, then you need to click here now. Today I'm going to give you the recipe for the cookie. It is easy to make and, as the name suggests, utterly decadent. My recipe is an adapted version of one from Better Homes and Gardens. Naturally, mine is much better. :-) The addition of the cocoa nibs makes sure of that. They add flavor, crunch, the richness of coffee, and sophistication, without making the cookies cloyingly sweet.
Utterly Decadent Toffee Bars

1 cup butter
3/4 cup packed dark brown sugar
1 extra-large egg yolk
1-1/2 cups all-purpose flour
1/4 teaspoon salt
1 14-ounce can sweetened condensed milk
2 tablespoons unsalted butter
2 teaspoons vanilla
1 12-ounce package semisweet chocolate chips
1 cup almond brickle pieces
2 tablespoons
Melissa’s cocoa nibs
Preheat oven to 375
°F.

Line a 10" x 10" pan* with foil leaving a 2" tail on either end. Spray the foil and all sides of the pan with Pam. Using the foil will allow you to lift the cookies in one slab from the pan allowing for easy and attractive cutting. If you don't want to do this, just spraying the pan on bottom and sides with Pam will work just fine.

Cream together 1 cup butter and brown sugar with an electric mixer. Add egg yolk; beat well. Stir in flour and salt, mixing just to combine. Spread dough into prepared pan and bake 22-25 minutes, or until light brown. Remove from oven to wire rack. Reduce oven heat to 350
°F.

Combine condensed milk and 2 tablespoons butter in a microwave-safe bowl and microwave, in 1-minute intervals, until thick and bubbly, stirring after each minute for a total of 4 minutes. Stir in vanilla. Spread mixture evenly over baked cookie layer. Return pan to oven and bake about 12 minutes, or until top is golden.

Sprinkle warm baked layers with chocolate chips. Return to oven for 1-2 minutes, or until the chocolate is glossy and melted. Spread chocolate evenly over baked layers. Top with an even layer of brickle chips and cocoa nibs. Allow to cool for 30 minutes, then place in the fridge to set chocolate for 30 more minutes. Cut into squares and store, covered, in the fridge.

* You can also use a 9" x 9" pan and bake for a minute or two longer, or a 9" x 13" pan (that was called for in the original recipe), but I find this makes the crust layer way too thin.
This post is linked to:

Sunday, May 29, 2016

Introducing Cocoa Nibs


If I said the words “cocoa nibs” to you, what would it bring to mind? If you’re thinking this was the name of the shy, brown-eyed girl who sat behind you in second period chemistry, the answer would be no. :-) Cocoa nibs are chocolate in its purest form. They are dried and fermented bits of cacao beans, with the deep, dense, almost exotic flavor of chocolate, and the crunch of coffee beans.
Deeply chocolaty, cocoa nibs are not sweet, and this is what makes them so darned versatile. They work equally well in sweet dishes as they do savory.  Toss them into salads for a nutty crunch, sprinkle them atop your morning oatmeal, add them to granola, or stir a spoonful into yogurt. Excellent in desserts (They do amazing things to brownies!), bakers will find them of particular use in topping cookies (as I did here) or added to streusel for extra crunch and a sophisticated taste. You can even snack on them right out of the box. Mix them in with your trail mix and you will have an amazingly healthy snack because they contain magnesium, fiber, iron, and antioxidants. They also act as mood enhancers thanks to phenylethylamine and anandamide.
Give these a try in your cooking, baking, and snacking. You’ll add a depth of flavor you’ll not believe!
 This post is linked to:

Saturday, May 28, 2016

May is National Salad Month


May is National Salad Month, and before it gets away (Can you believe that June is next week?), I wanted to share some of my favorite salads with you. This is a tasty and diverse group. Some are hearty, some are light, all are unique and satisfying, and sure to earn you lots of compliments. To get to the recipe, click on the name of the salad beneath each picture.

Fava Bean and Cherry Tomato Salad

 Pear and Walnut Salad

 Muffaletta Pasta Salad

 Tarragon Chicken Salad with Champagne Grapes

 Baby Greens, Beet, Walnut, and Blue Cheese Salad

 Mexican Cobb Salad

 Waldorf Salad

 Sorrel & Watermelon Salad with Feta


This post is linked to:

Thursday, May 26, 2016

White Russian Sorbet

When the heat is on (and, boy, is it!) it's time to cool things off with a frosty summer cocktail. It's even better when that cocktail is turned into a tasty frozen dessert.

This White Russian Sorbet is a breeze to make. The flavors explode in your mouth, leaving you wanting more...much more. Sorbets are made with just a touch of cream, so you are in for a major brain freeze if you try to eat it too fast, but this is really for the best, because you are going to want to savor every luscious spoonful. Plain old vodka works just as well, but treat yourself to the whipped cream variety. It does amazing things to drinks and desserts!

Slightly adapted from epicurious.com, this adults only dessert looks especially pretty when served in punch cups.
 White Russian Sorbet

1-3/4 cups water
1/2 cup sugar
3-1/2 teaspoons instant espresso powder
1 tablespoon dark corn syrup
1/2 cup whipping cream
3 Tablespoons Whipped Cream vodka
3 Tablespoons Kahlúa

Stir water and sugar in heavy medium sauce pan over medium heat until sugar dissolves. Increase heat and bring to a boil; remove from heat. Add espresso powder and stir to dissolve. Pour into medium bowl. Whisk in corn syrup, whipping cream, vodka, and Kahlúa. Refrigerate mixture until cold, about 2 hours.

Transfer sorbet mixture to ice cream maker; process according to manufacturer's instructions. Transfer sorbet to container; cover, and freeze until firm, about 2 hours, but overnight is best. (Can be made 2 days ahead.)

Freeze 4 coffee cups for 30 minutes. Scoop sorbet into frozen cups. Garnish with coffee beans and serve immediately.

This post is linked to:

Tuesday, May 24, 2016

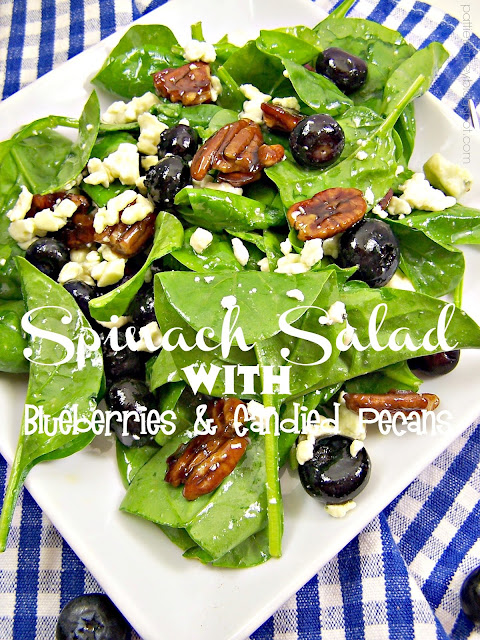
Spinach Salad with Blueberries & Candied Pecans


I'm not sure just what I like the most about this salad, the fresh baby spinach, the sweet, juicy blueberries, the pungent bleu cheese, or the toffee-like crunch of the candied pecans. Whatever it is, this salad is a can't-stop-eating-it winner.

Based upon a recipe I found on Allrecipes.com, my version has a slightly sweeter, more complex dressing that really brings everything together. Easy enough for every day, it is also elegant enough for company. This salad can't miss.

Not a fan of bleu cheese? Substitute an equal amount of feta.

Spinach Salad with Blueberries & Candied Pecans


For Vinaigrette
1 tablespoon raspberry vinegar

2 tablespoons red wine vinegar

½ cup olive oil

2 teaspoons granulated sugar

Pinch of kosher salt


Combine ingredients in a small jar with a tight-fitting lid, and shake it, baby, shake it.

  
For Salad

1 pound fresh baby spinach

1 pint fresh blueberries

4 ounces crumbled bleu cheese

1 recipe candied pecans


Toss salad ingredients together in a large bowl. Drizzle with dressing to taste. Serve immediately.

 This post is linked to:


Monday, May 23, 2016

Candied Pecans


It's going to be heating up this week, so, cold soups, crisp salads, and frosty drinks and desserts will be on the menu. I have a different salad planned for every night this week in honor of National Salad Month. I found this recipe on epicurious.com as a component of another salad, but decided to do my own thing with the salad (that you will see later in the week), and just use the nuts. They were amazing! Not only are they the perfect addition to a salad, but they're also wonderful atop ice cream, bread pudding, on their own, or broken and served on top of oatmeal whether you eat it warm or cold. You must try this simple recipe, and then try to stop eating these nuts.
Candied Pecans

 Nonstick vegetable oil spray
1/4 cup (packed) golden brown sugar
1 tablespoon olive oil
1 tablespoon balsamic vinegar
1 cup pecan halves

Spray sheet of foil with nonstick spray. Stir sugar, oil, and vinegar together to blend in heavy medium skillet. Cook over medium heat until sugar melts and syrup bubbles, about 3 minutes. Mix in pecans. Stir until nuts are toasted and syrup coats nuts evenly, about 7 minutes. Turn nuts out onto prepared foil. Using fork, separate nuts and cool completely (coating will harden).

 This post is linked to:

Friday, May 20, 2016

Green Bean Salad


When I was younger I loved going to school; when school wasn't in session I played school. In college I took classes every semester they were offered -- spring semester, winter semester, intersession, summer semester.  If classes were offered, I took them, and, in the doing, I built up a pot-load of credit hours. So much so, in fact, that I defied categorization and, eventually, they asked me if I would just graduate and leave. It was with great reluctance that I did, and I felt set adrift when it came time to sign up for coursework again. Not daring to show my face on the university campus, I grabbed a course catalog from the local community college, and signed up for a couple of extension classes, one of which was Gourmet Barbecue.

Looking back, I can't imagine what possessed me to take this class. I was the only young, single female in a class of, largely, forty-year-old men and their wives. As you can imagine, I was quite popular with the men, not so much with their wives. All's well that ends well, however, once they realized I was actually there to learn, and not shopping for a husband. I ended up learning quite a lot about grilling, and came away with a vast array of recipes. In addition to learning specialty grill recipes, we were also provided with side dishes suitable for whatever main dish we were working on that week. One of my favorites was this green bean salad. Mother loved it as well because the two of us were absolutely ga-ga over green beans, liking them so much that we would often eat them right from the can.

This recipe, a product of the late seventies, calls for canned green beans, but it is so much better when using fresh, and even more fun when using a variety of interesting beans as I have done here using both yellow and purple (they turn green when you cook them -- kids love to watch these)
wax beans from Melissa’s Produce. Use whatever you like to make this salad colorful and interesting, and in keeping with your family’s tastes. Serve it chilled or at room temperature. It makes a great addition to picnics, barbecues, salad bars, or serves as an excellent side dish.

Green Bean Salad

1 lb. fresh string or wax beans, trimmed, blanched, and cooled
1 pint cherry tomatoes, halved
½ red onion, thinly, and I’m talking THINLY, sliced
1/3 cup shredded Parmesan cheese
Homemade croutons (or store bought, if you must)
Italian Dressing

Toss together beans, tomatoes, onion, and Parmesan cheese, and refrigerate, covered, for an hour, or up to eight hours. When ready to serve, add croutons and dress with your favorite Italian dressing or vinaigrette.  Personally, I use low-fat Italian dressing and love it in this recipe.


 This post contains affiliate links.

Wednesday, May 18, 2016

Heavenly Hash Clusters

Last month I made some Heavenly Hash Fudge for my dad.  Boy was that stuff good. I was craving it again today, but didn’t want the hassle of having to measure and cook and cool and wait! So, I thought that I’d just make a small batch of “Heavenly Hash Clusters.” I’m not going to lie, these are not as good as the fudge, but in a pinch they work for me. 
Heavenly Hash Clusters

1-1/2 cups semi-sweet chocolate chips
1/3 cup pecan halves
2/3 cup miniature marshmallows

Cover a cookie sheet with parchment paper (or a Silpat).

Melt chocolate chips in the microwave at 30-second intervals, stirring after each 30 seconds. When chocolate is melted, stir in pecans, and marshmallows. Drop in globs (for lack of a better word) onto your parchment paper, or Silpat, and allow to harden at room temperature, or in the fridge for about 10 minutes.
This post is linked to:

Tuesday, May 17, 2016

Tropical Chicken Salad (Served in a Coconut Bowl)


It’s the season for spring and summer lunches, featuring fresh and delicious salads. As May is National Salad Month I thought it the perfect time to share this recipe for chicken salad with you, along a fantastic way in which to serve it. This version of a lunchtime favorite has a tropical bent thanks to the inclusion of coconut, macadamias, and fresh pineapple. Anyone can serve it on fresh leaves of lettuce or sandwiched in a flaky croissant, so why not come up with something unique and serve yours in a coconut half? I used coconut hearts from Melissa’s Produce. Because they are shelled and skinned, they are easy to slice in half (saving the delicious coconut water that is inside) and use this as your serving bowl. Who wouldn’t be in awe of a beautiful lunch like this?
Tropical Chicken Salad

¾ - 1 cup mayonnaise
¼ teaspoon curry powder
½ teaspoon salt
¼ teaspoon paprika
¼ cup macadamia nuts, rough chopped
½ cup fresh pineapple, cut into ½-inch dice
½ cup diced celery
2 cups cooked chicken, cubed

In a large bowl whisk together mayonnaise, curry powder, salt, and paprika. Using a rubber spatula, gently fold in nuts, pineapple, coconut, and celery. Gently fold in chicken. Cover and refrigerate for at least one hour or overnight, to allow flavors to meld. Serve on top of lettuce leaves, or in a coconut half.

 This post is linked to:


Monday, May 16, 2016

8 Minute Mushroom Risotto


Pressure cookers scare me. It's not from any experience that I've had with them, good or bad, I've had none, but I well remember the stories from my youth of my grandmother trying to use her stove-top version to make applesauce and having to bring in a ladder in order to wash off the ceiling. Mr. O-P felt the same, having been scarred in his youth by witnessing a similar explosion. So when I was offered one to test from the makers of the Power Pressure Cooker XL, I have to admit to being a bit wary. My fears were not assuaged in reading the accompanying usage manual that suggested this not be used by persons with “reduced physical, sensory, or mental capabilities, or lack of experience and knowledge…” Yikes! I had to seriously question whether or not I fell into any of these categories.
My first use was the seasoning process, easily done with nothing more than water. Thinking back, I shouldn't have used up all of the ice when filling a pitcher with freshly brewed iced tea because, at about the same time I turned the pressure cooker on, new ice dropped from the maker with a crash into the newly emptied bin, and I immediately hit the floor, fearing the worst. Can you say edgy? Mr. O-P was particularly worried that the top might be launched from the unit causing me some sort of disfiguring injury. Suffice it to say that we needed cocktails before putting it to use.

Last night, too tired to cook, but knowing we both needed something, and loathe to serve my usual easy meal of a bowl of Doritos, I decided to make mushroom risotto. To me, this would be the true test of whether this thing had value or not because while I truly love risotto, I truly hate making it, and, when I do, seldom get the hoped for results.
There was a bit of chopping involved -- onion, mushrooms, garlic, fresh basil, but that was it. The beauty of modern pressure cookers is that you can cook, sear, and sauté, right in the unit prior to pressure cooking, and avoid a lot of messy cleanup.

My sautéing accomplished, I stirred in the other ingredients, holding both cream and Parmesan aside for later addition, put the lid on, closed the vent, and waited while the pressure built up and the risotto cooked for 8 minutes. Yes, eight. Minutes. No stirring, no slowly adding stock and waiting for it to evaporate before adding more, just relaxing in front of a not-very-relaxing baseball game while the time counted down.

Once it did, and the pressure was manually released by moi, I opened the lid. Frankly, it didn't look like much. The onions had risen to the top, and I was convinced this was a failure of monstrous proportions, but I dutifully poured in the heavy cream and Parmesan and began to fold everything together. As I did, the most beautiful risotto began to appear, the earthy mushroom aroma delighting my senses. I was stunned. And not only did it look good, but it was delicious. Stunned x 2. To my way of thinking, it is well worth the price and storage space to have one of these for the risotto alone.

It also has a handy "keep warm" feature to which it defaults upon completion of cooking. You'll find this enormously handy when your husband asks for "just a taste" of yours, and ends up polishing off the entire bowl!

It's not often that I get this excited about an appliance, but I am. Giddy, in fact. And now I cannot wait to see what else I can do. Oh, and clean up...did I mention that it is a breeze? Wow. Power Pressure Cooker XL, where have you been all of my life?!


Mushroom Risotto
Recipe courtesy of Power Pressure Cooker XL

2 ounces olive oil
1 yellow onion, diced
2 cloves garlic, minced
2 cups Arborio rice
4 ounces dry sherry
4 cups homemade chicken stock
8 ounces crimini mushrooms, sliced
4 ounces heavy cream
2 tablespoons grated Parmesan cheese
1 ounce fresh basil, chiffonade

Place the inner pot into the pressure cooker. Push the Rice/Risotto button; adjust time to 8 minutes.

As the pressure cooker heats, place the oil in the pressure cooker to warm, and sweat the onions and garlic together for 2 minutes. Add the mushrooms, stir, and cook an additional 3 minutes.

Add the rice, sherry, and chicken stock; mix to evenly distribute mushrooms.

Place the lid on the cooker, locking it in place, and switch the pressure value to the "closed" position.

Once the timer reaches "0," the cooker will automatically switch to "Keep Warm." Switch the pressure valve to "Rapid Release." When the steam is completely released, remove the lid.


Stir the heavy cream into the rice mixture, and fold in the Parmesan cheese and basil.  Serve.

If you’d like to own your own personal Power Pressure Cooker XL (and you know you want one), you can order one online by clicking here.
Disclaimer: 
I received a Power Pressure Cooker XL free of charge in exchange for an honest review.

This post is linked to:


Thursday, May 12, 2016

Chicken Curry with Red Peppers and Coconut Milk


If you haven't heard of Ricardo, you're probably not Canadian. I'm not Canadian either, but he was brought to my attention by someone who is, and I am so glad that she did. He is Canada's version of Martha Stewart in male form. He has a lovely website, and an even lovelier magazine, far better, I think, than Martha's, and if not for the $90 per year subscription rate for a foreign subscription (sigh), I'd order it in a heartbeat.

I do get my Ricardo fix by way of his website, however, which is where I found this
easy recipe. I loved the 10 minute prep time and 15 minute cooking time. How perfect is that for a busy evening? Ricardo’s original recipe is below and serves 4, but I halved it to serve just us two. We both enjoyed it, but having now made it once, next time I make it I will halve all ingredients EXCEPT the spices because I like my chicken spicy, and will cut both meat and vegetables into strips rather than squares for easier consumption and aesthetic purposes. Otherwise, we both thought this was tasty and great weeknight fare.
Chicken Curry with Red Peppers and Coconut Milk

1 large onion, cut into 10 wedges
1 red bell pepper, cored and cut into squares
2 tablespoons olive oil
1 1/2 lb. skinless, boneless chicken breast, cut into cubes
2 cloves garlic, finely chopped
2 teaspoons chili powder
2 teaspoons curry powder
1/2 teaspoon ground turmeric
1 14-ounce can coconut milk
1 tablespoon honey
Salt and pepper

In a large skillet over high heat, saute the onion and bell pepper in the oil until soft and gold-colored. Add the chicken, garlic and spices. Saute for about 2 minutes. Season with salt and pepper.

Add the coconut milk and honey. Bring to a boil, reduce the heat and simmer gently until the chicken is cooked through, about 8 minutes. Adjust the seasoning.

Serve with basmati rice.
This post is linked to: