Thursday, August 29, 2024

No-Bake Dulce de Leche Cheesecake


Ever since making that  No-Bake Lemon Cheesecake, I have become a bit obsessed. As I mentioned when I made that one, I had never made nor eaten a no-bake cheesecake so I didn’t know what to expect. I was very pleased with that one, consequently, I became interested in trying a lot more. My friend, Alycia, mentioned that she would love to have a recipe for a no-bake Dulce de Leche cheesecake, so I decided that was going to be my next experiment.

This took some equipment, I’m not gonna lie. I used my food processor to make the graham cracker crust, my KitchenAid to make the cheesecake base, and another mixer and bowl to whip the cream. Still, it isn’t difficult, and after one taste, you’ll know that the effort was well worth it. This cheesecake is less dense than the lemon cheesecake, so it’s softer and creamier. If you want yours, a little stiffer, for lack of a better word, you can stick it in the freezer for about a half an hour.No-Bake Dulce de Leche Cheesecake

 Crust:

2¼ c. graham cracker crumbs

2 t. sugar

6 T. butter, melted

 Filling

4 t. cold water

1 t. unflavored gelatin

1 13.4-oz. can dulce de leche*

1 8-oz. pkg. cream cheese

2 t. vanilla extract

1 t. caramel flavoring

1 c. heavy cream, whipped

Heath English Toffee Bits, to garnish

 In a medium bowl combine the crust. Press the mixture into the bottom and up the sides of an 9” springform pan. Set in the fridge to chill.

Place cold water in a small bowl (like a ramekin or custard cup) sprinkle gelatin over top.  Allow to stand for 5 minutes. Once gelatin is set, place the bowl in the microwave and heat until gelatin turns to liquid, about 10 seconds. Mix filling ingredients — dulce de leche, cream cheese, vanilla extract, caramel flavoring— at medium speed  until smooth. Turn the mixer to high and slowly add the melted gelatin. Continue beating cream until welcome combined.

 In a separate bowl, using a mixture with a whisk attachment, beet cream until stiff peaks form. Mix whipped cream into filling ingredients. Spread mixture over crust.

 Refrigerate the cheesecake overnight. (If you’re in a hurry, you can also freeze the pie for one to two hours).

 Top with Heath English Toffee Bits, if desired. Cut and serve.

 (I stabilized an additional cup of whipped cream in order to pipe rosettes around the top.)

 *You can easily make your own.

As an Amazon Associate I earn from qualifying purchases.

Tuesday, August 27, 2024

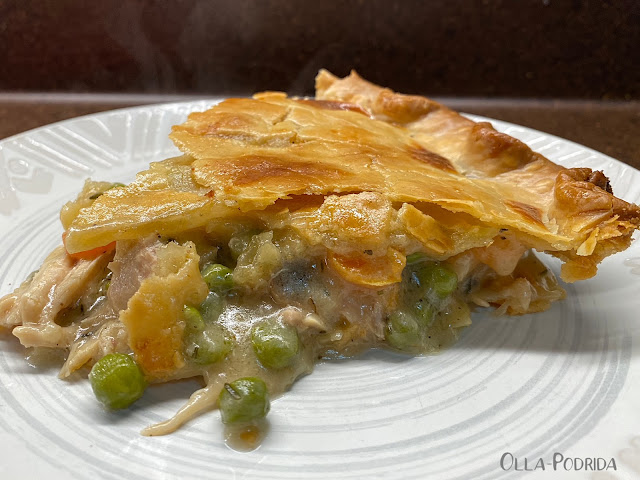
Chicken Pot Pie

 
I haven’t made chicken pot pie since before my husband passed away, and that was eight years in June. I used to make individual pot pies in medium sized ramekins with no bottom crust, and just a puff pastry topping. It was very similar to the cock-a-leekie pies that we used to get when we were in Scotland. Today I decided that I wanted a genuine potpie with two crusts. I also wanted it loaded with chicken and full of vegetables. To make things easier on myself, I did all of the cutting of vegetables and cubing of chicken the day before, so this went together very quickly. I am now 100% sold on the two crust pot pie, this was magnificent! It is a perfect comfort food. Everyone is going to love it.
Chicken Pot Pie

1/3 c. butter

1 c. sliced carrots

1 c. chopped celery

1 c. sliced mushrooms

½ c. diced yellow onion

1 t. minced garlic

1/3 c. flour

1 t. Montréal Chicken Seasoning

¼ t. kosher salt

½ t. freshly ground black pepper

1 t. dried thyme leaves

1¾ c. homemade chicken stock

1/3 c. whole milk

1/3 c. heavy cream

3 c. cubed cooked chicken

1 c. frozen peas

2 crust pie crust*

 Egg wash: 1 large egg beaten with 1 T. milk

 Melt butter in a 12” skillet over medium heat. Add vegetables (carrots, celery, mushrooms, and onion) and sauté, stirring occasionally, until onions become transparent and butter starts to lightly brown, 10-12 minutes. Stir in garlic.

 Using a wooden spoon stir in flour, chicken seasoning, salt, black pepper, and thyme. When flour has become well incorporated with the vegetables, stir in chicken broth, milk, and cream. Simmer over medium heat for 2-3 minutes and then stir in chicken. Simmer 10 minutes longer until very thick.  Stir in peas. Remove from heat and set aside.

 Preheat oven to 425°F.

 Carefully place one pie crust into a 9-inch deep-dish pie plate. Spoon the chicken and vegetable mixture into the crust. Cover the pie with the second crust and crimp the piecrust with a fork or your fingers to seal the edges. With a small sharp knife, slice a few small slits in the top crust to allow steam to escape.

Using a pastry brush, brush crust and edges with egg wash. Bake for 32–38 minutes or until the top of the crust is golden brown. If edges of crust start getting too brown, cover with a piece of foil or a pie crust shield.

 Remove from oven and cool for at least 10 minutes before serving.

 If there are leftovers, they reheat beautifully.

 * You can make your own if you feel so inclined, I never do.

 As an Amazon Associate I earn from qualifying purchases.

Monday, August 26, 2024

S’mores Clusters


S’mores were one of my favorite things as a kid. All I have to do is think of them, and I can hear a crackling fire, smell the wood smoke, and taste the singed marshmallows. I was thinking about them the other day, and wondering if I couldn’t treat them in a different type of way, making them easier and less messy, without compromising the taste. These simple clusters did the trick. There’s nothing to putting them together, the kids will certainly enjoy helping, and you can have that wonderful taste of summer at any time of the year.S’mores Clusters

1½ c. semisweet chocolate chips
½ c. white chocolate chips
½ c. broken graham crackers
2/3 c. miniature marshmallows*

Cover a cookie sheet with
parchment paper (or a Silpat). 

Place both kinds of chips into a microwave safe bowl, and microwave in intervals, stirring after each 30 seconds. I found it took me one minute and 30 seconds to melt them into smooth chocolate.

When chocolate has melted, stir in graham crackers and marshmallows.  Drop onto your parchment paper, and allow a couple of hours to firm. If you’re in a rush, you can place them in the refrigerator for about 20 minutes.  

 * If you’re feeling ambitious, you can spread the marshmallows out onto a foil-lined cookie sheet, and singe them with a kitchen torch in the same way in which you would caramelize sugar on top of crème brûlée. This would make them more authentic, but it’s also more work.

 As an Amazon Associate I earn from qualifying purchases.

Friday, August 23, 2024

Bacon Tomato Bites

 
This is a recipe of my late mother’s. She made these as far back as I can remember. They were always a huge hit, with everyone asking for the recipe. Everyone, that is, except me because I always thought they looked way too fiddly for my man hands. I got to thinking about these the other day when I was thinking about my mother because I still associate the two, and I thought I would give it a whirl. I used Melissa’s baby heirloom tomatoes because they are larger than cherry tomatoes, and the perfect size to use with the small end of a melon baller, making the cleaning out much less difficult than I anticipated.
 
The filling can be made ahead and refrigerated for stuffing tomatoes within a day or two. The tomatoes can be stuffed and stored in the refrigerator overnight; you decide which you prefer. They work equally well at a brunch as they do at luncheon, picnic, or dinner. I guarantee all who consume these are going to ask for the recipe. As an aside, these little rascals do tend to roll, so serving them in an olive dish just may not be a bad idea.
Bacon Tomato Bites

24 Melissa’s baby heirloom tomatoes
1 lb. bacon, cooked and crumbled
½ c. finely chopped scallions
2 T. grated Parmesan cheese
½ c.
Duke’s mayonnaise
Freshly ground black pepper

Remove stems from tomatoes and, using a sharp knife, cut a thin portion of the top off. Carefully hollow out tomatoes using a small spoon, grapefruit spoon, or the small end of a melon baller, as I did,
leaving a 1/8-inch thick shell. Invert the tomatoes onto a paper towel-lined plate, and allow to drain while you make the filling.

 In a medium bowl combine bacon, scallions, cheese, and mayonnaise; stir until well blended. Fill tomatoes with bacon mixture, top with freshly ground black pepper, and refrigerate for a number of hours before serving.

As an Amazon Associate I earn from qualifying purchases.

Thursday, August 22, 2024

“The Restaurant” (VÃ¥r tid är nu), a Review

 
I always enjoy reading blogs where the writer discusses his or her current interests, be it what they’re reading, watching, or doing/have done during the past week. Despite the fact that I enjoy when others do it, I seldom do it myself. I wanted to rectify that by telling you about my current obsession, and given the chance, it will become yours as well. 

The aforementioned obsession, and I have to call it that, is a Swedish television series, VÃ¥r tid är nu, that translates to “Our Time is Now, known to American audiences as simply The Restaurant.”

This show has none of the elements that would generally attract me. It is Swedish, and I am a big fan of Scandi Noir, but it doesn’t fall into that category. It takes place post World War II, in fact, just as the war is ending, and that is not a timeframe that I, for some reason, seldom find engaging. It’s not a gritty crime show, and there are no mysteries or murders to be solved. But it was highly recommended by so many people that I thought I owed to myself to have a look.

It is as addicting as was “Downton Abbey.” Once I started watching, I absolutely could not stop. It got to be a bit embarrassing to be honest. I kept making excuses to sit down with a cup of coffee, tea, a sandwich, what have you, so that I could watch another episode. Finally, I told myself that I had to earn episodes by getting chores done around the house, otherwise I would’ve been happy to binge watch all four seasons nonstop.

It begins in May, 1945, as peace is proclaimed in Europe. The story centers around the Löwander family, headed by stern matriarch, Helga, who runs their old fashioned restaurant in Stockholm with her two always warring sons, Gustaf and Peter, and their perpetually romantic rebel sister, Nina. The plots and subplots are fascinating, the characters varied and well developed, the acting is stellar, and it is quite intriguing to watch history unfold from postwar 1945 all the way to the civil rights movement. Like many Scandinavian productions, it can be a bit dark, but I was so drawn in that I found myself on edge worrying about the characters.

I highly recommend this series. It’s available for viewing on Acorn TV, AMC+, and Sundance Now. Get your chores done ahead of time, because once you start watching, you are not going to want to stop.

P.S. Yes, there are subtitles. I find that, after a while, I don’t even realize that I’m reading them. The plus in needing to read subtitles is that you can never take your eyes off of the screen. When I’m watching an English speaking production, I will often find my attention divided between it and other things, so I don’t capture every essence of the story. That can’t be the case when you’re reading.

 As an Amazon Associate I earn from qualifying purchases.

Tuesday, August 20, 2024

Oven Baked Ribs with Onions and Lemon

 
Not too long ago, I got it into my head that I wanted to have ribs for dinner. I didn’t want to grill them outside because I knew that was a rather lengthy, hands-on process, and the weather was hot. I also didn’t want to make them the way my mother used to because hers, while tender and tasty, looked more anemic than I generally like. So, I consulted my good friend Alycia from Tablescapes at Table 21 and she told me how she did hers. It is a simple process, you can season them up the way you like, and spend your day on other chores while they bake away in the oven. Having done this successfully on numerous occasions, yet still waxing nostalgic for my mother’s ribs, I decided to mix things up and combine Alycia’s technique with my mother’s recipe, and I think this is the best yet.Oven Baked Ribs

 2 to 2 ½ pounds baby back pork ribs

Salt and black pepper

Rib rub

1 lemon, thinly sliced

1 Melissa’s sweet onion, thinly sliced

1 12-18-oz. bottle your favorite Barbecue Sauce

 Preheat oven to 350° F. Line a 9” x 13” pan with heavy duty foil, allowing significant overhang in order to fold over the ribs. Scatter lemon and onion slices along the bottom of the pan, reserving a few for the top. If it hasn’t been done, remove the thin membrane from the back of the ribs.

 Rub the ribs thoroughly, front and back, with the rib rub, and gently lay on top of the slices of lemon and onion. Pour entire contents of bottle of barbecue sauce over the ribs to coat, and scatter reserved lemon and onion slices over the top.

 Loosely close the foil around the ribs, slide into the oven for to bake for 3 hours. After about two hours in, baste with sauce. At the 2½-hour point, open the foil to allow the sauce to caramelize a bit. At the end of three hours, remove from oven, place ribs onto a serving platter and serve.

As an Amazon Associate I earn from qualifying purchases.

Monday, August 19, 2024

Portobello Mushroom Parmesan


The late Mr. O-P was quite the accomplished chef. He had a number of specialties — a couple of salmon dishes, his lasagna (that, I am not kidding, took him three days to make), and eggplant Parmesan. I can eat a lot of things, but eggplant is something I simply cannot abide. To me, it tastes like dirt. Not that I know what dirt tastes like, you understand, but eggplant tastes like what I imagine dirt would. Many of our friends would often request his eggplant Parmesan, and I went along with it, just surreptitiously scooting the eggplant out from beneath the “Parmesan” and devouring that like a fiend.

I recently spotted a recipe for Portobello Parmesan that really blew my skirt up, because, as you all know, I love portobello mushrooms.* This one I found on Instagram and is by Daniel Mancini. I have made my changes to this adding Italian seasoning, Italian breadcrumbs, and I think it’s excellent. I had it for breakfast this morning, and thought it was really good. It is also super simple to put together, so it would make an excellent lunch, or last minute meal on a day when you’re particularly busy.

Portobello Mushroom Parmesan

1
Melissa’s portobello mushroom
Extra-virgin olive oil
Fine salt
Freshly ground black pepper
¼ t.
Melissa’s minced garlic
Your favorite marinara sauce (I used Rao), warmed
Sprinkle of
Italian seasoning
Italian breadcrumbs
Hand shredded mozzarella cheese

 Preheat oven to 350° F.

Wash the portobello mushroom (or mushrooms, depending upon how many you’re going to use) remove the stem, and clean out all of the gills. Pat dry, and place open end down on a baking sheet lined with
parchment paper or a Silpat. Drizzle olive oil over the top, and sprinkle with salt, pepper, and minced garlic, spreading it around to coat.

 Place into preheated oven and bake for 15 minutes. Remove from oven, invert, and fill the crevice(s) with marinara sauce, a sprinkling of Italian seasoning, a sprinkling of Italian breadcrumbs, and then mound mozzarella cheese over the top. At this point, I gave it yet another sprinkle of Italian breadcrumbs. Return to the oven and bake for an additional 15 minutes is hot and bubbly.

​*Portobello Mushroom Broth

Portobello Mushroom Soup

Portobello Onion Dip

Portobello Mushroom Sauce with Thyme


As an Amazon Associate I earn from qualifying purchases.

Friday, August 16, 2024

What have I done???


Photo: Stone Trends, LLC

 If you’ve seen a drawing like this, then you know what’s going on at my house. After 12 years of living here with an existing laminate/Formica/whatever the heck it is countertop that, over the years, has begun to look horrible, I am getting a new one. Cambria. This is no easy task. First of all, I have an open floor plant. I love my open floor plan, but what this means is that all of the colors need to coordinate in the three rooms, otherwise it’s going to be like a dissonant chord.  Second, it’s really impossible to know, despite your research, if you’re really going to like what’s on your countertop once it’s in place, and these things aren’t cheap.

Photo: Amazon

I chose this Houzer stainless steel undermount workstation sink with dual platform kitchen accessories.

Photo: Amazon
  

I chose this Kraus stainless steel faucet because, crime show lover that I am, it reminded me of those I’ve seen in pathology labs. Heh heh.

I wanted a dark countertop. I like things that are moody, evocative, and exotic. My style in the three rooms is a sort of global bohemian in neutral shades.  You do not, by the way, have to have nothing but bold colors in order to be bohemian. That’s a misnomer. So when I went to look for countertops, I was surprised at how few of them are dark. I had only found four different patterns that were dark, however, a number of them were way too dark, one ended up looking almost solid black, the other was dark black with white feathery streaks in it, and the other was just mottled black, none of them would do. Then I happened upon this one.

Photo: Stone Trends, LLC

Now in the sample, it looks to be exactly what I wanted. It’s described as:

"Earthy hues of rich browns, warm tans, and deep blacks create a canvas of captivating contrasts. A grand statement is made complete with hints of white and a veil of gold glimmer adding to the sophisticated charm."

So, this is what I ordered. Oh, the power of words! However, in rummaging around on the Internet (like you do), I came across the Cambria website and saw this pattern on a full countertop and it definitely gave me pause.

Photo: Cambria USA

Oh, dear. This is bold, isn’t it? Welp, I’ve done it now. Money has been spent, measurements have been taken, and in eight working days, that’s going to be in my kitchen. Part of me is very excited; the other part of me is scared to death.  I have a milestone birthday coming up this year, so I decided to treat myself to this countertop in celebration. I’ll show you before and after pictures once the deed is done, and you can decide whether I made the right decision or not.

  To give you an idea as to what I’m working with here, here is a picture of my kitchen before my builder, Joe, had an opportunity to work his magic on it.

Photo Joe Rogers

Here is an updated version after Joe had made a few changes.


Photo Joe Rogers

What do you think? Big mistake? Perfect choice? Or, suck it up, girl, and learn to live with it?

As an Amazon Associate I earn from qualifying purchases.

Thursday, August 15, 2024

Magical M&M Cookie Bars

 
If you made my [made with limes] Brazilian lemonade, then you found yourself with leftover sweetened condensed milk that you’re probably wondering what to do with. Well, I’ll tell you, you can do the same thing with a partial can of sweetened condensed milk that you can with a full one, in this case, make layered cookie bars.

I have been in a bit of a mood. There are a LOT of reasons for this mood, none of which I will go into here. Suffice to say that EVERYTHING was annoying me, the least of which was my “pummeling pantry” that, every time I opened the door, would hit me with one thing or another.  After four or five times, this becomes annoying. I decided that I was going to take all of those weird things that kept falling out of the pantry, put them together and make cookies out of them.

Months ago I had an intense craving for peanut M&Ms and bought a package that lasted longer than the craving. Every time I opened that pantry door, they either fell on my head, landed by my feet, or mocked me. I decided to get back at them by smashing them to bits with a meat mallet, providing me with one of the layers in these cookies. The next layer was about a half a cup of cocktail peanuts leftover from when I made the Salted Peanut Crisps, lastly was about a cup of chocolate chips that I had wrapped up and rubber banded together in a bag. All of those went together quite well, and I’m very pleased with the results. What I particularly like here is the crunch that you get from the M&M shells. Make these cookies with the kids. They will love smashing the M&Ms, be delighted with the colorful outcome, and no doubt happy with the taste. If you don’t have these particular ingredients, come up with your own. Essentially, you need a graham cracker crust, 3 cups of various chips, nuts, or other bits, and a full can (or not so full can) of sweetened condensed milk. Make yourself some magic.  Magical M&M Cookie Bars

2 c. graham cracker crumbs, more or less
1 stick butter, more or less, melted
1 c. crushed
peanut M&Ms*
1 c. cocktail peanuts
1 c. chocolate chips
1 14-oz., or thereabouts, can sweetened condensed milk

Preheat oven to 350°F. For easy removal of your cookie bars, line a
9” x 9” square baking dish with heavy duty foil making sure to have 2 inches sticking out of either side to facilitate lifting once the cookie bars have cooled. Spray foil and pan with PAM.

Stir together graham cracker crumbs and butter, and press into the bottom of a 9” x 9” pan. Scatter the M&Ms, peanuts, and chocolate chips over the top, then pour sweetened condensed milk overall to cover, or almost cover. Bake for 30-35 minutes until the edges are bubbly. Cool in the pan for about 20 minutes before running a knife around the edge and utilizing the foil to lift it out of the pan to a cutting board where you can then slice it into squares.

 *I put them in a plastic bag and used a meat mallet.

As an Amazon Associate I earn from qualifying purchases.