Showing posts with label hors d'oeuvre. Show all posts

Tuesday, January 9, 2024

Cream Cheese Wrapped Olives

This week I am continuing with my olive love fest with this wonderful appetizer that can be changed up in a variety of ways, made ahead, and is as deliciously appropriate at elegant occasions as it is at more casual ones.

Any variety of stuffed olive can be used. I used
jalapeño-stuffed olives for this batch, but feel free to use pimento-stuffed, garlic-stuffed, or blue cheese-stuffed; they all work, and each one has its own subtle difference. The olive juice in this recipe can be cut in half, the other half replaced with gin for a dirty martini variety. The ingredients are simple and few, and most likely things that you already have on hand, making this perfect for last-minute plans.

Cream Cheese Wrapped Olives

 1 jar queen green stuffed olives

8 oz. cream cheese, room temperature

½ t. garlic salt

¼ t. freshly ground black pepper

1 T. freshly grated Parmesan

2 T. olive juice, or brine from the jar*

½ c. walnuts, crushed

 Place olives, hole side down, on a plate lined with a double layer of papers towels to drain.

 In a medium bowl place cream cheese, garlic salt, black pepper, Parmesan, and olive juice or brine. Beat with an electric mixer until smooth. Chill until firm, about 30 minutes.

 Once mixture has chilled, give the olives a bit of a pat down with a paper towel, and wrap in the cream cheese mixture (it will be a bit sticky) by pressing it around the olive until it is completely covered. Roll in crushed walnuts.

Skewer each with a toothpick, place into your favorite olive server, and return to the fridge, lightly covered, until ready to serve.

 Great for charcuterie!

As an Amazon Associate I earn from qualifying purchases.


Monday, November 28, 2022

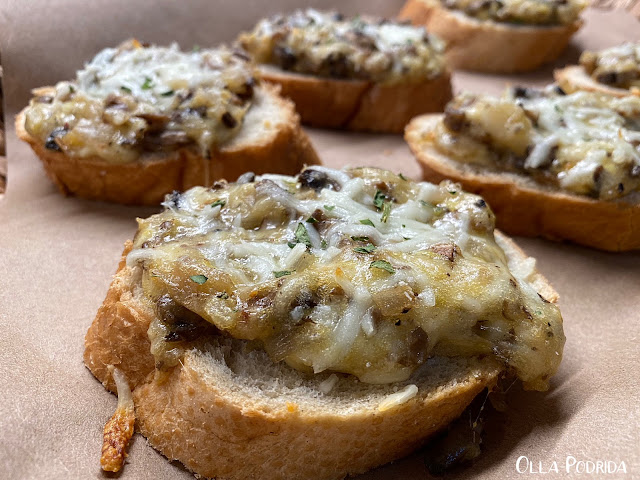
Cheesy Mushroom Toasts


It’s the “party food” time of the year! I love making it, and I love eating it. You are going to love this fabulous mushroom topping; it is excellent on slices of baguette, as I have done here. You can cut big slices out of your baguette by cutting on the diagonal, or small rounds by cutting it straight across. This works well as a main dish for lunch, an appetizer before dinner, or a wonderful side for soups and salads. It’s also excellent on top of a pizza crust, and baked until bubbly. This is a “must make” for the holiday season!

Cheesy Mushroom Toasts

 1½ T. unsalted butter

1 large Melissa’s shallot, chopped

1 c. mushrooms, chopped

½ c. mozzarella cheese shredded, plus extra for the top

¼ c. Parmesan cheese, shredded

1 large egg, beaten

1/8 t. oregano

¼ t. Montreal Steak Seasoning

¼ t. kosher salt

¼ t. freshly ground black pepper

1 baguette, sliced on ¾” diagonals

Parsley, chopped, for garnish

 Preheat oven to 350°F. Line rimmed baking sheet with silicone baking mat or parchment paper.

 Slice baguette into ¾ inch slices; set aside.

 In a large skillet melt butter. Add mushrooms and shallot, cooking until mushrooms have released their juices and shallots are transparent.

 Add oregano, salt, and pepper to the skillet; stir to combine. Add mozzarella cheese, Parmesan cheese, and egg; stir to combine. Remove the skillet from the heat.

 Place baguette slices on baking sheet, topping each with mushroom mixture. Add a pinch of shredded mozzarella cheese on top of each. Drizzle with olive oil if desired.

 Bake for 12-15 minutes until the cheese is melted and mushroom mixture heated through. Garnish with chopped parsley. This recipe can easily be doubled.

 As an Amazon Associate I earn from qualifying purchases.


Wednesday, January 13, 2021

Fannie Flagg’s Cheese Ball

This post contains affiliate links.


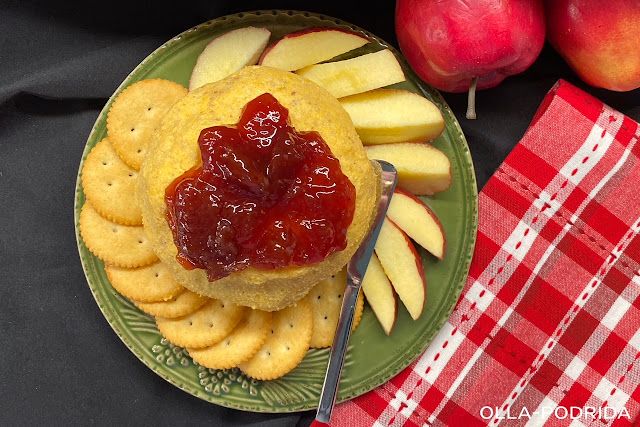
Years ago, when life was simpler and Facebook was fun, I followed Fannie Flagg. She is one of my favorite authors, and I always wanted to make sure I was well aware as to when her latest book was going to be released. I also enjoyed reading her witty comments and observations on life. Back in 2014 she posted a recipe for a cheese ball. As with everything she does, this cheese ball was unique. All my life a cheese ball has been covered in chopped pecans; leave it to Fannie to do things differently, and blend those pecans into the mix. I wasn’t quite sure how I was going to feel about this cheese ball once made, but I absolutely love it! The strawberry preserves topping just adds to the goodness.

In her own words, “The all-American cheese ball is great for the holidays, or to keep around in case of unexpected guests, or just for informal bowling on the lawn.” I’m not much of a lawn bowler myself; I will just tell you that it is wonderful with crackers, crudités, or crisp slices of apple. If you love cheese balls as much as I do, give this one a try.


Fannie Flagg’s Cheese Ball

4 c. shredded sharp cheddar cheese
¾ c. mayonnaise
1 small onion, peeled and grated*
1 c. chopped pecans
¼ t.
red pepper
Strawberry preserves

Combine cheese, mayo, and onion in a food processor until blended. Stir in pecans and red pepper. Shape into a mound on a serving plate, then cover and refrigerate for two hours. Spread preserves on top before serving with crackers.

*I used a shallot from Melissa’s Produce instead. I like the milder flavor.


Monday, October 19, 2020

Zucchini Caviar

Cookbook author, chef and owner at Barbuto in Manhattan, 2016 James Beard Award winner, and former participant in TV’s Top Chef Masters, Jonathan Waxman has a new book out, The Barbuto Cookbook: California-Italian Cooking from a Jonathan Waxman’s Beloved West Village Restaurant. While paging through this newly released (from Abrams Books) tome the other day, a recipe jumped out at me. The recipe paired two unlikely words, “zucchini” and “caviar.” Naturally, I was intrigued. Not just because of the interesting combination of words, but also because I had a refrigerator full of zucchini. I also happen to be a person who doesn’t like breakfast food at breakfast (I far prefer it at dinner, and enjoy cereal as a snack), so I’m continually looking for new, savory dishes to enjoy as my morning meal. A wonderful way to start the day, a delicious vegetarian lunch, or a great snack or appetizer, this is a winner!  While the recipe indicates it be served at room temperature, as shown in the photographs here, I tried it the second day, warm, after running it under the broiler, and I think that took it over the top! 


Zucchini Caviar


4 very fresh zucchini, 4"-6" long
Sea salt
4 T. olive oil, divided
1 small baguette*
2 cloves garlic, one thinly sliced and one cut in half
2 teaspoons capers
1/4 cup diced green olives
2 tablespoons minced fresh basil
2 tablespoons grated Parmesan

Slice zucchini lengthwise, 1/2-inch thick. Season with sea salt and top with 1 tablespoon of the olive oil. In a cast-iron skillet over medium-high heat, sear the zucchini on both sides. Remove and let cool, then very finely dice.

In the pan, heat 1 tablespoon oil over medium heat, add the shallots, sliced garlic, capers, and olives, and sauté briefly. Remove from the heat and let cool.

Preheat oven to 350° F. Slice the baguette lengthwise. Bake until golden, about six minutes, and let cool.

Rub the cut sides of the baguette with the halves of garlic, then slather 1 tablespoon olive oil per baguette half.

In a bowl, combine the zucchini, and the shallot-garlic-capers-olives mixture. Add the basil and then the Parmesan and mix well. Smear the mixture over the two baguette halves.

Serves 4

*I prefer slices of rustic bread

Monday, March 9, 2020

National Meatball Day 2020

Once again it is National Meatball Day (a personal favorite holiday of mine, destined to become the subject of a greeting card at some point in the future)! If you love them as much as I do, why not celebrate by whipping up a delicious meal in honor of the day using one or more of these delicious recipes. Click on the name beneath the picture to take you directly to the recipe.

Cheesy Baked Meatballs

Swedish Meatballs

Guinness Meatballs from The Original Crusoe's Restaurant

Sweet and Tangy Root Beer Meatballs

Soutzoukakia (Cumin Meatballs in Tomato)

Italian Meatballs

Beef Porcupines

Millie's Meatballs

Rigatoni and Meatball Soup

Monday, February 17, 2020

Air-Fried Crab Rangoon

This post contains affiliate links.
I told myself that I was going to make something special to eat on Valentine’s Day, but kept vacillating between an Olive Tart, Beef Wellington Tart, and homemade Crab Rangoon. Because I'd made the Crab Rangoon filling the day before, it seemed the easiest option.

Nothing could be simpler than this. Put the filling together ahead of time -- it will keep in the fridge for 1 to 2 days -- and then just assemble when the mood hits. 

As Santa had brought me a combination convection/toaster oven/air fryer for Christmas (this one), I thought I would air fry them. They were crispy on the outside like homemade potato chips, and wonderfully creamy on the inside. I imagine they would work out just as well in the oven. Either way, you need to make these. Now!
Air-Fried Crab Rangoon

1 8-oz. pkg. cream cheese
2 scallions, cut into 1-inch slices
1 6-oz. can
lump crab meat
½ t. Worcestershire sauce
¼ to ½ t. garlic salt
¼ t. freshly ground black pepper
2 to 4 drops hot sauce
1 pkg.
Melissa’s Wonton Wrappers

Place all ingredients into the work bowl of a food processor and pulse until creamy. Place wonton wrappers onto a flat surface, and dampen all four sides with a bit of water (you can use your finger or a pastry brush for this). Fold up all four sides to the top, and pinch closed. Spray with olive oil cooking spray, and bake at 350°F for five minutes.

 Makes two dozen


Wednesday, September 4, 2019

Olive and Feta Stuffed Mushrooms

My olive-loving friends, this one is for you. The filling can be made a day ahead, and then just plop it on top of your mushrooms and bake. It is a delightful and welcome cocktail nipple that your friends will surely enjoy.
Olive and Feta Stuffed Mushrooms

1 8-oz. package button mushrooms
1 4.25-oz. can chopped ripe olives, drained
4 slices bacon, cooked and crumbled
½ c. crumbled feta cheese
2 T. finely chopped
Melissa’s shallot

Preheat oven to 425° F.

Clean mushrooms. Remove stems and chop. Place chopped stems with remaining ingredients (except mushroom caps) into a medium bowl and stir to combine. Mound filling in mushroom caps and place on a foil-lined baking sheet. Feel free to top mushrooms with a sprinkling of Parmesan or a few gratings of mozzarella. Bake for 10 to 12 minutes until mushrooms have given off some juices and shriveled slightly. Remove from oven, allow to cool for five minutes; serve.

NOTE: To make things easier, I tossed all ingredients into a
mini food processor and pulsed until blended.


This post contains affiliate links.

Friday, July 5, 2019

Garlic Bread Dip

I’m not proud of this, but sometimes I have dip for supper. These days I’m busy and I just don’t want to be bothered. I wake up in the morning with the best of intentions of making an excellent meal, and by day’s end, whatever I can heat up in the oven and hold on my lap while watching the ball game works for me.

As you may know from my earlier post about
Cheesy Garlic Bread, I do love my bread and cheese, particularly when garlic is involved. I recently ran across this recipe, cut it in half, altered it, and it made the perfect high-calorie, artery-clogging, dinner for baseball-watching me. I dipped ribs of celery and toasted bread cubes into it, but dip whatever you like. It’s going to be good no matter what.
By the way, if you have any dip left over, it is marvelous piled on top of fresh mushrooms and broiled. I used a cookie scoop to top these mushrooms, and broiled them until the tops were pleasantly bronzed. Delish!

Garlic Bread Dip

1 8-oz. pkg. cream cheese, softened
1 c. sour cream
1 T.
Melissa’s roasted, chopped garlic
1 c. shredded mozzarella cheese
1½ c. Shredded Italian Blend Cheese
1 c. grated sharp cheddar cheese
Paprika
Garlic powder
Chopped fresh parsley
Toasted bread cubes or your dipping favorites

Preheat oven to 350°F. Spray a 1-quart baking dish with Pam. I used
this one.

In a medium bowl and with a hand-held electric mixer, combine cream cheese, sour cream, garlic, mozzarella, Italian cheese blend, and cheddar cheese. Beat until all the ingredients are well blended. Spread in your prepared
baking dish and bake for 20 minutes or until hot, and mixture bubbles around the edges. Remove from oven and sprinkle with onion powder, paprika, and chopped parsley. Serve.

Can’t get enough baked dip? Try this Hot Corn Dip with sweet, fresh, summer corn.


This post contains affiliate links.

Thursday, August 2, 2018

Fort Fromage


Do the words Fort Fromage mean anything to you? If they don’t, then pull up a chair, you are going to love this blog post. And before I say anything else, let me say you’re welcome. That’s how much you are going to love this.

I can’t tell you how many times when the late Mr. O-P and I were planning a dinner party that we completely forgot to consider snacks to serve with a cocktail before the meal. This would invariably involve my sending Mr. O-P to Sam’s hours, sometimes minutes, before guests were supposed to arrive to pick up a big jar of mixed nuts, assorted cheeses, and perhaps a container of hummus. This was always a frantic situation because Mr. O-P was easily distracted. Case in point, I will never forget the night we were fixing a birthday dinner for my dad. All Jim had to do was go out and buy dessert. I thought I had everything else covered so I sent him out around noon to pick up dessert. Four and a half hours later he came home with a sprinkler and two tickets to Baltimore. I couldn’t believe it. Not only that, but he was pleased with this purchase.

“Who wants to go to Baltimore?” I asked through gritted teeth.

“We can fly to Baltimore, rent a car, and drive to Virginia Beach,” he said with a smug smile.

Okay, I was softening to this, “But that sounds a bit expensive,” I countered.

“Not when you get the tickets for $30 apiece,” he reported.

“Are we riding in the cargo hold?” I asked, horrified. Knowing some of the strange way in which we had traveled in the past, I thought this might be a possibility.

“No,” he said, “It was a lightning deal. I got us two round-trip tickets to Baltimore for $30 each, and I got the senior discount on mine, so it really only cost $27.”

I blinked. “But what about dessert?” I asked him, not quite so willing to let him off the hook.

“Don’t worry, I’m heading out for it now,” he assured me.

I looked at him. “I guess you know they will be here in 10 minutes,” I snarled.

“I’ll be back in time,” he assured me, and he was off.

Where am I going with this you ask? Well, I’ll tell you. Had I known about Fort Fromage back in those days, I wouldn’t have worried about sending him out, last minute or otherwise, to pick up a pre-dinner nosh. Fort Fromage is something any of us can put together with the leftovers that we have in our fridge. You heard me, leftovers! Not only that, but it’s delicious. It can also be made ahead, and it only gets better with age.

I first learned of Fort Fromage when I read that a local restaurant was serving delicious sandwiches that were nothing more than slices of crusty bread, spread with Fort Fromage, and topped with pickled vegetables. At that time, with a crisper full of vegetables, the pickled vegetable thing quite appealed to me. But, having never heard of Fort Fromage before, I had to investigate. There are a variety of recipes — this one is based upon Jacques Pépin’s — but, truth of the matter is, that no two versions are ever going to be the same. The reason is that Fort Fromage is made up of a clove of garlic, dry white wine, and a half-pound of whatever cheese bits you happen to have left over in your fridge.

How many times have you looked at those little too-small-to-grate cheese bits and had no clue as to what to do with them? Here is your answer. Weigh out a half a pound of whatever cheese scraps you happen to have, toss them into the
food processor with a clove of garlic, salt and pepper to taste, and pulse until it’s finely ground. Then, with the motor of the processor running, drizzle in 4-5 tablespoons of dry white wine until you end up with a creamy spread. How easy does that sound? Well, it is! Mine consisted of a little chunk of Brie, about a tablespoon of feta (boy was I glad to get that container out of the fridge!), some non-smoked provolone, and cheddar. It is absolutely wonderful! I wish I’d had this recipe before Jim passed away. He would have loved the quirkiness of it, the convenience of it, and because we were such cheese lovers and always had a wide variety in our fridge, we could have put some together every time we had guests — even the unexpected spur-of-the-moment ones —, and each time it would have been special. Well, at least I can enjoy it now, and share this recipe with you.

It is wonderful as is spread on crackers, pieces of toasted baguette, or with crudités, or, for a heartier snack, can be spread on top of slices of crusty bread, and broiled until the cheese melts. Delicious!
Fort Fromage

1/2 pound assorted cheese scraps
1 clove garlic
1/4 cup dry white wine

Salt and freshly ground pepper, to taste
1 tablespoon mayonnaise (optional)

Place cheese parts into a food processor and pulse 6-7 times until finely ground. Add garlic and pulse again.  Then, with the processor running, stream in white wine until a nice, spreadable consistency is reached. If you have used cheese that is particularly dry (as in the case of feta), add a dollop of mayo for creaminess.  Place into a lidded container and refrigerate for at least two hours. It gets better when refrigerated overnight.

Keep it cool and serve it attractively in this Chilled Cheese or Dip Server.


Another fabulous, spreadable cheese to keep on hand is this Homemade Boursin. It kicks the packaged variety to the curb and is far less expensive.

This post is linked to:

This post contains affiliate links.

Tuesday, June 12, 2018

Bacon & Mushroom Spread


Continuing in our Festival of Fungus, today I am offering up Bacon & Mushroom Spread. Not only is this a delicious spread, but it has to be made ahead in order to allow the flavors to meld into something magnificent. You reheat it in the microwave when ready to serve, so this is probably one of the easiest hors d’oeuvres you can possibly serve your guests.
I put mine in one dish alongside an assortment of crackers, but if you like, you can use this as an appetizer at the beginning of the meal, putting small servings in ramekins and serving them on a plate with a couple of crackers or pieces of flatbread. It’s a lovely presentation, and a delicious way to start a meal.
Bacon & Mushroom Spread

3 slices bacon
6 ounces fresh mushrooms, chopped
1/2 cup finely chopped onion
1 clove garlic, minced
1 1/2 tablespoons flour
Pinch salt
Pinch freshly ground black pepper
4 ounces cream cheese, cubed
1 teaspoon Worcestershire sauce
1 teaspoon soy sauce
1/4 cup sour cream
1/2 tablespoon freshly squeezed lemon juice

Cook bacon in a 9-inch sauté pan until crisp. Remove bacon from pan to drain; crumble and set aside.

Add mushrooms, onions, and garlic to the pan in which you cooked the bacon. Cook over medium/low heat until tender and most of the liquid has evaporated. Sprinkle flour, salt, and pepper over the top, and cook, stirring, until smooth. Add cream cheese, Worcestershire, and soy sauce, stirring until cheese is melted (At this point it is going to look like glop. Don’t despair; it is supposed to look like glop.) Stir in sour cream, lemon juice, and reserved crumbled bacon. Heat through.

Pour into serving dish; allow to cool 10 to 15 minutes. Cover with plastic wrap and refrigerate overnight. Serve the following day at room temperature, or warm 1 to 2 minutes in the microwave.

Another delicious spread is this Superior Pecan Spread. Everybody loves this one!


This post contains affiliate links.