Showing posts with label vegetable garden. Show all posts

Friday, August 24, 2012

Italian-Style Vegetable Soup


When you ponder the fate of the literal fruits of your labor, a.k.a. the summer vegetable garden harvest, my guess is that soup isn’t the first thing to come to mind.  However, if you are one of the lucky people able to grow zucchini and reap its bounteous reward, then give this some thought.  As I’ve mentioned before, I have absolutely no luck growing zucchini, so I use Melissa’s, but my lack of zucchini growing skills doesn’t stop me from making this delicious soup recipe that my mother has been serving us for as long as I can remember.  It makes a large pot so there is plenty to share, takes a mere 45 minutes from start to finish, and freezes quite nicely so you can enjoy it in the winter months as well.

Italian Style Vegetable Soup

1 or 2 large onions totaling 1 pound
2 tablespoons vegetable oil
¾ cup diced carrots
¾ cup diced celery
1 16-oz. can diced tomatoes, undrained
2 cups cubed zucchini
1 teaspoon dried basil
½ teaspoon dried oregano
1 teaspoon minced garlic (more or less to taste)
2 tablespoons chopped parsley
2 cups cooked navy beans (or 1 15-oz. can)
6 cups beef broth
Salt
Freshly ground pepper

Peel and coarsely chop onions.  Heat oil in a large stock pot, add onions, carrots, and celery and sauté for five minutes.  Add tomatoes.  Stir in zucchini, basil, oregano, garlic, beans and broth.  Cover.  Bring to a boil and simmer for 30 minutes.  Serve topped with ample gratings of fresh Parmesan cheese.  Enjoy!

Looking for more soup recipes?  This book is my absolute favorite!

This post is linked to:
  

Friday, September 30, 2011

Corn Fritters with Spicy Remoulade

This post contains affiliate links.

I was able to try yet another tasty recipe thanks to the glut of zucchini I harvested this year (and by "glut" I mean four), once again making use of the October 2011 issue of Bon Appetit magazine, and a recipe by Maxcel Hardy.  I've tried many a fritter recipe in my day, coming away disappointed every time.  Until now.  This is a tasty recipe made even better by the addition of a truly wonderful remoulade sauce.  I ended up with 20 of them -- way too many for the two of us -- so froze the rest.  When we're ready to have them again, I'll pull out as many from the freezer as I need, place them on foil and pop them into a preheated 350 degree oven for about 20 minutes.

Corn Fritters with Spicy Remoulade
2 tablespoons olive oil
1 cup (packed) grated zucchini
3/4 cup fresh (or frozen, thawed) corn kernels
1/4 cup finely chopped onion
2 teaspoons chopped fresh thyme
2 teaspoons chopped fresh cilantro
3/4 cup all-purpose flour
1/2 cup plus 2 tablespoons packaged corn muffin mix
2 tablespoons sugar
1/2 teaspoon kosher salt
1/2 cup whole milk
1 large egg, whisked to blend
Vegetable oil (for frying)
Spicy Remoulade (see below)

Heat olive oil in a large heavy skillet over medium heat. Add zucchini, corn, onion, and thyme and saute until corn is slightly softened, about 3 minutes. Stir in cilantro and let cool.


Whisk flour, corn muffin mix, sugar, and salt in a medium bowl. Whisk milk and egg in a small bowl to blend; whisk into dry ingredients. Add zucchini mixture; fold just to blend. Chill for 30 minutes.
While the recipe (as you can see below) calls for a large pot and deep-fry thermometer, I found a saute pan with about 1/2" of oil worked just fine.
Pour vegetable oil into a large pot to a depth of 2". Attach a deep-fry thermometer to side of pot. Heat oil over medium heat to 325. Working in batches, spoon batter into oil by heaping tablespoonfuls. Fry until golden brown, turning once. Using a slotted spoon, transfer fritters to paper towels to drain. Serve with Spicy Remoulade.

Spicy Remoulade
 Feel free to cut back on the cayenne to tame this tangy sauce.

½ c. mayonnaise
2 T. coarse-grained mustard
2 T. drained prepared horseradish
2 T. chopped scallions
½ t. paprika
½ t. cayenne pepper (or less)
½ t. fresh lemon juice
Kosher salt
Freshly ground black pepper
Whisk first 7 ingredients in a small bowl. Season with salt and pepper. Makes about 2/3 cup.

DO AHEAD: Can be made 2 days ahead. Cover and chill.

Tuesday, September 20, 2011

Zucchini Corn Bread

You may recall from this post that I was lamenting what to do with the two zucchini that I'd harvested for the year, shaking my head at the fact that I had so many recipes, and too few zucchini.  Well, today I pulled in a third! Yes, four plants, a summer of care, water, worm castings, organic compost, and my guess is that each zucchini has probably cost me around $37.50, but I digress...

The zucchini in question.  Isn't it a beauty?
Today I knew exactly what recipe I wanted to try.  I spotted it in the July 2011 issue of Bon Appetit and thought it sounded unique and wonderful.  It is.  I think this is the best corn bread I've ever tasted.  Moist, dense, flecked with my home grown zucchini, just the right amount of sweetness, and it is not at all crumbly, so cuts like a dream.  It was the perfect accompaniment to our brisket dinner tonight, and I suspect will made a great adornment to the chili I expect to make later in the week.

Zucchini Corn Bread

1/2 cup (1 stick) unsalted butter plus more for pan
2 large eggs, lightly beaten
1/2 cup buttermilk
1 large zucchini (about 10 ounces)
1 cup all-purpose flour
1/2 cup whole wheat flour
1/2 cup sugar
1 teaspoon baking powder
3/4 teaspoon fine sea salt
1/2 teaspoon baking soda
3/4 cup medium-grind cornmeal

Position a rack in the middle of oven and preheat to 350 degrees F. Butter a 9 x 5 x 3" loaf pan.


Melt 1/2 cup butter in a small saucepan over medium-high heat. Continue cooking until butter solids at bottom of pan turn golden brown, about 3 minutes. Scrape butter into a medium bowl. Set aside and let cool. Whisk in eggs and buttermilk.


Trim zucchini ends. Thinly slice five 1/8" rounds from 1 end of zucchini and reserve for garnish. Coarsely grate remaining zucchini. Add to bowl with butter mixture and stir until well blended.


Sift both flours, sugar, baking powder, salt, and baking soda into a large bowl. Whisk in cornmeal. Add zucchini mixture; fold just to blend (mixture will be very thick). Transfer batter to prepared pan and smooth top.

Bake bread until golden and a tester inserted into center comes out clean, 55-65 minutes. Let cool in pan 10 minutes. Remove from pan; let cool completely on a wire rack. DO AHEAD Can be made 1 day ahead. Store airtight at room temperature.
Isn't this a beautiful loaf? Although, seriously, could I have found a napkin that looks more putrid than the one I selected for this picture? 


This post is linked to:

Dr. Laura's Tasty Tuesdays
Tuesdays at the Table
Tuesday Night Supper Club
Slightly Indulgent Tuesdays
Tempt My Tummy Tuesday
Tasty Tuesday


Sunday, August 14, 2011

Horseradish Mashed Potatoes

Horseradish flowers
It was never my intention to grow horseradish.  Not that I had anything against it, mind you, it had just never occurred to me to do so, and never once in all of my years of gardening did I ever run across a horseradish plant at the garden center.  One year we just happened to be visiting friends in my husband's native NJ and I was admiring his very large, very lush vegetable garden.  "What plant is this?" I asked him, pointing in the direction of a very healthy, wide-leafed plant.  "Horseradish," he replied, and then went on to sing the praises of the ease of growing, the disease resistance, and the wonderful jars of fresh horseradish they'd get each season as the result of this hardy plant. In fact, he told me, his horseradish had become so popular among his family and friends that people asked to have their names put on a list to get a small jar each year. 


I thought nothing else about it after our visit, so was very surprised when, two days after our return home, the Fed-X man was knocking at the door.  I hadn't ordered anything and neither had Jim, so the contents was a puzzle.  Much to our surprise, inside the package were six horseradish roots along with specific instructions as to how to prepare the soil and plant the roots. 


This was six years ago, and we've had horseradish ever since.  Horseradish, like Jerusalem artichokes, is one of those things that you put into the ground once and reap year after year after year. If you haven't had fresh horseradish, let me tell you it is amazing.  It can also be quite deadly if you don't learn to prepare it properly, i.e. outside, wearing a mask.  The first time I cleaned the roots I did so over the kitchen sink with no mask.  I ended up with the worst headache of my life and had to go to sleep in order to get rid of it, so be forewarned.  This does not, of course, apply to the roots you find in the produce section of your market, they are not out-of-the-ground fresh. 


There are many uses for horseradish, one of which is these delicious mashed potatoes.  My husband will not eat mashed potatoes, considering them too bland, but he does like these.  You can control the level of "zing" by adding more or less to your taste.  Consider this recipe as more of a guideline than something written in stone.  Experiment!
HORSERADISH MASHED POTATOES 

2 lbs. large Russet potatoes, peeled and quartered*
3/4 cup half-and-half (more or less to achieve desired texture)
3 tablespoons butter
1/2 teaspoon salt
1/4 teaspoon onion powder
1/4 teaspoon white pepper
2 T. fresh horseradish (but drained, bottled will do)

Put potatoes in a medium, heavy sauce pan. Cover with cold water, then simmer, uncovered, until fork tender, 25-30 minutes (Test with fork).

Meanwhile, in a small saucepan bring half-and-half, butter, salt, onion powder and pepper just to a simmer, stirring until butter is melted; keep hot, covered.
When potatoes have reached desired doneness, drain in a colander and put back on the hot burner to allow for evaporation of any liquid that remains in the potatoes. You'll see a lot of steam for a minute or two. With hand mixer, smash potatoes and then beat on medium speed, slowly adding the hot mixture.  Stir in horseradish.  Serve.

I like to mound the potatoes in an oven-proof dish and place them under the broiler for a minute or two to brown the top edges and make them puffed and golden. Yum!


*You can use small red potatoes and leave the skins on for a more rustic dish


Thursday, July 21, 2011

Chilled Cucumber-Avocado Soup

I made this soup for the first time last summer.  When my husband asked me how it was I said, quite truthfully, "It's so good I could swim in it."  True.  This is the chilled soups to end all chilled soups.  Decadent, one might say; with fresh cucumbers it is ambrosial! Cooling, delicious, what an excellent way to get your daily vegetables.  Try it!

Chilled Cucumber-Avocado Soup

1 large, ripe Haas avocado, peeled and pitted
1 large cucumber, unpeeled, and cut into large chunks
1-1/2 cups homemade chicken stock (canned, if you must)
4 scallions, diced
2-1/2 tablespoons fresh lemon juice
1 teaspoon fresh lime juice
1/2 cup sour cream (or plain yogurt)
3 tablespoons salsa (homemade, if possible, jarred, if not)
1-1/4 teaspoons cumin (more or less to taste)
Pinch Kosher salt
1/4 teaspoon freshly ground black pepper


Place avocado and cucumber into a large capacity food processor fitted with a metal blade and process until smooth.  With machine running, gradually pour chicken stock through feeder tube.  Process until smooth.  Add scallions, citrus juices, sour cream or yogurt, salsa, and cumin; process until combined.  Season to taste with salt and pepper.  Chill for at least 2 hours (the longer the better).  To serve, ladle into small cups or stemmed glasses and top with your choice of salsa, salsa verde, or sour cream.

This post is linked to:

Sunday, July 3, 2011

Dinner from the Garden

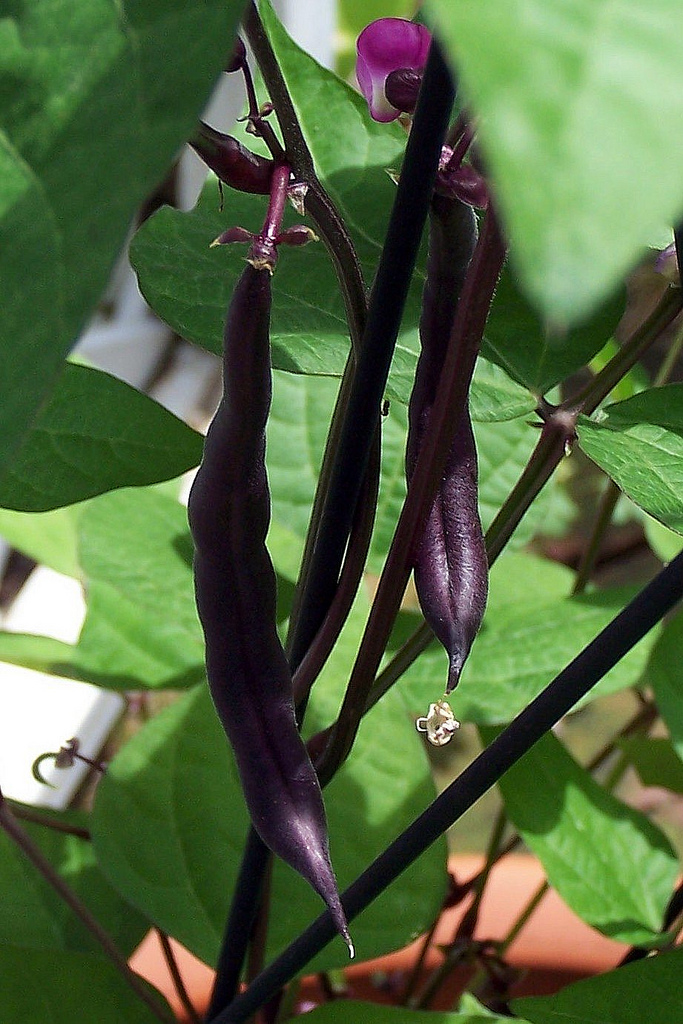
One of the great things about the Fourth of July is that it marks the beginning of harvest season.  There is nothing I like better than to serve a meal that features something I've grown myself.  Such was the case this evening when I served filets topped with sauteed mushrooms, "Trash Can Potatoes" (recipe and explanation at the bottom of this post), along with the purple beans I'd grown in a container on the patio. (They turn a dark green when cooked and have a buttery taste that far exceeds plain old green beans.)
Newly sprouted Phaseolus Vulgaris a.k.a. Purple Queen Bush Bean (though I have found them to be climbers, hence the little metal obelisk). This is a fun vegetable to grow in a garden. It is easy and forgiving with dark green leaves and deep purple string beans that turn green when cooked and have a wonderful flavor.
They will turn into lovely deep purple beans that cook up a rich green with a buttery taste.
If you have trouble getting your kids to eat green beans, wow them with these purple ones, and engage them in the cooking process so they can watch them turn from purple to green.

You're probably wondering about the name of the potatoes.  Back when my husband and I were dating, he had a long drive to come pick me up and, as a consequence, he'd sometimes (more often than not, if truth be told) make a pit stop in the powder room just off the entrance hall shortly after arrival.  The powder room also served to have the most convenient waste basket for getting rid of junk mail.  I tend to toss junk mail rather willy nilly without giving it much thought.  My husband, who then as now, simply cannot throw anything away, fished a real estate brochure out of the trash during one of his, ummm, visits, because he spied a recipe on the back that looked tasty.  Come to find out, it IS tasty and it's become a summer favorite for 16 years now.  The actual name is "Saucy Skillet Potatoes," but we tend to call them trash can potatoes since that's where he found the recipe.


Trash Can Potatoes a.k.a. Saucy Skillet Potatoes

1 T. butter
1 cup chopped onion
1/2 cup mayonnaise
1/3 cup cider vinegar
1 T. sugar
1-3/4 t. salt
1/4 t. freshly ground pepper
4 medium potatoes, cooked, peeled and sliced (4 cups)
1 T. freshly chopped parsley
1 T. bacon, cooked and crumbled

In a large skillet, melt butter over medium heat. Add onions; cook 2-3 minutes or until tender-crisp.  Stir in mayonnaise, vinegar, sugar, salt, and pepper.  Add potatoes; cook, stirring constantly, 2 minutes or until heated through (do not boil).  Garnish with parsley and bacon.  Makes 4-6 servings.


This post is linked to: Seasonal SundayMetamorphosis MondayMade by You Monday, On the Menu Monday, This Week in My Garden and Outdoor Wednesdays

Saturday, June 18, 2011

Dan Field's Pickled Green Cherry Tomatoes

Easy to make, here is a photo tutorial, the recipe is below.
This is a recipe that I stumbled upon years ago and for which I've been grateful ever since.  It suits me quite well in the spring, when the bounty of Sweet 100 cherry tomatoes begin to overwhelm and I over anxiously pick them before they turn, and again in the fall when I'm desperate to collect every last tomato from the vine before the frost.  I like having them in both seasons.  They are always welcome on picnic relish trays during the heat of summer, and such a wonderful taste of spring in a cocktail or salads during the fall and winter.
Nothing is quite so thrilling to a devoted gardener as that first tomato of the summer.
If you've never tried your hand at canning, preserving, or pickling, this is a great way to get your feet wet because truly, nothing is easier.
There is always something about pickling and canning that soothes my soul.  I love nothing more than pantry shelves full of  pickled and preserved items I've grown and harvested from my own garden.

Dan Field's Pickled Green Cherry Tomatoes
(adapted from Rick Field of Ricks Picks)
Eat these cherry tomato pickles as soon as they are ready -- 2 weeks. Ours were slightly sweet, gently sour, very crunchy and tasted of fresh tomato. They are delicious in a martini - the alcohol brings out the salty side of the pickle - but they are also very good with grilled pork tenderloin. Makes 6 pints.


For each pint jar:
2 cups (approximately) hard green cherry tomatoes, washed
2 bay leaves
1 teaspoon pickling spice (see note)
2 cloves garlic
1 dill head (or 3 sprigs fresh dill and 1 teaspoon dill seed)
1 slice onion
1/8 teaspoon celery seed

For the brine:
4 cups water
2 cups cider vinegar
1/2 cup Kosher salt

Method:
1. Sterilize jars and lids in a large pot of boiling water to cover for10 minutes. Using tongs, lift the jars and lids out of the hot water and place them on clean dishtowels on the kitchen counter.
2. Into each jar, as indicated above, place bay leaves, pickling spice, garlic, dill, onion and celery seed. Firmly pack tomatoes in each jar, to just below the fill line (the extruded line on the jar approximately 1/4-inch below the top of the glass). This can be tricky since the cherry tomatoes are so small. Don't skimp on the tomatoes and try to wedge them tightly in the jar to prevent shifting.
3. Bring the water, vinegar and salt to a boil. Pour the brine, still boiling, into the jars. The liquid should cover the solids--but only just cover them.
4. Wait 1-2 minutes to allow the brine to settle. If necessary, add a little more liquid to cover the tomatoes. Put on the tops and store for two weeks in the refrigerator or a cool, dark cupboard.

Note: The pickling spice I used came from Whole Foods and included mustard seed, cinnamon chips, allspice, dill seed, celery seed, bay leaf, mild chiles, cloves, caraway seed and ginger.
Peeking through the fence at the first bounty of the summer.
Books I recommend:
(Click on the book cover for more information)
The Joy of Pickling: 250 Flavor-Packed Recipes for Vegetables and More from Garden or Market (Revised Edition)The Complete Book of Pickling: 250 Recipes from Pickles and Relishes to Chutneys and SalsasThe Joy of Pickling: 200 Flavor-Packed Recipes for All Kinds of Produce from Garden or Market

Sunday, May 22, 2011

Home Grown Home Made Salsa Verde


I took a major step today: I planted something.  To be precise, I planted red peppers, green peppers, poblano peppers, tomatoes, tomatillos, cucumbers, bottle gourds, cherry tomatoes, heirloom tomatoes, basil, parsley, and potatoes.  Clean up of the tornado damage begins this week and I'm encouraged by the very thought of this.  It will take months, I'm not going to try to convince myself otherwise, but it's a beginning.  Thanks to my son who has diligently helped us during this past month of chaos and disruption, the potager has been cleared, the soil turned, and the beds prepared, so I can begin to get back to what I consider a "bit of normal."


For those of you who enjoy a vegetable garden and also like a great salsa, let me encourage you to grow tomatillos this summer.  I don't think there is a plant any easier to cultivate.  In past years I've grown it in containers, damp areas, dry areas, partially shady areas, and have always gotten a bumper crop.  This means lots of salsa verde, and nothing is better tasting than fresh homemade salsa verde derived from your own home grown tomatillos.  How can one fail to feel such a soul filling satisfaction from that?


Here is the recipe that I use, but it can be tweaked to suit your own tastes.  If you like it hotter, leave the seeds in the jalapenos.  Add more onion or garlic if you like; add or reduce the amount of cilantro.

This is one of those condiments that you're going to find a lot of uses for other than just as a dip for tortilla chips.  I like it on top of a poached egg, as a potato topping, on tacos, on top of a grilled steak, stirred into a cream sauce and poured over fish or chicken.

Salsa Verde

2 large fresh poblano peppers
1/2 pound tomatillos, husked, rinsed, diced
1 1/2 cups low-salt chicken broth
3 scallions, chopped (include both white and green parts)
1 large jalapeno pepper, stemmed, seeded
1 large garlic clove
1/4 cup (packed) fresh cilantro leaves (or to taste, I used a bit more)
1 tablespoon whipping cream
2 tablespoons fresh lime juice

Char poblanos directly over gas flame or in broiler until blackened on all sides. Place in bowl. Cover top of bowl with plastic wrap and let stand 10 minutes. Peel, seed, and chop chilies.

Combine tomatillos, broth, scallions, jalapeno, and garlic in medium saucepan; bring to boil over medium-high heat. Reduce heat to medium-low; simmer until mixture is reduced to 1 2/3 cups, stirring occasionally, about 18 minutes. Transfer mixture to blender, food processor, or use immersion blender to blend ingredients thoroughly.  Add poblanos, cilantro, and cream. Puree a second time, until smooth. Season salsa with Kosher salt and freshly ground pepper. Add lime juice, if desired. Can be made a day ahead.  Serve warm or cold. 


This is linked to: 
and Mosaic Monday at Little Red House