Thursday, October 6, 2011

Palmiers with Mustard and Prosciutto

We are nothing if not elegant when it comes to serving up snacks during the big game whether that game is baseball, football, or some Safari segment on Animal Planet.  As complicated as these look, they are actually very easy to put together, and can be assembled in about 15 minutes.  But the real beauty of this tasty little snack is that it can be frozen in log or sliced form and simply popped into the oven when you're ready to make them so you can wow a crowd with your culinary skills while still looking composed and refreshed.  This recipe comes from one of my favorite cookbooks, St. Louis Days, St. Louis Nights, and has never failed me.  If you need something sweet rather than savory, mix things up a bit by spreading softened butter on the rolled out pastry instead of the mustard and top with a cinnamon and sugar mixture, or simply spread it with jam.  What could be easier?
I annotate every recipe I make for future reference.
After thawing, open up your sheet of puff pastry and place on a board or countertop that has been dusted with flour.
Using a rolling pin, roll it out to approximately 18" x 11".
I use both Dijon mustard and the grainy, stone ground mustard combination for the best taste.  If you plan to do the same, make the first layer the smooth Dijon.
Spread the grainy mustard on top of the existing Dijon.
Use the best prosciutto that you can find to avoid ending up with a fatty, rubbery variety.  We buy ours at an Italian market, Di Gregorio's.
I have used both Parmesan and Romano cheeses and they work equally well.  I store these cheeses in the freezer (hence the lumps you see here, that do not matter one bit) to keep them fresh and help them to last longer.
Roll up as tightly as you can to keep it from trying to unroll when you slice it.
Trim the edges with a sharp knife.
Cover in plastic and chill to make slicing easier, or cover in plastic and then slip into a freezer bag to freeze for up to 4 months.
The sharper the knife, the easier these are to cut.  I turn the roll seam side down when cutting.  Do NOT use a serrated knife.
Place cut slices on parchment or a Silpat.
Brush with egg wash.  Use a silcone brush (If you don't have one of these, click on the link at the bottom of this post for more info.  You'll thank me later.) to coat with the egg wash.


This post is linked to: 

Sunday, October 2, 2011

Pumpkin Muffins from Longfellow's Wayside Inn

Fall is my favorite time of the year. I love the sights, sounds, colors, and crispness in the air.  I found it all today at the local garden center turned pumpkin wonderland.  It was hard to know what to grab first, the colorful, unusually shaped gourds, the pumpkins, or head for the ornamental kale and chrysanthemums.  I managed to come away with something of everything and then was so inspired that I made a batch of pumpkin muffins in muffin top form (I love my muffin top pan!).

Whenever I make pumpkin muffins, I always head for my "go to" recipe, from Longfellow's Wayside Inn (the oldest operating Inn in the country, dating back to 1716) located in Sudbury, Massachusetts.

The recipe yields 12-16 muffins, or about 22-24 muffin tops.  They are perfect with a mug of warm cider or pumpkin pie cocoa.
How cute is this pumpkin muffin top being kept warm perched atop a pumpkin mug?

Pumpkin Muffins
Longfellow's Wayside Inn

1 cup raisins
1/2 cup water
2 eggs
1 cup canned pumpkin
1-1/4 cups granulated sugar
3/4 teaspoon ground cloves
3/4 teaspoon cinnamon
1/2 teaspoon salt
1/3 cup canola oil
1-3/4 cups flour
1-1/2 teaspoon baking power
1/2 teaspoon baking soda

Preheat the oven to 400 degrees F.

Soak the raisins in the water for 5 minutes, do not drain.  Set aside.
In a large mixing bowl, beat the eggs until foamy, stir in the pumpkin, sugar, cloves, cinnamon, and salt.  Add the canola oil and mix well.  In a separate bowl, stir together the flour, baking powder, and baking soda.  Add the dry mixture to the pumpkin mixture with half of the raisin-water mixture.  Mix well, add remaining raisin mixture; stir to mix.  Fill greased muffin pans 2/3 full.  Bake at 400 degrees F until the top springs back when pressed with fingers, about 25 minutes for muffins, 22 for muffin tops.
Muffin tops served on a favorite pumpkin plate that I drag out and love to bits every year at this time.


Saturday, October 1, 2011

Turn Newspapers into Logs for Winter Fires

We recycle.  Bottles, cans, paper, plastics, glass, newspapers, I even toss eggshells and coffee grounds into the garden.  It has made a difference. We have been amazed at how much we've lessened our trash output around here, and like to think that we're doing something positive for the environment at the same time.
When fall hits (it's October!), things change a bit.  No longer do I toss newspapers into the recycling bin, but through the use of this wonderful little newspaper rolling tool, I turn them into logs for the fireplace.  If you've ever struggled to get a fire going in your wood burning fireplace or wood stove (we have both), this will end that.  These newspaper logs make great fire starters.  Stack them up with the logs and you'll get a wonderful blaze going with just one strike of the match.  It's a great family project -- kids will beg you to try their hand at it -- with a most practical outcome. One caveat: Use only newspaper pages.  Any shiny pictures, flyers, or magazines can release toxins into the air when burned (this is also a good practice for those of you who simply crumble newspapers under the grate to start a fire).
It's very easy to use.  Fold the top of the newspaper over about 3/4" when you slip it into the rod, this gives it more of a grip so it's less likely to come out when you're rolling up your newspaper log.  Roll it up slowly and tightly to the size you desire.  I generally make a variety of sizes so I'll have what I need for any size fire.  Once you achieve the desired size, tie it up and then slip your newspaper log off of the rod.  I keep mine in a terra cotta garden pot on the hearth.


My log roller was a gift from a friend, but you can also find them on Amazon.

Metamorphosis Monday-BNOTP
 Brag Monday-The Graphics Fairy
Motivate Me Monday-Keeping it Simple
Amaze Me Monday-Dittle Dattle
Thrifty Thursday-Tales from Bloggeritaville
100 Ideas Under $100-Beyond the Picket Fence
 Show and Tell Saturday-Be Different Act Normal
Flashback Friday


Friday, September 30, 2011

Corn Fritters with Spicy Remoulade

This post contains affiliate links.

I was able to try yet another tasty recipe thanks to the glut of zucchini I harvested this year (and by "glut" I mean four), once again making use of the October 2011 issue of Bon Appetit magazine, and a recipe by Maxcel Hardy.  I've tried many a fritter recipe in my day, coming away disappointed every time.  Until now.  This is a tasty recipe made even better by the addition of a truly wonderful remoulade sauce.  I ended up with 20 of them -- way too many for the two of us -- so froze the rest.  When we're ready to have them again, I'll pull out as many from the freezer as I need, place them on foil and pop them into a preheated 350 degree oven for about 20 minutes.

Corn Fritters with Spicy Remoulade
2 tablespoons olive oil
1 cup (packed) grated zucchini
3/4 cup fresh (or frozen, thawed) corn kernels
1/4 cup finely chopped onion
2 teaspoons chopped fresh thyme
2 teaspoons chopped fresh cilantro
3/4 cup all-purpose flour
1/2 cup plus 2 tablespoons packaged corn muffin mix
2 tablespoons sugar
1/2 teaspoon kosher salt
1/2 cup whole milk
1 large egg, whisked to blend
Vegetable oil (for frying)
Spicy Remoulade (see below)

Heat olive oil in a large heavy skillet over medium heat. Add zucchini, corn, onion, and thyme and saute until corn is slightly softened, about 3 minutes. Stir in cilantro and let cool.


Whisk flour, corn muffin mix, sugar, and salt in a medium bowl. Whisk milk and egg in a small bowl to blend; whisk into dry ingredients. Add zucchini mixture; fold just to blend. Chill for 30 minutes.
While the recipe (as you can see below) calls for a large pot and deep-fry thermometer, I found a saute pan with about 1/2" of oil worked just fine.
Pour vegetable oil into a large pot to a depth of 2". Attach a deep-fry thermometer to side of pot. Heat oil over medium heat to 325. Working in batches, spoon batter into oil by heaping tablespoonfuls. Fry until golden brown, turning once. Using a slotted spoon, transfer fritters to paper towels to drain. Serve with Spicy Remoulade.

Spicy Remoulade
 Feel free to cut back on the cayenne to tame this tangy sauce.

½ c. mayonnaise
2 T. coarse-grained mustard
2 T. drained prepared horseradish
2 T. chopped scallions
½ t. paprika
½ t. cayenne pepper (or less)
½ t. fresh lemon juice
Kosher salt
Freshly ground black pepper
Whisk first 7 ingredients in a small bowl. Season with salt and pepper. Makes about 2/3 cup.

DO AHEAD: Can be made 2 days ahead. Cover and chill.

Wednesday, September 28, 2011

Kale Chips

If you've ever tried the flash-fried spinach that seems to be so popular at restaurants these days, then you are going to love this recipe.  I had some kale left over from yesterday's pork roast (prior to yesterday's culinary adventure, I was a kale virgin), and wondered what the heck to do with it.  Then I remembered my cousin telling me (Thanks, Kelly!) that she tosses it with olive oil, sprinkles it with salt, bakes it in the oven and her kids (yes, her kids) love it.  She and her husband do too.  And now, so do we.  Can you imagine something crispy, crunchy, tasty, and healthy?  It tastes very much like the fried stuff, but this is baked.  I know, I couldn't believe it either.  You're just going to have to try it for yourself.  It goes together in no time.

Here's how:

Crispy Kale Chips

1 head kale, leaves separated, rinsed, 
dried, cut lengthwise in half, 
center ribs and stems removed
1 tablespoon olive oil
Dash of sea salt

Parmesan cheese (optional)

Preheat oven to 250°F. Place kale on a foil-lined baking sheet and drizzle it lightly with oil.  Toss together until the leaves are coated. Sprinkle sparingly with sea salt and pepper. Arrange leaves in single layer and bake until crisp, about 30 minutes.  Remove from oven and dust lightly with Parmesan cheese. Transfer leaves to rack to cool.

Tuesday, September 27, 2011

Prosciutto-Wrapped Pork Loin with Roasted Apples

My husband is the one who receives Bon Appetit magazine every month, so I generally leave it up to him to peruse each issue, scouting out recipes for us to try.  But this month I was struck by the wonderful prosciutto-wrapped roast on the cover and decided without even opening up the issue that I was going to try it.

It is not difficult to do, but it is time consuming.  It involves butterflying a roast (something I'd never done before, but found it to be a breeze), making a filling, rolling the roast, wrapping it in prosciutto and trussing it (something I learned to do by going on You Tube). As you can see from the picture, it makes an elegant, showy meal.  It is also a very good one.  The plus is that the roast can be assembled one day and roasted the next.  The only thing I'd change about this recipe is to substitute a cup of slivered leeks for the onion in the filling.  Leeks are an excellent accompaniment to pork and, in my opinion, have a much better flavor.

The recipe can be found in the current issue of Bon Appetit, online at epicurious.com, or below.  What follows is a step-by-step photo tutorial in case you'd like to give it a whirl.

Our pork roast was a little less than 1-1/2 pounds, so I cut the filling recipe in half.
A sharp knife is the key to butterflying a roast. Begin with the knife in this position.
As you slice, continue to unroll the roast.
The roast should look like this when you've finished.
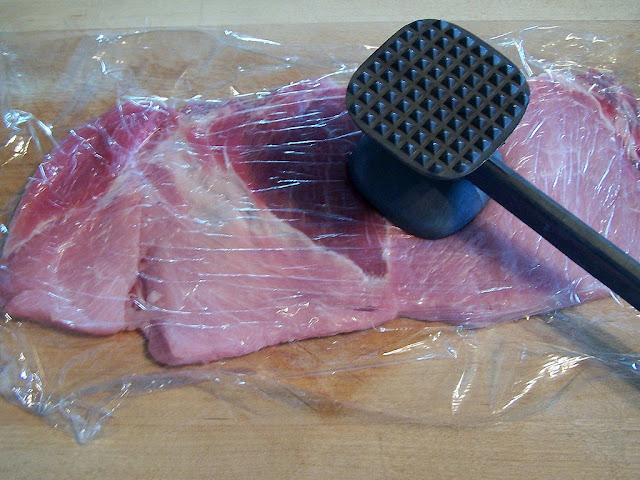
Cover with a sheet of plastic wrap and flatten with a mallet.
The stuffing ingredients all mixed together and ready to be spread on the roast.
First a layer of blanched kale.
Top the kale with the stuffing and smooth almost to the edges.
Roll up tightly and place seam side down on the cutting board or counter.
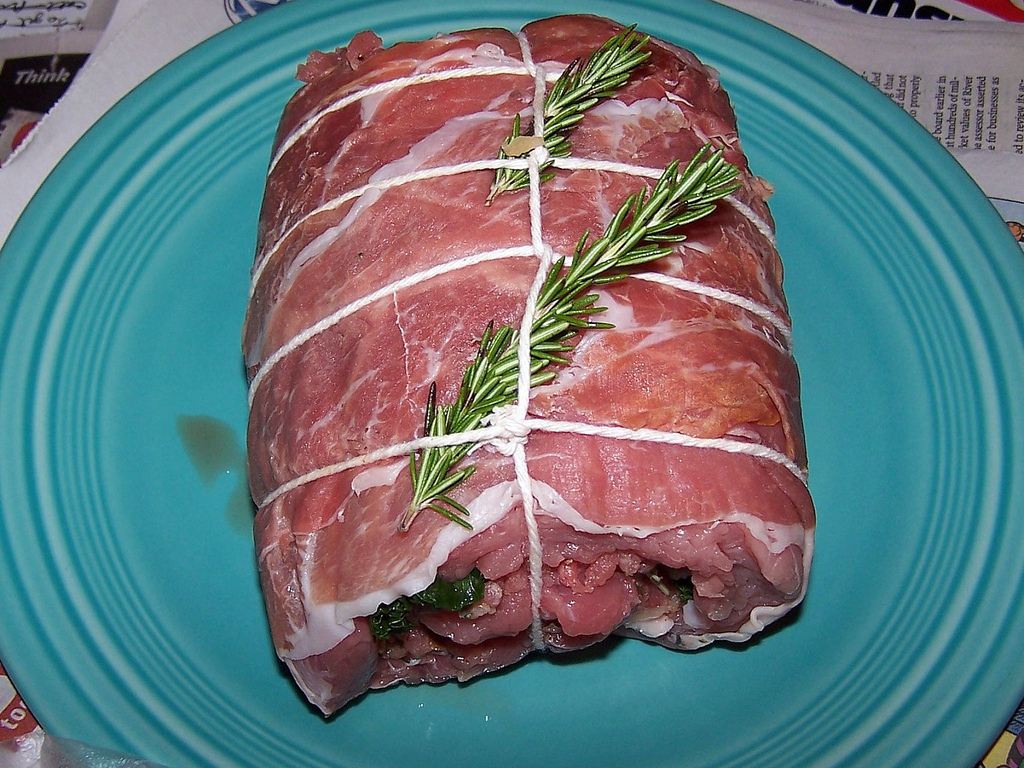
Wrap with thin layers of prosciutto.
Truss with kitchen twine and slip sprigs of fresh rosemary beneath twine.
Sear on all sides.
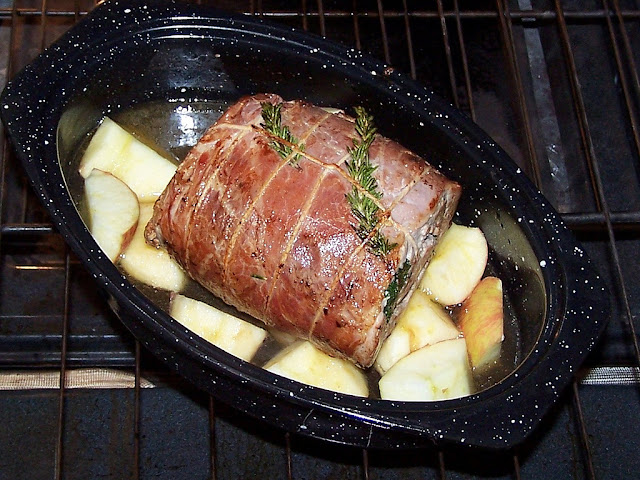
Place on a bed of apples, pour sauce all around and roast in the oven.
Pat yourself on the back and admire your beautiful roast.

Prosciutto-Wrapped Pork Loin with Roasted Apples


1 ounce (1 cup) dried whole porcini mushrooms
2 ounces (3/4 cup) dried apples
1 pound kale, bottom stems trimmed
2 teaspoons kosher salt plus more
2 tablespoons (1/4 stick) unsalted butter
1 cup minced onion
1 tablespoon finely minced garlic
1 1/2 teaspoons dried thyme
1 1/2 teaspoons dried rosemary
2 tablespoons brandy or Calvados
1/2 teaspoon freshly ground black pepper
1 pound ground pork

Pork
 1 (trimmed) 2 1/2 to 3-lb. pork loin
1 teaspoon kosher salt plus more for seasoning
1/2 teaspoon freshly ground black pepper plus more for seasoning
3 ounces thinly sliced prosciutto
5 sprigs rosemary
4 medium apples (such as Granny Smith or Fuji), quartered, or 8 small apples, halved
3 tablespoons unsalted butter, divided
2 tablespoons extra-virgin olive oil
1 cup dry hard cider
1/2 cup low-salt chicken stock

Preparation: Filling

Place dried mushrooms and dried apples in separate small bowls. Add 1 cup boiling water to each bowl. Let mushrooms and apples soak until very soft, about 30 minutes. Strain mushrooms. Cover and chill soaking liquid (about 3/4 cup). Drain apples, discarding soaking liquid. Finely chop mushrooms and apples, combine in a small bowl, and set mushroom and apple mixture aside.
Meanwhile, blanch kale in boiling salted water just until wilted, about 1 minute. Using tongs, transfer kale to a rimmed baking sheet. Refrigerate until cool. Remove any large, tough ribs.

Melt butter in a large skillet over medium heat. Add onion; cook, stirring often, until soft and lightly golden, about 8 minutes. Add mushrooms and apples; cook, stirring occasionally, until flavors meld, about 5 minutes. Stir in garlic, thyme, and rosemary; cook for 1 minute. Add brandy and cook until liquid is absorbed, about 1 minute. Stir in 2 tsp. salt and 1/2 tsp. pepper. Transfer mixture to a bowl and let cool completely. Add ground pork and stir to combine well.

Preparing the Pork Roast

To butterfly, put pork loin on a work surface with short end facing you. Holding a long, thin sharp knife parallel to work surface and beginning along one long side, cut 1/2" above underside of roast. Continue slicing inward, pulling back the meat with your free hand and unrolling the roast like a carpet, until the entire loin is flat. Cover with a sheet of plastic wrap. Using a meat mallet, pound to an even thickness.

Uncover pork. Season with 1 tsp. salt and 1/2 tsp. pepper. Place kale leaves on top of loin in an even layer, overlapping as needed and leaving a 1" border. Spread filling on top of kale. Roll pork into a tight cylinder. Wrap one layer of prosciutto around roast. Tie roast securely with kitchen twine in 1" intervals. Tuck rosemary sprigs under twine, spacing apart. DO AHEAD: Pork roast can be made 1 day ahead. Cover and chill. Let stand at room temperature for 1 hour before continuing.

Preheat oven to 400 degrees F. Place apples in a roasting pan. Melt 1 Tbsp. butter with oil in a large skillet. Brown pork on all sides, about 5 minutes total, then set on top of apples in pan. Add cider and 1/2 cup water to skillet and bring to a boil, scraping up browned bits. Pour mixture into roasting pan. Roast pork until an instant-read thermometer inserted into center of loin registers 140 degrees F (it will be cooked medium but still slightly pink), about 1 hour 40 minutes. Let roast rest for at least 20 minutes and up to 2 hours.
Put roast on a platter. Reserve apples from roasting pan; spoon off fat from juices in pan. Place pan on top of stove over medium-high heat. Add chicken stock. Pour in reserved mushroom liquid, leaving any sediment behind, and cook, scraping bottom of pan to release any browned bits, until slightly thickened, about 5 minutes. Whisk in remaining 2 Tbsp. butter and season to taste with salt and pepper. Strain sauce; slice pork. Serve sauce and apples alongside sliced pork.


Monday, September 26, 2011

Pumpkin Pie Cocoa

I spent a good bit of time the past couple of days "whipping up" (and yes, I did use the term facetiously here) the meal we enjoyed for dinner tonight, and that graces the cover of the October 2011 issue of Bon Appetit.  It is a good one (stay tuned later in the week for the results and step-by-step tutorial), but it took up so much time that I thought I deserved a break.  

So I decided to enjoy the beautiful day, put my feet up, and peruse the latest issue of Everyday with Rachael Ray (I do seem to have a one-track mind, don't I?).  Craving something pumpkin (as I tend to do this time of the year), this recipe leapt off the page at me, and sent me right back into the kitchen.  Pumpkin and chocolate (for those of you know don't know) is an excellent combination. It was nearly a year ago when I first acquainted you with this combo in the recipe for Harvest Pumpkin Loaf. Now here I am again acquainting you with yet another and, people, this one is DECADENT! I groaned when I took my first sip, that's how good it is. Since I only wanted to make one cup I cut the recipe in half.  I used Williams-Sonoma's Sweet Ground Chocolate instead of hot cocoa mix (pricey but well worth it), and added a pinch of pumpkin pie spice to the whipped cream.

Try it.  Go ahead.  I'm sure you deserve it.

Pumpkin Pie Cocoa

2 1/4 cups low-fat milk
1/2 cup hot cocoa mix
3 tbsp. canned pure pumpkin puree
1 1/2 tsp. pumpkin pie spice
1/2 cup whipped cream

In a saucepan, whisk milk, cocoa mix, pumpkin puree and pumpkin pie spice; heat until steaming. Pour into mugs and top with whipped cream.


This post is linked to: