Sunday, October 9, 2016

Roasted Red Pepper Soup Shots

I make no secret of the fact that I love Melissa's Fire Roasted Sweet Red Bell Peppers. So much so that, when I'm down to my last jar in the pantry, I get positively panicky. Here's why. This jar of red peppers, as much of a pantry staple for me as are flour and sugar, can brighten any dish, substitute for fresh peppers, take the place in fine fashion of pimientos in casseroles, perk up a salad, give some zing to a casserole, make a superb sandwich topping or relish, and, as I will show you here, give you an appetizer or starter soup in about three minutes.
I found this recipe on Epicurious.com and, being the huge fan of roasted red peppers that I am, had to try it. I expected it to be good; I did not expect it to be amazing. It is! I mean, it gets five stars right off the bat for being so darned easy, but it also gets five in the category of taste. It is hard to stop eating once you start.

Serving it in shooter glasses with a variety of toppings give it both interest and extra appeal. You can also customize for holidays, using minced cilantro or parsley to make the shooters red and green for Christmas, using feta to make it appropriate for Valentine's Day, chopped egg to turn it into picnic food, crumbled bacon to make it football food, or a tiny sprig of basil to say "Welcome Spring" when the time comes.  It's Sunday! Time to sip some soup.
Roasted Red Pepper Soup Shots
1 tablespoon Sherry vinegar (I used a bit more)
½ teaspoon kosher salt
¼ teaspoon freshly ground black pepper
¼ cup extra-virgin olive oil (use the best you can find)

Purée red peppers with their juices, Sherry vinegar, salt, and 1/4 pepper in a blender on high speed until very smooth, about 1 minute. With motor running, gradually add olive oil. Season to taste with salt, pepper, and more vinegar, if desired.
This post is linked to:

Friday, October 7, 2016

Peanut Butter Cup Crack Brownies

This blog post will be brief because, well, look at the picture. Do I really need to go on and on gushing about how good these are? The name alone, Peanut Butter Cup Crack Brownies, pretty much says it all. 

I'd seen this recipe, as perhaps many of you had, making the rounds on Facebook. After seeing it again and again, I finally caved and decided I had to make it. I made a big pan, divided it up between my dad, and my two sons and their families, and waited for the response. As you can well imagine, thumbs up all around. These are easy to make, rich, sweet, chocolaty, peanut buttery, and delicious. Need I say more?

Oh. P.S. It's my birthday!
Peanut Butter Cup Crack Brownies

 1 pkg. fudge brownie mix (not family sized)
½ cup chopped salted peanuts
12 peanut butter cups, chopped
2 cups semi-sweet chocolate chips
1¼ cups creamy peanut butter
1 Tablespoon butter
1½ cups crispy rice cereal
1 teaspoon vanilla
¼ teaspoon kosher salt

Preheat oven to 350°F.

Prepare brownies according to package directions. Spread into a greased and foiled-lined 9” x 9” pan. Bake for 17-20 minutes, until a toothpick inserted near the center comes out with moist crumb.

Remove from oven and sprinkle with chopped peanut butter cups and chopped peanuts. Bake 4-6 minutes longer or until chocolate is melted. Cool on a wire rack.

Meanwhile, in a microwave-safe bowl, melt the chocolate chips, peanut butter, and butter; stir until smooth. Fold in the cereal, vanilla, and salt. Carefully spread over brownies. Chill until chocolate is set, about 2 hours. Cut into squares to serve.

Slightly adapted from Taste of Home

Wednesday, October 5, 2016

Autumn Baker's Rack


A couple of months ago I treated you to my Baker’s Rack Redo project, something that I took on as therapy while Mr. O-P was in his final days. I've been enjoying that Baker’s Rack so much ever since that I decided to use it as a focal point to decorate with each season.
Often holiday decorating can become a bit overwhelming. This no longer need occur if you choose one focal point in your home, decorate it simply for the holiday, and leave it at that.
You'll be treated to a lovely change a number of times a year, and have something that's seasonally appropriate.
I have an open floor plan, so the Baker’s Rack is one of my main focal points. It’s a piece of furniture that I absolutely love, and have had since I was right out of college. It was one of my first large purchases (Large in size and money!) and I have been in love with it ever since.
It has been in a kitchen, on a covered porch, in the living room, bedroom, and now it's on the fringes of the kitchen and breakfast room.
Despite the fact that it is probably no longer “in style,” I love to look at it, and love that it's a showcase for some of my favorite pieces. As you all know, I do have a lot of dinnerware, but I tend to view it as not only a way to set a pretty table, but also as home décor to display and enjoy.
I like to change things up for the seasons so I can enjoy everything that I have. If you like dishes as much as I do then you should do the same.
When you last saw the Baker’s Rack it was very serene with whites and greens. I started taking a few pieces away, and dug around to see what I had in fall colors. I was actually quite surprised at how many different things I had in orange. I started putting things in place finding that very few pieces needed adding in order to change this into an early fall display. Stay tuned for more posts as it transitions from fall to Halloween, Thanksgiving, and Christmas.

This post is linked to:


Tuesday, October 4, 2016

Pesto Lasagna Roll Ups


This recipe looks more daunting than it really is. It came together rather quickly and, considering my complete lack of experience in using lasagna noodles, they rolled up like a dream. I was so pleased with these, in fact, that when I make them again, I plan to make different varieties, adding chicken to some, leeks and mushrooms to others, substituting the spinach with thin slices of sautéed zucchini in others, and even experiment with swapping out the basil pesto with tomato pesto and adding Italian sausage and black olives. Imagine doing this yourself, making up a big batch with enough varieties to provide you with a dish for brunch, a ladies luncheon, or football food. How versatile is that? Did I mention that they freeze beautifully? Don’t be put off by the numerous steps. These are well worth making.
Pesto Lasagna Roll Ups
Adapted slightly from Two Peas and Their Pod

12 lasagna noodles

For the Béchamel Sauce:
5 tablespoons butter
1/3 cup all-purpose flour
4 cups whole milk
¼ teaspoon freshly ground nutmeg
Kosher salt

For the Pesto Filling:
2 cups ricotta cheese
1 extra-large egg
2 cloves garlic, minced
10-ounces frozen spinach, thawed, drained, and squeezed to remove water
1/2 cu
p Melissa’s Basil Pesto
1/4 cup Parmesan cheese, plus 3 tablespoons, divided
1/8 teaspoon crushed red pepper flakes
Generous pinch of freshly ground nutmeg
Salt and freshly ground black pepper, to taste
2 cups shredded mozzarella cheese, divided

Preheat the oven to 350°F. Bring a large pot of water to a boil. Add the salt and cook the lasagna noodles to al dente, according to package directions. Drain and carefully lay the lasagna noodles out flat on a large piece of parchment paper or cooling rack. Let sit to cool.

To make the béchamel sauce, heat butter in a medium saucepan over medium heat until melted and foaming. Add flour and cook, whisking constantly, for 1 minute. Whisk in milk, 1/2 cup at a time. Bring the sauce to a boil, reduce heat, and simmer, whisking frequently, until the sauce thickens and is the consistency of cream. This will take about 8-10 minutes. Season with nutmeg and salt, to taste. Remove from heat and set aside.

In a medium bowl, combine the ricotta cheese, egg, garlic, spinach, pesto, 1/4 cup Parmesan cheese, crushed red pepper, and nutmeg. Stir until well combined. Season with salt and pepper.

Spray a 9x13 baking dish with cooking spray. Line the bottom of the pan with 1/2 cup of the béchamel sauce.

Take about 1/4 cup of the ricotta spinach mixture and spread it evenly onto each lasagna noodle. Top each noodle with 2 tablespoons of mozzarella cheese and 2 tablespoons of béchamel sauce. Carefully roll the noodles up and place them in the prepared pan. Top the lasagna rolls with the remaining béchamel sauce and remaining mozzarella and Parmesan cheese. Spray a large sheet of foil with cooking spray and cover the pan.

Place the pan in the oven and bake for 30 minutes. Remove the foil and bake for an additional 5 minutes, or until the cheese is melted on top. Remove from the oven and let sit for 5 minutes. Serve warm.


Monday, October 3, 2016

Pickled Cherries


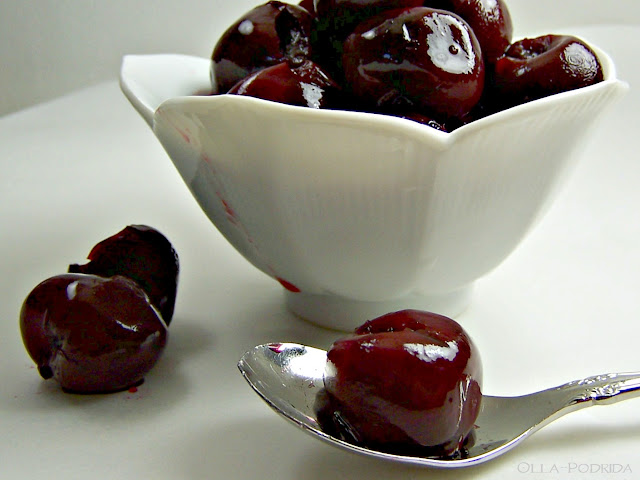
A couple of weeks ago, I shared a recipe for Roasted Red Pepper Spread. In the photo of this spread you may have noticed something that looked like grapes.  Nope.  Not grapes. Those tasty morsels were none other than pickled cherries. Not heard of pickled cherries, you say? Then you need to educate yourself immediately because these beat the pants off of grapes (unless you plan to pickle them as well). Sweet, spicy, and totally delicious, step aside cornichons, a new kid is in town. Simple to make, do-ahead, and able to be kept, refrigerated, for up to a month, you will dazzle with your next fruit and cheese tray, or antipasto platter.  Bing cherries are in season May through August, and again in December, so you still have time to try them for those big holiday parties.
Pickled Cherries
Adapted from epicurious.com

¾ cup distilled white vinegar
¾ cup water
2 Tablespoons granulated sugar
2 Tablespoons brown sugar
2 teaspoons whole black peppercorns
1 teaspoon coriander seeds
1 cardamom pod
1 cinnamon stick
1/2 teaspoon crushed red pepper flakes
1 pound
Melissa’s fresh Bing cherries, stemmed and pitted
1 large rosemary sprig

Bring first 9 ingredients to a boil in a medium stainless-steel saucepan, stirring to dissolve sugars. Reduce heat to medium-low, and simmer 5 minutes. Strain into a medium bowl, and return liquid to pan. Add cherries and rosemary to saucepan. Simmer until cherries are tender, 3-5 minutes. Transfer cherries and rosemary to a 1-quart mason jar (I used two smaller jars). Pour in enough pickling liquid to cover cherries. Cover and chill. Keep refrigerated. Strain before serving.


Sunday, October 2, 2016

Slow Cooker Loaded Baked potato Soup


Welcome to “Sip Some Soup Sunday.” Well, it isn't officially Sip Some Soup Sunday (though I am trying to get it to trend), I just like to call it that. :-) It is Sunday, and I do like to sip soup, and it's fun to say Sip Some Soup Sunday. Go ahead, say it. It's fun, am I right? I think it's the alliteration. Anyway it's October, and as far as I'm concerned that officially makes it soup season.


I've mentioned a number of times before that sometimes my main criteria for making a recipe is ease. This recipe falls into that category. When I first saw it I thought it was too good to be true. It just looked way too easy to be really good. In the past, I'd only worked with frozen hash browns in baked casseroles, so I wasn't sure how well they would translate to soup. If you were wondering the same thing, let me set your mind at ease, this recipe is fantastic, and boy is it easy. So relax, and enjoy your Sunday, while your dinner simmers away in the crockpot.

Slow Cooker Loaded Baked potato Soup
Slightly adapted from 12 Tomatoes

1 (32 oz.) bag frozen hash browns

1 (32 oz.) box chicken broth

1 (10 oz.) can condensed cream of chicken soup

1 (8 oz.) package cream cheese, softened

1 1/2 cups sharp cheddar cheese, grated, plus extra for garnish

3/4 cup crumbled bacon, plus extra for garnish

1/4 cup chopped scallions

Rosemary for garnish


Combine hash browns, cheddar cheese, chicken broth, cream of chicken soup, crumbled bacon, and cream cheese in slow cooker. Season with salt and pepper. Use a spoon to break up cream cheese and thoroughly mix ingredients together.

Place lid on slow cooker and cook on HIGH for 3 hours, stirring occasionally, or until potatoes are tender.

Taste and adjust seasoning, if necessary. Stir in scallions. Garnish with more cheddar cheese and bacon bits.

Serve.

Saturday, October 1, 2016

Pumpkin Swirl Brownies


I hate baking, I really do. Because no matter what I try to bake, no matter how simple, it always ends up being a massive cleanup for me. All I need do is lift the lid off of the flour canister, and suddenly I'm wearing it. Plus, it's on the floor, it's on the countertops, it's everywhere. This involves getting out major cleaning products, not to mention the vacuum, and in some cases the hardwood floor cleaner. If I try to wipe up the floor with a damp cloth, invariably that cloth will be too damp, yielding a floury goo that needs serious seeing to.

So, you have to know, that if I'm going to bake, it's going to be for someone special, or because the end result is something special. Such was the case today, when I decided to make Martha Stewart's Pumpkin Swirl Brownies for my number one son who agreed to brave the fierce and help me clean out my pantry.

It had been years since I last made these, but I had written on the recipe that we really enjoyed them. I'm not going to lie to you, these things are trouble. I was trying to relax today, and not upset myself during the baking process, ending up completely having to eliminate the nuts because I failed to locate and chop them, and had trouble swirling the two mixtures, because in my forced state of relaxation, I failed to read ahead in the recipe where it said "working quickly." Sigh.

Next time I'll use the nuts and, maybe, just maybe, I'll sprinkle some mini chocolate chips on top. I do love the combination of pumpkin and chocolate. These brownies, cake-like right out of the oven, are even better when refrigerated overnight and served at room temperature the following day. Something magical happens when these are allowed to rest for a while. Also, don't be afraid of the cayenne. These are in no way hot or spicy, the pepper just adds a wonderful depth.
Pumpkin Swirl Brownies
Slightly adapted from Martha Stewart

8 tablespoons (1 stick) unsalted butter, plus more for pan
6 ounces bittersweet chocolate, chopped
2 cups all-purpose flour
1 teaspoon baking powder
1/4 teaspoon cayenne pepper
1/2 teaspoon salt
1 3/4 cups sugar
4 large eggs
1 tablespoon pure vanilla extract
1 1/4 cups solid-pack pumpkin
1/4 cup vegetable oil
1 teaspoon ground cinnamon
1/4 teaspoon ground nutmeg
1/2 cup chopped hazelnuts or other nuts
Preheat oven to 350°F. Line a 9-inch square baking pan with foil; spray bottom and sides with Pam.

Melt chocolate and butter in a heatproof bowl in a microwave oven at 20-second intervals, stirring between each (1 minute).

Whisk together flour, baking powder, cayenne, and salt in a large bowl; set aside. Put sugar, eggs, and vanilla in the bowl of an electric mixer fitted with the paddle attachment; beat until fluffy and well combined, 3 to 5 minutes. Beat in flour mixture.

Divide batter between 2 medium bowls (about 2 cups per bowl). Stir chocolate mixture into one bowl. In other bowl, stir in pumpkin, oil, cinnamon, and nutmeg. Transfer half of chocolate batter to prepared pan smoothing top with a rubber spatula. Top with half of pumpkin batter. Repeat to make 1 more chocolate layer and 1 more pumpkin layer. Work quickly so batters don't set.

With a small spatula or a table knife, gently swirl the 2 batters to create a marbled effect. Sprinkle with nuts.

Bake until set, 40 to 45 minutes. Let cool in pan on a wire rack. Cut into 16 squares.