Wednesday, April 11, 2018

Spicy Mustard Ham Salad

Today I am going to share a delicious recipe for ham salad. I know what you’re thinking, enough with the ham already! We get it! You bought too much ham. To which I would respond, well at least you’re not living it. My life has become a porcine nightmare. Seriously, I am beginning to oink. But, you can relax now; this is the last ham-related recipe that I’m going to share for a long, long time. You can trust me on that.

This is a wonderful recipe because it has so many uses. You can put it in a dish and serve it with crackers as a snack or pre-meal appetizer, you can enjoy it on a sandwich as I did here, you can make a lettuce wrap out of it (that is really delicious by the way), or use it as a dip with tortilla chips (or even Fritos, and I cannot tell you how yummy that is). At any rate, this is a good recipe to keep on hand, because there always seems to be a bit of ham left over no matter your good intentions, and this is a great way to make use of it.
 
Spicy Mustard Ham Salad

10 ounces ham
3 kosher dill pickle spears (I used Clausen)
1 tablespoon brown sugar, loosely packed
1/4 cup mayonnaise
1/4 cup spicy brown mustard
1 tablespoon instant minced onion
1/2 teaspoon dried dill weed

Toss all ingredients into the food processor and pulse until it reaches desired consistency. If you want to thin it a bit, add a bit of pickle juice and pulse again.


 If you like your ham spread with a bit more kick, you might try Ham Spread Diablo. Zesty!


This post is linked to:

This post contains affiliate links.

Tuesday, April 10, 2018

​​​​Creamed Ham and Mushrooms on Toast

Can you believe that I am still eating ham? Wow! I had no idea how long that ham would last. At one point I considered burying it out in the backyard, but that would have gone against my grain, so I used up every last bit. This morning I decided to make a ham version of cream chipped beef on toast. As it turned out, it was excellent! So, here is the recipe for those of you whose hams are bigger than their stomachs.
​​​​Creamed Ham and Mushrooms on Toast

2 tablespoons butter, divided
4 ounces mushrooms, sliced
1 cup slivered ham
1 ½ tablespoons flour
1 ½ cups whole milk
1/4 cup sour cream
1/4 teaspoon freshly ground black pepper
1/4 teaspoon curry powder, or to taste
1/2 cup chopped fresh parsley​
4 pieces toast

In a 9 - 10 inch sauté pan, heat 1 tablespoon butter over medium high heat. Sauté mushrooms for 3 to 5 minutes, then add ham and sauté for 1 to 2 minutes, adding more butter if necessary. Move ham and mushrooms to one side of the pan, add remaining 1 tablespoon of butter and flour, stirring to combine. Cook and stir 1 to 2 additional minutes. Add milk in a slow stream and bring to a boil, stirring constantly. Reduce heat and simmer, stirring occasionally, until thickened. Stir in sour cream, pepper, curry powder, mustard, ​and parsley. Continue to cook over low heat, stirring constantly, until heated through, about two minutes. Ladle mixture over toast. This serves two hearty appetites, or four smaller ones.


This post is linked to:

This post contains affiliate links.


Monday, April 9, 2018

Slow Cooker Ham and Bean Soup


When Mr. O-P was alive, he was the one who did the grocery shopping. It is never a good idea to set me loose in the local market. Because when I do, I tend to get distracted. I am completely taken in by clever packaging, pretty bottles (I can get seriously lost in the liquor department), and interesting product names. I find myself wandering up and down aisles that I generally never visit, putting items into my cart that I have no idea what I’m going to do with once I get back home.

Such was the case with the package of
Bob’s Red Mill 13 Bean Soup Mix that I found myself reaching for last week. I have no idea what I was thinking. Essentially, it was just a bag of beans. An expensive bag of beans, and I don’t even eat beans, but the variety of shapes, sizes, and colors appealed to my artistic side, not to mention the beckoning little jute tie around the top. So, I made use, once again, of the massive ham left over from Easter, nearly jumping with joy at finally getting that bulky thing out of the fridge.

Fairly new to bean soup, I have to say that I really liked this, and would not hesitate to make it again. It goes particularly well with cornbread and honey butter.
Slow Cooker Ham and Bean Soup

10 ounces 13-bean soup mix (I used Bob’s Red Mill)
1 ham bone
3 cups cubed cooked ham
2 cups chicken stock
2 cups water
1 medium onion, diced
2 carrots, diced
2 cloves garlic minced
1 14.5-ounce can diced tomatoes
1/2 teaspoon freshly ground black pepper
1 teaspoon chili powder
1/2 teaspoon salt
1 bay leaf

Place 13-bean soup mix into a large bowl and cover with several inches of cool water; soak in refrigerator overnight. The next morning, drain and rinse. Place bean mix and all remaining ingredients into the slow cooker. Give it a mighty stir, cover, and cook on low for 8-10 hours. This soup will keep in the fridge for up to three days and the flavors improve with age.


If you enjoy bean soup as much as I found that I have, you will certainly enjoy this Cuban Black Bean Soup. It's a recipe from an area restaurant, and SO good!


This post is linked to:
This post contains affiliate links.

Sunday, April 8, 2018

Easter Linguini


I came up with the idea for this dish, believe it or not, while sitting in the dentist’s chair. I had an appointment to get my teeth cleaned, and because I find it so tedious, I generally just lie back, close my eyes, and take my mental leave. When I did, I started thinking about all of the Easter leftovers that I had in the fridge, and thus this recipe was born. This dish uses both ham and peas from my Easter dinner, and can be on the table in 30 minutes. So intrigued was I with the general idea, that as soon as I got home from the dentist, I dirtied up my clean teeth by eating a bowl of this. It is so good!

I decided to call this dish Easter Linguine because it makes use of leftover Easter ham and peas. Initially I had considered Easter Leftovers Linguine, but then I thought, who would want to eat that? :-)
Easter Linguini

8 ounces linguine
2 tablespoons unsalted butter
1 cup ham, cut into strips
1 garlic clove, minced
1/2 cup heavy cream
1 cup peas
1/4 cup chopped fresh parsley
1/4 cup freshly grated
Parmesan cheese
Freshly ground black pepper
Lemon zest, a few gratings

Cook linguini according to package directions. During the last two minutes of cooking, toss in peas. Drain peas and pasta, reserving 1/2 cup pasta water. Return peas and pasta to pan.

While pasta is cooking, melt butter in a 9-inch sauté pan. Gently sauté ham. Stir in garlic, cook for one minute. Stir in heavy cream, allow to simmer until thickened.

Pour cream sauce over linguini and peas, add parsley, Parmesan cheese, freshly ground pepper, and the lemon zest. Toss to coat. If sauce needs thinning, add pasta water a tablespoon at a time, until it reaches desired thickness. Serve immediately.

  
If you like linguini as much as I do, you may also enjoy Linguine in Broccoli Cream Sauce.


This post is linked to:

This post contains affiliate links.

Thursday, April 5, 2018

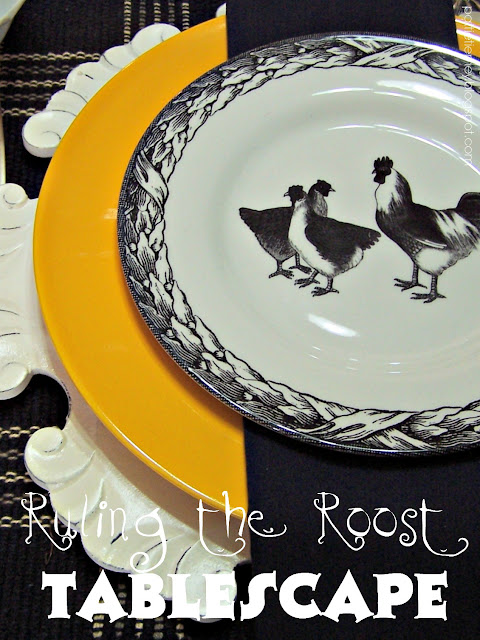
Ruling the Roost Tablescape


Easter on April Fools’ Day? Well, it fooled me. No way was I ready. Now, I don’t do a big meal on Easter anymore, but I do take a nice dinner to my dad, and I did that. But, instead of setting an Easter table that would only be appropriate for a day, I decided to set one for spring.
It has been gray and rainy for an entire week here, with more to come, so I wanted a table with punch. These yellow Waechtersbach dinner plates provided the punch here. With a centerpiece of yellow daffodils, I got the results that I was looking for, namely, a monochromatic yet cheery table to chase the gray away.
Black placemats that I purchased locally make up the first layer, and they are topped with carved wooden chargers from Pier 1; they are so versatile.
I was looking for some something colorful, with no pattern, and that would look good with all of the white and green dishes that I have, and these yellow plates filled the bill. I did a lot of shopping before I found the exact yellow that I was looking for, and this was it.
The black and white chicken plates on top finish things off here. Don’t you just love these? They are whimsical and fun, and will take me all of the way from summer into fall.
The yellow chalices you’ve seen before, they were purchased by my mother way back in the 70s. The small wineglasses are vintage pressed glass. They belonged to my mother's best friend as a girl, who later became matron of honor at her wedding. I don’t use them often, but I find they add just the right touch of sparkle when I do.
The black napkins I made myself. They’re very simple, just made out of solid black 100% cotton.

The white lotus bowls will hold a green or fruit salad, or even rice, depending upon what I’m serving; they can also be used to hold a biscuit or roll. They are versatile as well. These days, I don’t buy any dishes unless I can think of multiple uses.
I hope you found this table as inspiring to look at as I found to create.

This post is linked to:

This post contains affiliate links.

Tuesday, April 3, 2018

Chocolate Malt Cake with Chocolate Malt Frosting


I no longer do much for Easter. It’s not that I wouldn’t like to do something for Easter, it’s just that so many people have passed on, grown-up, have their own families, moved away, well… It is what it is. I make no complaints, I’m happy enough to do my own thing, but I do take a meal to my dad, and I did that on Good Friday. The meal consisted of a glazed spiral ham, a corn dish for which he has a particular liking, the pretzel salad that I mentioned here, a potato casserole, loaf of Rosemary Sea Salt Bread, and this cake.

I’ve said it once, I’ll say it again, I am not a baker, but I got to wondering what my dad might like for dessert. I know one of his favorite things, besides pecan pie, is a chocolate malt, so I thought I would make a chocolate malt cake. The only thing stopping me was the lack of a recipe, so I decided to come up with one of my own. It was very good, but not without its issues. I wanted to decorate it and make it look pretty. Therefore, I cut up malted milk balls and put them on the top of the cake as you can see in the pictures, something I did the day prior to taking the cake to my dad. That was not a good idea. The malted milk balls absorbed moisture from the frosting, and got a little gummy. Pretty, but chewy. I also thought I would split the two layers for extra frosting. Dad did not complain because he loves his sweets, but to me that was just too much frosting. So, keep these things in mind when you make this cake, and you should, because it is very dense and chocolaty.
Chocolate Malt Cake with Chocolate Malt Frosting

Cake:
2 cups granulated sugar
1 3/4 cups all purpose flour
3/4 cups unsweetened cocoa powder
1/4 cup
chocolate malt powder
1 1/2 teaspoons baking soda
1 1/2 teaspoons baking powder
1 teaspoon kosher salt
2 large eggs
1 cup whole milk
1/2 cup vegetable oil
2 teaspoons vanilla extract
1 cup hot, freshly brewed coffee

Frosting:
3/4 cup butter
1 cup unsweetened cocoa powder
1/2 cup
chocolate malt powder
5 1/2 cups confectioners sugar
3/4 cup whole milk
1 teaspoon vanilla extract

Preheat oven to 350°F. Grease and flour two 9-inch cake pans; set aside.

In the work bowl of a stand mixer, whisk together sugar, flour, cocoa, malt powder, baking soda, baking powder, and salt. Add eggs, milk, oil, and vanilla, and using the paddle attachment, beat at medium high speed for three minutes. Remove bowl from mixer, and stir in the hot coffee by hand. Divide mixture evenly between the two prepared pans. Bake for 35 to 45 minutes, or until tops spring back and a toothpick comes out clean. Remove from oven and cool on racks for 20 minutes. After the 20 minutes are up, run a knife around the edges of the pans, and invert both onto wire racks to cool completely.

To make the frosting, cream butter until light and fluffy, about 3 minutes. Stir in cocoa, malt powder, and confectioner’s sugar alternately with the milk and vanilla.
Beat to a spreading consistency another 3 to 4 minutes. Frost cake as you see fit.

This post is linked to:
This post contains affiliate links.


Monday, April 2, 2018

Not Your Momma’s Pretzel Salad

Pretzel Salad has been around for a long time. My first taste of it came somewhere in the 70s, and I loved it then the same way that I love it now. I’ve eaten a lot of it over the years, served to me by a lot of people. What I have learned from this is that very few people know how to properly make it. One pretzel salad that I had is particularly memorable, because there were big chunks of pretzel in the crust! Let me ask you, when you have a graham cracker crust, are there big chunks of graham cracker in that crust? No! And there should not be big chunks of pretzel in a pretzel crust. Pretzels should be treated in the same way in which graham crackers are treated.

The filling should be wonderfully creamy. For this to happen, the cream cheese needs to be at room temperature, and the topping needs to be thawed. This is one of those cases where I do use Cool Whip and I like it, and make no apologies.

Now let’s talk about the Jell-O. It needs to be made by the quickset method, refrigerated for a short while, and poured on top so that it’s not going to sink down through the layers and into the pretzel base. I was once served a pretzel salad where the Jell-O had apparently been poured on right after being made. It seeped all of the way down completely covering the pretzel layer turning it into a gelatinous mass. What you want is a beautifully layered salad.

If you want your pretzel salad to be memorable in a positive way, rather than the negative ways that I’ve mentioned above, I’m going to tell you exactly how to do it. One thing that’s going to make it particularly easy, is to do two of the layers in the food processor. You will get a beautiful crust if you pulverize your pretzels in the food processor, and then just wipe it out with a paper towel, replace the work bowl onto the base, and mix the filling ingredients in there as well. It turns out perfectly every time. I find strawberries in pretzel salad to be a bit cloying and mundane, so I like to use cherries. I find more people like a cherry topping than they do one of strawberries. If you want to make an adults only version of pretzel salad, you might try using
bourbon or brandy-soaked cherries. Talk about delicious!

Here’s the way that I make a pretzel salad, and I’ve never tasted one better.
Not Your Momma’s Pretzel Salad

1 8-ounce bag mini pretzel twists
3 tablespoons granulated sugar
1/2 cup butter, melted
1 8-ounce pkg. cream cheese, room temperature, I mean it!
1 8-ounce container Cool Whip, thawed
2 4-ounce packages cherry Jell-O
1 12-ounce can pitted bing or morello cherries, 
or fresh, pitted, if in season

Preheat oven to 350° F.

Pour the pretzels into the work bowl of your food processor. Pulse until they have been reduced to fine crumbs. Add sugar and melted butter, and pulse until combined. Turn out into a 9” x 13” pan pressing into the bottom. Bake for 10 minutes, remove from oven and allow to cool.

Wipe out the bowl of your food processor and add cream cheese and sugar. Pulse until combined. Add Cool Whip and process until smooth and creamy. Pour over the cooled crust.

Make Jell-O according to the “quickset“ directions. I use 2 cups of boiling water for two packages, and 1-3/4 cups of ice water. Place in refrigerator for 30 to 40 minutes, (checking at 30 minutes) until it has thickened, but is still pourable. Meanwhile, place the cherries in whatever design you see fit on top of the cream layer. When the Jell-O is ready (no more than 40 minutes), carefully pour over the cherries. Place pan in refrigerator and allow to chill completely, 3 to 4 hours. Cut into squares and serve. Keeps, refrigerated, for 3 days.

This post is linked to: