Friday, July 7, 2023

Cici’s Cherry Pizza

 
Sometimes I try recipes for no other reason than curiosity alone. This is one of those recipes. Prior to spotting it on the copycat recipes website, I had never heard of Cici’s pizza, so naturally, I’ve never eaten at one. This dessert just looked so simple and so good that I wanted to give it a try. I was leery at first, using pre-made pizza dough from the grocery store. I wasn’t sure how that was going to be, or if I would like it with something sweet, but I liked it a lot! This is a super simple dessert that will serve a crowd, and please every one of them. Give it a try.

Cici’s Cherry Pizza

 Crumb Topping

½ c. flour

3 T. granulated sugar

1 T. brown sugar

1/8 t. salt

¼ c. butter, softened

 Pizza

1 lb. pizza dough

1 20-oz. can cherry pie filling

Glaze

1 c. powdered sugar

½ t. vanilla extract

1½-2 T. milk

  Preheat the oven to 450°F. Spray a 12” pizza pan with PAM; set aside.

To make the crumb topping, mix the flour, sugar, brown sugar, and salt. Add the butter and use a pastry blender or fork to combine until the mixture resembles cornmeal.

To make the pizza, spread the dough on the prepared pizza pan and prick with a fork 8 to 10 times. Place in the preheated oven for 5 minutes. Remove from the oven, spread the cherry pie filling over the crust, and sprinkle with the crumb topping. Return to the oven and bake for 20 to 25 minutes.

 While the pizza is baking, make the glaze by combining the powdered sugar, vanilla extract, and 1½ tablespoons of milk. Mix well. When the crust is golden brown, remove the pizza from the oven and top with the glaze.

As an Amazon Associate I earn from qualifying purchases.


Tuesday, July 4, 2023

Hummingbird Cake

 
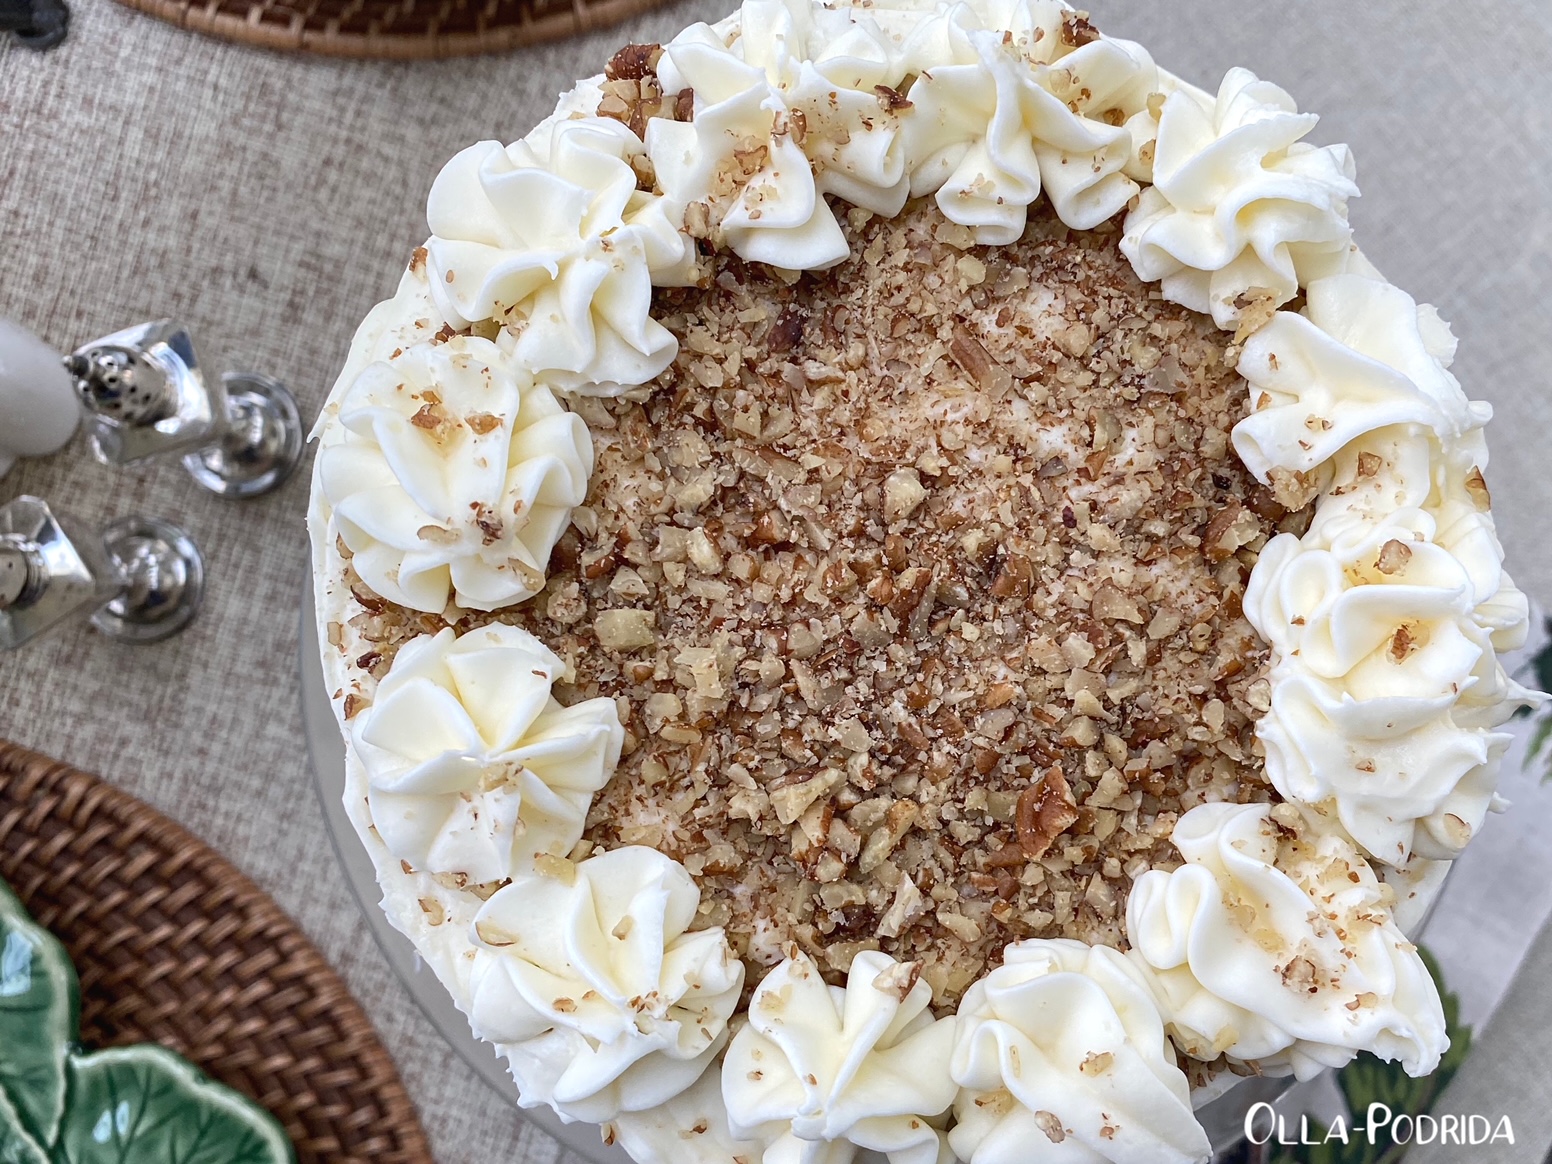
In Jamaica, where this cake originated, it is referred to as Doctor Bird Cake, named for the island’s national bird, the scissors-tail hummingbird. In 1968, hopeful of increasing tourism, the Jamaican Board of Tourism exported the recipe in media press kits sent to the United States. The recipe found its way into the February 1978 issue of Southern Living Magazine, was a huge hit with readers, and later that year won the Favorite Cake Award at the Kentucky State Fair.

I am not a particular fan of hummingbird cake; there is something about bananas and pineapple both, in a cake, that doesn’t appeal to me. But, it is one of my daughter-in-law’s favorites, and her birthday was July 1. In my family, you get what you want on your birthday, so I spent the last day of June (the hottest day of the year, thus far, with high humidity), making this cake for her. It’s not difficult to make, it’s just a bit time consuming. I wanted something small and grand, so I baked it in 3 6-inch cake pans. I’m very pleased with the results. My son and daughter-in-law gave it two enthusiastic thumbs up.Hummingbird Cake

2 c. chopped pecans

3 c. flour

1 t. baking soda

1½ t. ground cinnamon

½ t. allspice

½ t. salt

2 c. mashed bananas (about 4 large ripe)

1 8-oz. can crushed pineapple, lightly drained

3 large eggs, room temperature

2/3 c. vegetable oil

1 c. packed dark brown sugar

¾ c. granulated sugar

2 t. vanilla extract

 Cream Cheese Frosting

16 oz. cream cheese, room temperature

¾ c. unsalted butter, room temperature

5 c. confectioners’ sugar

1 T. milk

2 t. vanilla extract

1/8 t. salt

 Preheat oven to 300°F. Spread pecans onto a lined baking pan. Toast for 8 minutes. Remove from the oven. Turn oven up to 350°F.

 Spray the heck out of three 6-inch cake pans with Baker’s Joy; set aside.

 Whisk the flour, baking soda, cinnamon, allspice, and salt together in a large bowl.

 Whisk the rest of the cake ingredients in a medium bowl. Pour wet ingredients into dry ingredients and whisk until completely combined. Fold in 1 and 1/2 cups toasted pecans. (Reserving the rest for garnish.)

Spread batter evenly between the 3 prepared cake pans. Bake for 26-29 minutes or until a toothpick inserted in the center comes out clean.

Remove cakes from the oven and allow to cool completely in the pans set on a wire rack before removing from pans.

 Make the frosting: Beat together cream cheese and butter high speed until smooth and creamy. Add confectioners’ sugar, vanilla, milk, and salt. Beat on low speed for 30 seconds, then switch to high speed and beat for 2 minutes. 

 Frost cake and top with remaining chopped pecans. You can get fancy schmancy, or keep it simple.

 Keeps in the fridge for up to 5 days.

As an Amazon Associate I earn from qualifying purchases.     

Monday, July 3, 2023

Jalapeño Popper Grilled Cheese

 
If you are as big of a fan of jalapeño peppers, as I am, then you are going to love this clever way to enjoy them in a grilled cheese sandwich. This recipe is from smalltownwoman.com who is clearly a woman after my own heart. While her recipe is designed to serve two, I cut it in half, just made one, and it was sandwich perfection. After having this, I honestly can’t imagine enjoying a grilled cheese without the addition of jalapeños in one form or other. If you like the idea of jalapeño poppers, but jalapeños have too much heat for you that is no problem. Place your fresh jalapeños in a small bowl of water and put it in the fridge. Leave it there for a day or two and the heat will dissipate, leaving only the wonderful flavor of the pepper.

Jalapeño Popper Grilled Cheese

2 jalapeños, sliced lengthwise, seeds and membranes removed

4 oz. cream cheese

4 slices bacon, crispy cooked

2 slices Monterey jack

2 slices sharp cheddar

4 slices Italian bread

Cilantro chopped (optional)

Pats of butter

Preheat oven to 375°F.

 Stuff each jalapeño half with approximately 1 ounce of cream cheese. Bake on a baking sheet for 25-30 minutes. Remove from oven; cool slightly.

 Assemble sandwiches thusly:

Bread

Slice of cheddar

Stuffed jalapeño pieces

Bacon strips

Slice of Monterrey Jack

Bread

 Top each sandwich with several pats of butter. Place in skillet over medium-low heat, butter side down.  Top with more pats of butter. Now grill each side until lightly browned.

 Cheese should be melted and gooey.


Friday, June 30, 2023

Purple & Yellow Summer Salad with Lemon Vinaigrette

 
One of the best things I did this year was to give over one of my window boxes on the deck to the growing of lettuce. This beautiful variety is called “Merlot.” Interestingly enough, it was not my plan to grow lettuce. I got the seeds for free as a ‘thank you for the purchase of other seeds, so I decided to give it a try. Now I am hooked! This is a beautiful, tender, delicate lettuce that has been a wonderful addition to my dinner table. Every evening I go out with the scissors, cut what I’d like, experiment with different colors and ingredients, and enjoy a colorful, healthy, and delicious main or side.
 
Today I decided to focus on purple and yellow in my salad, and the results are absolutely delicious. The beauty of summer is that so many diverse fresh fruits and vegetables are available. I intend to take advantage of as many as I can.

Purple & Yellow Summer Salad

with Lemon Vinaigrette

Use the following ingredients in any quantity:
Merlot Lettuce
Blueberries
Fresh corn, stripped from cob
Blue cheese
Red Onion, thinly sliced

Melissa’s Yellow Watermelon
Lemon Vinaigrette (recipe below)

 Lemon Vinaigrette

 ¼ c. fresh lemon juice

1/3 cextra-virgin olive oil

1 t. Melissa’s minced garlic

1 t. Dijon mustard

1 t. sugar

¼ t. kosher salt

Freshly ground black pepper, to taste

 Place all ingredients into the work bowl of a mini food processor and process until emulsified. Taste for seasoning.

As an Amazon Associate I earn from qualifying purchases. 

Thursday, June 29, 2023

Spinach and Mushroom Tart

 
I don’t know about you, but I will often buy things at the grocery store with the intention of using them for a specific recipe, and then, as soon as I get home, can’t find the recipe. As often as this happens to me, you’d think I would do something about it, but no. Such was the case with a package of crêpes. Somewhere I knew that I had seen a recipe for a tart using crepes, but I couldn’t, for the life of me, find it. I remembered that the recipe called for spinach and mushrooms, but that was the extent of my remembrance.

 Today, feeling a bit cocky, I decided to make up my own, and boy, was it delicious! Honestly, I couldn’t believe how good it turned out to be. There are so many wonderful things that you can do with crêpes, but the most important thing is, don’t make your own when beautiful, delicious ones are available ready-made from Melissa’s Produce. This recipe would make a wonderful brunch, lunch, or dinner addition. It could be a main for brunch or lunch, and a side dish for dinner. If you want to make it heartier, add some chopped ham, or cooked and crumbled bacon. I don’t think you can go wrong.

Spinach and Mushroom Tart

 2 T. butter

2 T. flour

2 c. whole milk

Few gratings whole nutmeg

Salt and pepper, to taste

2 T. butter

8 oz. fresh baby spinach

2 c. sliced crimini portobello mushrooms

1 t. Melissa’s minced garlic

¼ t. Montréal Steak Seasoning

4 green onions, thinly sliced

2 c. grated Monterey Jack cheese

1 10-pack Melissa’s Ready-to-Use Crêpes

2 scallions, thinly chopped

Red pepper flakes

 Preheat oven to 375°F. Spray a 10” skillet or sauté pan with PAM; set aside.

In another large skillet, melt butter and sauté the spinach, mushrooms, and garlic until mushrooms are soft and spinach has wilted; set aside.

Make the béchamel sauce by melting butter over medium heat in a 1.5-qt saucepan. Whisk in the flour and continue to cook and stir until golden. Slowly whisk in the milk; cook until the sauce thickens and coats the back of a spoon. Stir in nutmeg, salt, and pepper, and set aside to cool slightly.

 Once the sauce cools down, measure out 1/4 cup, set aside, and mix the rest with the spinach and mushrooms.

 To assemble, place 2 crêpes into the bottom of the prepared 10” skillet. Spread about 1/3 c. of the béchamel sauce mixed with the spinach and mushrooms over the top. Sprinkle with some of the grated cheese.

 Repeat this process, using a two-crêpe layer each time. When you have only two crepes left, pour reserved béchamel sauce over the top and sprinkle with cheese, scallions, and pepper flakes.

 Bake in preheated oven for 20-25 minutes, until edges of crêpes are flaky and golden, and sauce is bubbling around the edges.

Allow to rest for five minutes before slicing and serving. It is delicious warm or at room temperature, so is perfect for a buffet.

As an Amazon Associate I earn from qualifying purchases.

Tuesday, June 27, 2023

Summer Berry Icebox Cake

 
There is a lot to like about this dessert, particularly where patriotic summer holidays are concerned. It is cool and refreshing, makes use of the sweet goodness of fresh fruit, will be enjoyed by all, it is boldly red, white, and blue, and probably most importantly is that this no-bake dessert is make ahead. There is nothing to putting together this simple dessert; it’s more assembly than anything. I have found its sweet, cool deliciousness to be quite welcome for breakfast, so I think this would be as suitable for brunch as it would be for lunch or dinner.

No Bake Summer Berry Icebox Cake

Adapted from cakescottage.com

 21 graham crackers

8 oz. cream cheese, softened

2 (3.4 oz) packages Vanilla Instant Pudding

2 c. whole milk

½ c. Amaretto

12 oz. Cool whip (or homemade whipped cream)

3 c. sliced fresh strawberries

1½ c. fresh blueberries

2 oz. white chocolate chips

 Beat cream cheese and dry pudding mixes in large bowl with mixer until blended; gradually beat in milk and Amaretto.

 Gently stir in Cool Whip or homemade whipped cream, reserving ½ cup. Spread a thin layer of Cool Whip in a 9” x 13” pan just to coat the bottom.

 Layer 5 graham crackers across the center of the pan, then 2 more, breaking them as needed, to fit around the top and bottom edges.

 Spread a layer of pudding mixture over grahams and top with a layer of blueberries and sliced strawberries. Place graham crackers on top of berries, then pudding mixture, and then layer of berries again. Repeat the graham/pudding/berries layers 1 more time (3 times total) and you should reach the top of the pan.

 Refrigerate for at least 4 hours or overnight until the graham crackers have softened completely.

 When ready to serve, melt white chocolate chips in a bowl as directed on package and drizzle over dessert.

As an Amazon Associate I earn from qualifying purchases.

Monday, June 26, 2023

Cheesy Paprika Cauliflower

 
My mother used to say that she could make a meal out of vegetables, and I was always right there with her. Dad, being a carnivore, wouldn’t go for that, and neither would the late Mr. O-P. Now that I’m on my own I eat what I like, when I like, and today was one of those vegetable days. Green beans amandine, broiled tomatoes, and this cauliflower dish made up my dinner plate. It was colorful, satisfying, and delicious, and, truth be told, eating vegetables always makes me feel a whole lot less guilty about having a buttered-slathered crusty roll alongside. This is a dish that is tastier than it would appear. It is super simple to put together, and is one that I do believe the kids would enjoy.

Cheesy Paprika Cauliflower

Adapted from robinmillercooks.com

1 head cauliflower, cut into florets

1 T. extra virgin olive oil

1 t. smoked paprika

½ t. garlic powder

¼ - ½ t. seasoned salt

¼ t. freshly ground black pepper

1 c. shredded cheddar cheese

1-2 scallions, chopped

 Preheat the oven to 350°F.

 Blanch the cauliflower in a large pot of boiling water for 4 minutes. Drain and transfer the florets to a large bowl. Add the olive oil and toss to coat. Add the paprika, garlic powder, seasoned salt, pepper, and 1/2 cup of the cheese; gently toss to coat the florets evenly.

 Transfer the cauliflower to a shallow baking dish and top with the remaining cheese. Bake for 5 minutes, until the cheese melts.

 Top with scallions and serve.

 As an Amazon Associate I earn from qualifying purchases.