Wednesday, September 28, 2016

Blueberry Croissant Puff


I am a big fan of breakfast, as long as I don't have to make it or eat it at breakfast time. That's why I fell in love with this versatile make-ahead casserole. Easy to assemble, suitable for individual servings for those intimate meals, or one casserole dish for family brunches, this will be my "go-to" sweet dish for my next buffet-style brunch.

I used the croissants as suggested by the original recipe, but I'm guessing that this would work equally well with challah. A dusting of powdered sugar is all I felt it needed, but a drizzle of pure maple syrup would make this absolutely decadent. If breakfast is not your thing, this makes for a delightful dessert when served straight from the oven with a big scoop of vanilla ice cream.
Blueberry Croissant Puff
Slightly adapted from Kraft

3 large croissants, cut up (about 5 to 5½ cups)
1 cup fresh or frozen blueberries
1 package (8 oz.) cream cheese, softened
⅔ cup sugar
2 eggs
1 teaspoon vanilla
1 teaspoon freshly grated lemon zest
Pinch of cinnamon
1-1/2 cups whole milk


Place croissant pieces in either 10 1/2-cup ramekins or a 9" square pan. Sprinkle with blueberries; set aside.


Beat cream cheese, sugar, eggs, vanilla, lemon zest, and cinnamon in a medium bowl with an electric mixer until well blended. Gradually add milk, beating well to combine.  Pour evenly over croissant pieces. Let stand 20 minutes or soak overnight.


If using a 9" pan, bake at 350°F for 35 to 40 minutes or until set in center and golden brown. If using ramekins, bake for only 22 to 25 minutes. If you find the top browning too quickly, cover with foil for the last 10 minutes.

Serve warm sprinkled with powdered sugar.
This post is linked to:

Monday, September 26, 2016

Spinach, Mushroom, and Artichoke Ravioli Bake


This is one of those recipes that I found online, was taken in by the nice pictures, and thought I'd make it. Honestly, I didn't think it could possibly be any good. I figured that I was wasting both time and ingredients, but I made it anyway. The appeal? It looked easy. Some days “easy” is my only criteria. The original recipe I found here, but, as I tend to do, changed it up a bit. I could not believe how good it was.
I cut the recipe in half...sort of. I had half of a bag of frozen cheese ravioli, so used it in an 8" x 8" pan (no way would the 9" x 13" pan in the original recipe work under any circumstance). I used half the amount of fresh spinach, a small jar of marinated artichoke hearts (because they are much more flavorful), added some thinly sliced crimini mushrooms, and a jar of Paul Newman's Alfredo Sauce. This was the first time I'd ever used a jarred sauce, but I have faith in Paul. I also added a few gratings of fresh nutmeg because spinach always calls for nutmeg, no matter what.
Here is my version. It isn't pretty, but it sure is good!
Spinach, Mushroom, & Artichoke Ravioli Bake
3 oz. fresh baby spinach, chopped
1 jar (4 oz.) marinated artichoke hearts, rough chopped
4 large crimini mushrooms, thinly sliced
2 tablespoons Melissa's Basil Pesto
Few gratings fresh nutmeg
1 jar Paul Newman's Alfredo Sauce
¼ cup chicken broth
18 frozen ravioli
1 cup Italian cheese blend, shredded
In a medium bowl, combine spinach, artichoke, and pesto, and mix well; set aside. In a large bowl, whisk together Alfredo Sauce and chicken broth. Spread ⅓ of the Alfredo sauce on the bottom of an 8”×8” baking dish. Top with half the spinach mixture. Lay half the ravioli in a single layer over the spinach. Repeat layers again. Finish up with the remaining Alfredo sauce.

Bake uncovered at 375°F for 30 minutes. 

Sprinkle with cheeses and broil at 450°F for 3-5 minutes. Serve.


Friday, September 23, 2016

Curried Carrot and Pumpkin Soup

Happy fall! Can you believe that it's here already, or should I say finally? Of course, you can't prove it by me, it is still hovering around 90 degrees here, much to my annoyance, but my interest in fall foods and suitable decor continues.

Over the weekend I was in such a mood for a spicy, warming, autumnal soup. I didn't want to make all of them, so decided to make one pot by combining my favorite carrot soup recipe with my favorite pumpkin soup recipe, and I ended up with Curried Carrot and Pumpkin Soup, my new favorite seasonal soup! 

This is very easy to make, takes little time, and can be made vegetarian by substituting the chicken stock with vegetable stock. I'm guessing that it would taste amazing using corn stock, and I may just give this a try a bit later in the season.
Curried Carrot and Pumpkin Soup

1 tablespoon olive oil
2 tablespoons butter
1 /2 medium onion, chopped
1 bunch scallions, chopped (white and green parts)
1 pound baby carrots
4 cups homemade chicken stock
1 1/2 tablespoons curry powder
1/4 teaspoon cayenne pepper
1 teaspoon pumpkin pie spice
1 teaspoon kosher salt
2 tablespoons dark brown sugar
2/3 cup solid pack pumpkin (not pumpkin pie filling)

Preheat medium pot over medium high heat. Add olive oil, butter, onions and carrots and saute 5 minutes. Add seasonings and stir well. Stir in chicken stock, bring 4 to a boil, cover and cook until carrots are very tender, about 15-20 minutes. Remove from heat and stir in pumpkin. Using an immersion blender or food processor, process soup until smooth and carrots are fully pureed. This soup can be made as much as three days prior to serving. The favors just get richer and more intense.

This post is linked to:

Thursday, September 22, 2016

Breaking Bread Tablescape


One of the most difficult things about setting a table is coming up with the centerpiece. Sometimes you want to invite people at the last minute, have an attractive table to go with your nice meal or your coffee and dessert, and, with no time to run out for flowers, you're struggling to find a centerpiece.
For this reason it's important to have a nice container that you can grab at the last minute. This container can be anything whether it's a wooden dough bowl like I've used here, a basket, silver tray, or any favorite piece that you happen to have on hand.
Place it in the center of the table, take a careful assessing look around your house, and fill it with something that you already have.
Finding myself in similar circumstances, last week I put a couple of mangoes in my bowl, this week I am serving a number of different breads, muffins, and bagels for a brunch, and I've chosen to use that as my centerpiece. Surprisingly, it's quite dramatic to see all the breads in front of you at once. It also makes it easy for people to take what they want without having to ask to have something passed to them.
Keep this in mind for your next brunch, luncheon, or dinner party. With each passing day we're getting closer and closer to the holiday season of dinners, lunches, chili suppers, and holiday parties, so give this idea some consideration.


Wednesday, September 21, 2016

Da Vinci Pasta (Cheesecake Factory Clone)

I’m not sure how we first got onto the subject, but a couple of weeks ago when my son and daughter-in-law visited we ended up talking about the Cheesecake Factory, and our favorite dishes served at this popular restaurant. I've only been there twice, both times having the Thai Peanut Noodles, and both times really enjoying it. My daughter-in-law, who once worked there, said that her favorite dish is the Da Vinci pasta, adding that she would love it if I could find the recipe.

After a brief Google search, I did find a recipe at bigoven.com. Last night I tried it, following it exactly, with the exception of using rigatoni instead of penne pasta because rigatoni was all I had. I really liked this dish. I think one of the reasons I liked it so much was due to the inclusion of the wonderfully flavorful Madeira wine that made up of part of the sauce. I made it with the chicken as directed, but I think this would be excellent as a vegetarian dish with the addition of more mushrooms, and perhaps zucchini. At any rate, this is definitely a dish worth trying, and would be an excellent choice to serve on those cool fall nights.
Da Vinci Pasta (Cheesecake Factory Clone)

Slightly adapted from bigoven.com

1 large red onion, diced

1 .5 ounce pkg. Melissa’s dried morel mushrooms, hydrated and halved

2-4 Tablespoons Olive oil

1 cup Madeira wine

1-2 tablespoons butter

1/2 cup sour cream

2/3 cup heavy cream

2 cloves garlic, crushed

2-4 chicken boneless, skinless breasts, chopped into bite-sized pieces

1 pound penne pasta; cooked according to directions

 Freshly ground black pepper

Salt

In a 9” skillet, over medium heat, caramelize the onion in 2 Tablespoons of olive oil. Sprinkle the onion with a little salt, and cook them until they are a rich brown color and taste sweet. The onions will have a “gooey” texture and excess liquid will be evaporated.

Add the chicken, mushrooms, and garlic to the onions. (Add a little more oil if the mixture is too dry.). Sauté until chicken is cooked through and the mushrooms are soft. Remove from skillet and set aside.

Deglaze the pan with the wine, and bring to a slow boil; reduce by 2/3 until the alcohol smell has cooked out.

Lower the heat and once the mixture is no longer boiling, add the sour cream and heavy cream. Stir constantly until melted. Swirl in the butter. Add cooked chicken mixture and stir. Toss with the cooked and drained pasta. Salt and pepper to taste.
This post is linked to:

Tuesday, September 20, 2016

Jalapeno Poppers with Mango Chutney Cream Cheese


Last week I showed you a simple table setting using a dough bowl and a pair of mangoes. After that I showed you what to do with those mangoes, namely turn them into a delicious exotic-tasting chutney. Today I'm going to tell you something you can do with that chutney, namely blend it into softened cream cheese and use it as a filling for jalapeño poppers. 

Jalapeño poppers are a popular appetizer, hors d'oeuvre, Super Bowl food, and easy snack. I don't know anyone who doesn't love these. Me? I thought they could use a little more taste rather than just plain cream cheese and a bacon wrapping, so I decided to take my 8-ounce brick of cream cheese and whip into it 1 to 2 tablespoons of mango chutney before filling the peppers. It was delicious! Not only did I use it to stuff jalapeño poppers, but I also used the leftover cream cheese to slather on top of a bagel the next morning for breakfast -- wonderful! 

If you ever thought about making chutney, but hesitated to do so, now is the time. You simply must make some, and then you need to try these jalapeño poppers. I wrapped each one with 1/2 a slice of bacon, but you may like more bacon, in which case, feel free to use a whole slice, whatever you're used to. If jalapeños are too hot for your tastes, substitute with shishitos or any other mild pepper. This is a delicious recipe that you definitely need to try. Your friends are going to love them, and they're going to wonder why your poppers are so much better than theirs. You have the secret, the addition of mango chutney.
 Jalapeño Poppers with Mango Chutney Cream Cheese

4 jalapeños, seeded and split
8 ounces cream cheese, softened
1-2 tablespoons
mango chutney 
4 slices bacon, split lengthwise

With a hand mixer, beat together cream cheese and chutney.  Fill jalapeño halves with cheese/chutney mixture, and wrap each with a half slice of bacon. Broil* 6-8 minutes until the bacon crisps. Cool 2-3 minutes and serve.

*If you prefer to bake your poppers, you may do so at 400°F for 30-45 minutes.


This post is linked to: Celebrate Your Story, Wow Us Wednesday, Work It Wednesday, Wine’d Down Wednesday, Wake up Wednesday, Full Plate Thursday,  Thursday Favorite Things, Share Your Style, Coffee and Conversation, and Foodie Friday & Everything Else

Monday, September 19, 2016

Trader Joe’s Maple Mustard Chicken


I make good use of our local library. I don't know about you, but I find it stunning the amount of resources that the library has available (for free, I might add), from hardcopy to digital streaming to genealogical services, the library, in my opinion, is one of the best places in town. When I visit, I tend to head in one of two directions, the audiobook section (because I am a huge fan of audiobooks) or, no surprise, the cookbook section. 

I try to keep up with new cookbooks that are being released, but some of them manage to slip by me. Apparently the entire series of Trader Joe's cookbooks completely escaped my notice. Once spotting them, naturally, I couldn't resist, and brought home the I Love Trader Joe's Cookbook

Like a lot of people, I am a fan of Trader Joe's, so this was a fun cookbook to read. One recipe that I stumbled across, was particularly inviting, because of the relatively few ingredients required, the fact that I had all of them, and that the meal could be on the table without a whole lot of effort. This recipe is a good one. I find the combination of maple syrup and mustard to be quite pleasing with the chicken thighs. I cut the recipe in half and made only two chicken thighs, one of which I ate for dinner, the other I pulled apart and had on a sandwich with additional sauce for lunch the following day. Both were sensational. Here's the recipe, I hope you enjoy it as much as I did.
Trader Joe’s Maple Mustard Chicken

1 1/2 - 2 pounds boneless, skinless, chicken thighs, trimmed of fat
1/2 cup Dijon mustard
1/4 cup pure maple syrup
1 tablespoon rice wine vinegar
1/4 teaspoon salt
1/4 teaspoon freshly ground black pepper
Preheat oven to 450° F. Spray an 8x8" ovenproof baking dish with Pam; set aside.
In a small bowl, whisk together Dijon mustard, maple syrup, rice wine vinegar, salt, and pepper.
Place the chicken thighs into the prepared baking dish, and then pour the mustard mixture on top of it. Turn the chicken around in the sauce to make sure it is well coated.
Bake, uncovered, for 40 minutes.
Remove from oven and let chicken rest for 5 minutes. Transfer to a plate, ladle the sauce over, and serve.


This post is linked to: Inspire Me Tuesday, Tuesdays At Our Home, Two Cup Tuesday, Celebrate Your Story, Wow Us Wednesday, Work It Wednesday, Wine’d Down Wednesday, Wake up Wednesday, Full Plate Thursday, Thursday Favorite Things, Share Your Style, Coffee and Conversation, and Foodie Friday & Everything Else

Sunday, September 18, 2016

Mango & Cranberry Chutney


Last week I showed you a simple table setting with an even simpler centerpiece using nothing more than a dough bowl and two mangoes. You may be wondering what I did with those mangoes, maybe not, but I'm going to tell you anyway. I made mango chutney. There's already a recipe on this blog for mango chutney, but I decided to do something different based upon a comment that a friend recently made. She told me that she would like to make mango chutney, but she doesn't because she doesn't care for raisins. That got me to thinking that surely there's a suitable substitute for raisins, and an easy one at that, in the form of other dried small fruits such as cranberries, blueberries, or cherries. I decided to use cranberries because that's what I had on hand. As it turned out, it made delicious chutney. I didn't notice a whole lot of difference between using the cranberries and the raisins, but the outcome was a good one. 

If you're wondering what to do with your chutney after you've made it, come back later in the week and I'll show you an interesting use for it. In the meantime, keep in mind that it is excellent with any type of ethnic food (even fried rice if you happen to carry out from your local Chinese place). It's a great accompaniment to roast chicken, wonderful when mixed with mayonnaise and spread thinly on a turkey, chicken, or club sandwich, and makes a great topping for baked ham. Treat chutney like you would treat any other relish and you are going to find yourself using it all the time.
 Mango & Cranberry Chutney

2
Melissa's Keitt mangoes (3 pounds total), 
peeled and cut into 1/2-inch cubes
1/3 cup white vinegar
1/3 cup packed brown sugar
1/3 cup dried cranberries
1 1/2 teaspoons salt
1 (1-inch) piece fresh ginger, peeled and chopped
1 tablespoon chopped fresh jalapeño including seeds*
2 garlic cloves, minced
3/4 teaspoon ground cumin
3/4 teaspoon ground coriander
1/2 teaspoon turmeric
1 tablespoon vegetable oil
1 medium onion, chopped
1 (3-inch) cinnamon stick

Toss together mangoes, vinegar, brown sugar, cranberries, and 1 teaspoon salt.

Mince and mash ginger, jalapeño, and garlic to a paste with remaining 1/2 teaspoon salt, and then stir in cumin, coriander, and turmeric.

Heat oil in a 4-quart heavy pot over medium-high heat until hot but not smoking, then sauté onion, stirring occasionally, until golden, 8 to 10 minutes. Add garlic mixture and cinnamon stick. Reduce heat to medium and cook, stirring, 1 minute. Stir in mango mixture and simmer, covered, stirring once or twice until mangoes are tender, 25-30 minutes. Remove cinnamon stick and cool chutney, uncovered, about 45 minutes. Spoon into jars and refrigerate 24 hours before using to allow favors to meld. Keeps 2 weeks in the fridge.


*If you like things a bit milder, do not use the seeds.

This post is linked to:

Friday, September 16, 2016

Set a Table with a Simple Centerpiece


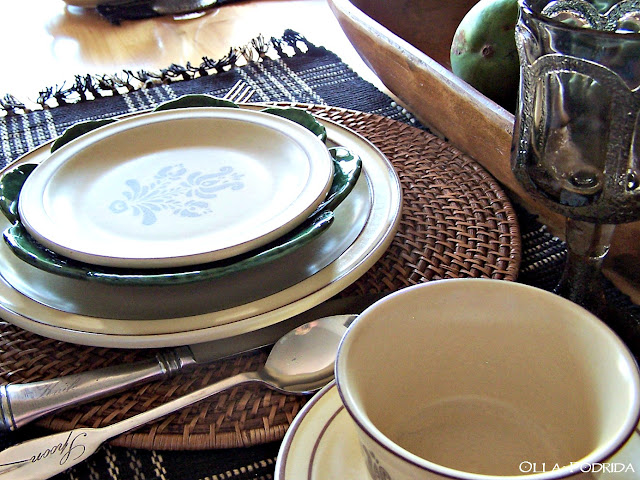
People will often tell me that they can't set a pretty table because they don't have all of the dishes and accessories that I have. Admittedly, I do have a lot of dishes and accessories, but a table need not be set in a dramatic fashion in order to be attractive and appealing.


Today's table is a wonderful representation of modesty. It consists of attractive place settings, patterned placemats, and a centerpiece that is almost Zen-like in its simplicity. A simple dough bowl and two mangoes is all it took. It's lovely, it's serene, and it takes very little by way of supplies or effort. Rummage around in your cupboards and see what you can come up with, and let me know. You just might surprise yourself.


Rattan Round Placemats – Pier One
Fabric Placemats - Three French Hens
Dinnerware – Vintage Pfaltzgraff “Village” (Mr. O-P’s collection)
Stemware – Gift from my mother
Geranium Leaf Plates - Williams-Sonoma
Dough Bowl – Pottery Barn
Flatware – Pottery Barn
Mangoes – Keitt Mangoes from Melissa’s Produce


This post is linked to: