Showing posts with label my mom. Show all posts

Friday, August 23, 2024

Bacon Tomato Bites

 
This is a recipe of my late mother’s. She made these as far back as I can remember. They were always a huge hit, with everyone asking for the recipe. Everyone, that is, except me because I always thought they looked way too fiddly for my man hands. I got to thinking about these the other day when I was thinking about my mother because I still associate the two, and I thought I would give it a whirl. I used Melissa’s baby heirloom tomatoes because they are larger than cherry tomatoes, and the perfect size to use with the small end of a melon baller, making the cleaning out much less difficult than I anticipated.
 
The filling can be made ahead and refrigerated for stuffing tomatoes within a day or two. The tomatoes can be stuffed and stored in the refrigerator overnight; you decide which you prefer. They work equally well at a brunch as they do at luncheon, picnic, or dinner. I guarantee all who consume these are going to ask for the recipe. As an aside, these little rascals do tend to roll, so serving them in an olive dish just may not be a bad idea.
Bacon Tomato Bites

24 Melissa’s baby heirloom tomatoes
1 lb. bacon, cooked and crumbled
½ c. finely chopped scallions
2 T. grated Parmesan cheese
½ c.
Duke’s mayonnaise
Freshly ground black pepper

Remove stems from tomatoes and, using a sharp knife, cut a thin portion of the top off. Carefully hollow out tomatoes using a small spoon, grapefruit spoon, or the small end of a melon baller, as I did,
leaving a 1/8-inch thick shell. Invert the tomatoes onto a paper towel-lined plate, and allow to drain while you make the filling.

 In a medium bowl combine bacon, scallions, cheese, and mayonnaise; stir until well blended. Fill tomatoes with bacon mixture, top with freshly ground black pepper, and refrigerate for a number of hours before serving.

As an Amazon Associate I earn from qualifying purchases.

Tuesday, August 20, 2024

Oven Baked Ribs with Onions and Lemon

 
Not too long ago, I got it into my head that I wanted to have ribs for dinner. I didn’t want to grill them outside because I knew that was a rather lengthy, hands-on process, and the weather was hot. I also didn’t want to make them the way my mother used to because hers, while tender and tasty, looked more anemic than I generally like. So, I consulted my good friend Alycia from Tablescapes at Table 21 and she told me how she did hers. It is a simple process, you can season them up the way you like, and spend your day on other chores while they bake away in the oven. Having done this successfully on numerous occasions, yet still waxing nostalgic for my mother’s ribs, I decided to mix things up and combine Alycia’s technique with my mother’s recipe, and I think this is the best yet.Oven Baked Ribs

 2 to 2 ½ pounds baby back pork ribs

Salt and black pepper

Rib rub

1 lemon, thinly sliced

1 Melissa’s sweet onion, thinly sliced

1 12-18-oz. bottle your favorite Barbecue Sauce

 Preheat oven to 350° F. Line a 9” x 13” pan with heavy duty foil, allowing significant overhang in order to fold over the ribs. Scatter lemon and onion slices along the bottom of the pan, reserving a few for the top. If it hasn’t been done, remove the thin membrane from the back of the ribs.

 Rub the ribs thoroughly, front and back, with the rib rub, and gently lay on top of the slices of lemon and onion. Pour entire contents of bottle of barbecue sauce over the ribs to coat, and scatter reserved lemon and onion slices over the top.

 Loosely close the foil around the ribs, slide into the oven for to bake for 3 hours. After about two hours in, baste with sauce. At the 2½-hour point, open the foil to allow the sauce to caramelize a bit. At the end of three hours, remove from oven, place ribs onto a serving platter and serve.

As an Amazon Associate I earn from qualifying purchases.

Sunday, July 21, 2019

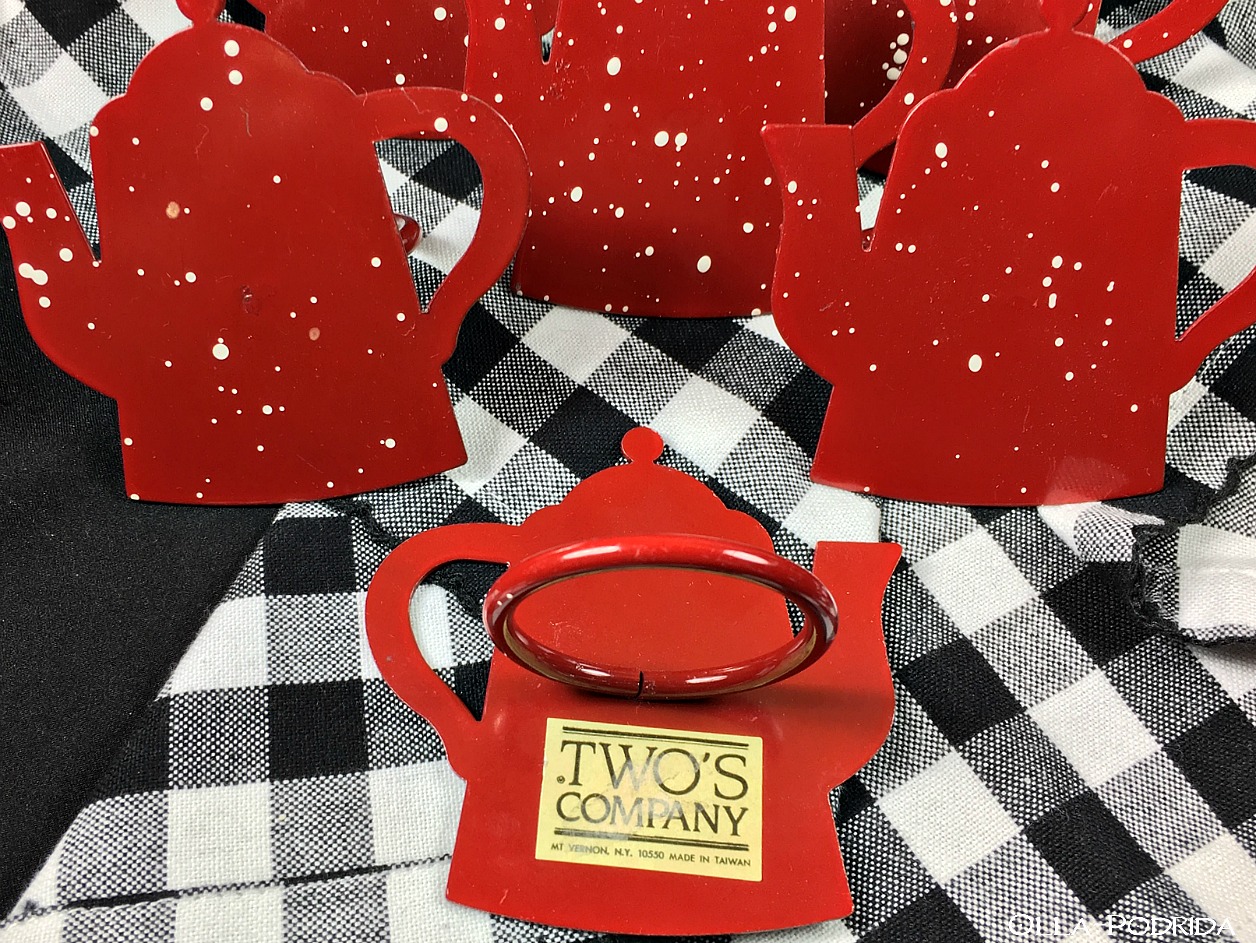
Coffee/Tea Pot Napkin Rings...This Week's Find

For someone who only used napkin rings at Christmas time (at least that I can recall), my mother sure had a lot of them. Today’s find is a recent unveiling of these darling teapot/coffee pot-shaped napkin rings. In looking at these, and setting them up to photograph, I wonder how many of you have napkin rings that you don’t use. I think we should all make a vow to remedy that.
I really like this cute set. Initially, I looked at them as tea pots, and something that I would use with tea, but the rather rustic finishing (the barn red speckled in white) made me think of them in another way, namely as something that you would use at a formal campsite. (Are there formal campsites? My guess is that today, there are!)
At any rate, I plan to use them in the fall. I particularly like the way they look with these black-checkered napkins. I need to go through my more primitive dinnerware, and come up with something suitable for a camp out in the woods. I can almost smell that coffee brewing over the crackling campfire.

To see last week’s unique find, click here.


This post contains affiliate links.

Wednesday, May 15, 2019

Ceramic Place Cards...This Week's Find

This week’s find is this sweet set of place cards. They are ceramic with lovely, delicate porcelain flowers in pink, yellow, and blue. As with so many things I have uncovered, I never remember my mother using these. That’s not to say that she didn’t, it’s just to say that I don’t recall if she did.
What these have me wondering, though, is whether or not people still use place cards?  I can actually envision myself using them, but I’m wondering what type of non-permanent marker would work on ceramic. If any of you have any suggestions or ideas, I would appreciate knowing.
To my great disadvantage, these are rather small, only about 2½ inches wide. To my further disadvantage, my hands are quite large, so I think it would be tricky for me to use these to write a name longer than three or four letters. Still, I will not be deterred! You can expect to see these at a table setting at some point in the future.

To see my previous find, click here.

Tuesday, July 31, 2018

The Saga of the Paella Pan


I am a passionate person. Those of us who are passionate people tend to anguish over many things. My anguish du jour (and I say “du jour” because indeed I do anguish about something new almost every day) is my late husband’s paella pan. Let me tell you the story of this pan.

My husband, too, was a passionate person, and one of his passions was cooking. He introduced me to all kinds of exotic cuisines that were completely new to my experience, and I embraced them all. One thing that he particularly enjoyed making was paella. He would make big pans of it, spending all day long on a dish that wasn’t supposed to be all that difficult, and would serve it at big parties we had with our friends. He decided one year, that the pan he had wasn’t big enough to serve the masses that often descended upon our home for a meal, and that he needed a bigger one. Upon hearing this, my mother’s ears perked up. She was always looking to buy someone that special something for Christmas that they didn’t deliberately ask for, wouldn’t expect, but would be delighted with its receipt.

So, my industrious mother managed to find a company that sold Spanish products, including paella rice, paella seasonings, and paella pans, and she put together quite a package of paella goodies for Jim that Christmas. Having never made paella, she had no idea what a paella pan looked like, so when she placed her order she asked for a large one. I can still see the look of shock and surprise on Jim’s face when he opened that box. My mother had given him the biggest paella pan that he had ever seen. If you’ve ever been to an open-air food market, say Camden Market in London, you may have seen food vendors stirring up food for the masses in pans this size. This pan is roughly 2 feet in diameter. This was way too big for Jim’s needs plus, every year one or other of our friends died off, and, sadly, our parties kept getting smaller and smaller. So, Jim put the pan aside.
Fast-forward a dozen years to today. My mother has now been gone five years, Jim has been gone a little over two, but the pan is still here. I stumbled upon it today, and it was like a kick in the gut. It was still in the shrink-wrap (and that was mighty shrink wrap, I had a devil of a time extricating the pan), and a wave of sadness swept over me. Suddenly, I remembered my mother’s delight in finding Jim the perfect gift; I remember the look of shock and surprise on his face when he opened it. I remember the parties that we used to have under the striped umbrellas, on the big brick patio at our house, with pitchers of ruby red sangria, pans of steaming, seafood-studded paella, laughter, music, conviviality, the works! Such good times. I have since moved house, most of those friends are gone, and here I am left with this pan, this unused, monster of a paella pan. It’s funny how something inanimate, and relatively insignificant, can cause such pain.
You may be inclined to tell me to donate it and get it out of the house, but I can’t do that. The fact of the matter is, I like it. I don’t make paella, I would never make this much paella, but because this pan caused happiness, shock, and awe in the past, it is going to have to be a part of my future. So, I am asking for your help. What can I do with this pan? It is big enough to use as a serving tray, I’m aware of that, but at a hefty ten pounds all on its own it, would be too heavy to carry. It is almost the size of my entire cooktop, so I cannot use it on the stove, and it would be too big to use near the stove. It may work as a centerpiece on a large table, but I’m not sure I have a table quite that large. Use your imagination, go little crazy if you like, and tell me what you would do with this behemoth among paella pans.

This post is linked to:

Tuesday, July 3, 2018

Old Fashioned Homemade Lemonade


It was only on rare occasions that my mother would make lemonade. I think the reason being was that it contained a decent amount of sugar, and she was afraid she would drink the entire pitcher. Yep, it was that good. But, considering the nutrition in the fresh lemon juice, I can’t help but think that offsets any negative aspects the sugar can bring. And, hey, with this hot weather we need to stay hydrated, right? I can’t think of a better way in which to do that than by drinking healthy quantities of this refreshing beverage.
Old Fashioned Homemade Lemonade

1 1/2 cups fresh lemon juice (I used Melissa’s Meyer lemons*)
1 cup Sugar
4 cups water, divided

Make simple syrup by placing 1 cup sugar and 1 cup water into a medium sauce pan. Bring to a boil over medium/high heat, stirring occasionally until sugar is completely dissolved. Set aside to cool. 

Add lemon juice and simple syrup to pitcher. Stir to blend. Add remaining 3 cups water, and stir until well mixed. Refrigerate at least 1 hour to chill. Pour into a tall glass (I like these) and enjoy! Garnish as you see fit.

If you’d like to make pink lemonade for the kids, stir in a half cup of maraschino cherry juice, and garnish with some cherries.

*Meyer lemons are sweeter than regular lemons and will give your lemonade an excellent taste. I highly recommend using these whenever you make a sweet drink.


Another equally refreshing drink is this Lime Cordial.


 This post is linked to:

This post contains affiliate links.

Thursday, June 21, 2018

Red Pepper Cheese Ball

Ahhh, the seventies! If you’re as old as I am, then you probably remember them as fondly as I do. One thing I remember in exquisite detail are the parties that my parents used to throw for their friends. My mother loved to cook, and made the most fabulous meals, but back then I didn’t care about wonderful dinners, I was all about snacks. 

One thing I remember particularly liking was her Party Cheese Ball, a recipe provided, back then, by Kraft Foods, in an effort to sell their cheese. You all know what I’m talking about — cream cheese, grated cheddar, seasonings, all rolled together and coated with crushed pecans. Allowed to come to room temperature, it is ambrosia on a cracker. 

I was thinking about her cheese ball the other day, wondering why I hadn’t made one in decades, firstly, and wondering, secondly, how much better it would be with bits of roasted red pepper scattered throughout. I was right, of course, red pepper makes everything better; it’s like the vegetable version of bacon. At any rate, thinking about my mom, I made this Red Pepper Party Cheese Ball. It is wonderful with any kind of cracker, delicious with crudités, and darned good when spread on wedges of apple. The fact of the matter is, with a cheese ball, you can never go wrong. Never!
Red Pepper Cheese Ball

1 8-ounce package cream cheese, softened
1 cup shredded sharp cheddar cheese
1/4 cup crumbled feta
1/2 tablespoon minced shallots
2 T. Melissa’s Fire Roasted Red Bell Peppers, minced
1 teaspoon Worcestershire sauce
1/2 teaspoon freshly squeezed lemon juice
Pinch of cayenne
1 cup finely ground toasted pecans.

Place all ingredients, except pecans, into a medium mixing bowl, and beat to within an inch of its life. (Or, you can do what I did, and toss everything into the food processor.) Scrape onto a piece of plastic wrap, and form into a ball as you are securely covering it. Place into the refrigerator for an hour to chill, then remove and roll in the pecans, pressing them firmly into the cheese ball, covering it completely. You can serve it at that point, or keep it for up to three days. If you’re having a larger crowd, you can double this recipe and make a cheese boulder. Either way, people are going to love it.

If you prefer your cheese warm and dip-able, try this Baked Pimiento Cheese. Heaven!


This post is linked to:
This post contains affiliate links.

Monday, March 2, 2015

The Remedy


I remember my mother telling me once, after emerging from a rather debilitating bout with the flu, that she felt so bad she thought she'd have to rally to die. Oh, boy, do I get that. Things started going south for me about a week ago. I'm talking way south. Like Antarctica south. What began as sniffles blossomed into a colossal headache, clogged sinuses, and sleepless night after sleepless night of relentless coughing. I plowed through boxes of tissues, drank gallons of tea, and watched a lot of Hallmark movies. I went from having my authoritative, sexy, big girl voice, to having the voice of a cartoon character, to no voice at all. In my late night bouts with delirium I started thinking aboutThe Waltons.  Yep, momma, daddy, John-Boy, the lot. I began to think about the Baldwin Sisters and the recipe, which ultimately reminded me that I had a recipe of my own.

It's an old folk remedy, but since I'm an old folk, umm, person, I can probably claim it as well as anyone. It's a cough calmer consisting of three common ingredients: honey, lemon, and gin.  My recipe makes 8 doses, and unlike the chemically-laden cough suppressants sold in drug stores, you can take this as often as needed.

There is actually science behind this combination. Gin is an effective expectorant. Lemon provides vitamin C that may strengthen the immune system. Honey has been found to be an effective cough suppressant.  Both lemon and honey have antimicrobial properties (significant ability to inhibit the growth of microbes that can cause infection). Nothing can shorten the duration of a cold, but this can treat the symptoms.

Not fond of the taste of gin?  Me neither, and I'm not all that keen on honey, but when these three ingredients come together, the taste is rather extraordinary and it goes down smooth. It is NOT, I repeat, NOT intended for children or anyone who has issues with alcohol. It is soothing, cough calming, and can help you sleep. 


Cough Remedy
2 tablespoons freshly squeezed lemon juice*
2 tablespoons good (local if you have it) honey
2 tablespoons gin

Stir ingredients together until the honey completely dissolves and is incorporated. Store in refrigerator until needed. Can easily be doubled, tripled, etc.

1 tablespoon = 1 dose

*I use my own home grown (a potted tree that I recommend everyone own) Meyer Lemons. If you don't have your own, please use fresh, organic lemons. I suggest
Melissa's.


This post is linked to: