Friday, March 31, 2023

M&M Sugar Cookies

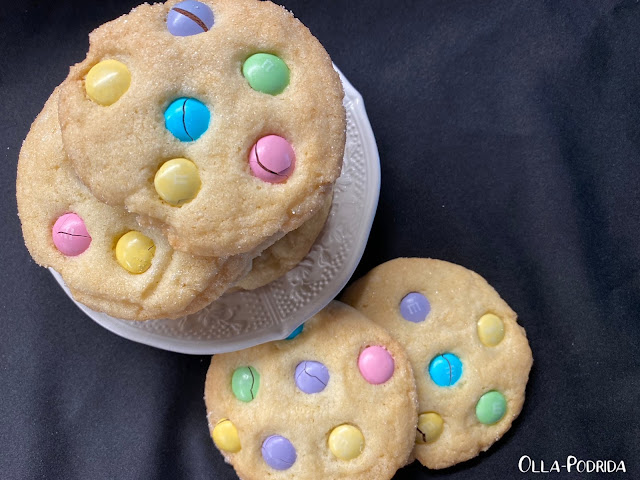
 In my Easter themed Table for Two tablescape, you may have noticed the pastel M&Ms in the bunny egg cups. I had a lot of those left over, and was looking for something to do with them, rather than just eating them straight out of the bag. I’ve always enjoyed M&M cookies, and recently had one from the bakery, that, instead of being made with dough similar to that of a chocolate chip cookie, was made of sugar cookie dough. I thought that was a great idea, so I combined a favorite sugar cookie recipe and the M&Ms, and this is the result. Imagine how cute these would be stacked in a cello bag with a pastel ribbon tied around the top to take as a hostess gift, put in Easter baskets, or at each place setting at your Easter dinner.

M&M Sugar Cookies

1 c. butter, softened
1 1/2 c. sugar plus more for rolling.
2 large eggs
2 t. vanilla extract
1 t. almond extract
3 c. flour
1 t. baking soda
1/2 t. baking powder
1/4 t. kosher salt
 One bag pastel M&Ms

  Preheat the oven to 375°F. Spray baking sheets with PAM, or line with a Silpat; set aside.

 In the work bowl of a stand mixer fitted with the paddle attachment, beat together butter and sugar until light and fluffy, 2 to 3 minutes. Add eggs, one at a time, mixing well after each addition; add vanilla and almond extracts, mix well.

 Sift together flour, baking soda, baking powder, and salt; add to creamed mixture, blending until combined.

 Using a 2 tablespoon cookie scoop, scoop out balls, roll in granulated sugar, flatten slightly, and place on prepared baking sheet spacing 1½” – 2” apart. Press 5 to 6 M&Ms into the top of each cookie. Bake for 9 – 12 minutes. Remove from oven and allow to cool five minutes before removing to a wire rack to cool completely.


As an Amazon Associate I earn from qualifying purchases.


Thursday, March 30, 2023

Lunching with Lapins

Today is Opening Day in the world of Major League Baseball. I know that I am not the only one who is excited about this. In fact, I even celebrate Opening Day Eve! I have cleared my schedule, just for the occasion, as I do every year, and, as I do every year, I always wonder what happened to the month of March. I was still trying to wrap my head around the fact that it’s February, and that is long gone.

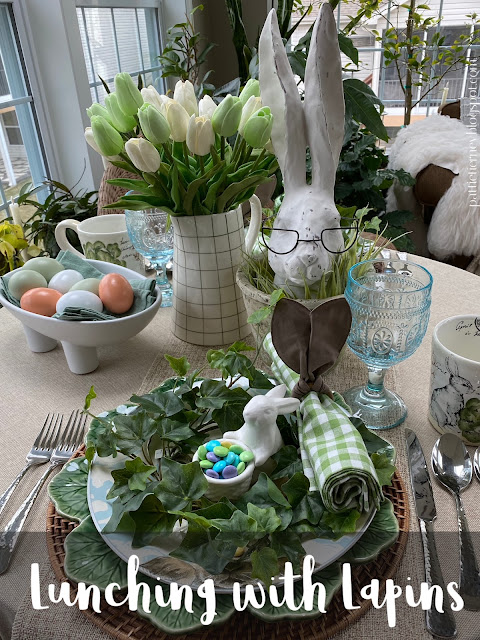
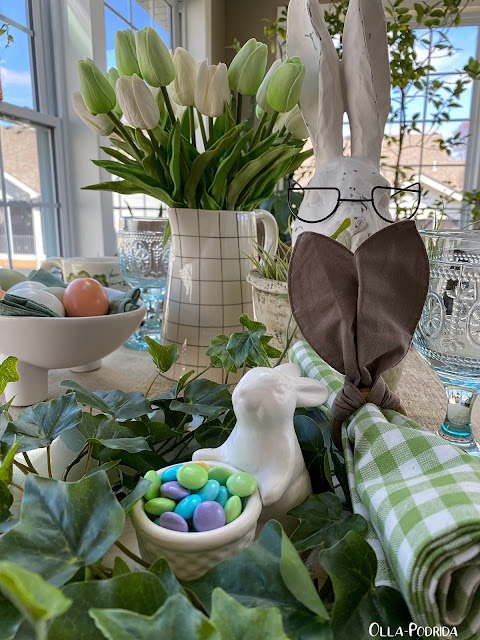
In just a little over a week we will be celebrating Easter. It is such a lovely, thoughtful holiday, symbolizing energy, growth, and rebirth. It also means there are going to be bunnies nibbling on my carrot tops; this table setting features those wonderful, sometime vexing, little creatures. Come and join me for a delicious lunch with lapins.

 I love the bunny plates. They are largely covered up, but that doesn’t matter, I know they are there. I bought these quite a few years ago at Williams-Sonoma, realizing that their use would be limited. Still, I could not pass up that adorable face.

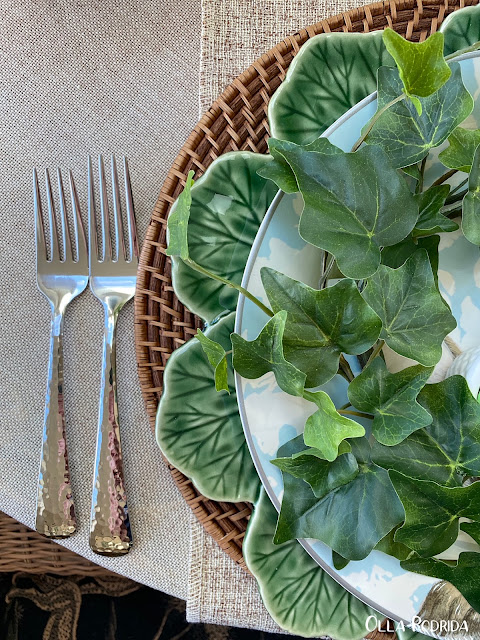
The bunny plates are resting on Bordallo Pinhiero geranium leaf chargers, on top of round woven placemats.

Because there is turquoise in the design of the bunny plate, I thought it would be fun to use turquoise stemware (Pier One ages ago) and I love it! I love it so much, that I’m thinking I need to use these a lot more often during the summer months.

On top of the plates are small ivy wreaths that I picked up when I bought that bedding at one of my favorite spots, The White Hare (a fitting place, considering the topic of this post). They surround white ceramic bunny eggcups, holding pastel M&Ms. I’m not one for soft-boiled eggs, but that doesn’t keep me from buying eggcups. I find they can hold salad dressing, little treats (like they’re doing here), or flavored butters equally well.

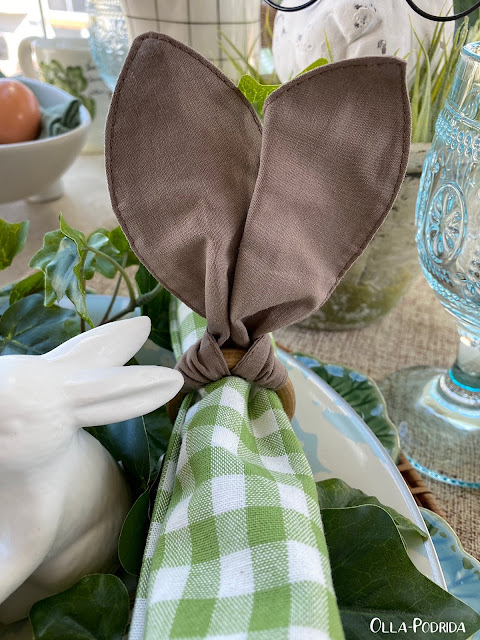
The bunny ears napkin rings are new this year and from Amazon (and are now on sale!). I chose the gray (they come in a variety of colors) because it matched my bunny plates so perfectly.

 The green checked napkins are from Pottery Barn.


The centerpiece consists of a glasses-wearing hare peeking out of a pot of greens (another White Hare purchase), alongside a pitcher that I bought from another favorite spot, coincidentally named The White Rabbit. Are you detecting a theme here? It is full of faux tulips in white and pale green.

The hammered flatware is from Mikasa.

The oversized cabbage bunny mugs are by Maxcera. I use those all summer long.

The three-legged white ceramic bowl holding stonewashed cloth dinner napkins (in case we need extras) and pastel eggs is new (as are the napkins and eggs). I fell in love with that bowl, finding it to be the perfect vessel for holding napkins; it would work equally well for holding dinner rolls, pastries, toast, etc.

You are going to see variations of this table throughout the summer months. I am really enamored with it. I may just pair of these little bunny goodies with a patterned tablecloth to see how I like it.

I hope you’re having fun decorating for spring.

Happy Easter to all!

 As an Amazon Associate I earn from qualifying purchases.

This post is linked to: Tablescape Thursday


Wednesday, March 29, 2023

King’s Hawaiian Cheesecake Danish

In the past, I have not been at all enamored with the phenomenon known as King’s Hawaiian sweet rolls. I think that’s probably because the first time I had them was part of a dinner, and there was something about a puffy sweet roll with a savory meal that left me cold. (Me, the fan of crusty rolls with dinner.) But recently, having tried the turkey cranberry sliders as well as beef sliders, both of which employ the use of this roll, I have done a complete 360. When I spotted cheese danish using them, I had to give it a try.

 There are a number of recipes online for these, none of which, I think, are as good as mine. These are relatively easy to assemble, and would be perfect to treat mom on Mother’s Day. Various components can be assembled the day prior to baking. You can even slide the rolls out of the package, cut your “X“ in each, and slide them back in, and no one would be the wiser.

King’s Hawaiian Cheesecake Danish

1 12-pack King's Hawaiian original sweet rolls

1/2 c. + 2 T. butter melted

3 T. brown sugar

2 t. ground cinnamon

¼ t. ground nutmeg

8 oz. cream cheese, softened

¼ c. granulated sugar

¼ t. almond extract

1 large egg, beaten

 Preheat oven to 375°F. Melt 2 T. butter and brush evenly along the bottom and up the sides of a 10” x 10” baking dish; set aside.

Separate the rolls and place into prepared pan. With a sharp knife (I used a fish boning knife), cut an “X” into the top of each roll about 2/3 of the way down.

 Stir together the 1/2 cup butter, brown sugar, nutmeg, and cinnamon in a small bowl; pour evenly over the rolls. Beat the softened cream cheese until smooth. Add sugar, almond extract, and egg, and beat until incorporated.

Transfer cream cheese mixture into a piping bag fitted with a wide tip. Press the tip down into the “X” that you created in each roll, and pipe full. You will see the roll expand as it fills with the delicious cheesecake filling.

 Bake, uncovered, for 12 to 15 minutes. In order to prevent sticking, allow rolls to cool for a couple of minutes, and then remove to a serving plate. Serve warm.

Monday, March 27, 2023

Olive Garden Alfredo Sauce

Earlier in the month I gave you a copycat recipe for Olive Garden’s salad dressing. Now, so that you can create an entire meal from Olive Garden, here is a copycat of their Alfredo sauce. This goes together in a hurry, and, if you put your pasta water on to boil when you start making the sauce, you will have dinner on the table in 30 minutes.

Olive Garden Alfredo Sauce

A seen on theslowroasteditalian.com

 1 c. half and half

½ T. unsalted butter

½ t. garlic powder

¼ c. fresh shredded Parmesan cheese

¼ c. fresh shredded Romano cheese

¼ t. kosher salt

¼ t. fresh ground black pepper, or white

Whisk together butter, garlic, and half & half in a medium saucepan over medium heat. Bring to a simmer (do not boil); remove from heat.

Stir in cheese, a handful at a time. Gently stir until the cheese melts before adding the next handful.

 Return pan to burner over medium heat. Season sauce with salt and pepper. Stir until cheese sauce is smooth and the sauce is thick enough to coat the back of a spoon.

 Remove from heat and allow sauce to cool for 5 minutes. Alfredo sauce will thicken even more as it cools.

 Serves 2.


Friday, March 24, 2023

Beef & Noodle Bake

 About 20 years ago, when the late Mr. O-P and I were working together (as we did for 20+ years), we employed the use of a programmer who would come to our home once a week for dinner to transfer data for us and update the program if need be. It was always a nice evening because he was good company. Naturally, because he was a bachelor, I wanted to make dinners for him that he would enjoy. One evening, I asked him what his favorite food was, and his answer surprised me. “Casseroles,” he told me. I don’t think I’ve ever gotten that as an answer to that question. It did make cooking for him very easy from there on out because I don’t find anything easier to put together than a casserole. Truth be told, it’s also a favorite of mine. There is something down home and comforting about a casserole, particularly when noodles are involved. Here’s the recipe I served to Joe a number of times, sending him home with more to heat and enjoy the following day. I don’t know anyone who doesn’t like it. It is hearty and filling, tasty, and freezes well. What more could you possibly want?

 Beef & Noodle Bake

  Adapted from the cookingthecookingjar.com

 12 oz. uncooked egg noodles

1 lb. ground chuck

1 yellow onion, finely chopped

1 T. Melissa’s minced garlic

1 15-oz. can tomato sauce

1 14.5-oz. can fire roasted diced tomatoes, drained

½ c. chopped fresh parsley, more for garnish

1 T. Worcestershire sauce

2 t. smoked paprika

Red pepper flakes to taste

Salt and pepper to taste

8 oz. sour cream

8 oz. small curd cottage cheese

½ c. Parmesan cheese, shredded

2 c. cheddar cheese, shredded

Fresh parsley to garnish, if desired

 Preheat oven to 350° F. Spray a 9” x 13” casserole dish with PAM; set aside.

Bring a pot of salted water to a boil and cook the egg noodles according to package directions until al dente. Rinse in cold water to stop the cooking process. Add a splash of olive oil to prevent the noodles from sticking.

 Meanwhile, brown the ground chuck in a skillet, breaking up any clumps; drain. Add chopped onion and garlic to the skillet and sauté until fragrant, about 3 minutes. Pour in tomato sauce and diced tomatoes.  Season with Worcestershire sauce, smoked paprika, red pepper flakes and salt and pepper to taste and simmer until sauce has thickened, about 5 minutes.

 In a large mixing bowl, combine sour cream, cottage cheese, Parmesan cheese and cooked egg noodles. Mix well.

Spoon half the creamy pasta mixture into casserole dish. Top with half the beef mixture and half the cheddar cheese. Repeat with one more pasta – beef – cheddar layer each. Finish with a cheddar cheese layer on top.  Bake uncovered for 25-30 minutes or until cheese has melted.

 Top with optional parsley and serve hot.

  As an Amazon Associate I earn from qualifying purchases.


Wednesday, March 22, 2023

And to all a Good Night

These days it takes a lot to get me out of the house, and I am talking A LOT! I think it’s probably due to the fact that, when Mr. O-P was alive, we were constantly on the go (one year we lived in three different cities, but I digress). That amount of travel, over time,  just wore me out, and I am now making up for it. There is nothing I like better than being at home, surrounded by my books and plants, a fire going in the fireplace, and my trusty Stanley by my side.

Taking all of that into consideration, last week I put on pants, got in the car, and headed out in a mixture of rain and sleet to one of my favorite home decor stores, The White Hare, and bought this bedding. This photo is from their Facebook page. I saved it when it was originally posted back in February, and have pined for this stuff ever since. It took me a couple of weeks to finally convince myself that, yes, I do deserve more bedding.

I am one of those people who changes bedding with the seasons. When October hits, I put on my Edgar Allan Poe duvet cover, with matching pillows. Obviously, I take my bedding very seriously. It gets replaced with Christmas bedding that gets replaced with Paris bedding, that gets replaced with safari and travel map bedding.

 I’m not quite sure where this new stuff is going to fit in the rotation, but trust me when I tell you that it will!

What appealed to me about this set is that it’s bohemian, but neutral.  I’m very pleased to see that neutral bohemian style is starting to find its place. It’s not that I don’t love color, I do; I had lots of bold color in my former home. But there’s something about getting older, and leading a quieter life, that I find too much color to be a bit anxiety inducing.

The beauty of neutrals is that you can add any color that you want, at any time, and take it away when you’ve grown weary.

Another thing I liked about the bedding was the bed it was on. Get a look at that headboard! Not only does it provide a shelf for books, bits, and bobs, but it also has built-in lights with switches on either side of the bed. See that bench at the end of the bed? That is not a bench…it is the footboard! I am swooning here! I was proud of myself for passing this up.

What do you think? Do you like bedding as much as I do, or can you take it or leave it?


Tuesday, March 21, 2023

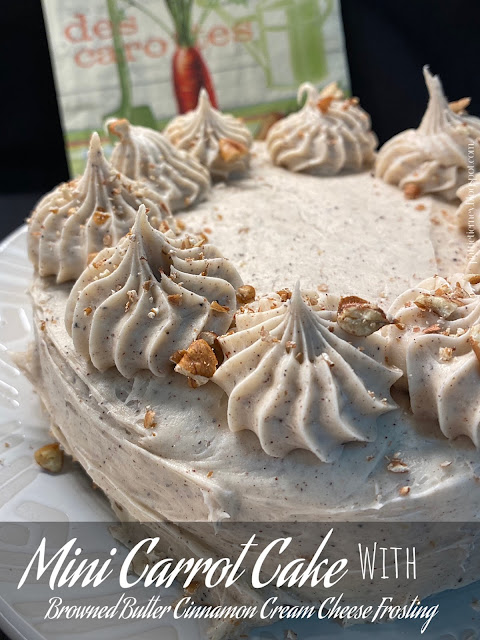
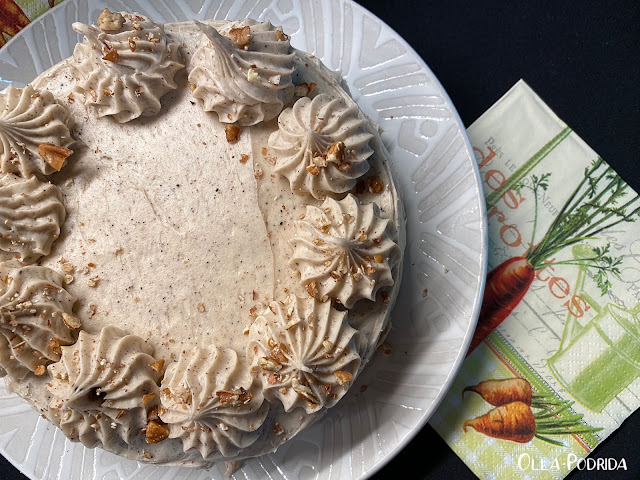
Single Layer Carrot Cake with Browned Butter Cinnamon Cream Cheese Frosting

 If you read this blog with any regularity, you will be only too aware of the carrot shredding frenzy that I got myself involved in a week or so ago. I’m happy to report that it has finally come to a delicious conclusion, the last having been used in this adorable and tasty mini carrot cake. I discovered this little morsel on the Beyond the Butter blog. It’s a wonderfully easy recipe because it mixes together by hand; there’s nothing to putting it together.

  I have recently become enamored with small cakes, having purchased this set of four of 6-inch cake pans. It’s the perfect size for singles, couples, or even a family of four. As for the frosting on this cake, it is nothing short of fabulous! Browning the butter makes all the difference, and I don’t think I will make a buttercream frosting from here on out without doing the same. It’s a wonderful Easter dessert, or, if cut into tiny slices, perfect tidbits for afternoon tea.  This is a keeper.

Single Layer Carrot Cake with

Browned Butter Cinnamon Cream Cheese Frosting

 Edited for clarity

 ½ c. flour

½ t. baking soda

½ t. cinnamon

1/8 t. salt

1/3 c. vegetable oil

½ c. sugar

1 large egg, room temperature

½ c. grated carrots

¼ c. chopped pecans

 Frosting

¼ c. unsalted butter (browned and cooled to solid state)

4 oz. cream cheese, room temperature

1 t. vanilla

½ t. cinnamon

2 c. confectioners’ sugar

 Preheat oven to 350ºF. Generously spray a 6-inch cake pan with Baker’s Joy; set aside.

 In a small mixing bowl whisk together flour, baking soda, cinnamon, and salt; set aside.

 In a medium mixing bowl, whisk together the vegetable oil, granulated sugar, and egg.

 Add the whisked dry ingredients to the wet ingredients and whisk together until just combined. Fold in carrots and pecans.

 Pour the cake batter into the prepared cake pan and bake for 30-35 minutes. Cool the cake in the cake pan for 10 minutes before inverting it onto a wire cooling rack to cool completely.

 FROSTING

In a small saucepan melt the unsalted butter over medium heat. As the butter begins to bubble and foam, stir until foaming subsides. Continue to cook until the butter turns a light brown and has a nutty aroma.

Immediately remove the browned butter from the heat and pour into a heatproof bowl. Cover lightly and place in the refrigerator to cool and solidify. This takes 40-55 minutes.

Using your hand mixer or stand mixer fitted with a paddle attachment beat the browned butter on medium-high speed until smooth and creamy. Add cream cheese, vanilla, and cinnamon, and continue to beat until well blended.

Reduce speed to low, and gradually the confectioners’ sugar; beat until blended. Scrape down sides and mix on medium-high speed for 1-2 minutes more.

 Frost cooled cake.

As an Amazon Associate I earn from qualifying purchases.


Monday, March 20, 2023

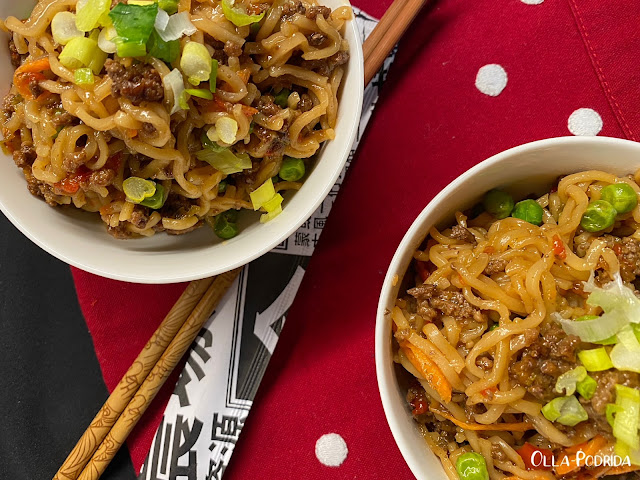
Slow Cooker Beef Ramen

 I don’t know that I entirely get the ramen craze, although my daughter-in-law is a big fan. She enjoys all sorts of varieties, has different bowls, chopsticks, even a ramen Christmas tree ornament. She is a true “ramenite.” Me? I just think those noodles look small and wormy. I also don’t quite understand why (at least in my area) they sell them as a kind of soup that comes with a seasoning packet. Where I live, or at least where I shop, you can’t buy just a package of plain ramen noodles, you have to buy individual packets with the seasoning. I find that odd. At any rate, anything that can be made in the crockpot I am willing to try. This is a recipe that I adapted from one I found online, and I’m quite taken with it. It has a lot of flavor, a lot of vegetables, and has proved to be yet another way for me to make the use of my vast supply of shredded carrots.

Slow Cooker Beef Ramen

1 lb. ground chuck

1 c. shredded carrots

1 red bell pepper, sliced

2-3 scallions, rough chopped

1 T. Melissa’s minced garlic

½ c. low sodium soy sauce

1 t. cider vinegar

½ c. brown sugar

1 14.5-oz. can chicken stock

1 c. frozen peas

2 ramen noodle packets

Sesame seeds for garnish optional

Scallions for garnish optional

 Brown and drain ground beef, to the slow cooker. Top with carrots, red bell pepper, and scallions.

In a small bowl mix together the garlic, soy sauce, vinegar, brown sugar, and chicken stock. Pour the sauce into the slow cooker and stir to combine. Cook on low for 4-6 hours. Thirty minutes before serving add peas and dry ramen noodles (discard the seasoning packets). Stir to coat noodles. When the noodles are tender, serve topped with more scallions and some sesame seeds.

As an Amazon Associate I earn from qualifying purchases.