Sunday, May 15, 2011

Blackberry Fool

The steps to making Blackberry Fool.
This time of year I absolutely cannot get enough berries to eat.  I love them all: strawberries, blueberries, raspberries, and blackberries.  I picked up quarts of each while shopping this morning, with no cue as to what I'd do with them other than juice them or just eat them.  Then my eyes fell upon a stack of Everyday Food magazines and would you believe it, this one was on top.  
I know what you're thinking -- Good gravy, Marie, this woman has food magazines from 2008 lying around her house!  Well, yes...and no.  This was one I had kept (the only one from that year, I swear it!) because of the berry recipes.  So, since so much time had passed, I decided to give the Blackberry Fool recipe a try. Heaven!

A delicious, light dessert that is easy to make (takes all of 15 minutes!), and worthy of an everyday meal or one for guests.  You can substitute raspberries or strawberries for the blackberries if you prefer, but do give the blackberries a try, they are astoundingly good for you, and the taste is sublime!


This is linked to:
and Mosaic Monday at Little Red House

Friday, May 13, 2011

Green Pepper Jelly

I love the jewel tone of the green pepper jelly. I've been passing out jars to friends, all of whom are as amazed as I am at the zesty flavor.
Summertime brings with it an entirely new way of cooking, and while it isn't summer here yet, the record high temperatures make it feel as if it were.  So I look for easy recipes that make use of local produce and healthy, but satisfying snacks.  In order for a snack to satisfy me it has to have a lot of taste.  So today I decided to give Paula Deen's recipe for green pepper jelly a try.  This is a product that I generally buy at the store and always have on hand because of its versatility.  I mean, what is easier when people drop in unexpectedly than opening a jar, unwrapping a brick of cream cheese, and pairing these with a box of Wheat Thins?

I was STUNNED at how easy to make and delicious this was, and this is high praise from a jelly-making rookie like me.  It is a real no-fail recipe, so don't hesitate to give it a try.  I can hardly wait for my pepper plants to begin bearing because I'm going to make more of this.  Lots more!


Green Pepper Jelly by Paula Deen

3/4 cup chopped green bell pepper
1/4 cup chopped fresh hot green pepper, such as Jalapeno or serrano
1 1/2 cups apple cider vinegar
6 cups sugar
4 ounces pectin (recommended: Certo)
4 drops green food coloring
Special Equipment: 6 (1/2-pint) canning jars with lids

Process bell pepper and hot pepper in a food processor until finely minced. Combine pepper mixture, vinegar, and sugar in a saucepan and bring to a rolling boil. Remove from heat and add pectin and food coloring. Pour into sterilized jars and seal*.

*Cook's Note: Follow USDA guidelines for proper sterilization and canning procedures.

I couldn't wait for it to cool to try it and found it is seriously better than any I've ever bought at the store.

This is linked to:


Paula Deen Celebrity Cook Along 
Happier Than a Pig in Mud
and
The Tablescaper for
Seasonal Sundays

DESTINATION: Dinner

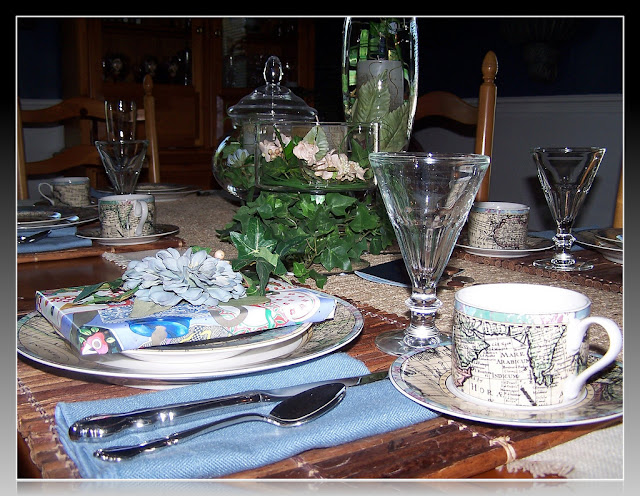
I love these dishes so much that I decided to pull them out again and use them for the Mother's Day dinner that I hosted, and share the setting with Tablescape Thursday.  The first time I used them (here) I focused on pale sage green tones, and it worked beautifully.  This time I decided to go with blue, matching the napkins to the plates, and I liked it equally as well.  It's surprising, really, just how many color combinations work with these very dramatic plates.
It was pure serendipity that I was able to match my mother's gift wrapping to the table setting (I bought her the DVD of the first season of Downton Abbey, and for those of you who watched it and loved it as I did, you just know she's going to swoon!)  I was actually in the process of taking apart a floral arrangement that mother used for years, then I used for years, and eventually the colors just didn't match anything that either of us had. Any time I take apart a floral arrangement, I remove the flowers and greenery and bag them up to reuse as a package decoration.
Here's the gift up close.  It really is a breeze (if you own a glue gun) to whip up a fabulously wrapped gift in no time if you set aside such flotsam and jetsam.  Honestly, I think I used to spend more time hunting for ribbon and bows than I do now just hot gluing a few flowers into place, and look how much prettier it is.  But, back to the table...
Here's the place setting without the gift covering up the design  Don't these just want to make you book a trip somewhere?
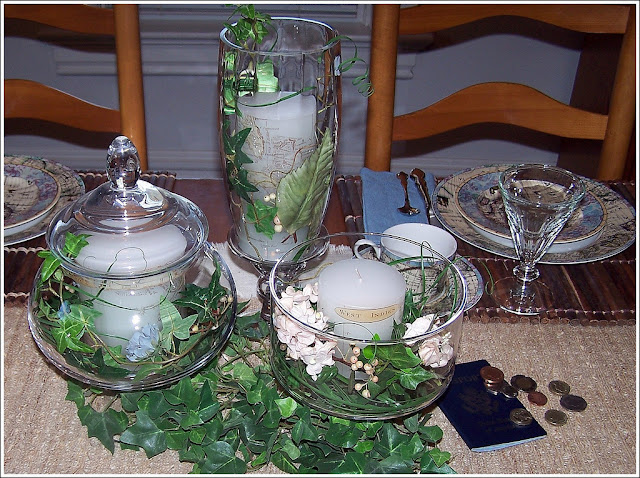
I had no idea what I was going to do with the center of the table and then I remembered the apothecary jars that I had purchased back in December and used as a part of my Boxing Day Dinner table setting.  I filled these with candles and more of the flowers and greenery from the disassembled arrangement.
I was thrilled to have scored this set of candles from Pottery Barn, that worked perfectly with the dishes.  I just happened to see them while shopping in the store one day and grabbed them.  The sales clerk told me that they had been flying off of the table ever since they arrived in the shop and, sure enough, by the time they reached the catalog they had sold out. 
Didn't this arrangement work out perfectly?  The passport is expired, but since it is loaded with stampings I kept it as a remembrance of our trips.  It, and a few scattered foreign coins, completed the table.

Old World Maps dinnerware - Omnibus by Fitz & Floyd
Flatware - Oneida
Placemats and runners - Pottery Barn
Apothecary Jars (medium size) - Crate & Barrel
Apothecary jar (tall) - Pier One
Candles - Pottery Barn
Passport - U.S. Government
Coins - British Government

This post is linked to:

Tuesday, May 10, 2011

Starbuck's Coffee Cake

I have no idea where I came across this recipe, nor have I ever tried coffee cake at Starbuck's.  What attracted me to it were the commonplace ingredients, the ease at which it could be prepared, and the fact that it appeared to easily lend itself to two 9" x 9" pans so that I could make one to keep and one to give away.  I was very pleased on all counts.  This is definitely a keeper!

Starbuck's Coffee Cake

Topping:
1 cup all-purpose flour 
1 cup light brown sugar, packed 
1/2 cup butter, softened 
1 teaspoon cinnamon 
1/2 cup chopped pecans

Cake: 
1 cup butter, softened 
3/4 cup light brown sugar, packed 
1/2 cup granulated sugar 
2 eggs 
1 1/2 teaspoons vanilla 
2 cups all-purpose flour 
1 teaspoon baking powder 
1/4 teaspoon salt 
1/3 cup milk

Heat oven to 325 degrees F.

Make topping by combining 1 cup flour with brown sugar, 1/2 cup softened butter and 1 teaspoon cinnamon in a bowl. Mixture should have the consistency of moist sand. Add 1/2 cup chopped pecans.

In a large bowl, cream together 1 cup butter, 3/4 cup light brown sugar and 1/2 cup granulated sugar with an electric mixer until smooth and fluffy. Add eggs and vanilla extract, and mix well.

In a separate bowl combine flour, baking powder and salt. Add this dry mixture to the moist ingredients a little at a time. Add milk and mix well. Spoon the batter into a 9 x 13-inch baking pan that has been buttered and dusted with a light coating of flour. Sprinkle the crumb topping over the batter. Be sure the topping completely covers the batter. Bake 50 minutes or until the edges just begin to brown. Cool. 

This post is linked to:

Monday, May 9, 2011

Marilyn's Cheese Peta

My aunt passed away last week after nearly a quarter of a century of battling depression.  Only those of us who knew her in the years before she became ill during the mid-seventies, knew how fun-loving she could be, what a great cook she was, not to mention a master mixologist.

I hosted a Mother's Day dinner yesterday, despite being a mother myself, and, along with a ham, Gruyere potatoes, salad and corn, made this recipe that I got from her years ago, in her honor.

Marilyn's Cheese Peta

2 tablespoons flour
3 extra large, eggs
1/4 cup butter, melted
1 pint low fat cottage cheese,small curd
1 package frozen, chopped spinach, thawed and well-drained
6 slices American cheese, broken into chunks
Few gratings of fresh nutmeg

Heat oven to 350 degrees F.  Thaw spinach and drain very well. Combine all ingredients. Pour into 9" pie pan. Bake for 1 hour.

NOTE: This recipe can be made the day prior to baking.  Just assemble it, pour in into a pie plate, cover, and keep refrigerated until ready to bake.

R.I.P. Marilyn Huther 1922-2011

[]
(Digitized slide, ca. 1968)


Saturday, May 7, 2011

Bacon and Cheddar Macaroni & Cheese

Is there anything more comforting than mac and cheese?  No, there isn't, don't even think about it.  It's one of those facts of life much like the fact that everybody likes Italian food.  There are different degrees of comfort, however, and if you want the absolute best form of mac and cheese comfort you can get, this recipe stands high above all others.  What makes it so great, you ask?  Bacon!  Which brings to mind another fact of life and that is that everything tastes better with bacon.

This is another recipe from my new favorite cookbook, Mother's Best by Lisa Schroeder with Danielle Centoni, and it is the last recipe I'm going to publish from the book because I insist you buy your own (not to mention the fact that the amount of typing is massive).  You'll thank me later.

Bacon and Cheddar Macaroni & Cheese

1 teaspoon kosher salt, plus more for salting the pasta water
2 cups firmly packed shredded sharp Cheddar cheese (about 1 2 pound; Love Note 3)
1 pound fusilli (corkscrew) or other pasta, preferably De Cecco
1/4 teaspoon freshly ground black pepper
3/4 pound bacon, diced (about 1 cup cooked; Love Notes 1 and 2)
1/2 cup sour cream, for garnish
3 cups heavy cream
1/2 cup thinly sliced scallions, (white and green parts), for garnish

Bring a medium (6- to 8-quart) pot of water to a boil. Salt it generously (it should taste like the sea). Stir in the pasta and cook according to the package directions. Drain (but don't rinse, or you'll rinse away starches that will help thicken the sauce) and return to the empty pot.

Meanwhile, place a large (12- to 14-inch) saute pan over high heat for several minutes. When hot, add the bacon and saute until browned and crispy (lower the heat to medium-high if necessary to prevent scorching), about 5 minutes. Remove the pan from the heat and, using a slotted spoon or spatula, remove the bacon from the pan and drain on paper towels.

Pour off the fat from the pan (into a metal can or heatproof cup, not down the drain or you'll potentially clog your pipes) and return the pan to medium-high heat. Add the heavy cream and bring to a boil, scraping up any browned bits from the bottom of the pan. Lower the heat to medium and continue to simmer until the cream is reduced slightly, about 3 minutes.

Add the Cheddar cheese and bacon. Stir well and cook over medium-high heat, stirring now and then, until the cheese has melted and the mixture thickens, about 3 minutes. Season with the salt and pepper.

Stir the sauce into the cooked and drained pasta in the pot. Place over medium heat and simmer for 1 to 2 minutes to thicken the sauce and allow the pasta to absorb the flavors, stirring now and then.

Serve in individual bowls topped with a dollop of sour cream and a sprinkle of sliced scallions.

Variation: Lorraine Mac & Cheese: You can easily change up this recipe by using the classic flavors of a quiche Lorraine for inspiration. You just have to add caramelized onions and substitute Swiss cheese for the Cheddar.

Pour off all but 2 tablespoons grease from the cooked bacon. Add 2 cups of finely sliced yellow onions and saute over medium heat until soft, brown, and caramelized, about 20 minutes. Pour in the 3 cups of cream and continue with the recipe (step 3), substituting firmly packed shredded Gruyere or Swiss cheese for the Cheddar.

If you have cooked, crumbled bacon and caramelized onions on hand, the recipe is even easier. When stirring the cheese into the reduced cream, just add 1 cup bacon crumbles and 1 2 cup caramelized onions, too. Then proceed with the recipe.

Love Notes: At Mother's, we prepare a lot of our components in large batches ahead of time, like the bacon crumbles in this recipe. It's a real time-saver, and a good idea for home cooks, too. To make things easier, try fitting the work into a recipe you're already cooking, like this one. That way you're not getting pots and pans dirty just for the heck of it. For example, cook twice the amount of bacon and save the rest in the fridge or freezer for salads, scrambles, or sandwiches.

Dicing slippery, floppy bacon is tough, unless you firm it up with a 10- to 15-minute stint in the freezer. Stack the strips to make the job go even faster.

Avoid preshredded cheese. It may seem like a time-saver, but much of the cheese's flavor has dissipated, and the starchy coating on the outside will interfere with the sauce.


This post is linked to:

Mother's Best: Comfort Food That Takes You Home Again

Friday, May 6, 2011

TRADER JOE'S Chocolate Croissants - Product Review


"The windows are full of neatly stacked palmiers and pain au chocolat and napoleons and strawberry tarts." --from Bread Alone 

Ever since reading Judith Ryan Hendricks' wonderful novel, Bread Alone (see link below), I've been intrigued by the idea of making pain au chocolat.  It certainly seems easy enough.  Essentially, it's a rectangle of puff pastry rolled around a piece of dark chocolate and baked until it is puffed and golden, and the chocolate is melted and gooey.  How tough can that be?  Somehow though, I never got around to it, so when I spied a box of 4 frozen chocolate croissants at Trader Joe's I owed it myself to give these a try.  Forget trying to make them yourself, these are sensational!  I occasionally treat us to the French croissants and morning buns offered by Williams-Sonoma (that are like a culinary trip to Paris in your own kitchen), so wasn't expecting these to be that good.  They are!  And nothing could be simpler.  You let them rise overnight, bake them in the morning, and prepare to start your day with a smile on your face.
Here is the box to look for the next time you visit Trader Joe's.
Out of the box they look like nothing special, but just wait until morning!

Puffed and beautiful is what will greet you after a night of raising.
Here's a peek inside.  Okay, for my tastes it could have had a bit more chocolate, but I'm not complaining, these are delicious.
Thumbs up! Highly Recommended.
Thanks, Trader Joe's!