Sunday, August 14, 2011

Horseradish Mashed Potatoes

Horseradish flowers
It was never my intention to grow horseradish.  Not that I had anything against it, mind you, it had just never occurred to me to do so, and never once in all of my years of gardening did I ever run across a horseradish plant at the garden center.  One year we just happened to be visiting friends in my husband's native NJ and I was admiring his very large, very lush vegetable garden.  "What plant is this?" I asked him, pointing in the direction of a very healthy, wide-leafed plant.  "Horseradish," he replied, and then went on to sing the praises of the ease of growing, the disease resistance, and the wonderful jars of fresh horseradish they'd get each season as the result of this hardy plant. In fact, he told me, his horseradish had become so popular among his family and friends that people asked to have their names put on a list to get a small jar each year. 


I thought nothing else about it after our visit, so was very surprised when, two days after our return home, the Fed-X man was knocking at the door.  I hadn't ordered anything and neither had Jim, so the contents was a puzzle.  Much to our surprise, inside the package were six horseradish roots along with specific instructions as to how to prepare the soil and plant the roots. 


This was six years ago, and we've had horseradish ever since.  Horseradish, like Jerusalem artichokes, is one of those things that you put into the ground once and reap year after year after year. If you haven't had fresh horseradish, let me tell you it is amazing.  It can also be quite deadly if you don't learn to prepare it properly, i.e. outside, wearing a mask.  The first time I cleaned the roots I did so over the kitchen sink with no mask.  I ended up with the worst headache of my life and had to go to sleep in order to get rid of it, so be forewarned.  This does not, of course, apply to the roots you find in the produce section of your market, they are not out-of-the-ground fresh. 


There are many uses for horseradish, one of which is these delicious mashed potatoes.  My husband will not eat mashed potatoes, considering them too bland, but he does like these.  You can control the level of "zing" by adding more or less to your taste.  Consider this recipe as more of a guideline than something written in stone.  Experiment!
HORSERADISH MASHED POTATOES 

2 lbs. large Russet potatoes, peeled and quartered*
3/4 cup half-and-half (more or less to achieve desired texture)
3 tablespoons butter
1/2 teaspoon salt
1/4 teaspoon onion powder
1/4 teaspoon white pepper
2 T. fresh horseradish (but drained, bottled will do)

Put potatoes in a medium, heavy sauce pan. Cover with cold water, then simmer, uncovered, until fork tender, 25-30 minutes (Test with fork).

Meanwhile, in a small saucepan bring half-and-half, butter, salt, onion powder and pepper just to a simmer, stirring until butter is melted; keep hot, covered.
When potatoes have reached desired doneness, drain in a colander and put back on the hot burner to allow for evaporation of any liquid that remains in the potatoes. You'll see a lot of steam for a minute or two. With hand mixer, smash potatoes and then beat on medium speed, slowly adding the hot mixture.  Stir in horseradish.  Serve.

I like to mound the potatoes in an oven-proof dish and place them under the broiler for a minute or two to brown the top edges and make them puffed and golden. Yum!


*You can use small red potatoes and leave the skins on for a more rustic dish


Thursday, August 11, 2011

Invite a Crab to Dinner


 We're having crab cakes for dinner tonight and what better way to serve them than on these crabby luncheon plates? As you were made aware in this post I am a bit of a nut for anything related to the sea. This evening I decided to give my new plates a spin, spread out a favorite piece of fabric on the table, bunching it to look like the waves of the ocean, and decorate with a variety of sea theme pretties collected over the years that make me happy, and will no doubt add to the enjoyment of our meal. 
A photo of a recent trip to Florida to visit friends will be a nice reminder of good times, long, sandy walks on the beach, and lots of fresh seafood!
Aren't these fun?  I scored these at an end-of-the-season sale at Williams-Sonoma.  They are actually dessert plates, but are large enough to work for a luncheon or light dinner.  (It would take one whopping piece of dessert to fill these up -- not that I'm complaining.)
I've taken quite a fancy lately to these cute little vintage tuna bakers produced years ago by Chicken of the Sea.
Fiesta flatware in turquoise echoes the color of the tuna baker.
Lobster salt and pepper shakers from Stonewall Kitchens bring out the color in the plates.
A floppy beach hat in the background, edged with turquoise beads makes for a whimsical addition.
A bit of beach sand and some river washed stones adorn the saucer.
Tablecloth - Fabric from Hancock fabricsPlates - Williams-Sonoma
Cups and Saucers - Amazon
Lobster Salt & Pepper Shakers - Stonewall Kitchens
Glassware - La Rochere
Tuna Baker - eBay
Flatware - Fiestaware

This is linked to

Wednesday, August 10, 2011

Buttermilk Fantails


I spotted these Buttermilk Fantails Rolls on the cover of the February 2009 issue of Gourmet magazine and made them for dinner last night. They were surprisingly easy to make and a big hit. You can find the recipe online by clicking the recipe link, but I think mine look much better than those pictured on the website (if I do say so myself).  For the sake of convenience, I've reproduced the recipe below.  Do try them.  I am not much of a bread maker, but was enormously pleased with these.  Next time I'm going to add some onion and garlic powder to give them a little more flavor.

Buttermilk Fantails

1 stick plus 2 tablespoons unsalted butter, melted, divided
2 teaspoons active dry yeast (from a 1/4-oz package)
1/4 cup warm water (105-115 degrees F)
1 tablespoon mild honey or sugar
3 cups all-purpose flour plus more for kneading and dusting

1 1/2 teaspoons salt
3/4 cup well-shaken buttermilk

Butter muffin cups with 1 tablespoon melted butter.

Stir together yeast, warm water, and honey in a large bowl and let stand until foamy, about 5 minutes. (If mixture doesn't foam, start over with new yeast.)

Mix flour, salt, buttermilk, and 6 tablespoons melted butter into yeast mixture with a wooden spoon or rubber spatula until a soft dough forms. Turn out dough onto a well-floured surface and knead, dusting surface and your hands with just enough flour to keep dough from sticking, until dough is elastic and smooth, 6 to 8 minutes. Form dough into a ball.

Put dough in an oiled large bowl and turn to coat. Cover bowl with plastic wrap and a kitchen towel and let dough rise in a draft- free place at warm room temperature until doubled, 1 1/2 to 2 hours.

Punch down dough (do not knead), then halve. Roll out half of dough on a lightly floured surface with a floured rolling pin into a 12-inch square (about 1/8 inch thick; keep remaining half covered with plastic wrap). Brush dough with 1/2 tablespoon butter and cut into 6 equal strips. Stack strips, buttered sides up, and cut crosswise into 6 equal pieces. Turn each piece on a side and put into a muffin cup. Make more rolls with remaining dough in same manner. Separate outer layers of each roll to fan outward. Cover rolls with a kitchen towel (not terry cloth) and let rise in a draft-free place at warm room temperature until doubled and dough fills cups, 1 to 1 1/2 hours.

Preheat oven to 375 degrees F with rack in middle. Bake rolls until golden brown, 20 to 25 minutes. Brush tops with remaining 2 tablespoons butter, then transfer rolls to a rack and cool at least 20 minutes.

Cooks' note:
Rolls are best the day they're made but can be frozen (cool completely, then wrap well) 1 month. Thaw, then reheat on a baking sheet in a 350 degrees F oven until warmed through, 5 to 10 minutes.
Gourmet | February 2009
by Ruth Cousineau

Yield: Makes 1 dozen rolls
Active Time: 45 min
Total Time: 5 hr (includes rising)

This post is linked to:

Monday, August 8, 2011

"Le Coq" - A Rooster Tale


There is a Chickens & Roosters party going on at Note Songs blog today, so I thought I'd join in.  My entry is probably a bit different than most as I'm showcasing an event rather than an item, but since it does indeed surround a picture of a rooster, I thought it would fit right in.

Read on...

When people learn that I live in a house that is 119-years-old, one of the first things they ask, usually with a look of intense curiosity, is if it's haunted. I always hesitate before responding. I think the answer is a resounding "No!" and yet a number of strange incidents have occurred during our 16-year residency that defy explanation. One such event concerns this picture.

A particular favorite of mine, it hangs in the kitchen just over the door that leads into the dining room. It was rather late in the evening on the night before my annual Thanksgiving dinner many years ago, and I was busily working in the kitchen doing as much advance preparation on the meal as possible. My husband was seated at the counter in the kitchen with his back to the dining room door, so was unable to witness the strange phenomenon that occurred. I was stirring a large pot of leek and potato soup on the stove when I heard a sort of swishing noise. Swish...swish...swish. I turned to see what he was doing and immediately looked over his head. The picture was violently rocking from side to side, swinging back and forth on the nail on which it had been hung. The lower right corner swung way up to the right, and then back again bringing the lower left corner way up to the left. I stood gaping at it for a while, the hairs raising on the back of my neck. Before I could get the words out to my husband to turn and look, the picture stopped and leveled itself perfectly. That alone was strange since nothing in this house is level. I immediately ran upstairs to see if either of my boys were doing anything that might have caused this most unusual and, I might add, creepy occurrence. Christopher was quitely sprawled on his bed reading a Jeffery Deaver novel; Andrew was sitting in front of his TV blasting something on a video game. Neither one, they said, had done anything other than what they were currently doing for the past half hour or so.

It was a quiet night. There was no traffic on the street. No high winds were blowing, in fact there was no wind at all. The weather was cold but clear, so no thunder to rattle things hanging on the wall. There was simply no cause for the picture to move an inch, much less rock back and forth, and yet it did that one night, never before and never again.

I've never looked at it in quite the same manner since that night, and it took me a long while before I could even take it down to clean it. Occasionally while in the kitchen I'll glance at it over my shoulder, and I still get goosebumps when I do.


This post is linked to:
and


Sunday, August 7, 2011

Homemade Dill Pickles

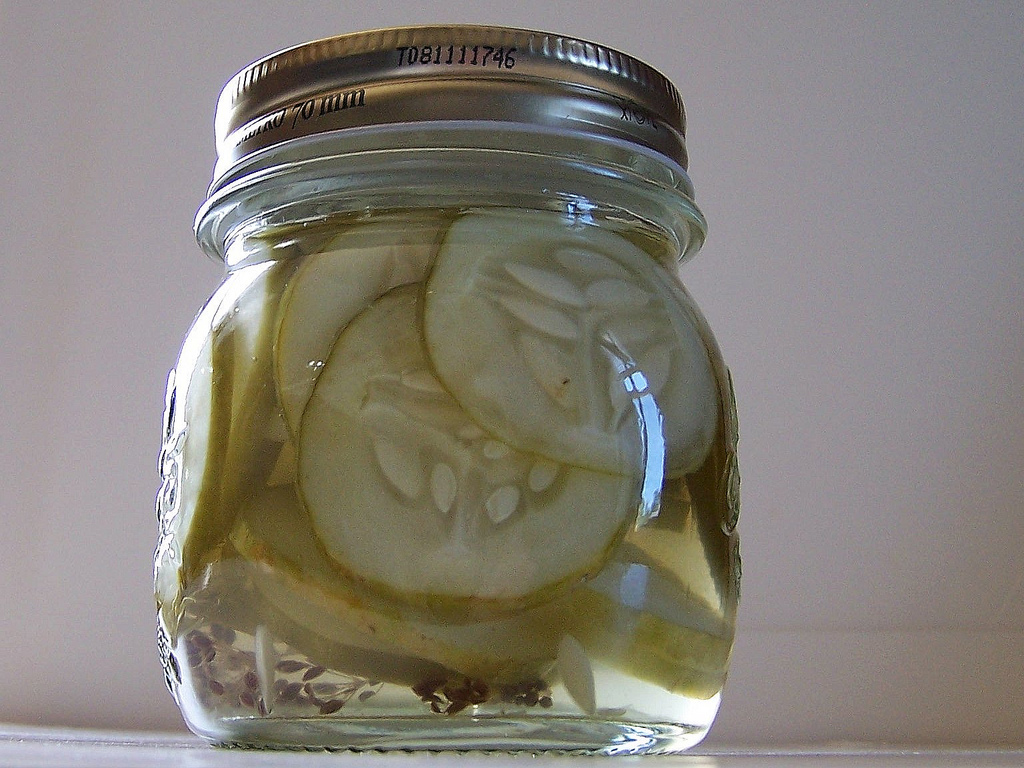
See the little dill head at the bottom of the jar?  I grew that too (she said proudly).  The cute little canning jars are Italian and on sale at Tuesday Morning.
Cucumbers abound at our house and it has been a lot of fun trying all sorts of new recipes.  The cucumber recipe du jour was dill pickles.  I love making these because they are so easy, and allow for a bit of creativity when it comes to additional flavor-making ingredients.

EASY DILL PICKLES

8-10 small pickling cucumbers (about 3 pounds)
2 cups white vinegar
2 cups water
2 tablespoons pickling salt
1/4 teaspoon sugar
4 heads fresh dill or 4 teaspoons dill seeds
4 small cloves garlic

Place your sterilized jars into the canner and bring the water to a simmer.  Keep them warm while you slice the cucumbers and prepare the pickling solution.

Cut a thin slice from the ends of each cucumber.  Slice into chips about 1/8 inch thick.  A mandolin works great for this as long as your cucumbers are crisp and fresh.  Set aside.

Combine vinegar, water, salt, and sugar in a saucepan and bring to a boil.  If you prefer a pickle more to the sour side, eliminate the sugar.

Carefully remove hot jars from canner. Place them open side up on a towel on the counter to keep them steady.  Here's where the fun comes in.  You can get very creative with the pickles.  For a basic garlic dill, place 1 head fresh dill or 1 tsp dill seeds and 1 clove garlic into each jar; pack in cucumbers.

You can also try the following additions (when I make pickles, each jar is different):

1-3 slices of Jalapeno peppers
1-2 pearl onions
1/4 teaspoon pickling spice
Sprig of dill weed
2-3 peppercorns

Pour boiling vinegar mixture over cucumbers to within 1/2 inch of the rim of the jar. Screw on cap and lid.  Process 10 minutes for pint jars and 15 minutes for quart jars.  Allow to cool on the counter and be sure to listen for the popping noise that indicates that you've gotten a good seal.  Store for 2 weeks to allow for the infusion of flavors.

This post is linked to:


Seasonal Sunday, Metamorphosis Monday, Made by You Monday, On the Menu Monday, This Week in My Garden, Outdoor Wednesdays and 
Tuesday Garden Party

Norpro 2478367600456 7-Piece Home Canning Set

Thursday, August 4, 2011

Angel Biscuits

I read a lot of Southern literature from the Anne George Southern Sisters mysteries, to Fannie Flagg's humorous narratives, to Michael Lee West's fiction and memoirs, to Martha Hall Foose's charming cookbooks.  It seems that, in any type of southern writing, there is often the mention of Angel Biscuits.  I'd not heard of Angel Biscuits until I started reading these books, but the mouth-watering descriptions of sweet tea and biscuits with fresh jam served in a relaxing porch atmosphere with a view of the bayou finally got to me and I had to try them.

The addition of yeast in the dough is what makes this biscuit recipe different and lighter than most.  Picture a yeast roll in biscuit clothing and you'll get the idea.  Unique in both taste and texture, they are suitable for use as both a breakfast biscuit or a dinner roll.  An added plus is that they must be made ahead. I love that in a recipe, don't you?  The one I tried is from King Arthur Flour -- a fabulous catalog company the likes of which has often been known to make bakers weak at the knees.  You can find it on their website with loads of informative step-by-step pictures here, or use the directions (sans photos) that I've written out below.

Angel Biscuits
Recipe from King Arthur Flour

2 1/2 cups all-purpose flour
2 teaspoons instant yeast
2 tablespoons sugar
3/4 teaspoon salt
2 1/2 teaspoons baking powder
1/4 cup vegetable shortening
1/4 cup cold butter, cut into pats
1 cup room-temperature milk
2 tablespoons melted butter, for brushing on top

Whisk together the flour, yeast, sugar, salt, and baking powder. Add the shortening, mixing till evenly crumbly. Add the butter, mixing till roughly combined. Pea-sized bits of butter can remain. Add the milk, mixing till just combined. The dough will be quite wet.

Transfer the dough to a well-floured work surface, and quickly and gently pat it into a 7" diameter, 1"-thick circle. Use a 2" round biscuit cutter to cut 16 biscuits. Place them close together on a lightly floured or parchment-lined tray or baking sheet. Cover with lightly greased plastic wrap or the cover of your choice, and allow the biscuits to rest at room temperature for 1 hour. After an hour, cover the biscuits with plastic wrap, and place the pan in the freezer for at least 1 hour. Overnight is fine. Alternatively, biscuits can be frozen up to 2 months.

When ready to bake, preheat the oven to 400 degrees F. Remove the biscuits form the freezer, remove the plastic, and space them on a lightly greased or parchment-lined baking sheet. Bake the biscuits for 16 to 18 minutes, till they're golden brown. Remove from the oven, and brush with melted butter, if desired.

Yield: 16 biscuits.

This post is linked to:
Foodie Friday
Foodie Friday @ Little Brick Ranch
Food on Friday
Friday Favorites
Friday Fat Camp

Wednesday, August 3, 2011

Salmon Cakes with Horseradish Thyme Mayonnaise

There is nothing like cooking with fresh herbs for the absolute maximum in taste. For those of you who grow herbs in your backyard or container garden, you already know what great flavor enhancers these are.  If you're considering growing them (something I strongly encourage), but are not quite sure where to start or which ones to plant, I recommend these six in my personal order of use/importance: chives, thyme, parsley, tarragon, dill, rosemary (alternately I'd say cilantro).

Chives for their versatility are always a must, but it may surprise you to see thyme ahead of parsley on my list.  I use thyme almost daily. This is one versatile and hardy plant: it happily tolerates heat and drought, an be propagated by seeds, cuttings or root division, is a good source of iron, and tea made from dried leaves is said to treat the common cold.

I divide it every year to share with friends and currently have three pots of it growing in the container garden, and another very large plant in the ground.  This little wonder herb enhances a wide variety of foods, makes an excellent flavored vinegar, is a must when making your own stock, and adds a special freshness to a salad when the small leaves are stripped from a stem and tossed in with the greens. One of my favorite uses is in this recipe for salmon cakes.  It is contained both in the cakes and the accompanying sauce, so they complement each other nicely and offer a fresh taste not found in other salmon cake recipes that do not rely upon fresh herbs.
Salmon Cakes with Horseradish Thyme Mayonnaise

For the Salmon Cakes:
2 cups loosely packed crumbled cooked salmon
1/2 cup panko
2 scallions, chopped
1/4 cup finely chopped celery
1/2 teaspoon Dijon mustard
1/4 cup mayonnaise
2 tablespoons chopped fresh thyme
2 drops Tabasco
Pinch of Old Bay Seasoning
Dash of Worcestershire sauce
1 large egg, beaten to blend

For the Horseradish Thyme Mayonnaise:
3/4 cup mayonnaise
2 drops Tabasco
1 tablespoon fresh lemon juice
1 tablespoon prepared horseradish
2 1/2 teaspoons chopped fresh thyme

2 tablespoons butter

Mesclun spring mix lightly tossed with a mild vinaigrette

Directions:
Combine first 10 ingredients in medium bowl and stir gently to blend. Season with salt and freshly ground black pepper. Mix in egg. Shape salmon mixture into 6 patties, about 3/4 inch thick. Arrange on plate.

Combine 3/4 cup mayonnaise, lemon juice, Tabasco, horseradish and 2 1/2 teaspoons thyme in small bowl. Season sauce to taste with salt and pepper. (Salmon cakes and sauce can be prepared 1 day ahead. Wrap separately and refrigerate.)

Melt butter in heavy large skillet over medium-low heat. Add salmon cakes and saute until brown and cooked through, about 5 minutes per side. Transfer to platter. Serve with on top of a bed of  lightly dressed, mixed greens, and top salmon cakes with sauce.