Sunday, June 30, 2024

Setting Tables Collaging Place Settings of Beauty by Nancy LaPonzina, Reviewed

 
Setting a beautiful table is very popular these days. You cannot go online without seeing one beautiful tablescape after another; it can be intimidating. We all want to have a lovely table, but do we all need that much dinnerware in order to do it? Me? I’m obsessed with dinnerware, and have so much of it that I have three industrial storage racks (soon to be a fourth) in the basement in order to hold it all. But that doesn’t mean that you can’t set a lovely table with what you already have lurking in cupboards and china cabinets. Nancy LaPonzina is the one to tell you how to do exactly that in her vastly informative book, Setting Tables Collaging place settings of beauty: Joyful mix & match inspiration from your china closet.

LaPonzina has all of her dinnerware in one china cabinet. From that she is able to get dozens and dozens of beautiful tables by simply combining her dinnerware in non-traditional ways. As she points out, with her eight different china patterns, and using three plates plus a charger, she can come up with well over 4000 different combinations. I found that staggering. It also told me that I need to do far more experimentation than I have been doing, instead of largely relying on my “go to” that’s been to buy something new.

With her economical mindset, plus her photographer’s presentation portfolio (divided into sections for each type of dinnerware) that she uses to contain photos of everything she has, she is able to easily, and beautifully, design a table in less time than it takes most of us to even think about it.

 I am all about using things in ways other than for which they are intended, so I fell in love with this table setting featuring a majolica wall vase used to hold a lovely striped napkin.

 
She suggests purchasing only four of any type of tableware – plate, cutlery, stemware, linens – reasoning that smaller parties occur far more often than larger ones. Should there be more than four guests at a table, existing tableware can be mixed and matched with other items on hand. As someone who came from a mother whose main advice in life was to collect service for 12, I found this very enlightening. I also found myself wrapping a lot of plates, cups, and saucers for donation to free up some of my very cluttered, jam-packed space. 
 
This should be the first book you purchase before you consider getting into tablescaping. Many of the pitfalls people fall into — myself included — are covered here, such as resisting holiday patterns (no matter how cute and tempting they may be) because of their limited use. This idea, and many more, can be found in this helpful and practical guide.
 
Lighting, linens, and whimsy are all covered in this book in addition to dinnerware, making it as perfect for the novice as it is for veteran tablescapers like me who, even as a seasoned veteran, found myself learning something from this lovely guide. The pictures are beautiful and inspiring, the advice is thoughtful, useful, and easy to put into practice.

 As well as writing about tablescapes, Nancy is also an award-winning fiction author. She can be found on Instagram @nancy_laponzina.

 As an Amazon Associate I earn from qualifying purchases.


Friday, June 28, 2024

Texas Tea

 
I’m going to confess a little something, I’ve really been embracing cocktails lately. I’m not much of a drinker, but occasionally I like to try a new recipe, and I have yet to be let down.


I have never had a Long Island iced tea before, so I don’t know how this compares. I will say that it is really tasty, doesn’t taste like it has alcohol in it at all, and disappeared a lot more quickly than I thought it would. It is so incredibly refreshing on a warm day. Make up a pitcher of these and keep them in your fridge. You can always mix the spirits, simple syrup, and lemon juice, and top it off with Coca-Cola when it’s time to serve. This will be the hit of your barbecue, I guarantee.

Texas Tea

1/2 oz. tequila
1/2 oz. rum
1/2 oz. triple sec
1/2 oz.
simple syrup
1/2 oz. freshly squeeze lemon juice
2 oz. Coca-Cola
Lemon wedge, for garnish

Mix everything together and pour over ice in a tall glass. You will love it!

As an Amazon Associate I earn from qualifying purchases.

Thursday, June 27, 2024

Jalapeño Pimiento Cheese

 
There is something about summer that makes me want to stock the refrigerator with all sorts of dips and spreads in order to make snacking and sandwich making quick and easy. As you are well aware, if you have read this blog for any length of time, I am a bit of a pimiento cheese fan, am constantly trying new recipes, and tweaking existing ones. It occurred to me this morning when I was chopping vegetables for crudités that I had yet to make pimiento cheese with jalapeño added, so I did just that. This is spicy and delicious, so easy to gobble right up.Jalapeño Pimiento Cheese

2 c. freshly grated extra-sharp Cheddar cheese

4 oz. cream cheese, cut into 1” cubes, room temperature

4 oz. Melissa’s fire roasted red peppers, chopped

3 T. Duke’s mayonnaise

¼ t. garlic powder

¼ t. onion powder

¼ t. Slap Ya Mama 

1 Melissa’s pickled jalapeño pepper, ribs and seeds removed, minced

Freshly ground black pepper, to taste

 Place all ingredients into a medium mixing bowl, and beat at medium speed with a handheld mixer until combined. Turn into a lidded container, and refrigerate for at least eight hours or overnight in order to allow flavors to meld. Keeps refrigerated for 7-10 days.

 As an Amazon Associate I earn from qualifying purchases.


Tuesday, June 25, 2024

Indian Shrimp Curry

 
I can’t tell you the first time I had Indian food; all I know is that I really liked it. I also know that the late Mr. O-P was the one who introduced me to it when he took me to dinner at local restaurant, India’s Rasoi. Once I realized how flavorful it was, I would seek out Indian restaurants when we traveled. One of the best Indian restaurants I think I’ve ever been to was Shalimar in Dublin, Ireland. Another good one was The Curry Leaf in London where I had the most magnificent salmon.

 It’s hard to have Indian food these days without thinking of Jim, but I do soldier on, as you are aware from my recent posting of Coconut Curry Chicken.  This one is for shrimp lovers; I served it on top of turmeric rice. Delicious! 

Indian Shrimp Curry

2 T. olive oil

1 c. minced onion

1 red pepper, chopped

2 cloves garlic, chopped

1½ t. ground turmeric

1 T. freshly grated ginger

1 t. ground cumin

1 t. smoked paprika

½ t. Kashmiri chilli powder

1 14.5-oz. can petite diced tomatoes

1 13.66-oz. can coconut milk

1 t. kosher salt

1 lb. medium shrimp, peeled and deveined

2 T. chopped fresh cilantro

1 T. chopped fresh Thai basil

 Heat oil in a 12” skillet over medium heat; cook and stir onion and pepper until onion is translucent, about 5 minutes. Remove the skillet from heat and allow to cool slightly, about 2 minutes.

 Add garlic, turmeric, ginger, cumin, paprika, and chilli powder to onion and pepper in the skillet; stir over low heat to bloom spices, about 30 seconds. Stir in tomatoes, coconut milk, and salt. Bring to a boil for 1 minute, and then reduce heat and simmer, stirring occasionally, for 10 minutes.

 Stir in shrimp, cilantro, and Thai basil; simmer until shrimp turns opaque, about 2-3 minutes.

 Garnish with chopped scallions.

As an Amazon Associate I earn from qualifying purchases.

Monday, June 24, 2024

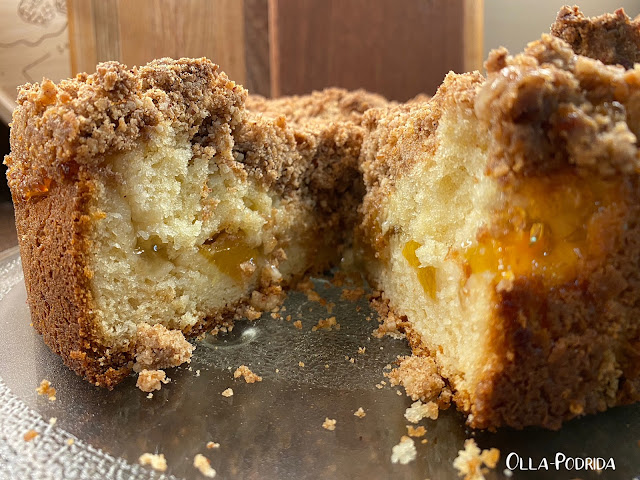
Peach Coffee Cake

 
I’ve tried to convince myself over the years that I am not a baker, but occasionally I just get the urge to bake, ergo, at least according to number two son, I am indeed a baker. Today he was coming over to hang out with his old mom. I love that my adult son still likes to come hang out with me. As a consequence, I decided that today would be the perfect day to experiment with a peach coffee cake, because I knew that he would enjoy being my taste tester, and give me an honest opinion.
By the time he arrived, the house was scented with cinnamon and toasted pecans. We could hardly wait to dig in, but I knew, considering the moist filling, that the cake was going to have to cool thoroughly before I could cut into it. I think that was the longest hour of our lives.
 
We both absolutely loved it! This is a coffee cake, so the cake itself isn’t as sweet as a dessert cake, making it perfect for breakfast. The peach filling is absolute heaven, as is the streusel topping. This is a must try.Peach Coffee Cake

For cake:

2 c. flour

2 t. aluminum free baking powder

½ t. aluminum free baking soda

1/8 t. salt

½ c. butter, room temperature

1 c. sugar

2 large eggs, room temperature

1 c. sour cream

1 t. vanilla extract

1 21-oz. can peach pie filling

Streusel Topping:

1 c. flour

½ c. firmly packed dark brown sugar

½ c. pecans

6 T. butter, cut into pieces and softened

1 t. cinnamon

¼ t. freshly grated nutmeg

 Make streusel: In a food processor pulse together streusel ingredients until combined well and crumbly; set aside.

Preheat the oven to 350°F. Spray the bottom and up the sides of a 9-inch springform pan with Baker’s Joy; set aside.

In a medium bowl, whisk together flour, baking powder, baking soda, and salt; set aside.

 In the work bowl of a stand mixer, cream butter and sugar until light and fluffy, 5-7 minutes. Turn the mixer to low and beat in eggs one at a time just until incorporated. With the mixer still on low, add sour cream and vanilla, then add flour mixture in 2-3 intervals, beating just to combine.

 Spread half of the batter in the prepared pan. Top with peach pie filling, spreading to within a half a spreading to within a half inch of the side of the pan. Dollop the rest of the batter over the peaches, spreading to cover.

 Bake for 55-60 minutes or until a toothpick inserted in the center comes out clean. Allow the cake to cool for 15-20 minutes on a wire rack before removing the springform pan sides.

 Because of the fruit filling, this does not keep. What you don’t eat the first day, slice up and freeze. It freezes beautifully.

 *Be sure to spread the dough to the edges. I dampened my hands in order to do so.

As an Amazon Associate I earn from qualifying purchases.

Friday, June 21, 2024

Deck Gardening 2024: Compost Bins

 
First of all, I tried the countertop compost bin that is generally designed to gather up the days (or weeks, depending upon how often you cook) scraps to be dumped into a larger bin. Despite all of the favorable reviews, this did not work for me. The problem I had with this is that, over time, it starts to smell, no matter how many times you change that filter. In addition, it can also drawn gnats, and that’s disgusting, so I threw mine out.
Photo: Amazon
Deck, balcony, and patio gardeners have space at a premium, and therefore have to be careful in planning what they intend to grow. Plants can outgrow their spaces in no time, so you don’t want to overcrowd. If you have too many things in one pot, nothing is going to do well.

Your crops are also not going to do well if you repeat plant in the same pot without rotating (Yes, there is a need to rotate crops even in pots.), or if you fail to enrich the soil with each year. With this in mind, one thing that you should dedicate space for is a compost bin. These have come a long way since those big, bulky things that people used to have in their backyards, or, failing that, a compost pile. For those of us with no room for piles (and I’ll just leave that there) the next thing is a compost bin where you can turn fruit and vegetable scraps into a wonderful rich soil. I have tried a number of them with mixed results.

Photo: Amazon

I then got a small compost bin to keep in the garage. Anytime I cook I always have a garbage bowl at hand for scraps (Never, and I cannot emphasize this enough, use meat or dairy scraps.) that I put into the compost bin. The reason that I bought this particular one was that it had a spigot on the bottom for “compost tea,” i.e. the runoff, or byproduct of the compost. Rich in nutrients, it can be mixed with water and used on your plants as a fertilizer; it is wonderful stuff. The trouble is, I never got any compost tea. With this design, however, what I did get was a door that popped off, and compost that rained down onto my feet, after which, I spent the rest of the day shoveling it back into the compost bin, and scrubbing my feet. After this happened three times it occurred to me that, again, despite favorable reviews, perhaps this was not the composter of my dreams.

Photo: Amazon

The one I finally settled on, and highly recommend is this one. It has a small footprint, has a narrow rather than bulbous design, and a door that slides into a channel so that there is no way it can pop off and dump compost onto your feet. It is on the small side, so the perfect choice for a household of one or two, but perhaps not large enough for household of three or more people.

One of the best things that you can do for yourself and the planet is to compost your scraps. You can use teabags, loose tea, coffee grounds, a sprinkling of wood ash from your fireplace (if you burn untreated wood), and all of the fruit and vegetable scraps that you end up with after working in your kitchen. Turning that into black gold is an absolute wonder, and your plants will love you for it.

 GARLIC UPDATE: Harvested!

  As an Amazon Associate I earn from qualifying purchases.

Thursday, June 20, 2024

Sultry Summer Nights Tablescape

 
This tablescape came about with the discovery of the centerpiece. Centerpieces always seem to be the bane of my existence. I can easily build a table, but coming up with something for the center often perplexes me. When I ran across this pineapple hurricane in the belly of the beast, I had to get it out, clean it up, and put it immediately into service.
 
This hurricane has quite a storied past. I bought it about 35 years  ago when I was still married to my first husband, back in the days when American country and Williamsburg-style decor were at their peaks. I loved it not only just to look at, but for the beautiful glow it gave off when the candle was burning. It went with me to a new house and a new husband, spent a good bit of time out on the back porch, and was one of the few survivors of the tornado that ripped through our yard in April 2011. It ended up getting packed away, when we moved out to the house I live in now, and I had forgotten all about it until I recently found it in the bottom of a box. 
It was like seeing an old friend. Number two son, who came by and spotted the pineapple, remembered it being on the back porch; it’s just special. The pineapple is also the symbol for hospitality, and this is a table that is most hospitable. 
 I wanted to go with something a little more masculine and subtle, so I went with largely neutral colors, and those that reflected the coloration of the pineapple. I chose Water Hyacinth placemats topped with gold chargers because I wanted to replicate the pineapple glow.

  I matched the chargers with gold flatware to continue that theme and add a bit of sparkle. Dinnerware (plates, dessert plates, and mugs) are by Tabletops Lifestyles in their “Bora Bora” pattern.
   
The pressed glass, crescent-shaped salad bowls have been with me forever, and always prove popular. It is a wonderful way to serve a salad on a table where space is limited. 
I wanted an additional touch of green, so I chose the salt and pepper shakers that used to be on the table in my parents’ kitchen. 
Napkins are by Pottery Barn; the glassware I inherited from my mother.
 
The black fans add a bit of drama, and are wonderful to use to fan oneself when overcome with the vapors.

As an Amazon Associate I earn from qualifying purchases.

This post is linked to: Tablescape Thursday


Tuesday, June 18, 2024

Nashville Bushwhacker


Recently I reviewed a unique cookbook called Ticket to Ride: The Official Cookbook by Alan R. Moon. If you haven’t yet, read that review, you can find it here. One of the recipes in that cookbook that turned my head was this adult milkshake/cocktail that is sooooo delicious. It’s easy to throw together in a mini blender, and goes down smooth.

  Nashville Bushwhacker

2 oz. dark rum or whiskey
2 oz. Kahlúa
2 oz. crème de cacao
2 oz.
Cream of Coconut
2 oz. milk
1 c. ice

Place in the bowl of a high-speed blender, and blend.

 Garnish with whipped cream, nutmeg, and a stemmed cherry.

 As an Amazon Associate I earn from qualifying purchases.

Monday, June 17, 2024

No Bake Lemon Cheesecake

 
Last week I was craving cheesecake. I had seen a picture of something called strawberry banana fantasy cheesecake that I knew I had to make. I went out and bought all of the ingredients, including bananas and strawberries, and then I took a look at the recipe. The recipe and the picture were completely unrelated. I did a search to see if I could find a recipe that matched the picture, and there was none to be found. This led me to the conclusion that the picture I was looking at was AI. I hate it when food blogs do this sort of thing because it’s misleading, and, in my opinion, deceit of the highest form. After this little secret was unveiled, I was kind of put off by that banana strawberry cheesecake. It must’ve been fate, because the next day a no-bake lemon cheesecake caught my eye. I’ve never made a no-bake cheesecake before so I thought I would give it a try.  The late Mr. O-P was a purist (you can read about our cheesecake wars here and here), and no doubt would have balked at something like this; too bad, because he would have really missed out. In my mind, this was going to be so easy. It wasn’t.

I suppose I probably shouldn’t have made this when I was frantically involved in a variety of things, and the Roomba was circling my feet. I had the entire kitchen covered with pots, pans, ingredients, and a freshly squeezed 1/2 cup of lemon juice (from three zested lemons) into which I had dissolved gelatin. In my zeal to clean a space to continue on, I hit that cup with my elbow and sent it sailing down to the floor. Not only did I have to clean up the mess that I had made, but I also had to squeeze three more lemons! Fortunately, I had them.

Was it worth it? Oh, yeah! This is so refreshingly delicious, light as a feather, and satisfied both my lemon and cheesecake cravings. It is the perfect dessert for summer, can be prettily garnished with fresh summer fruit, like
strawberries, blueberries, raspberries, or anything else that happens to be in season, and is certainly company worthy.

The original recipe called for a graham cracker crust, I wanted something a bit zingier, so I made a gingersnap crust. You can do what you like. I also added a few drops of yellow food coloring to make the filling look less white, and swapped out the vanilla flavoring in the whipped cream used for the garnish with lemon flavoring because I really wanted to take it over the top. Did I ever.

No Bake Lemon Cheesecake

Adapted from lifeloveandsugar.com

 Crust:

2¼ c. gingersnap crumbs

2 T. sugar

10 T. butter, melted

 Cheesecake Filling:

½ c. fresh squeezed lemon juice (3-4 lemons)

1 0.25 oz. pkg. unflavored gelatin (2½ t.)

¼ c. sweetened condensed milk

24 oz. cream cheese, room temperature

½ c. sugar

2-3 drops yellow food coloring

2 T. sour cream

2½ T. lemon zest

1¼ c. heavy whipping cream

¾ c. powdered sugar

 Whipped Cream:

1 c. heavy whipping cream

½ c. powdered sugar

1 t. lemon extract

To make the crust:

In a medium bowl combine the crust. Press the mixture into the bottom and up the sides of a 9-inch springform pan. Set in the fridge to chill.

To make the filling:

Place lemon juice into a medium-sized bowl, and sprinkle the powdered gelatin evenly over it; let stand for 4-5 minutes.

 Heat the lemon juice and gelatin mixture in the microwave for 10-20 seconds, until just warm and smooth. Stir the sweetened condensed milk into the lemon juice mixture, then set the mixture aside to cool to room temperature.

In a large mixing bowl, beat the cream cheese, sugar, and food coloring together, adjusting to achieve the desired color, until smooth. Add the sour cream and lemon zest and mix to combine. Add the cooled lemon juice mixture and mix until well combined and smooth; set mixture aside.

 In another large mixing bowl, add the heavy whipping cream and powdered sugar. Whip on high speed until stiff peaks form. Carefully fold the whipped cream into the cream cheese mixture in two parts until well combined. Pour the filling into the prepared crust and spread into an even layer using an offset spatula. Refrigerate cheesecake until firm, 5-6 hours or overnight.

Remove it from the springform pan and set on a plate or serving platter.

 To garnish: 

Place heavy cream, powdered sugar, and lemon extract into a medium mixing bowl. Whip on high speed until stiff peaks form. Pipe swirls of around the edge of the cheesecake, and garnish as you see fit.

 Refrigerate until ready to serve. Cheesecake is best for 4-5 days.

As an Amazon Associate I earn from qualifying purchases.