Showing posts with label Halloween. Show all posts

Friday, October 4, 2024

Pumpkin Hollow Tablescape

 
It has been a busy and exhausting week for me as the finishing touches were finally put on the kitchen. I have to say that I am completely in love with it, cannot stop looking at it, and will do a “reveal” blog post next week. While builder, Joe, was working, I did find time to go out in the 
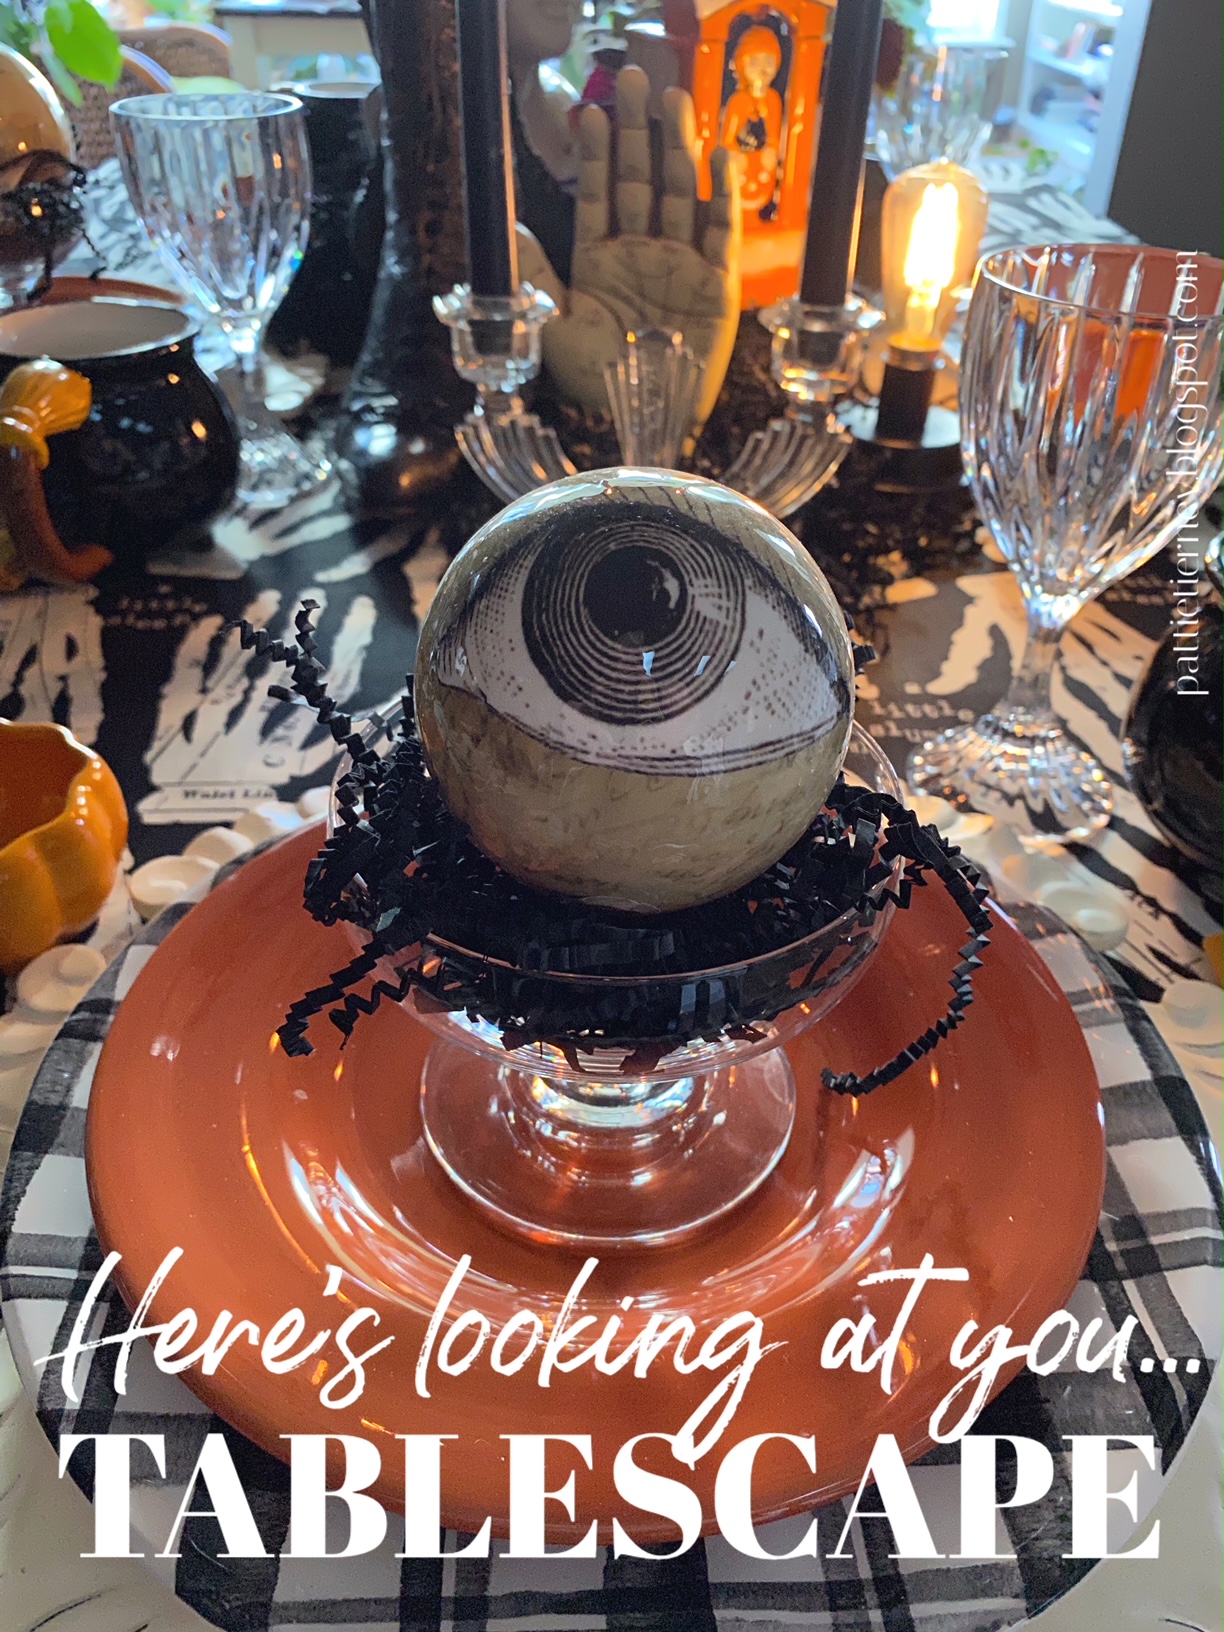
conservatory and set a table for two suitable for the month of October.The pumpkin tureen centerpiece was the inspiration for the table. I honestly can’t tell you how long ago it was that I bought that tureen (with the orange berry ring that surrounds it), but I do know that it was at a local shop on historic Main Street that closed about 20 years ago, so I have had this for a 
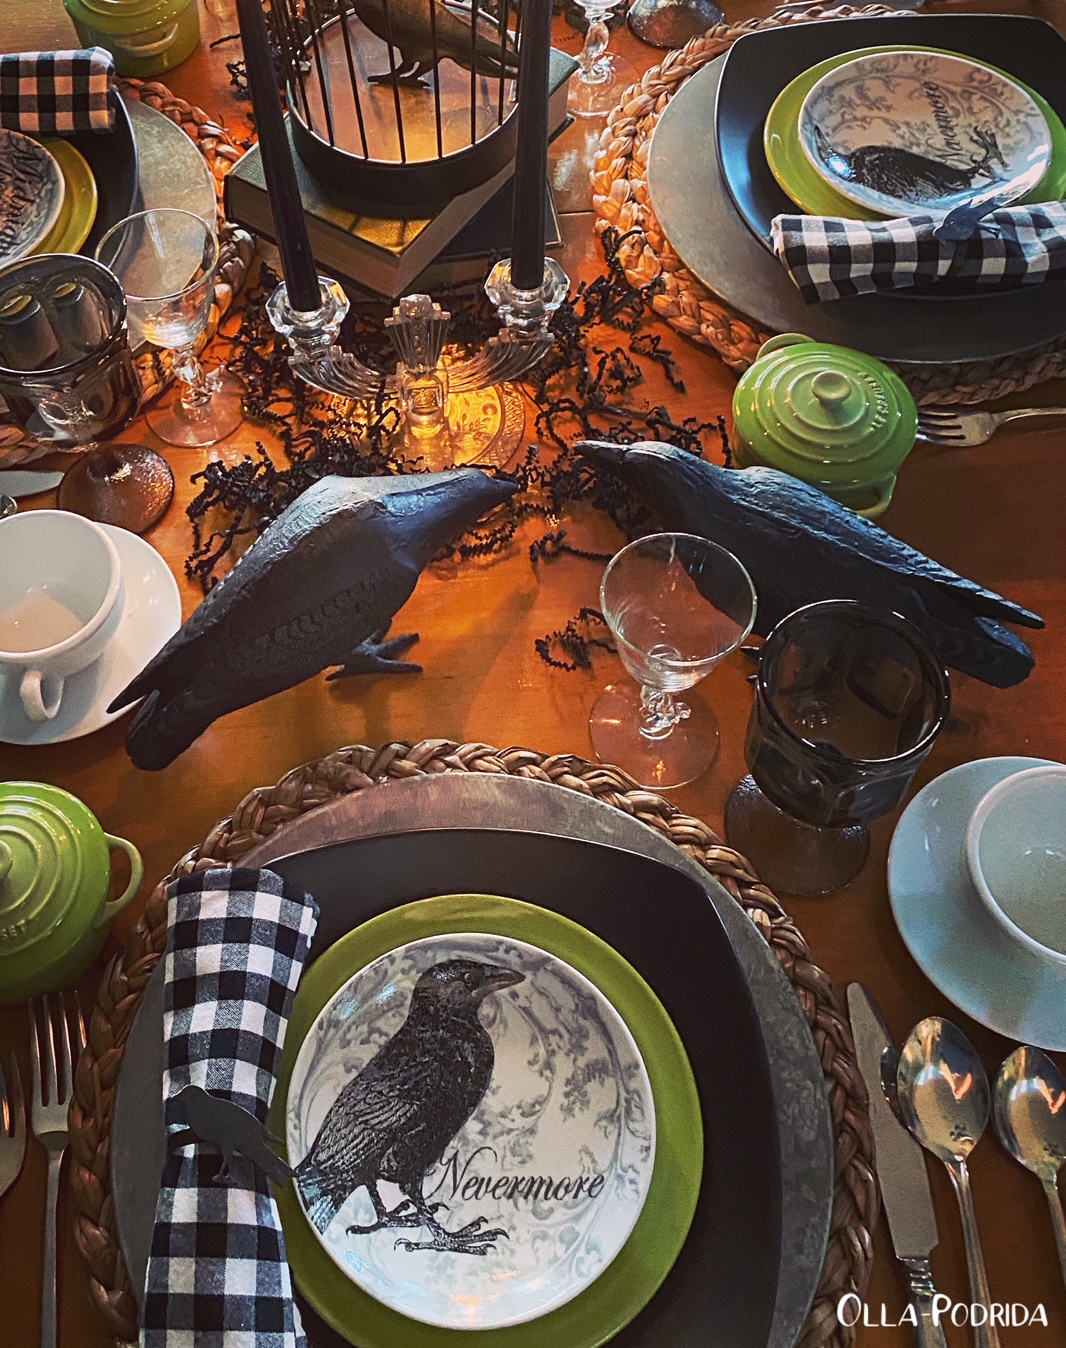
long time. It is, truly, one of my favorite pieces of holiday culinary decor.The plates are by David Carter Brown, the pattern is called “Pumpkin Hollow,“ providing the inspiration for the name of this tablescape. They are just small enough so that I was able to set them on orange Fiestaware salad plates providing a nice orange rim to delineate them from the square black dinner plates beneath. 
The black plates set on top Italian chargers with a deep green edge that I inherited from my mother. 
New for this year are the wine glasses with the pumpkin on the stem. I found these at Target, believe it or not, and pounced on them immediately. They are glass, not plastic, and surprisingly durable.
  
Orange flatware brightens atop Kate Spade striped napkins that reminded me of the legs of the wicked witch of the west, so I had to use them here.
The mugs are from Starbucks about 20 years ago. I get those out every year around this time.
 
 The wrought iron candleholders, when put together create a heart, but when separated, provide a unique look.This is my birthday month, and favorite time of the year, so I’m hopeful to be able to do at least one other table setting before October is but a memory.

This post is linked to: Tablescape Thursday

As an Amazon Associate I earn from qualifying purchases.

Sunday, July 28, 2024

Food to Die For, Recipes and Stories from America’s Most Legendary Haunted Places, Reviewed

 
Whether you are interested in the paranormal or not, I’ll bet every one of you will admit to loving a good ghost story. I know that I do, and have many fond memories of sitting around a campfire with my fellow Girl Scouts, listening to them. A couple of my own rather strange experiences have pushed me in the direction of believing in the paranormal, if only slightly, versus scoffing at it previously.
 
Those of you interested in the paranormal may be familiar with Ami Bruni, co-star and Executive Producer of the widely successful paranormal series, “Kindred Spirits” wherein she helps frightened people reclaim their homes from the mysteries of the unknown. Bruni, who admits that she grew up in a haunted house, was also one of the stars of the program “Ghost Hunters,” with which everyone is no doubt familiar.
 
Her combined love of vintage regional recipes and the paranormal shine through in this unique and fabulous cookbook, Food to Die For, Recipes and Stories from America’s Most Legendary Haunted Places, a book dedicated to Lizbeth “Lizzie” Borden, “…whose killer meatloaf recipe inspired the idea for this book.” I don’t think I have ever enjoyed reading a cookbook as much as I did this one. It combines haunted sights across the country — mysterious hotels, eerie ghost towns, and possessed pubs (one of which was visited by “Ghosthunters” in my town) — pairing these with recipes reflecting happenings on those sites. Case in point, there is a recipe for Lizzie Borden’s meatloaf. What a perfect dish to serve at a Halloween party, proffering slices on the blade of an axe.
  Bruni is not wrong when she says, “Food can bring the dead back to life.” A rather frightening sentiment, but an accurate one, considering that I can’t make fried chicken without thinking about my grandmother. I could really relate to Bruni when she talked about her late mother, her signature dish being a Caesar salad recipe that the family loved, but for which there was no physical recipe. When her mother passed away, the recipe went with her. This caused her to associate food and recipes with the dead and paranormal experiences. She was delighted when she found a Caesar salad recipe from Sheboygan Asylum, that reminded her so much of her mother’s. I’m just going to leave that there. 
The recipes are largely gleaned from other sources, many of which are now out of print. Imagine serving cinnamon sugar cookies from Alcatraz. What a great way to give your kids a tasty dessert and teach them some history at the same time. Many of these recipes do come from penitentiaries, all of which have a haunted past.

If you are looking for a new way to host a dinner party, you need this book. Nothing, I guarantee, will make you as popular in your neighborhood, at family gatherings, or as a member of your gourmet club, but to follow one of the menus and recipes in this book, pairing them with creepy music and a complementary story.

The book is full of wonderful vintage photographs as well as fabulous full color photos, along with recipes from the corresponding haunted places. I was pleased to see two places from Missouri listed in this book, but at the same time surprised that one of the most haunted places in Missouri, namely the Lemp Mansion in St. Louis was not.
 
 If you enjoy entertaining guests in a unique and memorable way, this is the guidebook on how to do it. The book is divided into the following sections:

Eerie Hotels
Horrifying Homes
Otherworldly Watering Holes
Hair-Raising Historic Landmarks
Hellish Institutions
Ghoulish Ghost Towns


It was so much fun learning the creepy history of so many places, as well as seeing the interiors the way these places looked back in the day, and even, in some cases, seeing a photo of their menu. I have to tell you that this book is the best cookbook that I have read all year. This book will appeal to those who love cookbooks as well as those who love the paranormal. It is a must have for either one of these personal libraries.
 
It is available for pre-order with the publication date of July 30, 2024. You can get your own copy (and you know you want to) by clicking here.

As an Amazon Associate I earn from qualifying purchases.

 Disclaimer: I received a complimentary digital copy from NetGalley in exchange for an honest review.


Tuesday, October 31, 2023

Halloween Caprese Salad

 
The week before last we had a little bit of spooky fun with a skull-shaped cheese ball. This week the skulls are of a smaller size and part of a Caprese salad. You have probably seen this online as it seems to be quite popular this year. It’s easy to put together, and quite tasty, working equally well as a side dish, or as a part of a charcuterie tray. The skull molds are a breeze to use (I got them here), and you can even mess things up and still come out just fine. The directions call for you to soften the cheese in the oven, and then press it lightly with a paper towel into the mold.  I was busy the day that I made these, left them in the oven too long, and the cheese melted. Not to worry, I put them right into the fridge, and after 30 minutes popped them right out. Are they perfect? No. Do they look just fine? They certainly do, and have the added benefit of looking as though they’ve rotted away a bit.  Great fun for Halloween.Halloween Caprese Salad

8 oz. fresh mozzarella balls 

1 pt. Melissa’s organic heirloom tomatoes

2 T. balsamic vinegar

2 T. good olive oil

¼ c. fresh basil leaves

Salt and freshly ground black pepper, to taste

 Make the mozzarella skulls:

Preheat the oven to 350ºF. Place the  silicon molds onto a rimmed baking sheet for stability. Lightly spray the interiors of the skull molds with PAM. Add a ball of mozzarella to each skull cavity. Bake for 6-8 minutes to soften the cheese. Use a folded paper towel to press the softened cheese into the molds (the paper towel will absorb the liquid that is released from the mozzarella). Transfer the molds to the refrigerator and let chill for 8-10 minutes, then remove from the mold and repeat with remaining cheese until all the mozzarella is formed into skulls.

Slice the cherry tomatoes in half and then toss the tomatoes and mozzarella skulls, with the balsamic and olive oil. Scatter basil leaves over top and sprinkle with salt and pepper before serving.

 Happy Halloween, everybody!

As an Amazon Associate I earn from qualifying purchases.


Friday, October 20, 2023

Spooky Cheese Ball

 
If you are looking for something simple, but effective, for your Halloween party, look no further. This delicious cheese spread can be used at any time of the year, served in a crock as is, rolled in chopped nuts and molded into a cheese ball, or formed into a skull to use as a clever hors d'oeuvre at your Halloween or Day of the Dead party. The beauty of this is that the cheese mixture can be made up to two days ahead of time, even molded into shape and placed on the serving plate, for you to remove, garnish, and serve. Nothing could be easier or more delicious. Spooky Cheese Ball

 1 8-oz. pkg. cream cheese, room temperature

1 2-oz. pkg. dried beef*, finely chopped

6 small pimiento-stuffed olives, finely chopped

2 scallions, finely chopped

1 t. Worcestershire sauce

¼ t. garlic powder

¼ t. onion powder

2 whole olives (for garnish)

2 sliced almonds (for garnish)

8 whole almonds, tip cut off (for garnish)

 Place all ingredients (except those used for garnish) into a medium bowl. Beat with a hand mixture until smooth and creamy. Scoop out of bowl onto square of plastic wrap, cover, flatten slightly, and chill at least 30 minutes, or up to 24 hours.

 Remove from plastic wrap, place onto serving dish, mold into a skull shape with your clean hands, and press olives into the skull for eyes, slivered almonds for the nose, and whole almonds for the teeth. Surround with crackers, and serve.

 *I used Buddig brand.

As an Amazon Associate I earn from qualifying purchases.


Monday, October 31, 2022

Catacomb Crumble Topping

It was a picture on Instagram wherein I was tagged by my daughter-in-law that sent me to the GhoulatHeart website where I first saw this clever catacomb crumble topping. Things like this really intrigue me, and I knew that I had to make it. There was no time, at this late date of discovery to shop around for small skull molds, so I used what I had that’s a little bigger. I actually prefer the look of mine (the kind that you see on old gravestones), to the more modern version.

Making the streusel skulls.

I’m not going to lie this was labor-intensive. Because my mold was bigger, it took longer in the freezer (more like 30 minutes) than author’s 10 minutes, so my process dragged out quite a long time. I also had only an eight-well mold, so I had to do it four times. Not every time was successful. Gradually I learned to pack the streusel as tightly as I possibly could, and made use of the smaller end of a tart tamper that worked quite well. I also learned that when I went to pop it out of the mold, in my case anyway, to start with the small end and work my way up to the top of the skull.

Ready for the oven.

 I absolutely love the look, it made my pumpkin bread look perfect for Halloween, it cut like a dream, and it is delicious! This crumble topping can be used on anything you like from coffee cakes, tarts, quick breads, to cupcakes. Just cover a cupcake with a light topping of crumbly streusel and press a streusel skull in the top. They hold up quite well in the oven (one of my fears was they wouldn’t), and as you can see, it’s quite eye-catching.

Right out of the oven.

Use your favorite pumpkin bread recipe add this for the topping.
 

Catacomb Crumble Topping
As seen on ghoulatheart.com

1 cup all-purpose flour
1/2 cup butter, softened
1/2 cup brown sugar, packed
2 teaspoons cinnamon

Make skull streusel ahead of time and keep refrigerated.

Add streusel ingredients to a medium bowl and use a fork to cut in butter until combined. Transfer 1/2 teaspoon of the streusel mixture into each skull cavity of the
skull mold and use the back of a teaspoon to pack the mixture tightly. Place mold into the freezer for about 10 minutes to set the skulls and tap to remove skulls onto parchment paper. Stores skulls in a plastic container and pop back in the fridge. Repeat until you have about 60 skulls. Reserve the remaining streusel mixture.

Make your favorite pumpkin bread. Sprinkle the crumbly streusel topping over the batter. Add about half the skulls to the top of the loaf. Bake for 30 minutes. Remove loaf from oven and top it with the remaining skull streusel, filling in where the bread has expanded. Return the loaf back to the oven and allow to bake 20 to 25 minutes or until a toothpick comes out clean. Let cool 10 minutes, then remove from pan to cool completely. Wrap and store at room temperature for up to four days, or 10 days in the refrigerator.

Note from Olla-Podrida: I rarely bother with the cut-in method. I placed all ingredients into the work bowl of a food processor and processed until large crumbs formed. Because my skulls were larger, each one took a tablespoon of mixture in order to make a full skull. I tamped it tightly into the mold using a
tart tamper. Unlike the originator of this recipe, I placed the crumbly streusel onto the pumpkin loaf, jammed all of the skulls on top, and baked it just once for 60 minutes at 350°. As you can see, it worked perfectly.

Something of major importance that the originator failed to mention is that your baking pan needs to be lined with either foil or parchment so that you can lift the loaf directly out of the pan. You don’t want to attempt to take it out on its side or invert it.

Have fun on Halloween. Bake something scary!

As an Amazon Associate I earn from qualifying purchases.


Wednesday, October 27, 2021

Here's Looking at You Tablescape

​ As an Amazon Associate I earn from qualifying purchases.


It’s not often that I do more than one tablescape for Halloween, but when I found a bag of these eyeballs in amongst the seasonal decorations, I decided to have a bit of fun with them.


A collector of fabric (even though I don’t sew), I am a big fan of J. Wecker Frisch. This fabulous fabric with skeleton hands is called (appropriately) “Hands Off.” I thought that it made a perfect backdrop for this fortuneteller theme table.

 Scalloped edge chargers from Pier One (that everybody seems to have) provide the base for the plaid plates (also from Pier One), and vibrant orange salad plates. Each one is topped with a dessert dish full of black excelsior and a big eyeball.

Witch mugs are from Pier One.

The centerpiece is anchored on either end with the antique crystal candle holders that I used in decorating last week’s table. I found high top Victorian shoes amongst my mother’s things, and added them for a witchy vibe.


The skull candle holder, pressed into use as a vase for freshly picked coleus from my garden is from Yankee Candle. If you have not checked out their holiday offerings, that’s a must. The fortuneteller’s booth (isn’t it adorable?), is also from them.

The phrenologist's head generally sets on my night table, but I pressed him into service here. The palmistry hand is a part of my living room decor, so I added it as well.

Join me for dinner. I’ll tell your fortune.


This post is linked to: Tablescape Thursday


Friday, October 22, 2021

The Black Bird Tablescape

As an Amazon Associate I earn from qualifying purchases.

For those of you familiar with classic cinema, the term “The Black Bird” is synonymous with the old Bogart film “The Maltese Falcon” based upon the Dashiell Hammett book of the same name. It was that film that inspired this table. Part mystery, part noir, with a good bit of October nights thrown in, it’s an atmospheric place to dine as the days get shorter.


The illuminated caged raven, situated on a pair of vintage books, was something I bought last year, put away, and forgot about it. I was determined to use it this year.

I paired it with two heavy metal crows, and black candles in antique crystal candle holders. 

Water hyacinth placemats hold tin chargers, square black plates, and lime green salad plates. The latter are topped with raven appetizer plates that I got a number of years ago from Pottery Barn. 

With my secondary color being lime green, I chose individual casserole dishes that can hold a serving of soup, vegetable casserole, or fresh fruit or salad.

Topaz stemware was inherited from my mother.

The wonderful wine glasses with ravens built into the stem are antiques purchased years ago.

The raven appears again in napkin rings corralling black and white checkered napkins.
I used black shredded paper to soften the centerpiece.

The white cappuccino cups I purchased years ago from Amazon. They are incredibly useful and versatile.


I hope you will join me for a memorable dinner.


This post is linked to: Tablescape Thursday


Wednesday, October 31, 2018

Witches Brew Coffee


Halloween, like St. Patrick’s Day, is one of those few days when I begin my morning with spiked coffee. There is something so decadent about the combination of coffee and liqueur. It’s not often that I indulge myself like this, but this morning Witches Brew was on the menu. I enjoyed it by flickering candle light in galvanized jack-o’-lanterns.

However you celebrate, have a spooky Halloween!

Witches Brew Coffee

4
Demerara sugar cubes
4 cups freshly brewed Sumatra coffee
8 oz. rum
2 oz. cinnamon liqueur
Cinnamon cream (recipe follows)

In a heatproof pitcher, stir the sugar into the coffee until dissolved, then stir in the rum and cinnamon liqueur. Pour the coffee into warmed mugs or heatproof glasses and spoon the Cinnamon Cream on top. Serves four.

Cinnamon Cream: In a medium chilled bowl, whip 4 ounces chilled heavy cream with 1 ounce Cinnamon liqueur and 1 tablespoon granulated sugar until soft peaks form. Spoon big dollops on top of hot coffee.

If you prefer cocoa to coffee, you will swoon for this Pumpkin Pie Cocoa.


This post is linked to:
This post contains affiliate links.