Showing posts with label how to. Show all posts

Wednesday, June 7, 2017

Country-Style Gravy


As I mentioned to you a while ago when I was discussing my initial fear of tartar sauce (and then ultimately learning to embrace it), I’d bought a variety pack from Omaha Steaks. In that variety pack, in addition to the Pub Cod, there was a box of Chicken Fried Chicken Patties. I didn't quite know what to expect, but figured that I just really couldn't go wrong, and I was right. They’re darn good! These days, with the deck construction going on, the house an absolute mess, and everything in a bit of an uproar, the last thing I want to do is cook.

The other night I tried a Chicken Fried Chicken patty, and was very pleased. I served it, diner style, on one of vintage grill plates, along with green beans, mashed potatoes (two of my favorite diner sides), and topped it with Country Style Gravy. I had no idea how to make country gravy, so did a little research. Essentially, it's nothing more than a béchamel using bacon fat in place of butter. I'm one of those people who, when I fry bacon, save the bacon fat (in a vintage canning jar stored in the fridge), after multiple screenings through a sieve and cheesecloth before doing so. As a consequence, the bacon fat that I have is the purest, most beautiful bacon fat that you can imagine. Oh, how my grandmother would be proud!

The recipe for tasty country gravy is as follows; I encourage you to give it a try. Adding some dried or fresh herbs makes a great deal of difference. I had intended upon adding some chopped fresh rosemary, but my rosemary plant is struggling amid all the chaos, so instead, I added some rubbed sage. It was a good choice. I enjoyed it, and I think you and your family will too.

(I imagine that a lot of you have your own versions, so tell me about them in the comments section below. I love hearing from you!)

 Country-Style Gravy

1 tablespoon pure, strained bacon grease
1 tablespoon all-purpose flour
1 cup whole milk
Salt and freshly ground black pepper to taste
1/4 teaspoon of your favorite dried herb, or,
2 teaspoons of your favorite minced fresh herb

Melt bacon fat in a medium saucepan over medium low heat. Whisk in flour, and continue whisking for 1 to 2 minutes to be certain to eliminate the floury taste. Slowly pour in whole milk, whisking continually; cook and stir until thickened. (This took me about 3 to 5 minutes.) Add salt and pepper to taste, and stir in the dried or fresh herbs of your choice. Top chicken patty or mashed potatoes and serve.

 This post is linked to:

Saturday, December 5, 2015

How to Peel Pearl Onions


Pearl onions are the darling of holiday buffets. Creamed onions are as traditional at Thanksgiving as are cranberries, and as traditional at Christmas as is eggnog. Braised, glazed, creamed, roasted, grilled, added to soups and stews, any way you enjoy them, they are delicious, but many people forego dealing with them because the peeling seems so daunting. If you're a pearl onion rookie, here is the best and easiest way to peel them. Start to finish it only consumes about fifteen minutes of your time, and is well worth it for the fresh taste.
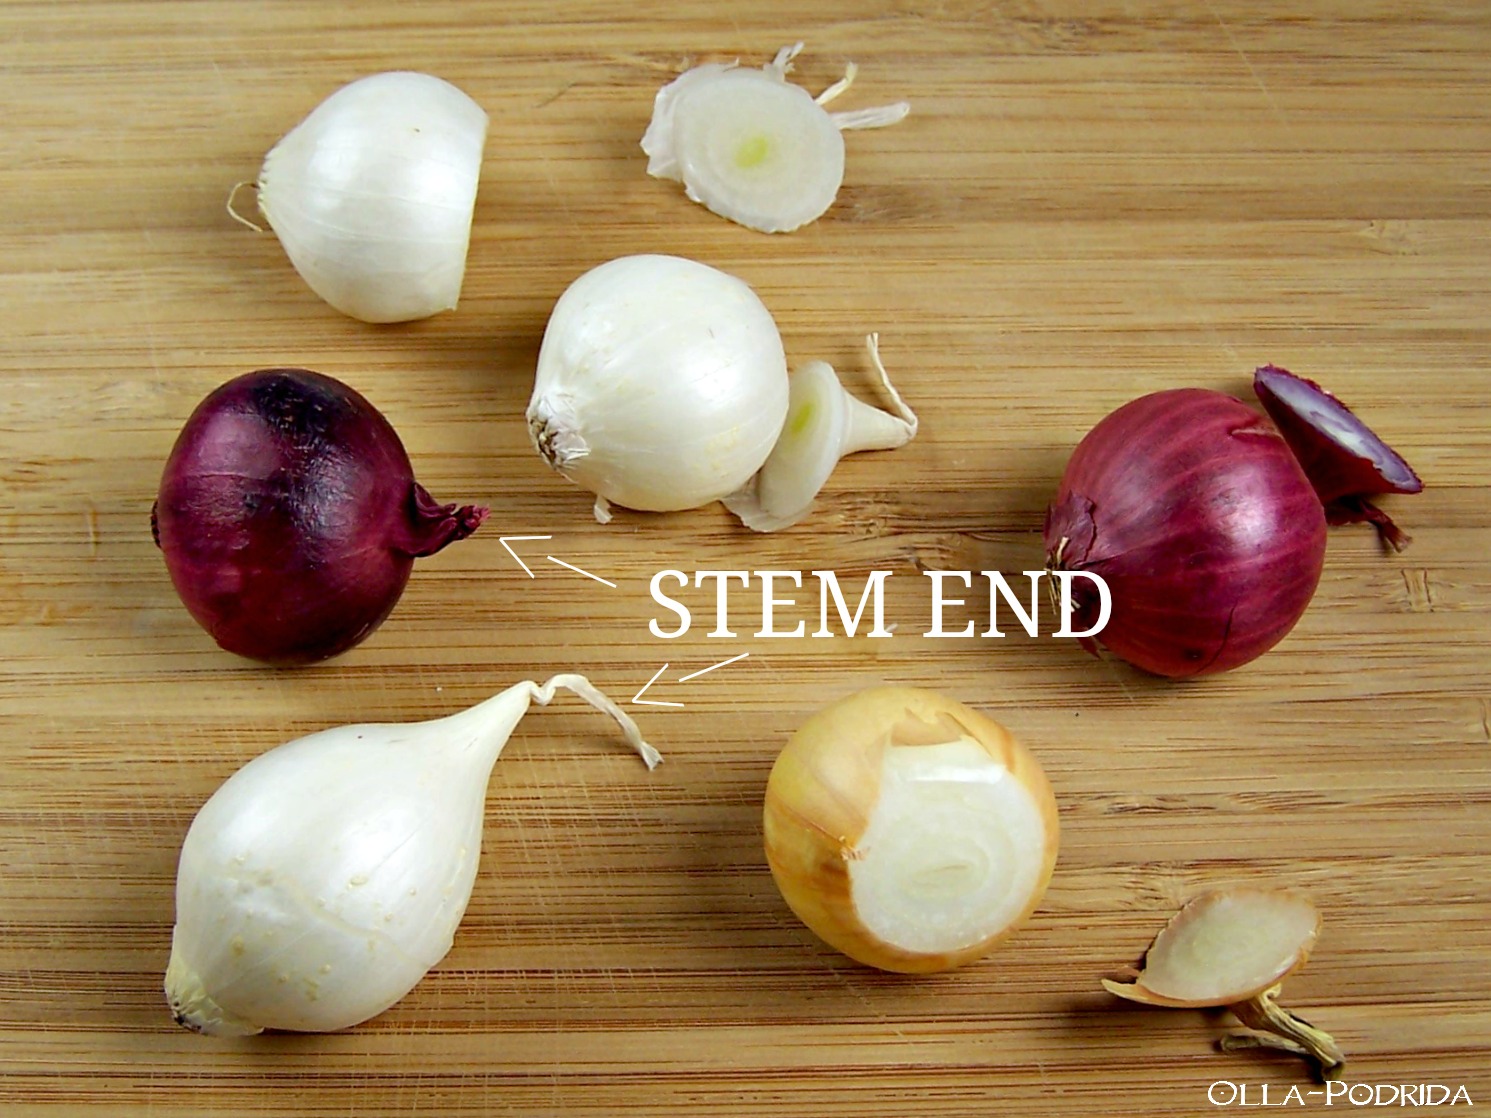
This mixed assortment from Melissa's Produce is by far my favorite. Not only is the variety of sizes and colors visually appealing, but the combination of tastes is unsurpassed.
Now, let's get started. First of all, bring a large pot of water to a boil. While you're waiting, cut the stem end (the end OPPOSITE of the root end) off of each onion. It may seem tedious, but you can develop a rhythm and knock them out in no time.
Discard the tips and put the onions in a small bowl. When the water reaches a full, rolling boil, dump the onions in all at once. Allow the water to return to a boil and boil them for three minutes. While they are boiling, fill the empty onion bowl with ice water and set a strainer over the sink.
When the three minutes of boiling time are up, strain the onions and immediately dump them into the bowl of ice water.
Allow them a couple of minutes to cool and then, one by one, squeeze the root end, and out will pop your peeled onion! Yes, there will be a tiny bit of waste, but nothing beats this method for speed, and aren't we all busy cooks? In some cases the root end may remain attached so either pinch it off or cut it off. That's it!
I have a delicious recipe that I made on Thanksgiving using these beauties that I will share next week. Stay tuned!

This post is linked to:

Monday, June 29, 2015

How to Make Coffee Liqueur


I am not a drinker per se. I like a Margarita with Mexican food, a glass of Chianti with pizza, a Sidecar in front of a crackling fire in the winter, and a glass or two of Sangria on a hot summer day. Occasionally, very occasionally, I like to sip a nice liqueur. But this liqueur sipping is so occasional that I really never keep what I like on hand because, well frankly, there is just no room in the cabinet that I have designated for liquor, and to expand would just wreak havoc on my kitchen dish storage. So when I received a copy of Infused for review, I looked with an interested eye at the recipe for coffee liqueur.

I was wary. Extremely wary. I just couldn't imagine how this would be any good. I was imagining a coffee-flavored rum. Not that this would necessarily be a bad thing, but it just didn't sound like my cup of tea. As a lover of coffee and cold brew, I was intrigued. Essentially this is no different than making
cold brew with the rum substituting for the water, so, day before yesterday I gave it a try.

People!! This is heaven! Throw out those bulky bottles of Kahlua with the sediment in the bottom and try this. The yield is rather small, so you won't be storing it for ages, and the taste is sublime. Imagine coffee liquor that actually tastes like coffee, really good coffee. Mr. O-P reports that it is magical (okay, my word not his) on top of a scoop (or two...or five...Mr. O-P does like his ice cream) of vanilla ice cream. It is also insanely delicious in a cup of coffee.
Coffee Liqueur
Recipe from Infuse. Oil. Spirit. Water. by Prum & Williams\

8 ounces of aged rum
4 ounces turbinado simple syrup (see recipe below)
½ cup of whole bean coffee, coarsely ground
Seeds from ½ vanilla bean

Combine all ingredients in a 16-ounce Mason jar.  Seal and shake to combine.  Refrigerate and let infuse for 24 hours.  Strain through a double layer of cheesecloth.  The infusion will last for up to three months in the refrigerator.

Turbinado Simple Syrup

½ cup turbinado sugar
½ cup water

Place sugar and water in a small saucepan.  Warm over low heat, stirring occasionally, until sugar has dissolved.  Cool before using.

This post is linked to:

Wednesday, June 3, 2015

How to Make a Seasonal Salad


There is no secret to putting together a tasty and elegant seasonal salad that will delight your family any night of the week, and impress your guests on weekends. It is, essentially, nothing more than a thoughtful layering of seasonal ingredients and topping with a dressing to complement.

Not a day goes by that I can't assemble a pretty salad. It helps, I think, that I always keep a variety of fresh greens on hand, as well as an assortment of nuts (stored in the freezer to maintain freshness), a package or two of
Melissa's French Country-Style Red Beets In Balsamic Vinaigrette, and have, in my repertoire, a variety of dressings both savory and sweet. If you get into the habit of doing the same, assembling a salad will become second nature. If making your own fresh dressing doesn't fit into your busy schedule, feel free to purchase two or three good ones. Many bottled dressings are excellent, with long shelf lives when properly stored in a cool pantry before opening, or a fridge thereafter.
Here is my method of assembly, from bottom to top:

Fresh greens (spinach, spring mix/mesclun, romaine, Boston, or red leaf lettuce)

Vegetable (beets, cucumber, mushrooms, red onion, peas, sprouts)

Fruit (use whatever is in season - melon, berries, orange slices, mango, apple, pomegranate seeds)

Cheese (feta, bleu, Gorgonzola, Parmesan)

Nuts (toasted pecans, toasted walnuts, toasted hazelnuts, peanuts, pepitas, sunflower seeds)

Simply select one or more item from each category, layer from the bottom up, and top with the dressing of your choice.
Poppy seed and vinaigrette dressings are my favorites for this type of salad, but a creamier type such as ranch, Caesar, or creamy Italian work well too.

The salad pictured contains romaine lettuce, cubes of Athena melon, cubed beets, crumbled blue cheese, toasted walnuts, and poppy seed dressing. I store my salad dressings in icing bottles so that I can squeeze it onto the top of the salad in delicate little stripes. It is so easy, and quite impressive.

When you use this little formula for making salad it is easy to make one or ten by just lining up chilled plates and layering ingredients. Try it yourself, and be bold in choosing your layers. It is as much about fun as it is about experimentation and taste.


This post is linked to: