Showing posts with label colorful. Show all posts

Friday, February 14, 2020

Pickled Eggs

This post contains affiliate links.
When I mentioned, on my personal Facebook page, that I had an interest in making pickled eggs, there was a huge uproar. You’d have thought that I’d said I was bagging up puppies, and leaving them on the side of the highway, people were so appalled. I have to admit, they are a bit colorful, perhaps a trifle on the gaudy side, but they are really good! You may think that you wouldn’t like them, but if you like deviled eggs, you would like pickled eggs, because they taste pretty much the same. The only difference is, pickled eggs are so much easier to make. Make them if you dare!
Pickled Eggs
As seen in Sweet Paul Magazine

12 hard-boiled eggs
1½ c. cider vinegar
½ c. water
1 T.
fine sea salt
1½ t. sugar
2
cardamom pods
1 t. crushed black peppercorns
½ t.
allspice berries
½ t. ground turmeric
½ t. celery seeds
1 medium
Melissa’s red beet, sliced
2 shallots, thinly sliced

Poke eggs with a pickle fork, through the white and down to the yolk, about 6 times.

Put the eggs in a tall jar, such as a quart canning jar. Put the remaining ingredients in a saucepan and bring to a boil.
Cover and simmer about 15 minutes, then allow liquid to cool.

Remove the beets and enjoy separately.

Pour the liquid and remaining solids over the eggs.
Refrigerate and let the eggs sit for a day and up to several weeks.

Note that after 1 day, the pink color will penetrate all the way to the yolk. However, the flavor will be best after about a week.

Serve eggs on their own, as an accompaniment to salads and grain dishes, or cut them in half and mix the yolks with mayonnaise, mustard, horseradish, and chives for bright Deviled Eggs.

If you think making and peeling hard-boiled eggs is a pain, get yourself one of these. Perfect eggs every time. Brilliant!


Wednesday, October 17, 2012

Autumn Harvest Table Setting

I must say that these placemats have served me well.  I bought them in the spring (they are still available if you want to run right out and grab some for yourself), used them throughout the summer, find they work beautifully for fall, and am thinking how gorgeous they would look with a Thanksgiving centerpiece of gourds and pumpkins.  They seriously go with just about every color imaginable.  That’s what I call versatility! 


Placemats – Pier 1
Glasses – La Rochere
Pumpkin Tureen – Oak Tree Furniture (long ago)
White plates – Old Time Pottery
Mugs and plates – Fiestaware
Bowls & Salad Plates – Autumn Harvest by Harden
Pumpkin Salt & Pepper - Pier 1

Monday, October 8, 2012

Maple Leaf Cookies


October is my favorite cookie baking month.  It is cool enough to be able to use the oven without sweltering, and it’s far enough away from the holiday season to not be frantic.  I like to bake when I’m relaxed and can actually enjoy the process.  These cookies have become a bit of a fall tradition for me because they are so easy and so much fun to make.  I like to use a shortbread dough, the recipe of which I’ve posted before, it’s Ina’s, and that woman really knows her shortbread!  It is an easy dough to work with, cuts like a dream, and leaves (if you'll pardon the pun) nice edges.

Maple Leaf Cookies

3/4 pound unsalted butter, at room temperature
1 cup sugar, plus extra for sprinkling
1 teaspoon pure vanilla extract
3 1/2 cups all-purpose flour
1/4 teaspoon salt

Preheat the oven to 350 degrees F.
In the bowl of an electric mixer fitted with a paddle attachment, mix together the butter and 1 cup of sugar until they are just combined. Add the vanilla. In a medium bowl, sift together the flour and salt, then add them to the butter-and-sugar mixture. Mix on low speed until the dough starts to come together. Dump onto a lightly floured board and divide into 3 sections.  Using Soft Gel Paste Food Color dye each portion of dough to the intensity that you desire. Form each colored piece of dough into a disk.  Wrap in plastic and chill for 30 minutes.
Remove dough from fridge. Tear each color of dough into four parts and fling them with reckless abandon onto a lightly floured cutting board. 
Roll the dough 1/2-inch thick and cut with a Maple Leaf Cookie Cutter. Gather up the scraps and roll again.  Each time you do this you'll get a new combination of colors.  Place the cookies on an ungreased baking sheet and bake for 20 to 25 minutes, until the edges barely begin to brown. Allow to cool to room temperature.


Tuesday, August 7, 2012

Glazed Rainbow Carrots with Dill


Let’s talk side dishes, shall we?  I know what you’re thinkingvegetables.  Yes, you’re right.  We all know that we’re supposed to have a nice combination of five fruits and vegetables each day.  We also know that it’s not always so easy to work these five servings into the course of three meals (although I am personally campaigning to include the Bloody Mary among this group, what with the tomato juice and celery and all).  Largely vegetables come in green or white.  Dull.  And, also largely, children tend to flee from them in packs.  So the best way to perk up the plate, and your family, is with lots of taste and bursts of color.

I’ve tried for years to grow carrots, with rather sorry results.  My interest was in growing the heirloom variety with multiple colors.  While I can’t seem to manage to do it, Melissa’s Produce can.  I love these colorful carrots!  They are so pretty and deliciously sweet, and look how beautiful they'll be on your table.  Honestly, who could resist these?

I really have no particular recipe, but for the sake of carrot virgins, will jot one below.  My experience is that even non-carrot lovers will quite enjoy these.

Glazed Rainbow Carrots with Dill

1 lb. Melissa’s Rainbow Crunch carrots, cleaned, peeled, and 
cut into ¼” coins
1 tablespoon butter
¼ cup dark brown sugar
1 Tablespoon apricot preserves
Pinch of Kosher salt
Pinch of curry powder (optional)
Pinch of turmeric (optional)
Snippings of fresh dill (or dried, if you must)

Bring a medium saucepan of water to a full boil.  Drop carrots in all at once and return pan to boil.  Cook for 4-7 minutes until just fork tender, and by this I mean barely fork tender as they will continue to cook after draining and you don’t want them to turn to mush; better to err on the crunchy side.  (The cooking time varies with the size of your carrots, so do test them – I use the tines of a pickle fork).  Empty into colander to drain thoroughly; set aside.  In same saucepan in which you cooked the carrots (and that should still be warm) place butter, and melt it over low heat.  Stir in apricot preserves and brown sugar until everything is well blended.  Add carrots all at once and fold together until carrots are glazed.  Throw in a pinch of salt and, if your family likes the taste of curry, a pinch of curry powder gives these a lot of zing, ditto for the turmeric, but I’ll leave both up to you (though do keep in mind that Turmeric is one of the super foods and this is a great way to slip it by your family with no one the wiser).

For more vegetable inspiration, I highly recommend this book:

This post is linked to:


Monday, June 13, 2011

Garden Bench

 For Metamorphosis and Mosaic Monday I thought I'd share a project my son has been working on for the past couple of weeks.  One of the causalities of the storm was our little Victorian garden bench.  The way it used to look is shown in the upper left-hand corner of this mosaic (photo from the Harbor Freight website).  I was perfectly happy with this, but after seeing it in bits, I decided I wanted something a bit different and more colorful with the placement changed from the far back of the yard, up to the front where I could see it every day as I was having my morning coffee.  The only spot relatively untouched by the tornado was a small area just outside the kitchen window, so a couple of weeks ago Andrew went to work.  Here are pictures of the results.
I LOVE the vibrant colors of this bench, and how great they look with the potted calibrachoa on top of the nudes base at right.  The "planter" at far left is the top of a birdbath, the base of which was lost to the storm, planted with begonias. Directly behind the bench I planted zinnia seeds, so it should be a riot of color come August.
All of the hostas in this area were rescued from beneath trees (now gone) in other parts of the yard.  We went from a yard that was all shade to one that is now virtually all sun, so I have to entirely rethink our existing and future plantings.  The small red impatiens will eventually grow together and fill this area with lots of red and hummingbirds.

These shoes have been in the garage for ages.  Many times I thought I should just get rid of them, but I'm glad I saved them as they look perfect beneath the bench, planted with creeping jenny.

Have a colorful Monday!

This post is linked to:
Seasonal SundayMetamorphosis Monday, Mosaic Monday
 This Week In my GardenWow Us Wednesday, Flora Thursday at Fishtail CottageOutdoor Wednesdays 
and
Visit thecsiproject.com

Wednesday, May 4, 2011

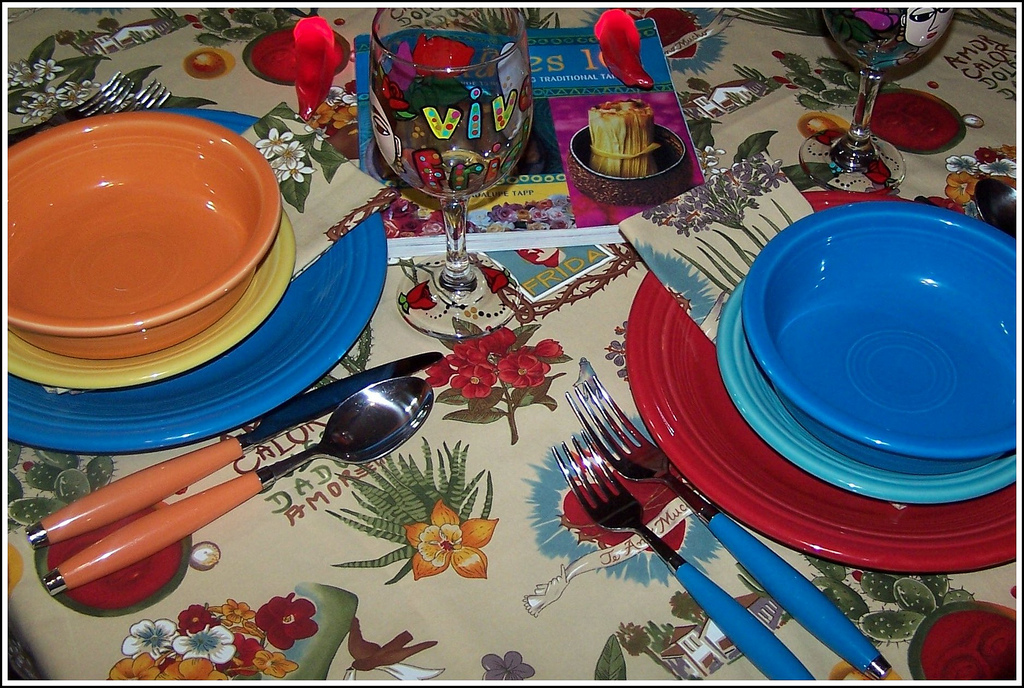
Cinco de Mayo Tablescape

When I first decided to collect Fiestaware, the hardest decision I had was in trying to decide what color to collect.  So, to make it easy on myself I decided to collect one place setting of each color.  As you can imagine this started to get a little out of hand, so I focussed on the bold colors because they look so great with all of the wonderful fabric that I tend to collect as well. The fabric I used here in making both the tablecloth and napkins is by Alexander Henry and called "Viva Frida."  How perfect is this for Cinco de Mayo?
Have I mentioned that one of my goals this year is to learn to make tamales?

Aren't these glasses fun?  They work equally well for Day of the Dead as they do Cinco de Mayo.
I make a set of napkins to go with every tablecloth that I make.  I actually find hemming to be therapeutic and love having such a wide variety of napkins.  These work very well on many different solids as well.
Here's another view of the glass.
  Dishes - Fiestaware
Flatware - Fiestaware
Tablecloth & Napkins - Made by me
Fabric - Alexander Henry
Glassware - Kelly's Color Studio

This post is linked to: