Showing posts with label Metamorphosis Monday. Show all posts

Monday, August 22, 2022

Laundry Room Makeover


I have made a lot of changes to this house, and have enjoyed every one of them. The other day, as I was tripping over junk in the laundry room, nearly plunging down a couple of steps into the garage, I wondered why I hadn’t done anything with that grubby, wretched little pass-through known as the laundry room. I got in touch with my faithful builder, Joe, and asked him to come out and take a look at it to see what we could do. I knew that I wanted cabinets. I was sick and tired of piling cleaning products and laundry detergent on top of the dryer, only to be knocked to the floor, often landing on one of my bare feet.

Here is the result of our conference. It’s amazing what a little paint, crown molding, and Home Depot cabinetry can do. It went from a place I tried to ignore to one I enjoy seeing.

The wall paint is Sherwin-Williams "Foothills;” I have used this same paint in both of my upstairs bathrooms. Despite it being a dark color, it does not make the room look small, particularly when there is the addition of white crown molding.

The shelf is nothing more than a finished board set on these brackets. The cabinets are stock cabinets from Home Depot.

The baskets on the shelf I got at Pottery Barn Kids years ago. They hold cleaning rags and plastic bags; the cute little laundry room sign I found here.

The non-skid floor mat is a welcome addition. It’s easy on the legs, inexpensive, and can be found here.


Because the cabinet above the freezer is difficult to get to, I store things in there that I’m only likely to use a couple of times a year. As a consequence I used a little bit of greenery, and a macramé table runner, to spruce it up.

 
I love my new space!

 As an Amazon Associate I earn from qualifying purchases.

 This post is shared on Metamorphosis Monday.

Thursday, January 26, 2012

Help me Choose a Rug!

I consider Olla-Podrida to be a Lifestyle blog, but do realize that, for the most part, it is all about food.  So, this is going to be a blog post of a different feather, as I’m in the very early stages of decorating and, since decision-making is not my strong suit, I turn to the wise and wonderful of blogland for thoughts and advice.  I’ll take you on a step-by-step photographic journey once each week as things get seriously into motion, but for now, I’m shopping, and one of the first things I’m going to need is a rug for beneath the dining table.
Here are two that I’m considering.  I’m not going for a particular theme per se, but am trying to evoke the feeling of Hemingway, travel, exotic, with a dash of Old Hollywoodget the picture? (Pun intended.)

To give you a better idea of the logistics of things, here is the Floor Plan for the area in question.  The dining area to the extreme left is where the rug will go, on top of a hardwood floor.  The table on top of it will have black legs and apron, with a light-medium pine wood top and four black Windsor chairs.  The sofa in chocolate brown will be on a pale neutral carpeted area to the left of the fireplace and perpendicular to the back wall.
Here is a picture of Rug #2 against the fabric of the sofa.  It's not a good one, as I couldn't manage to capture the depth or richness of the colors, and the background is black not the navy blue it would appear to be here.  But, trust me when I tell you that the brown in the rug is an exact match for the brown fabric of the sofa.
Okay, now see these lamps and side tables?  I have them as well. No, this is not my sofa, nor does the rest of the furniture visible in this picture belong to me.  These were the decorator's pieces, I just liked the look of the lamps and tables and had them made part of the deal.  (I am nothing if not resourceful!) I’ll be swapping out the existing shades with these Calligraphy lamp shades from Pottery Barn.
Now, all things considered, which rug should I choose:  Rug #1 with the black background and fan-shaped palm fronds, or Rug #2, with the variety of leaves in green, browns, and gold?
This post is linked to:

Sunday, October 30, 2011

Happy Halloween!

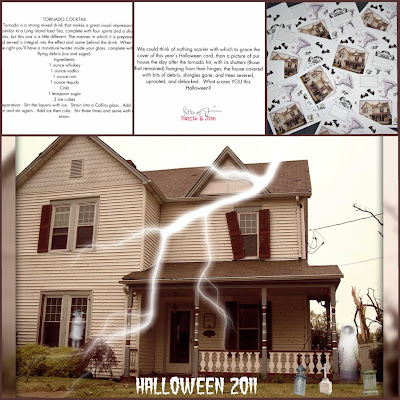
This picture of our house after the tornado (with a few embellishments) served as the perfect cover for our Halloween card this year.
By now you know my penchant for collecting and sharing items with recipes on them, from the Recipe Tea Towels  that you read about earlier this month to the Recipe Postcards that I told you about last month. I also make my own greeting cards and, yes, I always manage to work a recipe into them as well.  So, to wish you a Happy Halloween, I'm sharing the card that I designed for the holiday, interior and exterior, along with the envelope in which it arrived.

Have a frightening day everyone, and enjoy!

This recipe for a Tornado Cocktail appeared on the inside top of the card.
The greeting inside.
The envelopes just before they went into the mail.  If you detected a theme here, you're right!  I also paid homage to the World Champion St. Louis Cardinals, by including the Rally Squirrel circling the large tornado.


Have a Happy Halloween!

This post is linked to:
Metamorphosis Monday-BNOTP
Brag Monday-The Graphics Fairy
Amaze Me Monday-
Dittle Dattle

Sunday, October 9, 2011

Recipe Tea Towels


As anyone who's read this blog knows, I love cooking, love recipes, and love collecting things with recipes on them such as recipe postcards, recipe rubber stamps, and now, recipe tea towels. I stumbled upon these quite accidentally with an Anthropologie purchase of a pair of towels bearing a recipe for Irish Soda Bread.  It was close to St. Patrick's Day at the time, and I thought it would be a wonderful way to wrap rustic loaves of Irish Soda Bread to give as gifts.  It was, the recipients loved it!  Foolishly, I failed to photograph the towels, the bread wrapped up in the towels, or buy an extra one to keep for myself.  Lesson learned there.  Ever since this initial purchase, I now seem to find recipe tea towels everywhere.  I also consider them to be a most practical souvenir to pick up whenever we travel.  I don't know that I'll ever make any of the recipes, but I enjoy reading and displaying them.  Try to come up with ideas for their use on your own, and please share them with me.

Here are a few of my favorites. 
A nice assortment of Manx (Gaelic) recipes on a very colorful towel.
Here's a recipe for strudel...in Italian!

I love this towel with both English and Spanish versions of a recipe for Paella. I'm not going to use it as a towel though, but will fly it as a flag at our next Paella cooking bash. 
I love this cozy kitchen scene and recipe for Yorkshire Pudding.
I love everything about the newest addition to my collection from the recipe to the curtain blowing in the breeze from the open window to the table full of delicious looking scones.
This tea towel features Cornish recipes, some of them sound pretty good. I'll have to start a new series of blog posts of recipes I've tried that appear on tea towels!

This post is linked to:
Mosaic MondayLittle Red House
Metamorphosis Monday-BNOTP
Brag Monday-The Graphics Fairy
Motivate Me Monday-Keeping it Simple
Amaze Me Monday-Dittle Dattle
Thrifty Thursday-Tales from Bloggeritaville
100 Ideas Under $100-Beyond the Picket Fence
Show and Tell Saturday-Be Different Act Normal
 
Fall in Love - Decor to Adore
Mouthwatering Monday
Seasonal Sunday


Saturday, September 24, 2011

Sharing Recipes

If you read this blog with any regularity, you know that I collect recipe postcards.  What you probably don't know is that I also make them. It started years ago -- my guess is back in the 80s, but who knows? -- when a friend asked me for my recipe for Lemon Squares.  Rather than just dictate it to her over the phone (this was in the days before email), or send it to her in a letter, I thought, why not make it the letter, or in this case, postcard.  Making use of a piece of clip art and sheet of yellow card stock, my longtime love of creating recipe postcards was born, and continues to this day.  I am one woman who is determined not to let the art of correspondence go by the wayside, and figure that I'm helping out the post office at the same time.  (At my local post office, all of the employees know me by name.)


As my interest in rubber stamping grew, I changed my approach to the postcards, hand-stamping and coloring them rather than making use of clip art.  


I have, at this point, close to forty different designs, but those that reflect my long-held love of mysteries tend to be my favorites.  


(The back side)

Back in 2002 they came to the attention of Rubber Stamper magazine, and they featured some of my work on a page in their October issue.


 I hope you'll consider doing something like this the next time someone asks you for a recipe.  Your miniature work of art will be both a delight and keepsake to its recipient.

This post is linked to:

Metamorphosis Monday-BNOTP
Mosaic Monday-Little Red House
 Brag Monday-The Graphics Fairy
Making the World Cuter Monday-Making the World Cuter
Motivate Me Monday-Keeping it Simple
Masterpiece Monday-Boogieboard Cottage
Amaze Me Monday-Dittle Dattle
Thrifty Thursday-Tales from Bloggeritaville
 
100 Ideas Under $100-Beyond the Picket Fence
 Show and Tell Saturday-Be Different Act Normal

Fall in Love - Decor to Adore

Sunday, July 24, 2011

Bread & Butter Pickles

Remember the cucumbers that I showed you here?  I had no idea that one plant could be so prolific.  After making Chilled Cucumber Dill Soup, and then Cucumber Avocado Soup, I thought it was time to embark on pickles.  My first pickles, to be exact.  Yes, I was a pickle virgin.  But do you know what?  It's easy!  So much so that this week I'm planning on making garlic dill pickles.  But before I get ahead of myself, here is the recipe for these delicious Bread & Butter pickles.  They are a teeny bit vinegary, so if you like a less, ummm, aggressive pickle, then substitute 2/3 cup of the vinegar for 2/3 cup of water.

Bread & Butter Pickles
4 pounds pickling cucumbers
1 large onion, quartered, sliced about 1/4" thick
1/3 cup Kosher salt
3 cups cider vinegar
1-1/2 cups granulated sugar
1 teaspoon ground turmeric
1/2 teaspoon celery seeds
2 teaspoons yellow mustard seeds

Wash cucumbers and cut off ends.  Slice crosswise into 1/4" slices (I used a crinkle cut knife to do this).  Toss in a large bowl with the salt and onion slices. Cover with 4-6 cups of ice cubes.  Cover and refrigerate overnight.

Prepare the boiling water bath.  Add water to a large canner with rack and heat to about 180 degrees.  The water should be high enough to be at least 1 inch above the filled jars.

Wash jars thoroughly and heat water in a small saucepan; put the lids in the saucepan and bring it just to a simmer.  Keep heat low, you want to sterilize the lid, not boil the rubber off of them, this will ruin the seal.

Drain the cucumber mixture.  Combine the remaining ingredients in a large nonreactive pot and place over medium heat; bring to a boil.  Add the drained cucumber mixture and bring to a boil.  With a slotted spoon, loosely pack the pickles in your prepared jars.  Ladle the liquid into the jars to cover, dividing evenly.  Wipe away any drips with a clean, damp cloth before putting on the 2-piece lids; do not over-tighten.

Place filled jars into the prepared water bath.  Bring the water to a boil and "process" for 10 minutes (start counting as soon as the jars hit the hot water.  Too much processing will leave you with a limp pickle. Lift jars out of the water to cool. Makes about 6 pints.


Crinkle cut your own cucumbers using this special knife:
Stainless Steel Crinkle Cut Knife By MSC - (Random Colors) 7-Inch
 For more information on how to make your own pickles, I recommend this book:
The Complete Book of Pickling: 250 Recipes from Pickles and Relishes to Chutneys and Salsas
This post is linked to: 

Sunday, July 17, 2011

Cranberries!

Brace yourselves, people, I have a cranberry!  Three years ago when I first began to container garden, I planted blueberries in a 24" wide container.  Guided by the book Crops in Pots, I underplanted with three cranberry plants due to the similar needs of the two.  I suppose, like most people, I thought cranberries needed to be grown in bogs.  Not so, I found out.  The bogs are only for the ease of harvest, they are perfectly adaptable to the home garden and thrive in containers.  Year after year I'd have plenty of blueberries, but despite healthy, trailing plants, not a cranberry in sight.  Today while weeding, I spotted my first one!  Too early to break out the cranberry relish recipe, but hope springs eternal and all that.  Here's the recipe anyway just so everyone can plan ahead.
Crops in Pots
Spicy Cranberry Relish

1 cup sugar
1 medium yellow onion, finely chopped
6 whole cloves
1 teaspoon ground cinnamon
2 whole cardamom seeds, crushed
1 pinch cayenne pepper
1/4 teaspoon ground ginger
1/2 teaspoon Kosher salt
1/4 cup cider vinegar
2 cups fresh cranberries
1 cup golden raisins
1/3 cup light brown sugar
1 cup water

Combine all ingredients in large soup kettle.  Bring to a boil.
Lower heat and simmer 45 minutes.  Serve chilled.

Monday, June 13, 2011

Garden Bench

 For Metamorphosis and Mosaic Monday I thought I'd share a project my son has been working on for the past couple of weeks.  One of the causalities of the storm was our little Victorian garden bench.  The way it used to look is shown in the upper left-hand corner of this mosaic (photo from the Harbor Freight website).  I was perfectly happy with this, but after seeing it in bits, I decided I wanted something a bit different and more colorful with the placement changed from the far back of the yard, up to the front where I could see it every day as I was having my morning coffee.  The only spot relatively untouched by the tornado was a small area just outside the kitchen window, so a couple of weeks ago Andrew went to work.  Here are pictures of the results.
I LOVE the vibrant colors of this bench, and how great they look with the potted calibrachoa on top of the nudes base at right.  The "planter" at far left is the top of a birdbath, the base of which was lost to the storm, planted with begonias. Directly behind the bench I planted zinnia seeds, so it should be a riot of color come August.
All of the hostas in this area were rescued from beneath trees (now gone) in other parts of the yard.  We went from a yard that was all shade to one that is now virtually all sun, so I have to entirely rethink our existing and future plantings.  The small red impatiens will eventually grow together and fill this area with lots of red and hummingbirds.

These shoes have been in the garage for ages.  Many times I thought I should just get rid of them, but I'm glad I saved them as they look perfect beneath the bench, planted with creeping jenny.

Have a colorful Monday!

This post is linked to:
Seasonal SundayMetamorphosis Monday, Mosaic Monday
 This Week In my GardenWow Us Wednesday, Flora Thursday at Fishtail CottageOutdoor Wednesdays 
and
Visit thecsiproject.com