Showing posts with label peppermint. Show all posts

Thursday, April 6, 2023

Chocolate Mint Oreo Trifles

 
My initial plan was to make this as a dessert for St. Patrick’s Day, because it’s green. As usual, holidays just fly by, generally with me chasing after them, so it had come and gone before I even purchased a package of mint Oreos. But, because it’s spring, and everything is starting to turn green, I decided to make it and share it with my number one son and his family. I made a bit of a mistake by doing this. This serves four, and no more. I stretched this out to serve five, and that completely threw off the pudding-to-whipped-cream ratio. Don’t be tempted to do that; learn from my mistakes. This can be made up to 24 hours ahead of serving it, thanks to the stabilized whipped cream. If you prefer not to stabilize the whipped cream, as I have done here, you’re going to want to serve it fairly quickly.Chocolate Mint Oreo Trifles

Adapted from The Slow Roasted Italian

12 Oreo Mint Cookies, chopped

1 3.9-oz. pkg. Instant JELL-O Chocolate Pudding

2 c. whole milk

2 c. heavy whipping cream

2 t. unflavored gelatin (Knox recommended)

½ c. powdered sugar

1½ t. peppermint extract

6-8 drops green food coloring

20 Andes Mints, chopped

In a medium mixing bowl with an electric mixer, beat  pudding mix and milk for 2 minutes until thickened. Refrigerate until ready to use.

Into a small bowl or ramekin, place 8 teaspoons of cold water. Sprinkle gelatin on top, and let it set on the counter until firm. Meanwhile whip heavy cream with an electric mixer. Start the mixer on low while you put the ramekin with the water and gel mixture into the microwave for 10 seconds to melt. As the cream is whipping, slowly add the melted gel mixture. Add powdered sugar, food coloring, and peppermint extract. Increase speed to high and whip cream until stiff peaks form. You have just stabilized your rib cream, so that it won’t collapse on itself while your trifles are in the refrigerator waiting to be served.

 To assemble: Add 1/4 of the Oreos to the bottom of each of the four individual trifle dishes. Spoon 1/4 of pudding directly on top of Oreos. Reserve a tablespoon of chopped mints. Add ¼ of remaining mints to trifle, directly on top of pudding. Top with whipped cream. Sprinkle with reserved mints. Refrigerate until ready to serve. Garnish with an Andes mint, if desired.

Serves 4.

As an Amazon Associate I earn from qualifying purchases.


Saturday, December 22, 2018

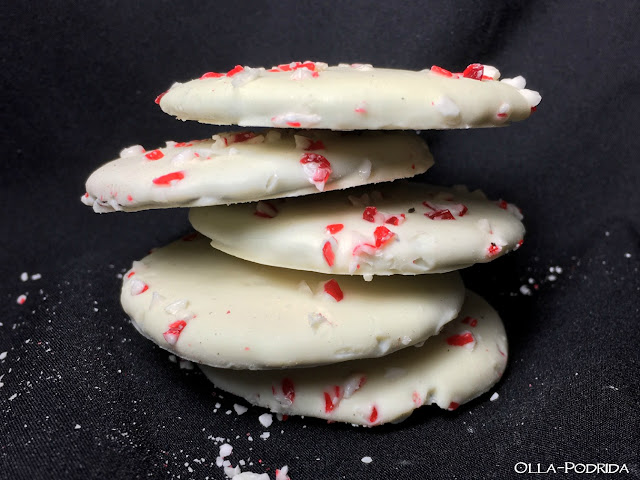
Quick & Easy Peppermint Crunch Cookies

The holiday season just calls for peppermint, doesn’t it? Of course, the holiday season also calls for chocolate, but then pretty much every season calls for chocolate. At any rate, if you love the combination of peppermint and chocolate as much as I do, you are going to love these Quick and Easy Peppermint Crunch Cookies. Baking cookies, as much as I would like to do it, is really rather tedious and time-consuming. This is an easy way to get fabulous results with a minimal amount of work. Try these at home, slip them onto your cookie tray, and wait for the compliments.
Quick & Easy Peppermint Crunch Cookies

1 9-oz. pkg.
Famous Chocolate Wafers
1 11-12 oz. pkg. white chocolate chips
2 - 4 drops oil of peppermint, more or less, to taste
Crushed peppermint candies, if desired

In a microwave safe bowl, melt white chocolate chips, at 30-second intervals, until smooth and creamy. Stir in oil of peppermint. Dip chocolate wafers into white chocolate and place onto a parchment-lined baking sheet. Sprinkle immediately with crushed peppermint candies, if desired. Allow to harden at room temperature, or slide them into the fridge for 15-20 minutes.

If you prefer dark to milk chocolate in your peppermint cookies, you will love these Thin Mint Clones!


This post contains affiliate links.

Monday, December 15, 2014

How to Make Candy Cane Vodka

I am a fan of minty deliciousness, so when I saw a post on the Home is Where the Boat Is blog on how to make candy cane vodka, I had to give it a try. Now I am not a vodka fan, per se. People like to assert that vodka has no taste, but it definitely does have a taste. If you've done any traveling out of your immediate surroundings then you have become aware that even water has a taste, so vodka certainly does as well, and not a particularly good one from my standpoint. So, in my opinion, flavored vodkas are genius.

This is a fun little project. It is also unbelievably easy, immensely practical, and a great little seasonal gift.
A clean, empty bottle, box of candy canes, and bottle of vodka is all that you need. 
I used an 8-ounce spring top bottle and about a dozen miniature candy canes.  You can use fewer candy canes if you want a more subtle taste. The dissolution process takes about three hours. 
I watched intently for the first twenty minutes or so as the candy canes began to dissolve, creating a bit of a head at the top of the bottle in the process. 
Thereafter I'd give the bottle a bit of a shake every half hour or so. 
That is all you do. No straining. No nothing. 

Just tie on a tag and add it to your gift basket, take it to a deserving host or hostess, or do what I did, pour some into a steaming cup of hot cocoa. Marvelous!

This post is linked to:

Sunday, December 14, 2014

Peppermint Patties

I was intrigued by this recipe from the moment I laid eyes on it while mindlessly flipping through an issue of Saveur Magazine. I like York Peppermint Patties (Boy, do I!), but had no real clue as to how they were made, so in order to discover this I had to try making them myself. In addition to being a bit challenged in the candy-making area, I have no fondant making experience, so didn't quite know what to expect when I started.

I waited until the house was empty before beginning (as I tend to do when experimenting) in order to avoid the rather amused and pithy remarks that often come from the mouth of Mr. O-P when he sees a genius at work. As I'd allowed an entire evening to make these I was quite surprised that it took relatively little time. I followed the directions to the letter and poured the hot mixture onto the marble slabs. What a pile of glop! Good tasting, minty-fresh glop, but glop nonetheless. How on earth, I asked myself (Yes, I often talk to myself while cooking.), could this turn into anything other than goo (one step up from glop)? But I continued on, sliding it back and forth on the slabs with the only two heat-proof spatulas I had in the house -- pancake turners.

Absolutely NOTHING changed for quite some time, all the while I was thinking of various methods of disposal that would neither point a finger at me nor what I'd been doing. The peppermint aroma was delightful, but strong, and a clever nose could sniff out my failure if it ended up in someplace as obvious as the kitchen garbage. But then, a miracle occurred, dough was forming! Excitedly I continued by gathering the mixture into a ball and kneading it. It was very oily from the butter and I thought, once again, that I'd failed, but then all of a sudden I was there. Fondant! It was like magic! One minute I had goo, the next minute fondant, and such a firm fondant that I had to quickly reach for the spray bottle to keep it moist.

It was fascinating to see what I'd perceived as a failed mess turn into peppermint patties. In fact, once this process began I really needed help because it was drying out faster than I could shape it into patties (be advised). It was supposed to make 36, but I ended up with 20 rather large ones, partially due to the speed at which the fondant was hardening and my enormous zeal to get them formed and shaped before the mixture dried beyond use.

Once the patties were formed, melting the chocolate and dipping them was a breeze. The fondant is sweet, rich, and peppermint-y, so certainly you wouldn't want to indulge in more than one, but they are very good, and your family and friends will be dazzled by your skills. I put one atop a small doily at each place setting for a holiday dinner party one evening and they were quite the topic of conversation. Can you say, 
Proud?

If you're the intrepid (and by this I mean foolish) cook that I am, here's the recipe. Give it a try and report back. I'd love to know your experience.

Peppermint Patties
The recipe for this fondant-centered candy is based on one in The Candy Cookbook by Mildred Brand (Ideals, 1979).

2 1/2 cups sugar
1/2 cup heavy cream
1/2 cup milk
2 tbsp. butter
1/4 tsp. cream of tartar
1/2 tsp. peppermint oil
6 drops green food coloring
2 1/2 cups semisweet chocolate chips, melted in a bowl

1. Stir together sugar, cream, milk, butter, and cream of tartar in a medium pot. Bring to a boil, without stirring; reduce heat to medium. Attach a candy thermometer to inside edge of pot; cook, without stirring, until it registers 236°F (soft-ball stage), 12-14 minutes.

2. Pour sugar mixture onto a marble slab. Using 2 heatproof spatulas, scrape mixture back and forth to make a fondant, moving it across the marble quickly until it becomes thick and just cool enough to touch, 3-4 minutes. Toward the end, completely work in the oil and coloring.

3. Gather fondant into a ball; knead until it resembles smooth dough, 3-4 minutes. (If it becomes powdery, work in a few drops of water.) Shape fondant into thirty-six 1 1/2"-wide disks, each about 1/3" thick. (Keep unshaped fondant covered while you work.)

4. Working with one fondant disk at a time, dip them into chocolate using a fork; let excess drip off. Transfer to a wax paper-lined sheet pan. Let set in a cool spot. Serve immediately or store in an airtight container in a cool spot for up to a week.

Makes 3 dozen.

This post is linked to:


Saturday, December 21, 2013

Holiday Thumbprints


On Monday of this week, my aunt, my cousin, and I all combined forces to have a little holiday luncheon for my dad and a couple of friends.  The weekend weather had been formidable, but thankfully road crews managed to clear paths well enough for us to come from far and wide.  It was an intimate group of seven, but an enjoyable time for all – my dad in particular who is struggling mightily (as you might imagine considering the time of the year) with the loss of my mom last February.  The conversation was brisk, the food was delicious.

My cousin made these darling thumbprint cookies.  How she has the time with a seriously busy full time job, and two seriously busy, adorable kids, is beyond me, but I appreciated trying them and thought I would share them with you.  She takes no credit, attributing Betty Crocker for the recipe, but kudos to her for assembly and presentation!

Holiday Thumbprints

Cookies
¾ cup sugar
¾ cup butter or margarine, softened
½ teaspoon vanilla
1 egg
1-3/4 cups Gold Medal® all-purpose flour
3 tablespoons unsweetened baking cocoa
¼ teaspoon salt
Crushed hard peppermint candies, if desired

Fudge Filling
¼ cup whipping cream
1 cup milk chocolate chips

Directions
Preheat oven to 350°F. In large bowl, beat sugar, butter, vanilla and egg with electric mixer on medium speed until well blended. Stir in flour, cocoa and salt until dough forms.

Shape dough by rounded teaspoonfuls into 1-inch balls, and place about 2 inches apart on ungreased cookie sheets. Press thumb or end of wooden spoon into center of each cookie, indenting about halfway.

Bake 7 to 11 minutes or until edges are firm. If necessary, quickly remake indentations with end of wooden spoon. Immediately remove from cookie sheets to cooling racks. Cool completely, about 30 minutes.

Meanwhile, in 1-quart saucepan, heat whipping cream over medium heat, stirring occasionally, until steaming. Remove from heat; stir in chocolate chips until melted. Cool about 10 minutes or until thickened.
Spoon rounded 1/2 teaspoon filling into indentation in each cookie. Top with peppermint.

This post is linked to: