Thursday, June 29, 2017

Oriental Beef Casserole


As stunned as I am to say this, it was over a year ago that I first mentioned Oriental Beef Casserole. It was during the last days of my husband's life, and boy were those tough times. It's hard for me to believe that, as of Sunday the 25th, he’s been gone a year. That's scary on a number of levels, one of which is that time seems to go by faster and faster every year. Sometimes I feel as if I am hurtling toward my date of expiration.

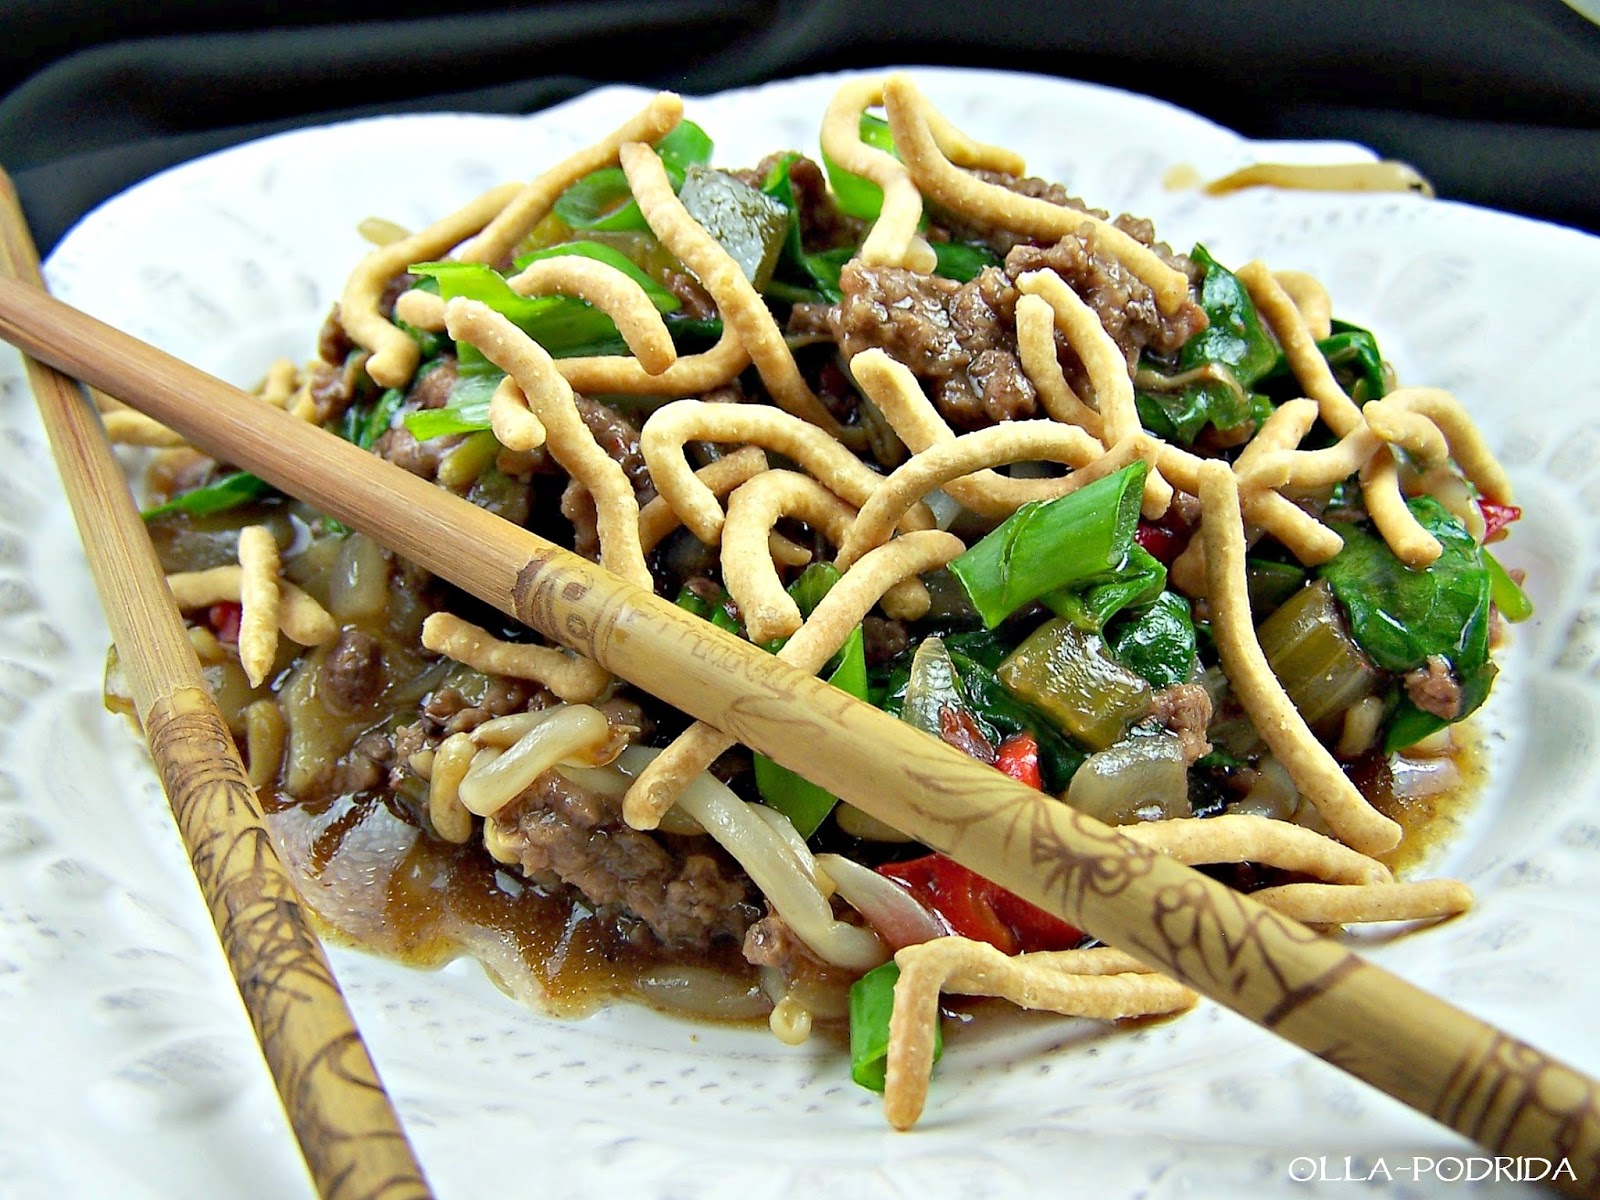
But I'm wandering from my point, namely my mention of Oriental Beef Casserole, and one of you lovely commenters asking if I was going to post it, and I never did. Well, here it is. I decided to take dinner to my dad for Father's Day, naturally, and thought this would be something that he would enjoy. My mother used to make it a lot, it's fairly easy to put together, freezes beautifully, and it's a real crowd pleaser; I don't know anybody who doesn't like it.

The original recipe comes from the Make Ahead Cookbook from Better Homes & Gardens. I got my copy back in the 70s when I was still in high school. As I often do, I change things up a bit. Essentially, this is the same recipe as appears in the book, I just did a couple things differently this time. First of all, I added half a cup of chopped
Melissa's Fire Roasted Sweet Red Bell Peppers. I like the added color, and I like the taste. Second, I didn't have peas on hand, so I decided to use fresh spinach. In the past, I have used the called for peas, snow peas, sugar snap peas, broccoli, bok choy, kale, and this time spinach. Any green vegetable will work. I haven't tried it with asparagus because asparagus seems to have a stronger taste that I didn't think would work well with this casserole. Don't feel hemmed in by a recipe if you don't have all of the ingredients. Experiment, substitute, you might be surprised what works.

When I serve this I like to serve it in individual casseroles with a little side dish of the oriental noodles. That allows people to add as many or as few as they like. I like to add a lot because I like the extra crunch, which reminds me, I've added a can of sliced water chestnuts is this casserole in the past as well.

Here's the recipe as it appears in the book. Give it a try, and let me know what you think.
Oriental Beef Casserole

1 pound ground chuck
1/3 cup chopped celery
1/3 cup chopped onion
1/2 cup chopped green pepper
1 cup water
2 tablespoons cornstarch
1 teaspoon sugar
1/4 teaspoon ground ginger
2 tablespoons water
1/4 cups soy sauce
1 16-ounce can chop suey vegetables, drained
1 10-ounce package frozen peas
1 3-ounce can chow mein noodles

In a 12 inch skillet over medium-high heat, cook the beef together with the celery, onion, and green pepper. Stir and cook until all of the meat is browned. Drain and discard the liquid from the mixture and return to pan. Add the water and bring to a boil.


In a small bowl combine the cornstarch, sugar, and ground ginger. Blend in water and the soy sauce. Add this mixture to the beef mixture, cook and stir until thick and bubbly.

Stir chop suey vegetables into the meat mixture. Break up frozen peas and add to the meat mixture, stir thoroughly, continuing to cook until heated through.

Spoon mixture into a 1-1/2 quart casserole, or individual serving bowls, topping each with a portion of the chow mein noodles. Serves four.


This post is linked to:

Wednesday, June 28, 2017

Welcome to the Lanai!


You've probably been wondering where I've been. Now you have the answer, the deck is finished! It surpassed even my wildest dreams! Joe could not have done a better job; I absolutely love my new space. Not only did he build the deck and do a marvelous job, but he also helped me carry out some of the furniture.

To refresh your memory, I started out with this...
...and ended up with this.
I furnished this entire space, now referred to as the lanai, totally off of the Internet, with everything sight unseen. This was a scary thing for me, as I imagine it would be for anybody. Never in my life have I done such a thing, or made as large an expenditure as the furniture, and all of the items that you see here, having not seen one of them in person.
As the boxes began to arrive (and trust me, I have boxes in my garage that look like a small village), I began to wonder if perhaps I was just a little bit crazy. This, I said to myself, cannot possibly work. Everything is not going to go together in reality as beautifully as it went together in my head. But, as it turns out, it did.
This is my spot.
One thing that I'd like your opinion on: the table in the corner, where I have my morning breakfast, or afternoon tea, depending upon the weather, has a chair behind it that was an extra in a set of patio furniture. It's very comfortable, and I like it with this table, but I think it should be painted a color other than the existing black. I posted the query on Facebook, and got a lot of interesting answers, what do you think? Should I leave it? Or, should I paint it white? Lime green? Orange? Turquoise? Let me know in the comments section below.


Come join me for cake and coffee!
Oh, one more thing, with this lovely small table, you can expect to see some fun and dynamic table settings for one, or perhaps, two. Stay tuned!


 This post is linked to:

Thursday, June 22, 2017

Devonshire Cream


I am a huge fan of clotted cream, and have been ever since I experienced my first cream tea in London back in 1997. It's expensive to buy in those little jars (and not all that easy to find), although I do, on occasion, treat myself to the original thing. I know that clotted cream can be made at home, but I've not had great success with that, so when I came across a recipe for Devonshire Cream I thought I'd give it a try. No, it is not clotted cream, but it is a nice substitute, and goes together in a flash. 

I experimented with a couple of different recipes, and I like this one the best, because it's not overly sweet. Authentic clotted cream isn't sweet at all, but Devonshire Cream is, so I like to keep that sweetness to a minimum by adding more cream cheese than sugar. You can experiment on your own, adding an additional tablespoon of sugar (or more), or even going so far as to adding a drop or two of flavoring like vanilla or almond just to change things up a bit. For me, this is the best recipe for Devonshire Cream around. It goes wonderfully well with yesterday's Cream Scones with Amaretto Cherries, so give it a try.
 Devonshire Cream

4 ounces cream cheese, softened
3 tablespoons granulated sugar
Pinch of salt
1 cup heavy whipping cream

Beat together cream cheese, sugar, and salt. Slowly stream in whipping cream, beating constantly, and continue to beat until stiff peaks form. Chill for two hours before serving. Store in a covered container in the refrigerator.

NOTE: I used my stand mixer with the whisk attachment to make this. I found it worked much better when streaming in
the cream. As you can see from the photos, the results were beautiful.


Wednesday, June 21, 2017

Cream Scones with Amaretto Cherries


I've been having a lot of fun working with bing cherries, but decided to switch from the fresh ones to the dried ones because, after all, bing cherry season need never be over as long as you have a package of delicious and sweet dried cherries in your pantry.

Because I had such wonderful success with adding amaretto to the cherry preserves, I decided to make some scones with amaretto cherries in them. You have to plan ahead for this recipe by soaking your dried bing cherries in amaretto overnight. Once that's done, the scones go together easily and are, I think, the best scones I've ever eaten. Topped with homemade Devonshire cream (that recipe will be coming up tomorrow), and a dollop of delicious fresh Bing Cherry Preserves, nothing is better for breakfast than this. Whether you are serving it to guests at some special occasion breakfast or brunch, or just treating yourself, these are wonderful!
Cream Scones with Amaretto Cherries

2 cups sifted cake flour
1/4 cup sugar
2 tsp. baking powder
1/2 tsp. salt
6 T. unsalted butter, cut into 1/2-inch pieces
soaked overnight in 1/3 cup Amaretto
1 egg
1/2 tsp. almond flavoring
1/3 cup heavy cream

Heavy Cream
Sanding Sugar

Preheat oven to 375°F with rack in middle. Drain cherries; set aside.

In the work bowl of a food processor combine flour, sugar, baking powder, salt, and butter.  Pulse until mixture resembles coarse meal; empty mixture into a large bowl. Add cherries, toss to coat.

In a small mixing bowl whisk together egg, cream, and almond flavoring.  When thoroughly blended, pour it over the flour mixture in the large bowl and fold until it just comes together.  Add 1-3 more teaspoons of cream, if needed.

Turn out dough onto a lightly floured surface. With floured hands, press into a 1/2-inch thick rectangle. Cut out rounds with a 2" biscuit cutter and arrange 2 inches apart on a Silpat-lined baking sheet. Gather scraps together and cut out additional scones.

Brush tops of scones with cream and sprinkle liberally with sanding sugar. Bake scones, rotating baking sheet halfway through, until edges are golden, 25 to 30 minutes. Cool on a rack before serving.

Makes 8-10

This post is linked to:

Tuesday, June 20, 2017

Bing Cherry Amaretto Preserves


Cherry season is one of my favorite times of the year because I absolutely LOVE cherries! I’d received a nice big bag of Bing cherries, courtesy of Melissa's Produce and, seriously, could have eaten the entire thing until I made myself sick, that's how much I love them. Instead, I started thinking about my grandmother, remembering her climbing up into the cherry tree that grew in her backyard, alongside an apple and peach. When I think back on those moments, it makes me realize, now more than it ever did back then, just how truly amazing she was. Not quite five feet tall, and rounder than she should have been, she would climb up into the cherry tree -- wearing a housedress no less -- gathering cherries in her apron to use in making preserves. Aha! I thought to myself, that's what I'll do; I'll make some cherry preserves.

My grandmother used to use an equal amount of fruit to sugar, but these cherries are so sweet that I thought that would be too much, so I cut back on the sugar. I also got to thinking about how cherries are often paired with almond flavoring, so in addition to a little hint of almond flavoring I decided to add a bigger hint of Amaretto Liqueur. Boy, is this good.
 Bing Cherry Amaretto Preserves

5 cups stemmed and pitted Bing cherries (I used
Melissa's)
2 tablespoons fresh lemon juice
1 box of Sure Gel fruit pectin
4 cups sugar
1/4 teaspoon almond extract
1/4 cup Amaretto

If you plan on storing your preserves, have your jars warm and sterilized, and your boiling water canner ready.

Into a 6- to 8-quart saucepan, place cherries, lemon juice, and pectin. Stir together to combine. Bring mixture to a full rolling boil, i.e., a boil that doesn't stop bubbling when stirred, over high heat, stirring constantly. Stir in sugar and almond extract. Return to a full rolling boil, and boil exactly 1 minute stirring constantly. Remove from heat and stir in Amaretto. Skim off any foam that may have gathered on top with a metal spoon.

Ladle into prepared jars, wipe rims and threads, place lids on and screw them down tightly. If you plan on processing the preserves, be sure to do so for at least 10 minutes.


This post is linked to:


Monday, June 19, 2017

All Decked Out (Part Three!)

It may seem to all of you like a mere three weeks since the deck project began, but in reality, we are starting our sixth week. When this week draws to a close, the deck will be completed. Here's what has taken place since I last posted.

The flooring is in place and it looks absolutely beautiful. I never realized how much like real wood outdoor flooring could appear. Stepping from the breakfast room out onto the deck is a smooth transition.

The shingles are all in place, and the addition has been added beautifully to the house.

The tray ceiling went in, as well as the electricity, and the fan has been mounted.
The rails went up around the open area, and the solar light caps were put into place. I'm very pleased with the way the railing looks. I had the option of choosing what the other neighbors had on their decks, namely the standard white rails, or to go a bit different with this rail with the black bars. I'm so happy that I did this. It looks a bit more high-end, and makes the space feel so much more open. I couldn't be happier!

During this last week of construction the guttering will be installed, the screening will go up, and the support posts will be wrapped in the composite material. As soon as everything is completed, you just know that I'm going to be dragging that rug out onto the deck and starting to move out the furniture. I can hardly wait! Come back next week and see what it all looks like.

Photos by Joe Rogers of Advanced Carpentry and Remodeling, LLC, 

Sunday, June 18, 2017

Slow Cooker Zuppa Toscana


Making soup on a 95° day is probably not a normal activity, but that's what I did today, having such a hankering for a nice a bowl of Zuppa Toscana. There are many recipes for Zuppa Toscana, but not all of them can be made in the crockpot like this one. I came up with my own recipe, a bit on the nontraditional side, to suit my own tastes. First of all, I don't use the called for Italian sausage, I use pork sausage, and season it up the way I like. That's the only way that I can ensure that I get the seasonings that I want in order to yield the best, most intense flavor. Second, despite its enforced popularity, I am not a fan of kale. I far prefer the delicate leaves of baby bok choy, and I think you will too. No matter the season, give this easy and flavorful soup a try. It only gets better in the fridge, so make it on the weekend, and enjoy it during the week.
Slow Cooker Zuppa Toscana

1 pound pork sausage (I used Bob Evans original)
3 large russet potatoes, peeled, and diced
1 yellow onion, diced
1 large clove fresh garlic, minced
1 1/2 teaspoons Italian seasoning
1/4 to 1/2 teaspoon hot pepper flakes
1/4 teaspoon fennel seed
1/2 teaspoon garlic salt
1/4 teaspoon freshly ground black pepper
32 ounces homemade chicken stock
4 small heads
Melissa’s Baby Bok Choy, torn into bite-size pieces
1 cup heavy cream
2 tablespoons flour

In a 10-inch sauté pan over medium heat, brown and crumble the sausage. Stir in minced garlic, Italian seasoning, hot pepper flakes, and fennel seed. Stir well to combine. Drain
off the grease on a paper towel-lined plate, and place in the bottom of the slow cooker. Top with potatoes, onion, and chicken stock. Stir in garlic salt and freshly ground black pepper. Cover and cook on low for 5 to 6 hours or until the potatoes are fork tender. Whisk together heavy cream and flour, and pour into slow cooker, add bok choy, and stir to combine. Cook on high an additional 30 minutes until soup has thickened. Season to taste, if needed.

 This post is linked to:

Friday, June 16, 2017

Slow Cooker Korean-Style Short Ribs


I always keep packages of short ribs in the freezer because it is such a flavorful cut of meat, so easy to work with because it slow cooks all day long whether in a slow cooker, or at a low temperature in the oven, and the results, no matter how they're prepared, are always wonderful.

I tend to stick with a select few recipes that are my favorites,
this one, for example, and this one, but recently I found a recipe for Korean-style short ribs to be made in the crockpot, and I knew I had to try them. The downside of this recipe is that it calls for a couple of ingredients that may not be common in the average kitchen. I have all of them on hand, but then I tend to do a lot of ethnic cooking. I can tell you this, it would be worth your while to buy these ingredients because once you taste these short ribs, you're going to want to make them again and again. I found the recipe on Food.com, and made it as written, except I served it with mashed potatoes rather than rice.
Slow Cooker Korean-Style Short Ribs

1/2 cup low sodium soy sauce
1/2 cup packed light brown sugar
2 tablespoons sesame oil
2 tablespoons rice vinegar
2 tablespoons minced fresh ginger
4 garlic cloves, crushed
1/2 teaspoon red pepper flakes
5 pounds beef short ribs
3 tablespoons cornstarch
1/2 cups shredded carrots
3 scallions, trimmed and  sliced
1 tablespoon sesame seeds
3 cups cooked white rice, ramen, or mashed potatoes,
whichever suits you

Blend soy sauce, sugar, oil, vinegar, ginger, garlic, and red pepper flakes in a medium bowl.

Place ribs in a 5-quart slow cooker and top with sauce. Cover and cook on high for 6 hours or low for 9 hours, until the meat is tender.

Transfer ribs to a platter. Skim and discard excess fat from liquid. Combine cornstarch and 3 tablespoons water; blend with liquid in a saucepan. Bring to a boil over medium-high heat and cook for 2 minutes, stirring, until thickened. (I found this took only about a minute.) Stir in carrots. Top ribs with sauce, scallions, and sesame seeds. Serve over cooked rice, ramen, or potatoes.

 This post is linked to:


Thursday, June 15, 2017

Caramel Pound Cake with Salted Toffee Glaze


Some of you may recall from earlier blog posts, that Bundt cakes are my nemesis. I have made many a Bundt cake, all with disastrous results. Finally, in desperation, I washed up my cathedral style Bundt pan for the last time, and slipped it into the donation box. I should have let it go at that, but the fact that I couldn't make a good Bundt cake continued to haunt me. So, I treated myself to a new pan -- this one -- and took the advice of a lot of you who told me to try using Baker’s Joy. As you can see from these pictures, my luck has most definitely changed! The new Bundt pan, with simpler, more traditional lines, coupled with the Baker’s Joy, was 100% successful. Thank you all very much.

Last Sunday I went to dad's house for a visit. I am so tired these days from getting up early to greet the contractor that I'm literally stumbling with fatigue. As you know, I like to take at least one meal to dad with me when I go -- often two -- but I was just too tired to make anything other than a cake. Dad tends to like pound cake because, like me, he thinks it works equally well at breakfast as it does for dessert. This cake does particularly because, despite what appears to be an awful lot of sugar, it's not overly sweet. My fear was that it was going to be cloying, but no. This is a wonderful cake. Dense, slightly sweet, tasting nicely, but not too much, of caramel, with a wonderful salted toffee glaze that takes it over the top.
This is a recipe I'll make again and again, not only because it's so easy, but because it's so darned good. (As it turned out, dad really dodged a bullet by my not making him a meal this past week. My plan was to make him chicken chow mein. It was a new recipe, and not particularly a good one, so I will not speak of it again.)

Do give this cake a try; it's tasty and different from your average Bundt, and don't forget the Baker’s Joy!
Caramel Pound Cake with Salted Toffee Glaze

1 cup butter
1/2 cup Crisco
2 1/4 cups brown sugar
1 cup white sugar
5 large eggs
1 teaspoon vanilla
2 1/2 cups flour
1/2 teaspoon baking powder
1 cup milk
1 cup chopped pecans
1/2 cup flour

Preheat oven to 325° F. Grease and flour (or spray with Baker’s Joy) a 10-12 cup Bundt pan.

In the work bowl of a stand mixer fitted with the paddle attachment, cream together butter, Crisco, and sugars until light and fluffy. Add eggs, one at a time, beating well after each addition; stir in vanilla.

Sift together 2 1/2 cups flour and baking powder, and add alternately to mixture with the 1 cup of milk.

In a small bowl stir pecans with 1/2 cup flour to coat; fold pecans into batter.

Pour the batter into your prepared pan and bake for 70 to 90 minutes, or until a toothpick inserted in the center comes out clean. Allow the pan to stand for 10 minutes after removing from oven and then invert onto a wire rack to cool completely. When cake is cool, drizzle with Salted Toffee Glaze (recipe below).

Salted Toffee Glaze
From The Café Sucre Farine
5 tablespoons salted butter
½ cup packed dark brown sugar
 cup heavy cream
¼ teaspoon vanilla extract
 cup sifted powdered sugar
Flaking sea salt

Combine the butter, dark brown sugar, heavy cream and salt in a heavy sauce pan and bring the mixture to a rolling boil, stirring constantly. Boil for ONE minute, stirring constantly. Remove from heat, stir in vanilla extract. Add about ½ cup of the powdered sugar and whisk until smooth. Continue to whisk in powdered sugar by the tablespoon until you reach your desired consistency. Place on a serving platter or cake stand and pour the salted toffee icing over the top. Sprinkle lightly with flaky sea salt.

This post is linked to:

This post contains affiliate links.

Wednesday, June 14, 2017

Red Pepper and Artichoke Tapenade


I have to be honest with you, I gave this the name Red Pepper & Artichoke Tapenade, because I thought it sounded a lot better than “Leftovers from the Fridge Tapenade.” I’m sure you agree. Essentially, I rummaged through the fridge with reckless abandon, pulled out half jars of things, put them all into the food processor, and pressed on. The result was phenomenal! This is a delicious tapenade, and it's so easy. Let me encourage you to do the same thing. Let me also encourage you to always have things on hand to allow you to do this, namely Melissa's Fire Roasted Sweet Red Bell Peppers, Melissa’s Hearts of Palm, capers, black olives, and a jar of marinated artichokes. You would be amazed at what these three things can do. I made a wonderful relish for wrap sandwiches using a combination of these ingredients that I will be telling you about later in the week

If making tapenade scares you because you don't know what you would do with it, let me tell you, there are endless ways in which to use it. Personally, I could just scoop it right of the bowl and into my mouth, but a wonderful way to use it that will really impress your guests (although we're not trying to impress people here, at least not so that it's obvious) is to scoop it into two ramekins, place one on either end of the dining table, and, as your centerpiece, have a big bowl of different Artisan breads. Suggest the tapenade be spread onto the bread in place of butter, and your guests will go crazy! This stuff is so good! You could also use it as a dip for crackers or crudités, dollop it onto an English muffin, top with shredded cheese, and run it under the broiler for a wonderful appetizer, use it as a topping for grilled fish, or mix it into egg salad or the filling for deviled eggs. You will enjoy it no matter what you do.

I'm going to try to write out the recipe as well as I can, but please know I was literally dumping jars of various items from my fridge into a sieve to let them drain, and then emptying the sieve directly into the food processor. Essentially, it's important to have grated Parmesan, olive oil, garlic, lemon juice, and salt and pepper. From there you can just use what you like. Personally, I love this combination, but feel free to experiment.
Red Pepper and Artichoke Tapenade

½ 7-ounce jar
Melissa's Fire Roasted Sweet Red Bell Peppers, drained and chopped
½ 12-ounce jar Marinated Artichoke Hearts, drained and coarsely chopped
1 small can of pitted black olives, drained
½ cup freshly grated Parmesan cheese
¼ cup olive oil
1 heaping tablespoon drained capers
1 large clove garlic, as fresh as possible
1-1/2 teaspoons fresh lemon juice (I used a Meyer lemon because that's what I had)

Toss everything into the food processor and pulse until it's finely chopped. Taste it, and season it with more salt or pepper as you see fit.

This post is linked to: