Monday, February 27, 2023

Pimiento Cheese Potato Gratin

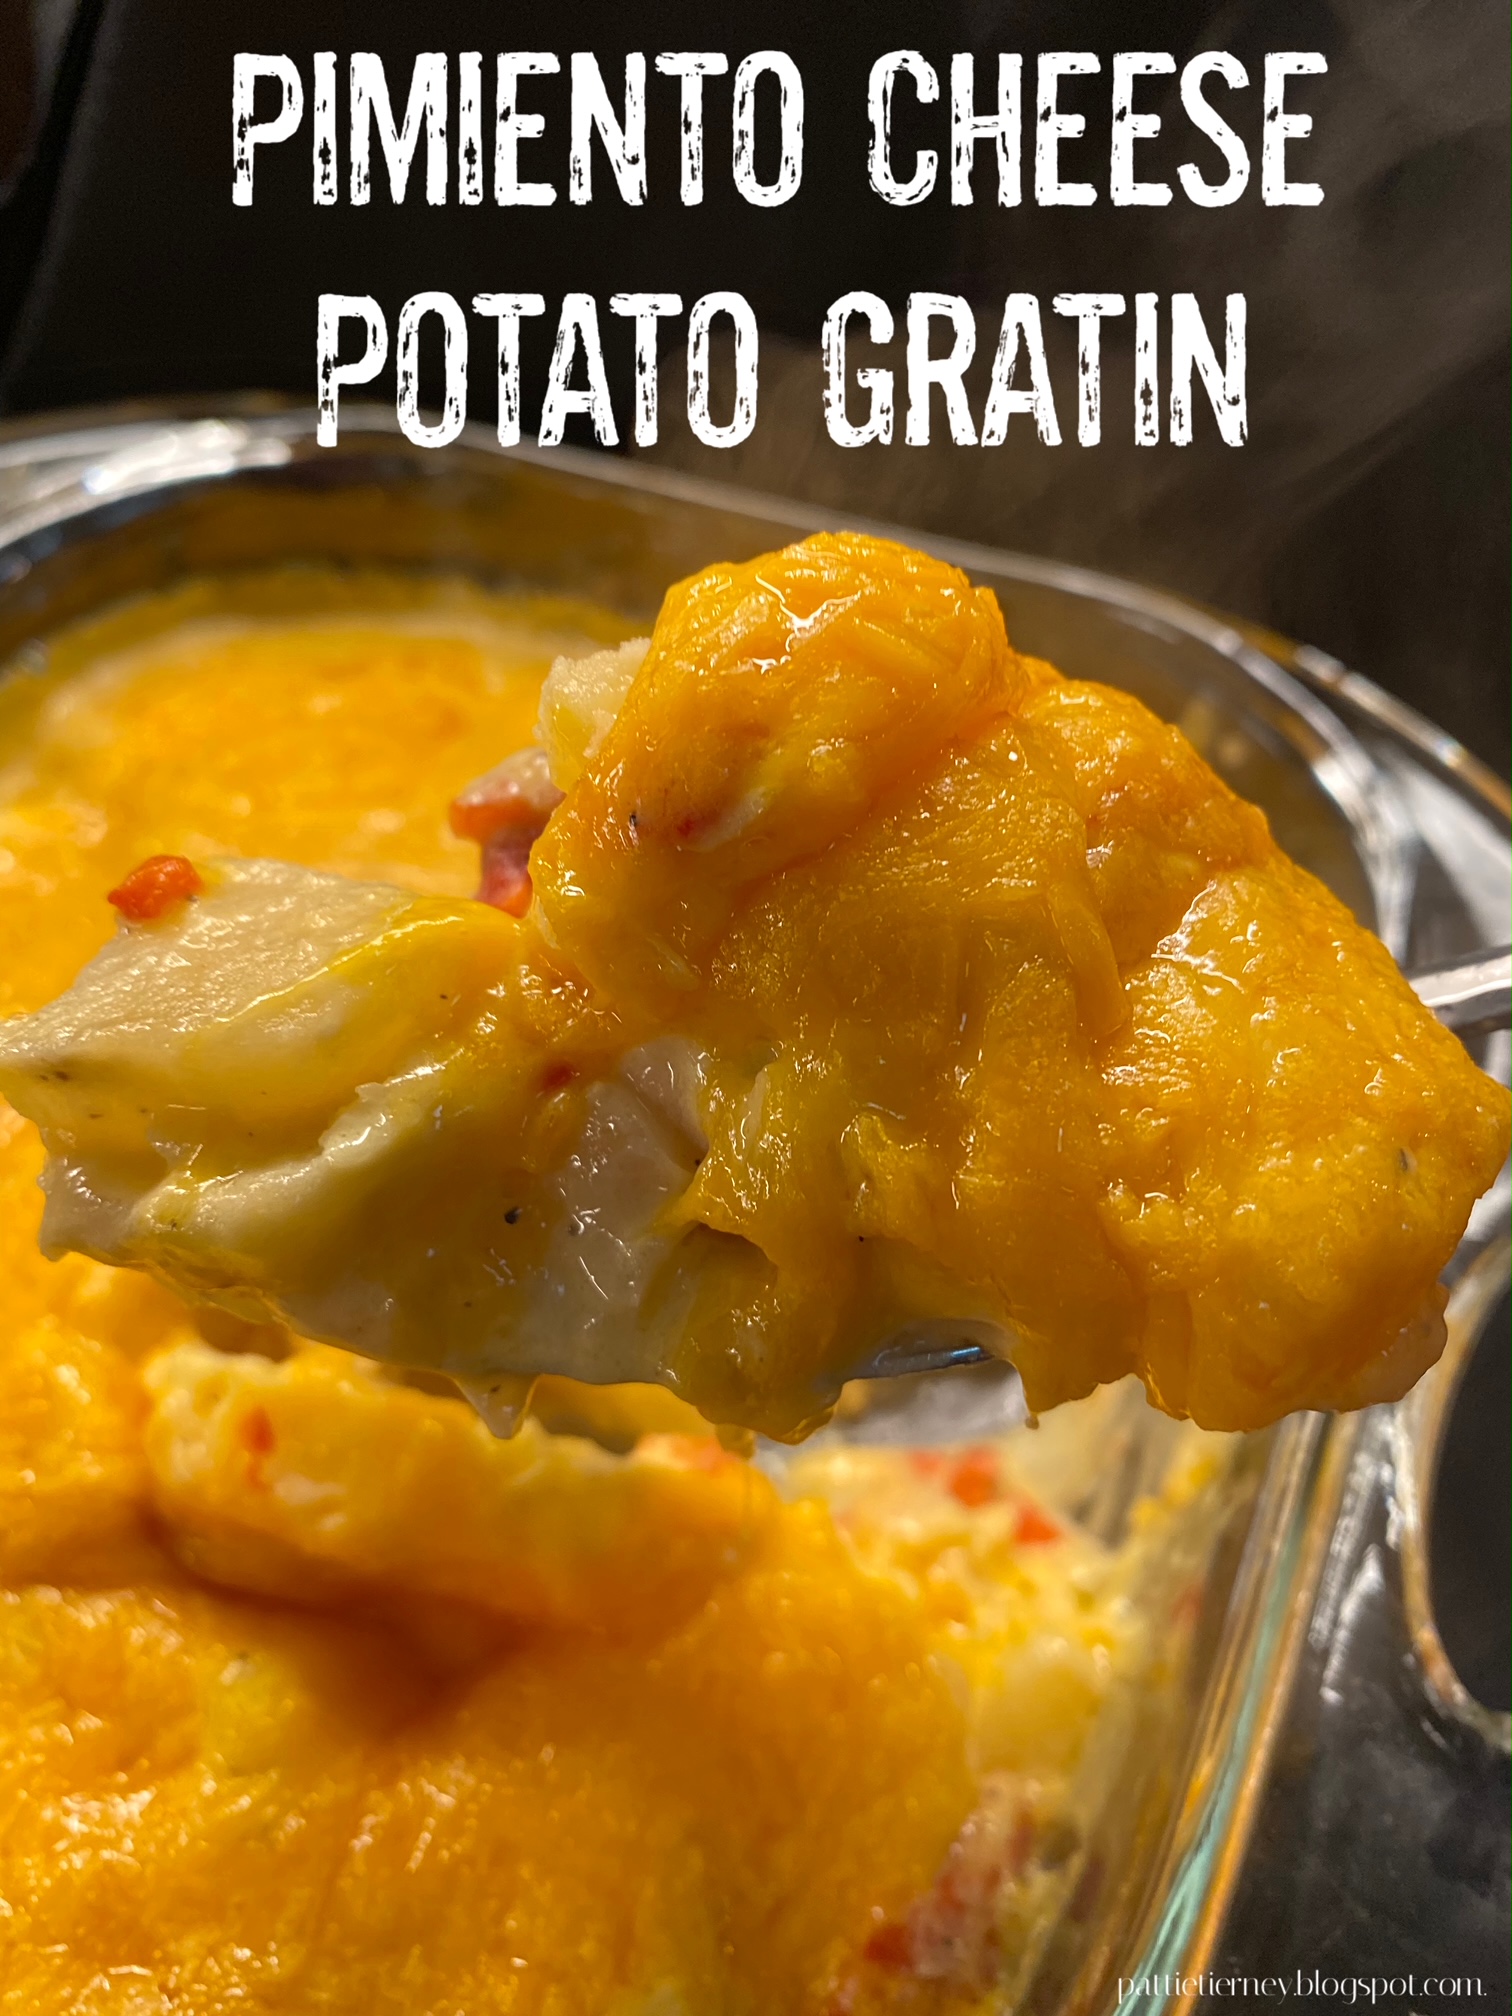
I have made no secret of my love for pimiento cheese; a cursory search of this blog would indicate the extent of my love. I like it in its purest form, and I like it when it’s used as a burger topping, a salad ingredient, or baked into another dish. This delicious cheesy potato recipe is one that I have adapted from the Lee Brothers’ recipe in their book, The Lee Brothers, Simple Fresh Southern. It is tangy, creamy, and immensely satisfying.

Pimiento Cheese Potato Gratin

Adapted from the Lee Brothers

 2½ t. salt, plus more to taste

112 lb. Yukon Gold potatoes, peeled, sliced into 14” thick rounds

34 c. heavy cream

3 Melissa’s shallots, minced

14 t. crushed dried red chili flakes

12 t. freshly ground black pepper

1 c. chopped Melissa’s roasted red peppers, with their liquid

8 oz. extra-sharp cheddar cheese shredded 

 Heat the oven to 375°F with racks positioned in the middle and top third of the oven. In a 3- to 4- quart stockpot, bring 2 qts. of water and 2 t. of the salt to a boil. Add the potatoes and cook for 10 minutes; drain and set aside.

Combine the cream, shallots, chili flakes, remaining 1/2 teaspoon salt, the black pepper, and 2 tablespoons of the liquid from the jar of roasted peppers in a small saucepan. Bring to a simmer and cook until the chili flakes have begun to stain the cream, about 2 minutes. Add half of the cheese and stir until it melts, about 1 minute. Remove the pan from the heat.

 Layer roughly a third of the potatoes in a 6-cup baking dish, overlapping them slightly so that they fit in an even layer. Scatter half of the roasted peppers on top of the potatoes, and repeating layering potatoes and peppers until all of the potatoes and peppers have been used. Pour the cream mixture over the potatoes and peppers and agitate the dish to distribute the liquid throughout. Cover with foil and bake on the middle rack for 15 minutes. Uncover the dish, sprinkle the remaining cheese over the top, and place the fish on the top oven rack. Bake for 8 minutes, or until the cheese is bubbly and gently browned on top. Serve immediately.


 As an Amazon Associate I earn from qualifying purchases.


Thursday, February 23, 2023

Popeye’s Chicken Sandwich

When my boys were little, I was room mother for both of them. One of the field trips that we took was to the local McDonald’s where we got to go behind the scenes to see how their hamburgers were made. That was one of the most traumatic experiences of my life. After seeing those five gallon buckets of oil and fat, not to mention how that food was handled in a restaurant with a grade “A” rating, I vowed never to go back there again, and I didn’t. In fact, I try to avoid fast food restaurants as often as I can. That’s not to say that I don’t enjoy it, but I have found that it is possible to enjoy it, but make a healthy version of my own.

 This recipe that I found online is a darned good one! In fact, in my opinion, it puts the Popeye’s restaurant chain to shame. The marinade is wonderful; the breading is spicy and delicious. I plan to use it for chicken wings and chicken drumsticks at some point in the future. It takes a little bit to put this together, but you save yourself some time if you want to skip making the spicy mayo, and just buy some of the Chick-fil-A sauce that they sell at the market. All components can be made ahead, the chicken can be breaded, covered and refrigerated overnight if need be, and it reheats beautifully. Enjoy it as a sandwich, and then enjoy it cut in slices on top of a chef salad. This is a keeper.

Popeye’s Chicken Sandwich

As seen on easychickenrecipes.com

 For the Marinade

2 boneless, skinless chicken breasts

1 c. buttermilk

2 T. Frank’s RedHot Original Hot Sauce

1 t. smoked paprika

1 t. garlic powder

1 t. onion powder

1 t. ground black pepper

1 t. kosher salt

 For the Breading

1 c. flour

½ c. cornstarch

1 T.  smoked paprika

1 T. garlic powder

1 T. onion powder

1 t. cayenne pepper

1 t. kosher salt

1 t. ground black pepper

 For the Spicy Mayo

½ c. Duke’s mayonnaise

2 t. Frank’s RedHot Original Hot Sauce

1 t. honey

½ t. garlic powder

 For Assembly

4 c. vegetable oil for frying*

2 T. unsalted butter

4 brioche buns

16 dill pickle slices

 Place a chicken breast on a cutting board and cover with a piece of plastic wrap. Use a meat mallet or rolling pin to pound the chicken into an even thickness. Remove the wrap and cut the chicken in half to fit the bun. Repeat with the second chicken breast.

 In a large bowl, whisk together the buttermilk, hot sauce, paprika, garlic powder, onion powder, pepper, and salt. Add in the chicken and toss to coat. Cover with plastic wrap and refrigerate for 1 hour and up to overnight.

In a shallow bowl, whisk together the breading ingredients. Add in ¼ cup of the buttermilk mixture from the chicken and use a fork to stir until small clumps form.

Bread the chicken in the flour mixture, pressing it into the chicken to create a thick crust. Refrigerate for 10 minutes.

While the chicken chills, heat the oil in a Dutch oven or other heavy-bottomed pot until it reaches 350°F.

Fry the chicken, in batches if needed, until crisp and golden on both sides and the chicken is cooked through, about 3-5 minutes. Set on a paper towel lined plate to drain.

While the chicken cooks, stir together the ingredients for the spicy mayo.

 Melt the butter in a large skillet over medium high heat. Toast the buns until golden.

To assemble, spread spicy mayo on the bottom bun, top with pickles, fried chicken, and another drizzle of spicy mayo. Add the top bun and enjoy!

*I used about 2 cups in the bottom of a deep 10” sauté pan, frying one at a time.


As an Amazon Associate I earn from qualifying purchases.


Monday, February 20, 2023

Tuscan Vegetable Soup with Shells & White Beans

 
Some days I’m just in the mood for vegetables, all kinds. When I get in moods like this, I decide that the best way to enjoy these vegetables is in a big bowl of soup. I’m not going to lie, there is a lot of chopping involved in making this soup. I also feel obliged to tell you to take it easy here, because if you have too much of this stuff, you will feel as though you’re prepping for a colonoscopy. That said, it is delicious, nutritious, and, once made, one of the easiest things you will put on the table. Serve it with crusty rolls or garlic bread; for true Italian authenticity, pour yourself a glass of Chianti. Enjoy!

Tuscan Vegetable Soup with Shells & White Beans

 2 T. olive oil

1 large onion, finely chopped

1 t. dried thyme

1 t. dried basil

1 t. Italian seasoning

1 T. Melissa’s minced garlic

¼ head green cabbage, cut into ½” pieces

4 stalks celery, diced

3 large carrots, diced

10 cups chicken broth

1 T. chicken soup base

Parmesan cheese rind (optional)

15.5-oz. cans cannellini beans, rinsed and drained

14.5-oz. can chopped tomatoes, with juices

1 8-oz. can tomato sauce

2 c. chopped baby spinach

4 medium zucchini, cut into ½-inch pieces

½ c. small shell pasta

1 t. salt

½ t. freshly ground black pepper

1 t. granulated white sugar

1 c. grated fresh Parmesan cheese

 In a large pot, heat the olive oil over medium heat. Add the onion, thyme, basil, Italian seasoning, and garlic; sauté 5 minutes. Add the cabbage, celery, and carrots; sauté 10 minutes. Add the broth and soup base. Add the Parmesan cheese rind, if using. Bring to boil. Reduce heat; cover and simmer 1 hour.

 Add the beans, tomatoes, spinach, zucchini, pasta, salt, pepper, and sugar. Cover and simmer until the vegetables are tender, about 20 minutes longer.  

Just before serving, stir in the cheese, divide the soup among bowls. Top each serving with a sprinkle of more Parmesan, if desired.

 As an Amazon Associate I earn from qualifying purchases.


Friday, February 17, 2023

White Almond Cupcakes

 
I made these for Valentine’s Day dessert, and included them on my Valentine’s Day table for two. A number of you noticed them and asked for the recipe, so here it is. I shared them with my number one son and his family, and they absolutely loved them! They last for a number of days on the countertop, and the icing can be tinted any color to suit whatever holiday you happen to be celebrating. These would be wonderful for St. Patrick’s Day or Easter. Try them. The whole family is going to love these.

White Almond Cupcakes

1 18.25-oz. pkg. white cake mix
1 c. flour
1 c. sugar
¾ t. salt
1-1/3 c. water
1 c. sour cream
2 T. vegetable oil
1 t. 
pure almond extract

1 t. clear vanilla flavoring
4 egg whites

Preheat oven to 325° F. Spray two 12-well cupcake pans with PAM, or use cupcake liners; set aside.

Stir together white cake mix, flour, sugar, and salt in a large bowl until well mixed. Pour in water, sour cream, vegetable oil, almond extract, and vanilla flavoring. Beat to combine. Add egg whites, and beat with an electric mixer on low until all ingredients are mixed, about four minutes.


Scoop the batter into each well of the cupcake pans, filling 2/3 full. And ice cream scoop works well for this. Bake until the tops are light golden brown and a toothpick inserted into the center comes out clean, about 25-30 minutes. Allow to cool in pans 10 minutes before turning out onto rack to cool completely.

Almond Butter Cream Frosting

3 c. confectioners’ sugar
1/3 c. unsalted butter, room temperature
1 t. 
clear vanilla flavoring
½ t. pure almond extract

2-3 T. whole milk

1-2 drops red food coloring

Beat together sugar and butter in a large mixing bowl until creamy. Add remaining ingredients and beat at high-speed for five minutes, until light and fluffy, add more milk to thin, if necessary. Add food coloring and beat to combine. Use a star tip to pipe frosting in a swirl onto each cupcake. Sprinkle with pink sanding sugar.

As an Amazon Associate I earn from qualifying purchases. 

Thursday, February 16, 2023

The Keymaster’s Peanut Butter Parallel

 
You just never know where you’re going to find the next interesting recipe. Case in point, this one that I discovered in Ghostbusters: The Official Cookbook, a recent release for fans of the movies in the Ghostbusters franchise. My boys liked the original version of this movie so much that, having heard it again and again, as they seemingly watched it on repeat, I have memorized most of the dialogue. When I spotted this book (a real delight for fans of the series as well as young and beginner cooks), I couldn’t resist paging through. Because I am a fan of chocolate and peanut butter, this was a recipe that I had to try. It is delicious! I can’t imagine anyone not absolutely loving it. Prior to making this, it never occurred to me to include peanut butter with ice cream, or to melt peanut butter and use it as a topping, but rest assured, I will be doing this many times in the future. Instead of having Redi-whip on hand, I whipped my own cream. I think next time I’m going to add a little bit of peanut butter powder to the whipped cream to get the full effect.  This is rich and filling, but, oh so delicious.

 The Keymaster’s Peanut Butter Parallel
From Ghostbusters: The Official Cookbook

1 c. chocolate ice cream.
1 c. vanilla ice cream
3 T. smooth peanut butter
½ c. whole milk
1 c. whipped cream.
1 T. melted peanut butter
2 T. crushed
honey roasted peanuts

In a blender, combine chocolate ice cream, vanilla ice cream, smooth peanut butter, and milk. Blend until smooth. Pour into a tall glass.

Top with the whipped cream. Drizzle over the melted peanut butter, top with crushed peanuts, and serve.

As an Amazon Associate I earn from qualifying purchases.

Tuesday, February 14, 2023

Valentine Table for Two


I don’t know about you, but over the course of time, it becomes more and more challenging to come up with a holiday table different from those that I’ve done in the past. This year I decided to put my clear  Duralex luncheon plates to good use by placing them on top of a plaid dinner plate from Pier One, and then use floral wrapping paper to place beneath the clear plate to make it appear as though it had a cluster of roses in the center. I have used these Duralex plates in the past here, here, and here, and enjoy the creativity involved in coming up with something suitable to put underneath each time. It can make a table setting deeply personal.

I wanted to incorporate neutrals, and I did by using a brown table covering, white shabby chic charger, and square black plate to form the base of my place setting. The red flatware I inherited from my mother.

The napkins were made by my cousin years ago. My mother taught her how to hem napkins, and these were among the first that she made. Happily, tiring of them over time, she gave them to me. 

I decided to use both red and pink in my table setting. The white pitcher is filled with pink tulips. A scattering of Valentine M&M’s add a bit of whimsy, not to mention dessert.

Speaking of dessert, I made delicious white almond cupcakes on which I piped pale pink almond butter cream frosting. I shared this with my number one son and his family, and they were over the moon with these.


I wanted to add a bit of crystal sparkle, so incorporated knife rests that I inherited from my mother, and used the crystal candle holders that the late Mr. O-P bought me as we celebrated our first Christmas together.

 
While I did send Valentines this year, opting to send them through Juliette, Georgia to get the special postal cancellation and cachet. I didn’t get as many done as I had hoped, so used the remaining as tabletop decorations.

 A trio of glassware rounds out the place setting. The cranberry cut glass liquor glasses hadn’t been used in quite a while, and I thought this would be a good time to get them out. The LaRochere wine glass will be put to use as will the pale pink pressed water glass.

Happy Valentine’s Day to you and yours.


As an Amazon Associate I earn from qualifying purchases.

This post is linked to: Tablescape Thursday


Monday, February 13, 2023

Cheesy Mushroom Bread


The hearty cheese bread is a unique twist on plain cheesy garlic bread. The mushrooms add a wonderful earthiness, making it perfect for Meatless Monday. It pairs nicely with soup or a salad, but is equally good when eaten on its own.

Cheesy Mushroom Bread

Adapted from food52.com

 8 oz. shredded mozzarella

4 oz. shredded cheddar

¾ c. butter

4 oz. mushrooms, sliced

2 T. minced onion

1 T. poppy seeds

½ t. seasoned salt

1 T. dry mustard

1 T.  lemon juice

loaf French bread

 Preheat oven to 350°F.

 Make diagonal slices, about 1” apart, to within ¼” of the bottom of the loaf. Then, repeat this process but on the opposite slant, so that you’re making little diamonds across the loaf while leaving bottom intact.

 Press cheese into all of the openings. Place loaf on heavy-duty aluminum foil and transfer to a baking sheet. In a medium sauté pan, melt butter and sauté mushrooms until caramelized. Remove from heat, and stir in the onion, poppy seed, salt, mustard, and lemon juice. Pour mixture over bread, coating evenly.

 Seal foil tightly around loaf. Place on top oven rack and bake for 45 minutes.


As an Amazon Associate I earn from qualifying purchases.

Friday, February 10, 2023

Cheddar Bay Biscuit Loaf

If you, like me, are absolutely in LOVE with the Cheddar Bay Biscuits from Red Lobster, then you will go crazy over this similarly tasting, super easy loaf. It is incredible warm from the oven, but also delicious when cooled. It makes fabulous toast, and the tastiest croutons ever.

Cheddar Bay Biscuit Loaf

Adapted from bellyfull.net

 For the Bread:

1¾ c. flour

1 T. sugar

1 T. baking powder

½ t. fine sea salt

¼ t. Old Bay seasoning

3 c. freshly shredded cheddar cheese

1 c. whole milk

1 large egg

¼ c. unsalted butter, melted

 For the Topping:

¼ c. unsalted butter, melted

¼ t. garlic powder

1/8 t. fine sea salt

Pinch Old Bay seasoning

Pinch onion powder

Pinch dried parsley

 Preheat the oven to 350°F. Spray a 9”x5” loaf pan with PAM; set aside.

In a large bowl, whisk together the flour, sugar, baking powder, salt, and Old Bay until combined. Add the cheddar cheese and stir it together so the cheese is coated in the flour mixture. Set aside.

In a small bowl, whisk together the milk and egg; pour into the dry mixture and stir it until just combined. Add melted butter and mix it in until everything is combined and there are no dry patches.

Pour the mixture into the prepared loaf pan and smooth out the top. Bake for 35-40 minutes or until a toothpick inserted into the center comes out clean.

While the bread is baking, make the topping: whisk together the butter, garlic powder, salt, Old Bay, onion powder, and dried parsley.  

Remove loaf pan from the oven and set on a wire rack to cool slightly. Immediately brush the bread with the butter topping. Let the bread cool for 5 minutes in the pan and then take it out of the pan and cool completely on the wire rack. Slice and serve.

 As an Amazon Associate I earn from qualifying purchases.